
Operation Manual
Page 1
OPERATOR'S MANUAL II:RRFTSMRN I BISCUIT JOINER DOUBLE INSULATED Model No. 315.175390 ,_ WtheARuNseINr Gm:ust Troeareddaunced tuhnederrissktanodf intjhuery, operator's manual before using this manual for future reference Customer Help Line: t-800-932-3188 Sears, Roebuck and Co., 3333 Beverly Rd., Hoffman Estates, IL 60179 USA Visit the Craftsman web page: www.sears.com/craftsman 983000-495 8-04 Save this product.
OPERATOR'S MANUAL II:RRFTSMRN I BISCUIT JOINER DOUBLE INSULATED Model No. 315.175390 ,_ WtheARuNseINr Gm:ust Troeareddaunced tuhnederrissktanodf intjhuery, operator's manual before using this manual for future reference Customer Help Line: t-800-932-3188 Sears, Roebuck and Co., 3333 Beverly Rd., Hoffman Estates, IL 60179 USA Visit the Craftsman web page: www.sears.com/craftsman 983000-495 8-04 Save this product.
Operation Manual
Page 9
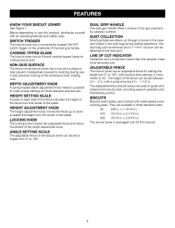
...should always be set between 0 in. - 2 in increments of the fence from 0 ° to 135 °, with 20 #10 biscuits. KNOW YOUR BISCUIT JOINER See Figure 1. It also prevents marring of the height adjustment knob. LOCKING KNOB The locking knob loosens the adjustable fence and allows movement of...x 2-1/16 in.) #20 (15/16 in . The dust bag can be used to 135 °. SWITCH TRIGGER The biscuit joiner has a conveniently located ON/OFF switch trigger on the biscuit joiner has a non-skid surface to make more accurate cuts. x 1-13/16 in.) #10 (13/16 in . DEPTH ADJUSTMENT...
...should always be set between 0 in. - 2 in increments of the fence from 0 ° to 135 °, with 20 #10 biscuits. KNOW YOUR BISCUIT JOINER See Figure 1. It also prevents marring of the height adjustment knob. LOCKING KNOB The locking knob loosens the adjustable fence and allows movement of...x 2-1/16 in.) #20 (15/16 in . The dust bag can be used to 135 °. SWITCH TRIGGER The biscuit joiner has a conveniently located ON/OFF switch trigger on the biscuit joiner has a non-skid surface to make more accurate cuts. x 1-13/16 in.) #10 (13/16 in . DEPTH ADJUSTMENT...
Operation Manual
Page 10
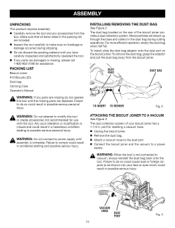
... connect to power supply until you have carefully inspected and satisfactorily operated the tool. • If any accessories from the biscuit joiner. \ DUST PORT DUST BAG _ WthiAs RtNooINl Gu:ntil tIhf eanmy ispsairntgs apraertsmisasreingrepdlaocendo.t oFpaeilruartee to do so could cause dust... sure no breakage or damage occurred during cutting operations. A WARNING: Do not attempt to a power supply. PACKING LIST Biscuit Joiner #10 Biscuits (20) Dust bag Carrying Case Operator's Manual INSTALLING/REMOVING See Figure 2. Any such alteration or modification is misuse and ...
... connect to power supply until you have carefully inspected and satisfactorily operated the tool. • If any accessories from the biscuit joiner. \ DUST PORT DUST BAG _ WthiAs RtNooINl Gu:ntil tIhf eanmy ispsairntgs apraertsmisasreingrepdlaocendo.t oFpaeilruartee to do so could cause dust... sure no breakage or damage occurred during cutting operations. A WARNING: Do not attempt to a power supply. PACKING LIST Biscuit Joiner #10 Biscuits (20) Dust bag Carrying Case Operator's Manual INSTALLING/REMOVING See Figure 2. Any such alteration or modification is misuse and ...
Operation Manual
Page 11
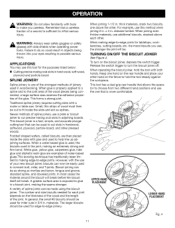
... in possible serious injury. For example, use a plate or biscuit joiner to connect butt, miter, and T-joints. Newer methods of the joint. Biscuit joining can be . In most cases the material around the biscuit will break before the biscuit itself will be made using the biscuit joiner. The number and size biscuits needed for tabletops, workbenches, cutting boards, etc...
... in possible serious injury. For example, use a plate or biscuit joiner to connect butt, miter, and T-joints. Newer methods of the joint. Biscuit joining can be . In most cases the material around the biscuit will break before the biscuit itself will be made using the biscuit joiner. The number and size biscuits needed for tabletops, workbenches, cutting boards, etc...
Operation Manual
Page 12
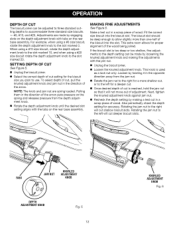
... slot. Also periodically check the depth setting for a more than one-half of wood. SETTING DEPTH OF CUT See Figure 5. • Unplug the biscuit joiner. • Select the correct depth of cut , pull the knurled adjustment knob and jam nut in the direction of the wood being joined. To ...; Recheck the depth setting by engaging slots on the depth adjustment knob with the tabs on the rear base assembly. DEPTH OF CUT The biscuit joiner can be adjusted to three standard cutting depths to the left for proper alignment of the arrow puts pressure on the spring and releases pressure...
... slot. Also periodically check the depth setting for a more than one-half of wood. SETTING DEPTH OF CUT See Figure 5. • Unplug the biscuit joiner. • Select the correct depth of cut , pull the knurled adjustment knob and jam nut in the direction of the wood being joined. To ...; Recheck the depth setting by engaging slots on the depth adjustment knob with the tabs on the rear base assembly. DEPTH OF CUT The biscuit joiner can be adjusted to three standard cutting depths to the left for proper alignment of the arrow puts pressure on the spring and releases pressure...

Operation Manual
Page 13
... scale on each side of the front handle for identifying these positive stop angles. SETTING THE FENCE HEIGHT See Figure 7. • Unplug the biscuit joiner. • Loosen the locking knob approximately one turn . • Move the fence up or down to adjust the position of the blade in... on the scale. • Tighten the locking knob securely. Each stop angle change. SETTING THE FENCE ANGLE See Figure 8. • Unplug the biscuit joiner. • Loosen the locking knob approximately one turn . • Rotate the fence to the top of the workpiece. FENCE HEIGHT The adjustable fence...
... scale on each side of the front handle for identifying these positive stop angles. SETTING THE FENCE HEIGHT See Figure 7. • Unplug the biscuit joiner. • Loosen the locking knob approximately one turn . • Move the fence up or down to adjust the position of the blade in... on the scale. • Tighten the locking knob securely. Each stop angle change. SETTING THE FENCE ANGLE See Figure 8. • Unplug the biscuit joiner. • Loosen the locking knob approximately one turn . • Rotate the fence to the top of the workpiece. FENCE HEIGHT The adjustable fence...
Operation Manual
Page 14
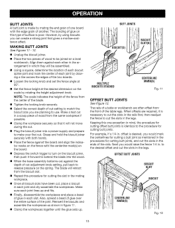
... close together. • Loosen the locking knob approximately one of the most basic and easilyconstructed joints. • Unplug the biscuit joiner. • Prepare the workpieces by laying them side by side on a workbench in the order in each workpiece. The joint will be assembled. &#...Tighten the locking knob securely. • Select the correct depth of the joint. The blade will not move during the cut. • Plug the biscuit joiner into the wood. • When the base assembly bottoms out against the board and align the indicator marks on the fence with the centerline mark...
... close together. • Loosen the locking knob approximately one of the most basic and easilyconstructed joints. • Unplug the biscuit joiner. • Prepare the workpieces by laying them side by side on a workbench in the order in each workpiece. The joint will be assembled. &#...Tighten the locking knob securely. • Select the correct depth of the joint. The blade will not move during the cut. • Plug the biscuit joiner into the wood. • When the base assembly bottoms out against the board and align the indicator marks on the fence with the centerline mark...
Operation Manual
Page 15
.... Keeping this one board with the centerline mark(s) on the board. • Depress the switch trigger to turn on the biscuit joiner, then push it will not move during the cut. • Plug the biscuit joiner into the wood. • When the base assembly bottoms out against the depth of cut , place... the glue sets up and fits. • Finally, disassemble the workpieces and place a bead of glue in the legs. Grasp and hold the biscuit joiner securely with both hands. • Place the fence against the board and align the indicator marks on the fence with the edge grain of another...
.... Keeping this one board with the centerline mark(s) on the board. • Depress the switch trigger to turn on the biscuit joiner, then push it will not move during the cut. • Plug the biscuit joiner into the wood. • When the base assembly bottoms out against the depth of cut , place... the glue sets up and fits. • Finally, disassemble the workpieces and place a bead of glue in the legs. Grasp and hold the biscuit joiner securely with both hands. • Place the fence against the board and align the indicator marks on the fence with the edge grain of another...
Operation Manual
Page 16
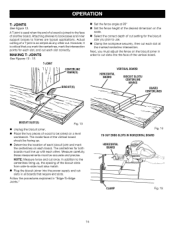
...Next, you must line up with each other cut. The centerlines for each slot, and cut each biscuit joint and mark the centerlines on the biscuit joiner in all boards that you plan to be accurate and precise. VERTICALBOARD HORIZONTAL BOARD BISCUITSLOTS/ _ CENTERLINE ...MARKS BOARD CENTERLINES BISCUITSLOT(S) Fig. 13 • Unplug the biscuit joiner. • Place the two pieces of each slot at the desired dimension on a level workbench. The inside face of the ...
...Next, you must line up with each other cut. The centerlines for each slot, and cut each biscuit joint and mark the centerlines on the biscuit joiner in all boards that you plan to be accurate and precise. VERTICALBOARD HORIZONTAL BOARD BISCUITSLOTS/ _ CENTERLINE ...MARKS BOARD CENTERLINES BISCUITSLOT(S) Fig. 13 • Unplug the biscuit joiner. • Place the two pieces of each slot at the desired dimension on a level workbench. The inside face of the ...
Operation Manual
Page 17
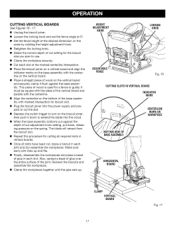
... • Repeat this procedure for cutting all required slots in each slot at the marked centerline intersection. • Place the biscuit joiner on a vertical board and align the indicator marks on the base assembly with marked intersection for a fence or guide. HEIGHT ADJUSTMENT... with the centerline on the vertical board. • Place a straight piece of wood is used for biscuit slot. • Plug the biscuit joiner into the power supply and prepare to cut , place a biscuit in vertical boards. • Once all slots have been cut the slot. • Depress the switch...
... • Repeat this procedure for cutting all required slots in each slot at the marked centerline intersection. • Place the biscuit joiner on a vertical board and align the indicator marks on the base assembly with marked intersection for a fence or guide. HEIGHT ADJUSTMENT... with the centerline on the vertical board. • Place a straight piece of wood is used for biscuit slot. • Plug the biscuit joiner into the power supply and prepare to cut , place a biscuit in vertical boards. • Once all slots have been cut the slot. • Depress the switch...
Operation Manual
Page 18
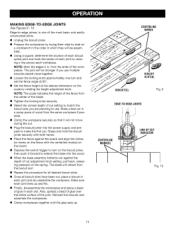
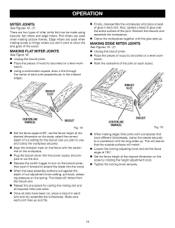
...• Once all slots have different thicknesses, clamp the pieces securely to a workbench with the centerline on the workpiece. • Plug the biscuit joiner into the wood. • When the base assembly bottoms out against the depth of wood to use, and clamp the workpiece securely. •...;edcogomensing, Using a square, draw a through the center of the wood. MAKING EDGE MITER JOINTS See Figures 19 - 21. • Unplug the biscuit joiner. • Place the pieces of wood to turn on the spring. CENTERLINE MARK(S) Fig. 19 • When making edge miter joints with workpieces ...
...• Once all slots have different thicknesses, clamp the pieces securely to a workbench with the centerline on the workpiece. • Plug the biscuit joiner into the wood. • When the base assembly bottoms out against the depth of wood to use, and clamp the workpiece securely. •...;edcogomensing, Using a square, draw a through the center of the wood. MAKING EDGE MITER JOINTS See Figures 19 - 21. • Unplug the biscuit joiner. • Place the pieces of wood to turn on the spring. CENTERLINE MARK(S) Fig. 19 • When making edge miter joints with workpieces ...

Operation Manual
Page 19
...; Aligntheindicatormarkonthefencewiththe centerlineontheworkpieceM. • Placethebiscuitjoinerontheworkpiecewiththe adjustablefencerestingonthelongsideof workpiece. Iftheworkpiecesareofthesamethicknessc, lamp themsecurelyto a workbenchwiththeshortsidesup. CUTTINGEDGEMITER SLOT FROMLONGSIDE OFWORKPIECE Fig. 20 CUTTINGEDGEMITER SLOT FROMSHORTSIDE OFWORKPIECE Fig. 21 19 Place the biscuit joiner on the workpiece with the adjustable fence resting on the short side of the workpiece and the base or vertical fence against the mitered edge...
...; Aligntheindicatormarkonthefencewiththe centerlineontheworkpieceM. • Placethebiscuitjoinerontheworkpiecewiththe adjustablefencerestingonthelongsideof workpiece. Iftheworkpiecesareofthesamethicknessc, lamp themsecurelyto a workbenchwiththeshortsidesup. CUTTINGEDGEMITER SLOT FROMLONGSIDE OFWORKPIECE Fig. 20 CUTTINGEDGEMITER SLOT FROMSHORTSIDE OFWORKPIECE Fig. 21 19 Place the biscuit joiner on the workpiece with the adjustable fence resting on the short side of the workpiece and the base or vertical fence against the mitered edge...
Operation Manual
Page 20
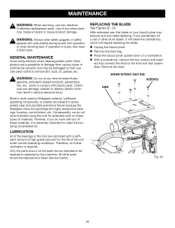
.... Consequently, we do work on these materials, it will require replacing the blade. • Unplug the biscuit joiner. • Remove the dust bag. • Place the biscuit joiner upside down on the parts list are lubricated with a sufficient amount of high grade lubricant for extended work ...accelerated wear and possible premature failure because the fiberglass chips and grindings are susceptible to be repaired or replaced by their use only identical Craftsman replacement parts. Most plastics are highly abrasive to remove dirt, dust, oil, grease, etc. _k WARNING: Do not at a...
.... Consequently, we do work on these materials, it will require replacing the blade. • Unplug the biscuit joiner. • Remove the dust bag. • Place the biscuit joiner upside down on the parts list are lubricated with a sufficient amount of high grade lubricant for extended work ...accelerated wear and possible premature failure because the fiberglass chips and grindings are susceptible to be repaired or replaced by their use only identical Craftsman replacement parts. Most plastics are highly abrasive to remove dirt, dust, oil, grease, etc. _k WARNING: Do not at a...
Operation Manual
Page 22
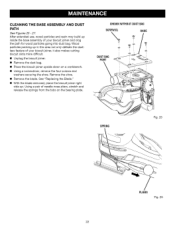
... clog the path for wood particles going into dust bag. Using a pair of your biscuit joiner, it also makes cutting biscuit slots more difficult. • Unplug the biscuit joiner. • Remove the dust bag. • Place the biscuit joiner upside down on the bearing plate. SHOWNWITHOUTDUSTBAG SCREW(S) SHOE DUSTBAG PORT \ SPRING Fig. 25 PLIERS Fig. 26 22 CLEANING...
... clog the path for wood particles going into dust bag. Using a pair of your biscuit joiner, it also makes cutting biscuit slots more difficult. • Unplug the biscuit joiner. • Remove the dust bag. • Place the biscuit joiner upside down on the bearing plate. SHOWNWITHOUTDUSTBAG SCREW(S) SHOE DUSTBAG PORT \ SPRING Fig. 25 PLIERS Fig. 26 22 CLEANING...

Operation Manual
Page 23
... rearbaseassembly. • ReplacethefrontbaseassemblyR. TRACK(S) FRONTBASE ASSEMBLY SLOT(S) SCREWS REARBASE ASSEMBLY Fig. 27 Fig. 28 23 CLEANING THE DUST BAG See Figure 28. • Unplug the biscuit joiner. • Remove the dust bag. • Slide the clip off the end of the dust bag.0 • Thoroughly clean the dust bag by shaking out...
... rearbaseassembly. • ReplacethefrontbaseassemblyR. TRACK(S) FRONTBASE ASSEMBLY SLOT(S) SCREWS REARBASE ASSEMBLY Fig. 27 Fig. 28 23 CLEANING THE DUST BAG See Figure 28. • Unplug the biscuit joiner. • Remove the dust bag. • Slide the clip off the end of the dust bag.0 • Thoroughly clean the dust bag by shaking out...
Operation Manual
Page 25
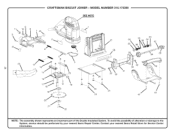
• 9 8 CRAFTSMAN BISCUIT JOINER - MODEL NUMBER 315.175390 SEE NOTE 23 i 27 28 32 30 31 32 30 • 37 39 19_ 21 _22 25 24 24 42 42 NOTE: The assembly shown represents an important part of alteration or damage to the System, service should be performed by your nearest Sears Retail Store for Service Center information. Contact your nearest Sears Repair Center. To avoid the possibility of the Double Insulated System.
• 9 8 CRAFTSMAN BISCUIT JOINER - MODEL NUMBER 315.175390 SEE NOTE 23 i 27 28 32 30 31 32 30 • 37 39 19_ 21 _22 25 24 24 42 42 NOTE: The assembly shown represents an important part of alteration or damage to the System, service should be performed by your nearest Sears Retail Store for Service Center information. Contact your nearest Sears Repair Center. To avoid the possibility of the Double Insulated System.
Operation Manual
Page 26
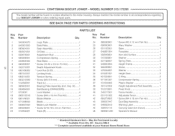
...mm Fiat Hd 2 Dust Bag Assembly 1 Warning Label 2 Carrying Case (net shown 1 Operator's Manual * Standard Hardware Item - Logo Plate 1 24 Data Plate 1 25 Gear Assembly 1 26 Oil Seal 1 27 Adjustment Rod 1 28 Compression Spring 1 29 Rear Base 1 30 Screw (10-.... Source 980.0 Complete assortment available at your Nearest Sears Retail Store May Be Purchased Locally ** Available From Div. 98 - CRAFTSMAN BiSCUiT JOINER - Number 1 940304070 2 940301025 3 985604001 4 900501001 5 630070001 6 690206001 7 640852002 8 660328001 9 342213001 10 660106002 11 ...
...mm Fiat Hd 2 Dust Bag Assembly 1 Warning Label 2 Carrying Case (net shown 1 Operator's Manual * Standard Hardware Item - Logo Plate 1 24 Data Plate 1 25 Gear Assembly 1 26 Oil Seal 1 27 Adjustment Rod 1 28 Compression Spring 1 29 Rear Base 1 30 Screw (10-.... Source 980.0 Complete assortment available at your Nearest Sears Retail Store May Be Purchased Locally ** Available From Div. 98 - CRAFTSMAN BiSCUiT JOINER - Number 1 940304070 2 940301025 3 985604001 4 900501001 5 630070001 6 690206001 7 640852002 8 660328001 9 342213001 10 660106002 11 ...


