
Operation Manual
Page 4
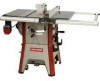
...spreader is nearest the blade. 4 USE ONLY ACCESSORIES DESIGNED FOR SAW • Crosscutting operations are installed properly. Blade II i 5 +1 !I_12" + ' + i p to table to guide work on table and pinch saw was designed. Figure lb - Never use maximum diameter blade for which saw blade. 12" 1½" + -t 6½" 4 It...wheels, friction wheels (metal slitting blades), wire wheels or buffing wheels. Use extra care when ripping wood with twisted grain or wood that is twisted or bowed--it may rock on the table. + I ¾,, J I Rip Fence I Table ,-- 13A,, Miter slot I I ...
...spreader is nearest the blade. 4 USE ONLY ACCESSORIES DESIGNED FOR SAW • Crosscutting operations are installed properly. Blade II i 5 +1 !I_12" + ' + i p to table to guide work on table and pinch saw was designed. Figure lb - Never use maximum diameter blade for which saw blade. 12" 1½" + -t 6½" 4 It...wheels, friction wheels (metal slitting blades), wire wheels or buffing wheels. Use extra care when ripping wood with twisted grain or wood that is twisted or bowed--it may rock on the table. + I ¾,, J I Rip Fence I Table ,-- 13A,, Miter slot I I ...
Operation Manual
Page 8
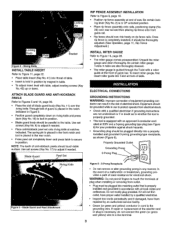
... Refer to Figure 11, page 22. ° Place table insert (Key No. 41) into matching outlet that is necessary, do not connect the green (or green and yellow) wire to Figures 5 and 14, page 28. • Placethe slot of blade guard body (Key No. 11) over rear rail and then.... 8) to whetherthe tool is in UP unlockedposition. ° Place rip fence assembly onto rails,positioningclamp (No. 26) over the riving knife.Throughbolt of saw. Properly Grounded Outlet Grounding Prong iBlade Guard Pawl Set 3-Prong Plug ___ Figure 6 - 3-Prong Receptacle ° Do not remove or alter grounding prong in...
... Refer to Figure 11, page 22. ° Place table insert (Key No. 41) into matching outlet that is necessary, do not connect the green (or green and yellow) wire to Figures 5 and 14, page 28. • Placethe slot of blade guard body (Key No. 11) over rear rail and then.... 8) to whetherthe tool is in UP unlockedposition. ° Place rip fence assembly onto rails,positioningclamp (No. 26) over the riving knife.Throughbolt of saw. Properly Grounded Outlet Grounding Prong iBlade Guard Pawl Set 3-Prong Plug ___ Figure 6 - 3-Prong Receptacle ° Do not remove or alter grounding prong in...
Operation Manual
Page 9
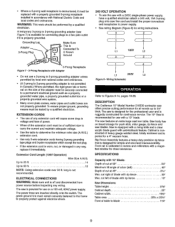
...the current and maintain adequate voltage. • Use the table to determine the minimum wire size (A.W.G.) extension cord. ° Use only 3-wire extension cords having 3-prong grounding type plugs and 3-pole... any way, replace it immediately. The 10" Saw is not recommended. cut at 45 Max. DESCRIPTION The Craftsman 10" Model Number 218330 contractor saw with Adapter ° Do not use a 3-...NOTE: Using extension cords over 50 ft. The saw is designed for simple and one-hand maneuverability. Saw is designed for the professional user and is encountered, it is not permitted...
...the current and maintain adequate voltage. • Use the table to determine the minimum wire size (A.W.G.) extension cord. ° Use only 3-wire extension cords having 3-prong grounding type plugs and 3-pole... any way, replace it immediately. The 10" Saw is not recommended. cut at 45 Max. DESCRIPTION The Craftsman 10" Model Number 218330 contractor saw with Adapter ° Do not use a 3-...NOTE: Using extension cords over 50 ft. The saw is designed for simple and one-hand maneuverability. Saw is designed for the professional user and is encountered, it is not permitted...
Operation Manual
Page 16
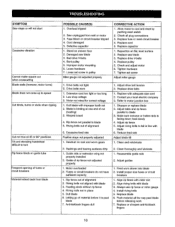
Damaged saw blade 3. Loose hardware 7. Check all the way past blade 7. Replace drive V-belts 4. Tighten hardware 7. Motor not wired for correct voltage 1. Sawdust on uneven floor 2. feed slowly 4, Adjust rip fence 5. Reduce feed rate Adjust blade tilt 1, ...2. Contact your local electric company 3. Rip fence out of alignment 6. Clean thoroughly and lubricate 1. Saw unplugged from blade POSSIBLE CAUSE(S) 1. Extension cord too light or too long 2. Adjust table and rip fence parallel to fall in pulley Miter gauge not adjusted properly CORRECTIVE ACTION I . Guide...
Damaged saw blade 3. Loose hardware 7. Check all the way past blade 7. Replace drive V-belts 4. Tighten hardware 7. Motor not wired for correct voltage 1. Sawdust on uneven floor 2. feed slowly 4, Adjust rip fence 5. Reduce feed rate Adjust blade tilt 1, ...2. Contact your local electric company 3. Rip fence out of alignment 6. Clean thoroughly and lubricate 1. Saw unplugged from blade POSSIBLE CAUSE(S) 1. Extension cord too light or too long 2. Adjust table and rip fence parallel to fall in pulley Miter gauge not adjusted properly CORRECTIVE ACTION I . Guide...

