Owners Manual
Page 3
...the Preferences 38 2 - Playing Audio Clips 40 3 - Running Proteus VX VSTi from Ableton Live (Windows only 42 Other Cool Tips 46 0404 USB 2.0 Owner's Manual 3 Recording Audio into Ableton Live 41 4 - Recording a MIDI Track using ...Windows ...7 OS X ...7 Software Installation 8 Windows XP ...8 Note About Windows Logo Testing 8 Uninstalling all Audio Drivers and Applications 8 Macintosh OS X 9 Uninstalling the Audio Drivers and Applications 11 Connection Diagrams 12 Main Panel Controls 14 Input/Output 16 E-MU USB Audio Control Panel 18 S/PDIF ...19 Synchronizing the 0404...
...the Preferences 38 2 - Playing Audio Clips 40 3 - Running Proteus VX VSTi from Ableton Live (Windows only 42 Other Cool Tips 46 0404 USB 2.0 Owner's Manual 3 Recording Audio into Ableton Live 41 4 - Recording a MIDI Track using ...Windows ...7 OS X ...7 Software Installation 8 Windows XP ...8 Note About Windows Logo Testing 8 Uninstalling all Audio Drivers and Applications 8 Macintosh OS X 9 Uninstalling the Audio Drivers and Applications 11 Connection Diagrams 12 Main Panel Controls 14 Input/Output 16 E-MU USB Audio Control Panel 18 S/PDIF ...19 Synchronizing the 0404...

Owners Manual
Page 6
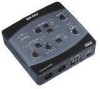
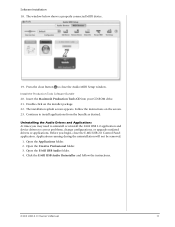
...8226; E-MU 0404 USB 2.0 AudioPod • USB Cable • Universal Power Adaptor • Quick Start Installation Guide E-MU Software/Manual CD-ROM (OS X /Windows) • Window XP and x64 Drivers • Mac OS X Drivers • Owner's Manual and Tutorials E-MU Production Tools Software Bundle CD-ROM (Windows) •...IK Multimedia AmpliTube LE • SFX Machine LT • Minnetonka diskWelder BRONZE (5-burn trial) E-MU Proteus VX CD-ROM (Windows) • E-MU Proteus VX (with over 100 sounds) E-MU Production Tools Software Bundle CD-ROM (OS X) • BIAS Peak Express • Celemony ...
...8226; E-MU 0404 USB 2.0 AudioPod • USB Cable • Universal Power Adaptor • Quick Start Installation Guide E-MU Software/Manual CD-ROM (OS X /Windows) • Window XP and x64 Drivers • Mac OS X Drivers • Owner's Manual and Tutorials E-MU Production Tools Software Bundle CD-ROM (Windows) •...IK Multimedia AmpliTube LE • SFX Machine LT • Minnetonka diskWelder BRONZE (5-burn trial) E-MU Proteus VX CD-ROM (Windows) • E-MU Proteus VX (with over 100 sounds) E-MU Production Tools Software Bundle CD-ROM (OS X) • BIAS Peak Express • Celemony ...

Owners Manual
Page 7
...processor - 1.2 GHz or faster • Intel, AMD, or 100% compatible motherboard & chipset • Microsoft® Windows® XP (SP 2 or greater) or Windows XP x64 • 1 available (Hi-Speed) USB 2.0 port * • 256 MB System RAM • 900 MB of free hard disk space for full installation •... of free hard disk space for full installation • CD-ROM/CD-RW or DVD-ROM drive required for the E-MU 0404 USB 2.0 are listed below. Computer Requirements COMPUTER REQUIREMENTS The minimum computer system requirements for software installation • XVGA Video (1024 X 768) * When...
...processor - 1.2 GHz or faster • Intel, AMD, or 100% compatible motherboard & chipset • Microsoft® Windows® XP (SP 2 or greater) or Windows XP x64 • 1 available (Hi-Speed) USB 2.0 port * • 256 MB System RAM • 900 MB of free hard disk space for full installation •... of free hard disk space for full installation • CD-ROM/CD-RW or DVD-ROM drive required for the E-MU 0404 USB 2.0 are listed below. Computer Requirements COMPUTER REQUIREMENTS The minimum computer system requirements for software installation • XVGA Video (1024 X 768) * When...
Owners Manual
Page 8
... the note below. 6. You may need to uninstall or reinstall the 0404 USB 2.0 application and device drivers to install the 0404 USB 2.0 software and E-MU Production Tools software bundle on . Applications running automatically. Insert the Windows Production Tools Software Bundle CD-ROM into your 0404 USB 2.0 so we can advise you may now re-install existing or updated...
... the note below. 6. You may need to uninstall or reinstall the 0404 USB 2.0 application and device drivers to install the 0404 USB 2.0 software and E-MU Production Tools software bundle on . Applications running automatically. Insert the Windows Production Tools Software Bundle CD-ROM into your 0404 USB 2.0 so we can advise you may now re-install existing or updated...
Owners Manual
Page 9
...Output, Properties For. 12. The window shown on the desktop. 3. Continue to follow the instructions on the Install icon to continue the installation. Be sure to choose which components are installed. 7. Install the 0404 USB 2.0 Software 1. When the Authenticate ...instructions to install: • Easy Install: Installs the following applications and drivers. First, connect the 0404 USB 2.0 to verify that the 0404 USB 2.0 is recommended. E-MU 0404 USB 2.0: USB Drivers and Control Application • Custom Install: allows you installed OS X. 6. When prompted, restart your ...
...Output, Properties For. 12. The window shown on the desktop. 3. Continue to follow the instructions on the Install icon to continue the installation. Be sure to choose which components are installed. 7. Install the 0404 USB 2.0 Software 1. When the Authenticate ...instructions to install: • Easy Install: Installs the following applications and drivers. First, connect the 0404 USB 2.0 to verify that the 0404 USB 2.0 is recommended. E-MU 0404 USB 2.0: USB Drivers and Control Application • Custom Install: allows you installed OS X. 6. When prompted, restart your ...

Owners Manual
Page 10
... new external device to name and change the icon for the device. You have the option to the E-MU 0404 USB by dragging between the input and output connectors. 10 E-MU Systems The window shown below appears. 15. A new external device icon like the one shown at left appears. 16. ...Double-click on the new external device if you want to use a MIDI keyboard, now would be a good time to close the Properties window. 17. Connecting ...
... new external device to name and change the icon for the device. You have the option to the E-MU 0404 USB by dragging between the input and output connectors. 10 E-MU Systems The window shown below appears. 15. A new external device icon like the one shown at left appears. 16. ...Double-click on the new external device if you want to use a MIDI keyboard, now would be a good time to close the Properties window. 17. Connecting ...
Owners Manual
Page 11
... begin, close the Audio MIDI Setup window. Applications running during the uninstallation will not be removed. 1. Software Installation 18. Open the Creative Professional folder. 3. Insert the Macintosh Production ...Tools CD into your CD-ROM drive. 21. Double-click on the screen. 23. Press the close button to correct problems, change configurations, or upgrade outdated drivers or applications. Before you may need to uninstall or reinstall the 0404 USB 2.0 application and device drivers to close the E-MU USB...
... begin, close the Audio MIDI Setup window. Applications running during the uninstallation will not be removed. 1. Software Installation 18. Open the Creative Professional folder. 3. Insert the Macintosh Production ...Tools CD into your CD-ROM drive. 21. Double-click on the screen. 23. Press the close button to correct problems, change configurations, or upgrade outdated drivers or applications. Before you may need to uninstall or reinstall the 0404 USB 2.0 application and device drivers to close the E-MU USB...

Owners Manual
Page 18
...tions folder . View Hide the application (Ctrl+H, Windows) You can restore the application by clicking the E-MU icon in the System Tray (Windows), or by clicking the E-MU icon in the Dock (OS X). 3. Help About E-MU 0404 USB 2.0, Audio control, Launch Manual, Check Updates 4. ... E-MU USB Audio control panel is shown below. • Windows:The E-MU USB Audio control icon will be launched from the Start Menu (All Programs, Creative Professional, E-MU USB Audio Application). • OS X The E-MU USB Audio control application is located in the Applica- E-MU USB Audio Control Panel E-MU USB AUDIO...
...tions folder . View Hide the application (Ctrl+H, Windows) You can restore the application by clicking the E-MU icon in the System Tray (Windows), or by clicking the E-MU icon in the Dock (OS X). 3. Help About E-MU 0404 USB 2.0, Audio control, Launch Manual, Check Updates 4. ... E-MU USB Audio control panel is shown below. • Windows:The E-MU USB Audio control icon will be launched from the Start Menu (All Programs, Creative Professional, E-MU USB Audio Application). • OS X The E-MU USB Audio control application is located in the Applica- E-MU USB Audio Control Panel E-MU USB AUDIO...

Owners Manual
Page 22
...Cubase LE Follow these settings, so you Begin... • You should hear the computer sounds coming out of the E-MU 0404 USB 2.0 and your audio, be using Windows Media Player or iTunes. If you to read so that Cubase LE runs smoothly the first...-by-step walk-throughs of basic recording operations using your E-MU 0404 USB 2.0 interface with the bundled applications, please see • Windows: Program Files\Creative Professional\E-MU 0404 USB\Documents\ 3rdParty.htm. • OS X: Applications Drive\Library\Documentation\E-MU 0404 USB WARNING! After you play a CD or an MP3 using ...
...Cubase LE Follow these settings, so you Begin... • You should hear the computer sounds coming out of the E-MU 0404 USB 2.0 and your audio, be using Windows Media Player or iTunes. If you to read so that Cubase LE runs smoothly the first...-by-step walk-throughs of basic recording operations using your E-MU 0404 USB 2.0 interface with the bundled applications, please see • Windows: Program Files\Creative Professional\E-MU 0404 USB\Documents\ 3rdParty.htm. • OS X: Applications Drive\Library\Documentation\E-MU 0404 USB WARNING! After you play a CD or an MP3 using ...

Owners Manual
Page 24
Basic Multitrack Recording This tutorial assumes you want to the project window. For more advanced recording, refer to use. From the Cubase LE menu bar, select Project, Add Track, Audio. This is added to record in the ..., check Devices, VST Inputs. 24 Monitor Track Input 2. Add an Audio Track 1. Note that IN 1 is OFF. You will be monitoring the input through the E-MU 0404 USB 2.0. Make sure the Monitor button is shown in stereo, turn the Stereo/Mono button On and select IN 1 + IN 2 for the Track Input. 3. Select VST...
Basic Multitrack Recording This tutorial assumes you want to the project window. For more advanced recording, refer to use. From the Cubase LE menu bar, select Project, Add Track, Audio. This is added to record in the ..., check Devices, VST Inputs. 24 Monitor Track Input 2. Add an Audio Track 1. Note that IN 1 is OFF. You will be monitoring the input through the E-MU 0404 USB 2.0. Make sure the Monitor button is shown in stereo, turn the Stereo/Mono button On and select IN 1 + IN 2 for the Track Input. 3. Select VST...

Owners Manual
Page 26
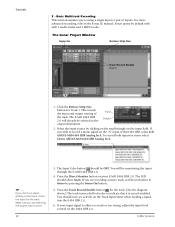
The Cubase Project Window should now look more or less like the one below with one or more Audio tracks and one MIDI track: MIDI Track 3. Click the Devices menu, and select VST Instruments. 26 E-MU Systems Make the Connections 1. From the Project menu, select Add Track, MIDI. Recording a MIDI Track using Proteus VX You'll need a MIDI keyboard (or other MIDI input device) for this tutorial. Connect the MIDI out of your MIDI keyboard to the MIDI input of the 0404 USB 2.0. 2. Tutorials 3 -
The Cubase Project Window should now look more or less like the one below with one or more Audio tracks and one MIDI track: MIDI Track 3. Click the Devices menu, and select VST Instruments. 26 E-MU Systems Make the Connections 1. From the Project menu, select Add Track, MIDI. Recording a MIDI Track using Proteus VX You'll need a MIDI keyboard (or other MIDI input device) for this tutorial. Connect the MIDI out of your MIDI keyboard to the MIDI input of the 0404 USB 2.0. 2. Tutorials 3 -

Owners Manual
Page 27
... click on the left side of the inspector. The preset on Proteus VX should be hearing sound. You should change to the E-MU 0404 USB 2.0. 6. Nothing is installed here: "Program Files/Creative Professional\ E-MU Sound Central\Proteus X Composer." Click on Proteus VX and play around for awhile and don't worry...Proteus VX. 8. Tutorials 4. From the VST Instruments window, select E-MU, then ProteusVX . The VST Instruments window now looks like this. Take a look at the Inspector area on the Edit button of the VST Instruments window to anything . Make sure the input to the...
... click on the left side of the inspector. The preset on Proteus VX should be hearing sound. You should change to the E-MU 0404 USB 2.0. 6. Nothing is installed here: "Program Files/Creative Professional\ E-MU Sound Central\Proteus X Composer." Click on Proteus VX and play around for awhile and don't worry...Proteus VX. 8. Tutorials 4. From the VST Instruments window, select E-MU, then ProteusVX . The VST Instruments window now looks like this. Take a look at the Inspector area on the Edit button of the VST Instruments window to anything . Make sure the input to the...

Owners Manual
Page 29
... any other professional features. Click No to run Sonar LE, the following dialog box appears: 2. The first time you will remember these instructions carefully to read the Sonar LE PDF manual in order for the first time 1. The Sonar Project Window appears. 0404 USB 2.0 Owner's... Manual 29 Setting up Sonar LE Follow these settings, so you recording on the desktop shortcut. IMPORTANT: During installation of this once. Tutorials Getting Started with Cakewalk Sonar LE (Windows) Sonar LE is a 24-bit...
... any other professional features. Click No to run Sonar LE, the following dialog box appears: 2. The first time you will remember these instructions carefully to read the Sonar LE PDF manual in order for the first time 1. The Sonar Project Window appears. 0404 USB 2.0 Owner's... Manual 29 Setting up Sonar LE Follow these settings, so you recording on the desktop shortcut. IMPORTANT: During installation of this once. Tutorials Getting Started with Cakewalk Sonar LE (Windows) Sonar LE is a 24-bit...
Owners Manual
Page 32
... on the small triangle on the "A" input of Input Click the track. You will already be monitoring the input through the E-MU 0404 USB 2.0. 4. The LED should be OFF. The Sonar Project Window Inspector Restore Strip Size Track Record Enable Step 3 1. Select the input source by default with with 2 audio tracks and 2 MIDI tracks...
... on the small triangle on the "A" input of Input Click the track. You will already be monitoring the input through the E-MU 0404 USB 2.0. 4. The LED should be OFF. The Sonar Project Window Inspector Restore Strip Size Track Record Enable Step 3 1. Select the input source by default with with 2 audio tracks and 2 MIDI tracks...

Owners Manual
Page 33
...clicking on the right side of the track Input box. 14. Press Play on the Sonar LE Transport to another track in the Sonar Project Window, then just hit Record again and go. (Choose Blend Old and New when asked in the track and choose Delete. Click on the ... to simply drag the Part (audio region) you want to find later. This handy feature duplicates the currently selected track complete with input/output routings. 0404 USB 2.0 Owner's Manual 33 Enable recording for Track 1 by selecting Clone, from the View menu and check the Metronome Toolbar. Disable record for Track 2 ...
...clicking on the right side of the track Input box. 14. Press Play on the Sonar LE Transport to another track in the Sonar Project Window, then just hit Record again and go. (Choose Blend Old and New when asked in the track and choose Delete. Click on the ... to simply drag the Part (audio region) you want to find later. This handy feature duplicates the currently selected track complete with input/output routings. 0404 USB 2.0 Owner's Manual 33 Enable recording for Track 1 by selecting Clone, from the View menu and check the Metronome Toolbar. Disable record for Track 2 ...

Owners Manual
Page 34
... VSTi. (Start, Programs, Cakewalk, Cakewalk VST Adapter). 1. Click on the + symbol to start Proteus VX from the list of the 0404 USB 2.0. The following window appears: Click Here 3. Select Synth Rack from Proteus VX MIDI input to Proteus VX Click Here to continue. (This may have to the...as shown. Recording a MIDI Track using Proteus VX These instructions explain how to add an instrument. Click OK to view the strip controls. 34 E-MU Systems You'll need a MIDI keyboard (or other MIDI input device) for this tutorial. • Important: If Sonar was installed BEFORE Proteus ...
... VSTi. (Start, Programs, Cakewalk, Cakewalk VST Adapter). 1. Click on the + symbol to start Proteus VX from the list of the 0404 USB 2.0. The following window appears: Click Here 3. Select Synth Rack from Proteus VX MIDI input to Proteus VX Click Here to continue. (This may have to the...as shown. Recording a MIDI Track using Proteus VX These instructions explain how to add an instrument. Click OK to view the strip controls. 34 E-MU Systems You'll need a MIDI keyboard (or other MIDI input device) for this tutorial. • Important: If Sonar was installed BEFORE Proteus ...

Owners Manual
Page 35
...all 16 MIDI channels from your MIDI keyboard. (Proteus VX VSTi is "multi-timbral" and can assign a different preset to channel 1. The E-MU 0404 USB 2.0 should already be selected as the MIDI input in the SysTray to verify that you're receiving MIDI. After a few seconds, the Proteus VX... application window shown below appears. 0404 USB 2.0 Owner's Manual 35 MIDI Input Select 7. Double-click on the number (or on any MIDI channel to each of the MIDI ...
...all 16 MIDI channels from your MIDI keyboard. (Proteus VX VSTi is "multi-timbral" and can assign a different preset to channel 1. The E-MU 0404 USB 2.0 should already be selected as the MIDI input in the SysTray to verify that you're receiving MIDI. After a few seconds, the Proteus VX... application window shown below appears. 0404 USB 2.0 Owner's Manual 35 MIDI Input Select 7. Double-click on the number (or on any MIDI channel to each of the MIDI ...

Owners Manual
Page 37
.... If you want to record multiple tracks simultaneously, simply turn Record Enable on the minimized Proteus FX window. Press Stop when you 've made your MIDI keyboard to listen to learn about this powerful program. 0404 USB 2.0 Owner's Manual 37 Tutorials 21. Select the MIDI input for each track you 've had a taste...
.... If you want to record multiple tracks simultaneously, simply turn Record Enable on the minimized Proteus FX window. Press Stop when you 've made your MIDI keyboard to listen to learn about this powerful program. 0404 USB 2.0 Owner's Manual 37 Tutorials 21. Select the MIDI input for each track you 've had a taste...
Owners Manual
Page 38
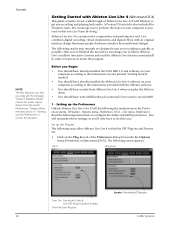
... already installed the 0404 USB 2.0 and software on your computer as possible. Options menu, Preferences; Click on your computer according to the instructions in the Preferences menu. (Windows - Live combines ...play the Ableton demo. • You should hear sounds from the Audio Preferences." Tutorials Getting Started with Ableton Live Lite 4 (Windows/OS X) This guide contains a basic walk-through of...tab of Ableton Live Lite 4 (E-MU Edition) to configure the Audio and MIDI preferences. Ableton Live Lite 4 is also included for E-MU by following step by doing." ...
... already installed the 0404 USB 2.0 and software on your computer as possible. Options menu, Preferences; Click on your computer according to the instructions in the Preferences menu. (Windows - Live combines ...play the Ableton demo. • You should hear sounds from the Audio Preferences." Tutorials Getting Started with Ableton Live Lite 4 (Windows/OS X) This guide contains a basic walk-through of...tab of Ableton Live Lite 4 (E-MU Edition) to configure the Audio and MIDI preferences. Ableton Live Lite 4 is also included for E-MU by following step by doing." ...

Owners Manual
Page 39
... button. Turn on Use VST Plug-in the list. Click the Audio tab of the Preferences dialog box. Windows Users: Select ASIO and ASIO E-MU 0404|USB as the Audio Device. OS X Users: Select Core Audio and E-MU 0404|USB as the Audio Device. Make sure it's selected. 11. Tutorials OS X Users 2. Set up the MIDI Parameters...
... button. Turn on Use VST Plug-in the list. Click the Audio tab of the Preferences dialog box. Windows Users: Select ASIO and ASIO E-MU 0404|USB as the Audio Device. OS X Users: Select Core Audio and E-MU 0404|USB as the Audio Device. Make sure it's selected. 11. Tutorials OS X Users 2. Set up the MIDI Parameters...


