User Guide
Page 3
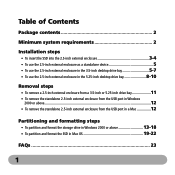
... steps • To insert the SSD into the 2.5-inch external enclosure 3-4 • To use the 2.5-inch external enclosure as a standalone device 5 • To use the 2.5-inch external enclosure in the 3.5-inch desktop drive bay 5-7 • To use the 2.5-inch external enclosure in the 5.25-inch desktop drive bay 8-10 Removal steps...in Windows 2000 or above...12 • To remove the standalone 2.5-inch external enclosure from the USB port in a Mac 12 Partitioning and formatting steps • To partition and format the storage drive in Windows 2000 or above 13-18 • To partition and...
... steps • To insert the SSD into the 2.5-inch external enclosure 3-4 • To use the 2.5-inch external enclosure as a standalone device 5 • To use the 2.5-inch external enclosure in the 3.5-inch desktop drive bay 5-7 • To use the 2.5-inch external enclosure in the 5.25-inch desktop drive bay 8-10 Removal steps...in Windows 2000 or above...12 • To remove the standalone 2.5-inch external enclosure from the USB port in a Mac 12 Partitioning and formatting steps • To partition and format the storage drive in Windows 2000 or above 13-18 • To partition and...

User Guide
Page 4
... USB 2.0 external enclosure • 3.5-inch hot-swappable SATA drive bay • 5.25-inch bracket • USB cable • Internal SATA cable • Internal power cable adapter • Screw packets: - 7 large screws for mounting 3.5-inch drive bay and 5.25-inch bracket, plus 1 spare • Protective carrying case • User guide NOTE: The Crucial SK01 storage kit...
... USB 2.0 external enclosure • 3.5-inch hot-swappable SATA drive bay • 5.25-inch bracket • USB cable • Internal SATA cable • Internal power cable adapter • Screw packets: - 7 large screws for mounting 3.5-inch drive bay and 5.25-inch bracket, plus 1 spare • Protective carrying case • User guide NOTE: The Crucial SK01 storage kit...
User Guide
Page 5
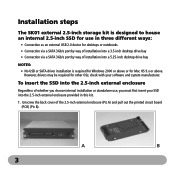
Installation steps The SK01 external 2.5-inch storage kit is required for Windows 2000 or above . To insert the SSD into the 2.5-inch external enclosure Regardless of installation into a 5.25-inch desktop drive bay NOTES: • .No USB or SATA driver installation is... other OSs; Unscrew the back cover of the 2.5-inch external enclosure (Pic A) and pull out the printed circuit board (PCB) (Pic B). A B 3 check with your SSD into the 2.5-inch external enclosure provided in three different ways: • Connection as an external USB 2.0 device for desktops or notebooks • Connection ...
Installation steps The SK01 external 2.5-inch storage kit is required for Windows 2000 or above . To insert the SSD into the 2.5-inch external enclosure Regardless of installation into a 5.25-inch desktop drive bay NOTES: • .No USB or SATA driver installation is... other OSs; Unscrew the back cover of the 2.5-inch external enclosure (Pic A) and pull out the printed circuit board (PCB) (Pic B). A B 3 check with your SSD into the 2.5-inch external enclosure provided in three different ways: • Connection as an external USB 2.0 device for desktops or notebooks • Connection ...
User Guide
Page 6
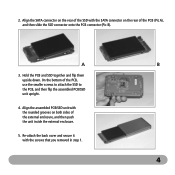
... connector (Pic B). 2. Align the SATA connector on the rear of the SSD with the screws that you removed in step 1. 4 A B 3. On the bottom of the external enclosure, and then push the unit inside the...
... connector (Pic B). 2. Align the SATA connector on the rear of the SSD with the screws that you removed in step 1. 4 A B 3. On the bottom of the external enclosure, and then push the unit inside the...
User Guide
Page 7
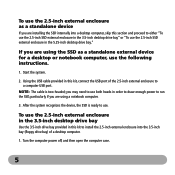
... SSD is two-headed; If you are installing the SSD internally into the 3.5-inch bay (floppy drive bay) of the 2.5-inch external enclosure to use. To use the 2.5-inch external enclosure as a standalone device If you are using a notebook computer. 3. you may need to use both heads in order to draw ...enough power to either "To use the 2.5-inch SSD external enclosure in the 3.5-inch desktop drive bay" or "To use the 2.5-inch SSD external enclosure in this section and proceed to run the SSD, particularly if you are using the SSD as a standalone...
... SSD is two-headed; If you are installing the SSD internally into the 3.5-inch bay (floppy drive bay) of the 2.5-inch external enclosure to use. To use the 2.5-inch external enclosure as a standalone device If you are using a notebook computer. 3. you may need to use both heads in order to draw ...enough power to either "To use the 2.5-inch SSD external enclosure in the 3.5-inch desktop drive bay" or "To use the 2.5-inch SSD external enclosure in this section and proceed to run the SSD, particularly if you are using the SSD as a standalone...

User Guide
Page 9
...Pic B). If the system does not recognize the drive, contact technical support at www.crucial.com/support. A B 6. The eject button on the 3.5-inch drive bay will pop out when the 2.5-inch external enclosure is off. Connect the drive bay power cable to the SATA slot on the ...computer power; Insert the 2.5-inch external enclosure (Pic A) into the 3.5-inch drive bay until they are firmly connected. 5.. Connect the...
...Pic B). If the system does not recognize the drive, contact technical support at www.crucial.com/support. A B 6. The eject button on the 3.5-inch drive bay will pop out when the 2.5-inch external enclosure is off. Connect the drive bay power cable to the SATA slot on the ...computer power; Insert the 2.5-inch external enclosure (Pic A) into the 3.5-inch drive bay until they are firmly connected. 5.. Connect the...
User Guide
Page 10
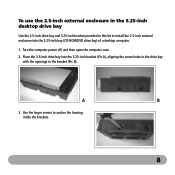
To use the 2.5-inch external enclosure in the 5.25-inch desktop drive bay Use the 3.5-inch drive bay and 5.25-inch bracket provided in the bracket (Pic B). Place the 3.5-inch drive bay into the 5.25-inch bay (CD-ROM/DVD drive bay) of a desktop computer. 1. Use the larger screws to install the 2.5-inch external enclosure into the 5.25-inch bracket (Pic A), aligning the screw holes in the drive bay with the openings in this kit to anchor the housing inside the brackets. 8 A B 3. Turn the computer power off, and then open the computer case. 2.
To use the 2.5-inch external enclosure in the 5.25-inch desktop drive bay Use the 3.5-inch drive bay and 5.25-inch bracket provided in the bracket (Pic B). Place the 3.5-inch drive bay into the 5.25-inch bay (CD-ROM/DVD drive bay) of a desktop computer. 1. Use the larger screws to install the 2.5-inch external enclosure into the 5.25-inch bracket (Pic A), aligning the screw holes in the drive bay with the openings in this kit to anchor the housing inside the brackets. 8 A B 3. Turn the computer power off, and then open the computer case. 2.
User Guide
Page 12
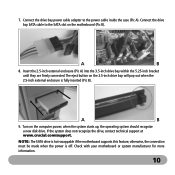
... 3.5-inch drive bay within the 5.25-inch bracket until they are firmly connected. Turn on the 3.5-inch drive bay will pop out when the 2.5-inch external enclosure is off. A B 9. otherwise, the connection must be made when the power is fully inserted (Pic B). Connect the drive bay power cable adapter to the SATA...: The SATA drive is hot-swappable if the motherboard supports this feature; 7.. If the system does not recognize the drive, contact technical support at www.crucial.com/support.
... 3.5-inch drive bay within the 5.25-inch bracket until they are firmly connected. Turn on the 3.5-inch drive bay will pop out when the 2.5-inch external enclosure is off. A B 9. otherwise, the connection must be made when the power is fully inserted (Pic B). Connect the drive bay power cable adapter to the SATA...: The SATA drive is hot-swappable if the motherboard supports this feature; 7.. If the system does not recognize the drive, contact technical support at www.crucial.com/support.

User Guide
Page 13
Removal steps To remove a 2.5-inch external enclosure from a 3.5-inch or 5.25-inch drive bay 1. .If your system does not support hot-swapping, turn off the computer power before removing the drive. (Check with your motherboard or system manufacturer for more information.) 2. Press the eject button on the 3.5-inch drive bay to pop out the 2.5-inch external enclosure. 3. Pull the 2.5-inch external enclosure out of the 3.5-inch drive bay. 11
Removal steps To remove a 2.5-inch external enclosure from a 3.5-inch or 5.25-inch drive bay 1. .If your system does not support hot-swapping, turn off the computer power before removing the drive. (Check with your motherboard or system manufacturer for more information.) 2. Press the eject button on the 3.5-inch drive bay to pop out the 2.5-inch external enclosure. 3. Pull the 2.5-inch external enclosure out of the 3.5-inch drive bay. 11
User Guide
Page 14
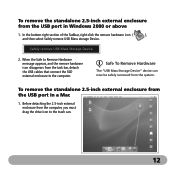
... can now be safely removed from the system. Before detaching the 2.5-inch external enclosure from the computer, you must drag the drive icon to the computer. Safe To Remove Hardware The "USB Mass Storage Device" device can . 12 In the bottom-right section of the Taskbar..., right-click the remove hardware icon ( ), and then select Safely remove USB Mass storage Device. To remove the standalone 2.5-inch external enclosure from the USB port in Windows 2000...
... can now be safely removed from the system. Before detaching the 2.5-inch external enclosure from the computer, you must drag the drive icon to the computer. Safe To Remove Hardware The "USB Mass Storage Device" device can . 12 In the bottom-right section of the Taskbar..., right-click the remove hardware icon ( ), and then select Safely remove USB Mass storage Device. To remove the standalone 2.5-inch external enclosure from the USB port in Windows 2000...