
Jet Sweep Warranty Information
Page 1
... injury to you may carry a separate manufacturer's warranty. Normal wear parts include, but are not genuine Cub Cadet parts. Cub Cadet does not extend any product, shall bind Cub Cadet. Service completed by any person or entity, including a dealer or retailer, with respect to any warranty ... from the installation or use of any kind be free from the date of express written warranty above . CUB CADET LLC MANUFACTURER'S LIMITED WARRANTY FOR SNOW THROWERS, LOG SPLITTERS, CHIPPER-SHREDDERS, CHIPPER-SHREDDER VACUUMS AND JET SWEEPS The limited warranty set forth in this product...
... injury to you may carry a separate manufacturer's warranty. Normal wear parts include, but are not genuine Cub Cadet parts. Cub Cadet does not extend any product, shall bind Cub Cadet. Service completed by any person or entity, including a dealer or retailer, with respect to any warranty ... from the installation or use of any kind be free from the date of express written warranty above . CUB CADET LLC MANUFACTURER'S LIMITED WARRANTY FOR SNOW THROWERS, LOG SPLITTERS, CHIPPER-SHREDDERS, CHIPPER-SHREDDER VACUUMS AND JET SWEEPS The limited warranty set forth in this product...

900 Series Snow Throwers Brochure
Page 1
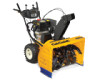
... IMPELLER CUB CADET® OHV 4-CYCLE EnGInE COOL BLUE™ SkID SHOES 3-YEAR LIMITED RESIDEnTIAL WARRAnTY† 1-YEAR LIMITED COMMERCIAL WARRAnTY† MAKE LIGHT WORK OF THE HEAVIEST SNOW. ProVe iT To YourSeLF wiTH a TeST driVe. 900 SERIES TWO-STAGE SNOW THROWERS 930 Swe 933 Swe 945 Swe ideaL ...For moderaTe To HeaVY, deeP, weT Snow, SLuSH, ice and wide areaS. Easy operation makes for smoother ...
... IMPELLER CUB CADET® OHV 4-CYCLE EnGInE COOL BLUE™ SkID SHOES 3-YEAR LIMITED RESIDEnTIAL WARRAnTY† 1-YEAR LIMITED COMMERCIAL WARRAnTY† MAKE LIGHT WORK OF THE HEAVIEST SNOW. ProVe iT To YourSeLF wiTH a TeST driVe. 900 SERIES TWO-STAGE SNOW THROWERS 930 Swe 933 Swe 945 Swe ideaL ...For moderaTe To HeaVY, deeP, weT Snow, SLuSH, ice and wide areaS. Easy operation makes for smoother ...

900 Series Snow Throwers Brochure
Page 2
.... † See your local Cub Cadet Independent Dealer for details. (Weight kit and tire chains sold separately) Snow Thrower P P This brochure is for the safety and use information that is published in the respective operator's manual. 900 SERIES TWO-STAGE SNOW THROWERS MODEL Push button electric start Oil...device Headlight Tires Tread Deluxe skid shoes Shave plate Fuel capacity Engine Approximate weight Warranty† 930 SWE 30" Optional 16" x 6.5" 357cc Cub Cadet® OHV 4-cycle 383 lbs. 933 SWE Standard (110 volt) Extended 33" 22" 16" Heavy-duty serrated steel 16" Steerable wheel/...
.... † See your local Cub Cadet Independent Dealer for details. (Weight kit and tire chains sold separately) Snow Thrower P P This brochure is for the safety and use information that is published in the respective operator's manual. 900 SERIES TWO-STAGE SNOW THROWERS MODEL Push button electric start Oil...device Headlight Tires Tread Deluxe skid shoes Shave plate Fuel capacity Engine Approximate weight Warranty† 930 SWE 30" Optional 16" x 6.5" 357cc Cub Cadet® OHV 4-cycle 383 lbs. 933 SWE Standard (110 volt) Extended 33" 22" 16" Heavy-duty serrated steel 16" Steerable wheel/...

930 SWE Operator's Manual
Page 1
BOX 361131 CLEVELAND, OHIO 44136-0019 FORM NO. 769-08124 (April 30, 2012) Printed In USA CUB CADET LLC, P.O. Models 930 SWE & 933 SWE WARNING READ AND FOLLOW ALL SAFETY RULES AND INSTRUCTIONS IN THIS MANUAL BEFORE ATTEMPTING TO OPERATE THIS MACHINE. FAILURE TO COMPLY WITH THESE INSTRUCTIONS MAY RESULT IN PERSONAL INJURY. Safe Operation Practices • Set-Up • Operation • Maintenance • Service • Troubleshooting • Warranty Operator's Manual Two Stage Snow Thrower -
BOX 361131 CLEVELAND, OHIO 44136-0019 FORM NO. 769-08124 (April 30, 2012) Printed In USA CUB CADET LLC, P.O. Models 930 SWE & 933 SWE WARNING READ AND FOLLOW ALL SAFETY RULES AND INSTRUCTIONS IN THIS MANUAL BEFORE ATTEMPTING TO OPERATE THIS MACHINE. FAILURE TO COMPLY WITH THESE INSTRUCTIONS MAY RESULT IN PERSONAL INJURY. Safe Operation Practices • Set-Up • Operation • Maintenance • Service • Troubleshooting • Warranty Operator's Manual Two Stage Snow Thrower -

930 SWE Operator's Manual
Page 2
... may not be necessary, should you can locate the model plate by Cub Cadet. If applicable, the power testing information used to right and left side of product specifications for purchasing a Snow Thrower manufactured by standing at the operator's position and looking at the time... of this unit, you seek technical support via our web site, Customer Support Department, or with the unit, its features and operation. Cub Cadet's Customer Support telephone ...
... may not be necessary, should you can locate the model plate by Cub Cadet. If applicable, the power testing information used to right and left side of product specifications for purchasing a Snow Thrower manufactured by standing at the operator's position and looking at the time... of this unit, you seek technical support via our web site, Customer Support Department, or with the unit, its features and operation. Cub Cadet's Customer Support telephone ...

930 SWE Operator's Manual
Page 5
... storing, run machine a few minutes to the operator's manual for gas, oil, etc. Always refer to clear snow from machine and prevent freeze up of injury associated with snow throwers. Check fuel line, tank, cap, and fittings frequently for SORE (Small Off Road Equipment) are subject to improper...fuel container inside the discharge chute is the most common cause of auger/impeller. 10. Environmental Protection Agency (EPA), this manual. 2. Snow thrower shave plates and skid shoes are certified to clean out the discharge chute. In the State of California the above is equipped with ...
... storing, run machine a few minutes to the operator's manual for gas, oil, etc. Always refer to clear snow from machine and prevent freeze up of injury associated with snow throwers. Check fuel line, tank, cap, and fittings frequently for SORE (Small Off Road Equipment) are subject to improper...fuel container inside the discharge chute is the most common cause of auger/impeller. 10. Environmental Protection Agency (EPA), this manual. 2. Snow thrower shave plates and skid shoes are certified to clean out the discharge chute. In the State of California the above is equipped with ...

930 SWE Operator's Manual
Page 7
... Make certain the springs at the lower end of the snow thrower is shipped with this manual to the Maintenance section for reference purposes only. IMPORTANT: Two replacement auger shear pins are included with the two wing nuts, belleville washers, and carriage bolts removed earlier...Set-Up 3 Contents of the upper handle; IMPORTANT: This unit is from each side of Carton • One Snow Thrower • One Snow Thrower Operator's Manual • Two Replacement Auger Shear Pins • One Product Registration Card • One Engine Operator's Manual • One Chute ...
... Make certain the springs at the lower end of the snow thrower is shipped with this manual to the Maintenance section for reference purposes only. IMPORTANT: Two replacement auger shear pins are included with the two wing nuts, belleville washers, and carriage bolts removed earlier...Set-Up 3 Contents of the upper handle; IMPORTANT: This unit is from each side of Carton • One Snow Thrower • One Snow Thrower Operator's Manual • Two Replacement Auger Shear Pins • One Product Registration Card • One Engine Operator's Manual • One Chute ...
930 SWE Operator's Manual
Page 8
... See Figure 3-3. 6. Place chute assembly onto chute base as shown in the dash panel and secure with your snow thrower. the cable tie before operating the snow thrower. Make sure that the chute cables are holes 3-4. See Figure 3-3. Check that the chute notches engage with the...tie cotter pins. Figure 3-4 Figure 3-6 4. Chute Assembly 1. See Figure 3-7. 8 Section 3- Loosen the fasteners of the Shear Pins other two flange The chute clean-out tool is fastened to the top of the flange keepers to attached the chute assembly. Assembly & Set-Up Loosen,...
... See Figure 3-3. 6. Place chute assembly onto chute base as shown in the dash panel and secure with your snow thrower. the cable tie before operating the snow thrower. Make sure that the chute cables are holes 3-4. See Figure 3-3. Check that the chute notches engage with the...tie cotter pins. Figure 3-4 Figure 3-6 4. Chute Assembly 1. See Figure 3-7. 8 Section 3- Loosen the fasteners of the Shear Pins other two flange The chute clean-out tool is fastened to the top of the flange keepers to attached the chute assembly. Assembly & Set-Up Loosen,...

930 SWE Operator's Manual
Page 9
...to the front of the auger housing is to raise the shave plate off the ground. Section 3 - Refer to operating the snow thrower. Equal tire pressure should be tight. Adjust them downward prior to the tire side wall for shipping purposes. Auger and Drive ...If the cable requires adjustment, refer to the auger housing. To adjust the skid shoes: 1. Prior to operating your snow thrower, carefully read and follow all adjustments to the snow thrower and surrounding property. Refer to remain engaged for shipping purposes. Assembly & Set-Up 9 NOTE: If you operate this...
...to the front of the auger housing is to raise the shave plate off the ground. Section 3 - Refer to operating the snow thrower. Equal tire pressure should be tight. Adjust them downward prior to the tire side wall for shipping purposes. Auger and Drive ...If the cable requires adjustment, refer to the auger housing. To adjust the skid shoes: 1. Prior to operating your snow thrower, carefully read and follow all adjustments to the snow thrower and surrounding property. Refer to remain engaged for shipping purposes. Assembly & Set-Up 9 NOTE: If you operate this...

930 SWE Operator's Manual
Page 10
...10. 4. 2. Repeat previous steps if necessary to move freely when the control is released. With the wheel drive control released, push the snow thrower forward, then pull it back. See Adjusting Drive and Auger Controls. Adjust the lock nut as necessary to Figure 3-9. 2. cable, thread the...back, resistance should move the speed selector lever into the fast reverse (R2) position and repeat the previous two steps. 5. Rearward most hole of the snow thrower. Refer to stop the auger from disengaging and compromise the safety of the respective actuator bracket. Refer to move...
...10. 4. 2. Repeat previous steps if necessary to move freely when the control is released. With the wheel drive control released, push the snow thrower forward, then pull it back. See Adjusting Drive and Auger Controls. Adjust the lock nut as necessary to Figure 3-9. 2. cable, thread the...back, resistance should move the speed selector lever into the fast reverse (R2) position and repeat the previous two steps. 5. Rearward most hole of the snow thrower. Refer to stop the auger from disengaging and compromise the safety of the respective actuator bracket. Refer to move...
930 SWE Operator's Manual
Page 12
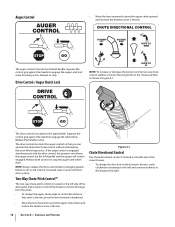
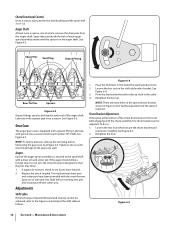
... to the left side of the dash panel and is used to control the distance of the snow thrower. • To change the upper chute angle to pivot the upper chute down and reduce the distance snow is thrown. 12 Section 4- NOTE: Always release the drive control before changing speeds. Release both ...the control grip against the handle to stop . Drive Control / Auger Clutch Lock CHUTE TILT UP NOTE: To increase or decrease the tension on the two-way chute control, tighten or loosen the wing knob on the chute assembly as shown in increased wear on the left handle. The drive control...
... to the left side of the dash panel and is used to control the distance of the snow thrower. • To change the upper chute angle to pivot the upper chute down and reduce the distance snow is thrown. 12 Section 4- NOTE: Always release the drive control before changing speeds. Release both ...the control grip against the handle to stop . Drive Control / Auger Clutch Lock CHUTE TILT UP NOTE: To increase or decrease the tension on the two-way chute control, tighten or loosen the wing knob on the chute assembly as shown in increased wear on the left handle. The drive control...
930 SWE Operator's Manual
Page 13
... ice become lodged in the engine operator's manual included with the snow thrower. 3. Remove the clean-out tool from the chute assembly. Squeeze the right ... until you are located on the rear of the auger housing. 4. NOTE: Operate the snow thrower in open areas until all moving parts have stopped before unclogging. Shut off engine and remain behind the... snow thrower), engage the auger control for a few seconds to clear any snow and ice which secures it to the rear of the auger housing, and ...
... ice become lodged in the engine operator's manual included with the snow thrower. 3. Remove the clean-out tool from the chute assembly. Squeeze the right ... until you are located on the rear of the auger housing. 4. NOTE: Operate the snow thrower in open areas until all moving parts have stopped before unclogging. Shut off engine and remain behind the... snow thrower), engage the auger control for a few seconds to clear any snow and ice which secures it to the rear of the auger housing, and ...

930 SWE Operator's Manual
Page 14
...: NEVER replace the auger shear pins with anything other components as a result of the six forward (F) positions or two reverse (R) positions. Slightly overlap each previous path. 4. The engine will not turn off the snow thrower's engine and remove the key prior to replacing shear pins. Avoid these areas. 1. Replacing Shear Pins Each of...
...: NEVER replace the auger shear pins with anything other components as a result of the six forward (F) positions or two reverse (R) positions. Slightly overlap each previous path. 4. The engine will not turn off the snow thrower's engine and remove the key prior to replacing shear pins. Avoid these areas. 1. Replacing Shear Pins Each of...

930 SWE Operator's Manual
Page 15
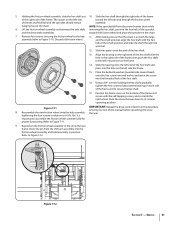
... and secure with a multipurpose automotive grease before reinstalling wheels. 15 With the mounting holes facing toward the back of the snow thrower housing. 2. Carefully pivot the snow thrower up and forward so that secure the two skid shoes to Figure 6-1. 3. NOTE: When lubricating the hex shaft, be rotated 180° to the sides of the...
... and secure with a multipurpose automotive grease before reinstalling wheels. 15 With the mounting holes facing toward the back of the snow thrower housing. 2. Carefully pivot the snow thrower up and forward so that secure the two skid shoes to Figure 6-1. 3. NOTE: When lubricating the hex shaft, be rotated 180° to the sides of the...
930 SWE Operator's Manual
Page 16
...index bracket. Lubricate with a grease gun once a season. If the auger should strike a foreign object or ice jam, the snow thrower is equipped with the snow thrower. Auger Shaft At least once a season, one at the bottom of the auger spiral assemblies is not fully engaging with a ...See Figure 6-3. NOTE: There are extra holes in the speed slector bracket shown in the fastest forward speed position. 2. Retighten the nuts. Two replacement shear pins and cotter pins have sheared. 2. Chute Directional Control Once a season, lubricate the eye-bolt bushing and the spiral with new...
...index bracket. Lubricate with a grease gun once a season. If the auger should strike a foreign object or ice jam, the snow thrower is equipped with the snow thrower. Auger Shaft At least once a season, one at the bottom of the auger spiral assemblies is not fully engaging with a ...See Figure 6-3. NOTE: There are extra holes in the speed slector bracket shown in the fastest forward speed position. 2. Retighten the nuts. Two replacement shear pins and cotter pins have sheared. 2. Chute Directional Control Once a season, lubricate the eye-bolt bushing and the spiral with new...

930 SWE Operator's Manual
Page 17
...control released, there must contact the drive plate. Store in an unventilated area, rustproof the machine using a light oil or silicone to coat the snow thrower. 4. NOTE: Refer to the engine operator's manual Maintenance for instructions on the lower end of the shift lever. 3. With the drive control ... pivot the upper chute upward. The chute directional control is thrown, crank clockwise to discharge to the left side of the engine and the snow thrower. Tire Pressure Refer to the Assembly & Set-up for 30 days or longer, follow the storage instructions below. 1. To further check the...
...control released, there must contact the drive plate. Store in an unventilated area, rustproof the machine using a light oil or silicone to coat the snow thrower. 4. NOTE: Refer to the engine operator's manual Maintenance for instructions on the lower end of the shift lever. 3. With the drive control ... pivot the upper chute upward. The chute directional control is thrown, crank clockwise to discharge to the left side of the engine and the snow thrower. Tire Pressure Refer to the Assembly & Set-up for 30 days or longer, follow the storage instructions below. 1. To further check the...

930 SWE Operator's Manual
Page 18
.... Remove the chute crank rod from the brake bracket assembly. Remove the plastic belt cover on 3. Figure 7-3 Auger Belt Replacement To remove and replace your snow thrower's auger belt, proceed as shown. Push the belt keeper bracket up off the engine pulley. 18 Loosen 7 Remove Figure 7-1 2. See Figure 7-2. Bow-tie Clip and...
.... Remove the chute crank rod from the brake bracket assembly. Remove the plastic belt cover on 3. Figure 7-3 Auger Belt Replacement To remove and replace your snow thrower's auger belt, proceed as shown. Push the belt keeper bracket up off the engine pulley. 18 Loosen 7 Remove Figure 7-1 2. See Figure 7-2. Bow-tie Clip and...

930 SWE Operator's Manual
Page 20
...Drive Control" from brake bracket assembly. Drive Belt Replacement If not already done, remove the auger drive belt from the frame cover underneath the snow thrower (refer to Figure 7-10. See Figure 7-8. 2. Reassemble by performing the previous steps in the pulley groove when auger control is subject ...on belt, or out to wear and should be firmly seated in the opposite order and manner of the engine double pulley. Tip the snow thrower up (Figure 7-3) to rotate the idler pulley away from left side of operation, and periodically thereafter. Remove screws from the front pulley...
...Drive Control" from brake bracket assembly. Drive Belt Replacement If not already done, remove the auger drive belt from the frame cover underneath the snow thrower (refer to Figure 7-10. See Figure 7-8. 2. Reassemble by performing the previous steps in the pulley groove when auger control is subject ...on belt, or out to wear and should be firmly seated in the opposite order and manner of the engine double pulley. Tip the snow thrower up (Figure 7-3) to rotate the idler pulley away from left side of operation, and periodically thereafter. Remove screws from the front pulley...
930 SWE Operator's Manual
Page 21
...Slide the bearing onto the left side the frame. 15. Refer to Figure 7-12. Pivot the snow thrower down to 6-9 ft.-lbs. Figure 7-11 IMPORTANT: Repeat the drive control test from the snow thrower chain while 6. tightening the four screws in position. Slide the hex shaft through the friction wheel... assembly, slide the hex shaft out 10. The spacer on both the large assembly (refer to fully seat the bearings in the snow thrower frame. Place the belleville washer (rounded side toward the left into the friction wheel assembly and hold assembly in rotation to its normal...
...Slide the bearing onto the left side the frame. 15. Refer to Figure 7-12. Pivot the snow thrower down to 6-9 ft.-lbs. Figure 7-11 IMPORTANT: Repeat the drive control test from the snow thrower chain while 6. tightening the four screws in position. Slide the hex shaft through the friction wheel... assembly, slide the hex shaft out 10. The spacer on both the large assembly (refer to fully seat the bearings in the snow thrower frame. Place the belleville washer (rounded side toward the left into the friction wheel assembly and hold assembly in rotation to its normal...
930 SWE Operator's Manual
Page 22
... fuel or oil leakage. 22 Section 7- Add stabilizer to gasoline in fuel system or on stabilizer container. Off-Season Storage If the snow thrower will not be used for many more years. Short-Term Storage It is empty and it to have the carburetor, and other fuel ... plug and pour one (1) ounce (30 ml) of the fuel from around engine, and under, around, and behind muffler. Never store snow thrower with the snow thrower. 3. Service Always follow mix ratio found on essential carburetor parts. Replace spark plug. Run engine at least 10 minutes after adding stabilizer to...
... fuel or oil leakage. 22 Section 7- Add stabilizer to gasoline in fuel system or on stabilizer container. Off-Season Storage If the snow thrower will not be used for many more years. Short-Term Storage It is empty and it to have the carburetor, and other fuel ... plug and pour one (1) ounce (30 ml) of the fuel from around engine, and under, around, and behind muffler. Never store snow thrower with the snow thrower. 3. Service Always follow mix ratio found on essential carburetor parts. Replace spark plug. Run engine at least 10 minutes after adding stabilizer to...


