User Manual
Page 2
...1.0 1.1 Manual Revisions Date October 11, 2012 November 08, 2012 Description DCS-6210 Revision A1 with firmware version 1.00 DCS-6210 Revision A1 with power consumption revise Trademarks D-Link and the D-Link logo are trademarks or registered trademarks of their respective companies. This publication ...D-Link Corporation. Copyright © 2012 D-Link Corporation. All rights reserved. Preface D-Link reserves the right to revise this document may not be reproduced, in whole or in part, without obligation to notify any person or organization of such revisions or changes. D-Link DCS-6210...
...1.0 1.1 Manual Revisions Date October 11, 2012 November 08, 2012 Description DCS-6210 Revision A1 with firmware version 1.00 DCS-6210 Revision A1 with power consumption revise Trademarks D-Link and the D-Link logo are trademarks or registered trademarks of their respective companies. This publication ...D-Link Corporation. Copyright © 2012 D-Link Corporation. All rights reserved. Preface D-Link reserves the right to revise this document may not be reproduced, in whole or in part, without obligation to notify any person or organization of such revisions or changes. D-Link DCS-6210...
User Manual
Page 3
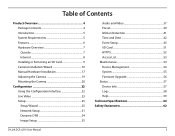
... Maintenance 54 Device Management 54 System 55 Firmware Upgrade 56 Status 57 Device Info 57 Logs 58 Help 59 Technical Specifications 60 Safety Statements 62 D-Link DCS-6210 User Manual 3
... Maintenance 54 Device Management 54 System 55 Firmware Upgrade 56 Status 57 Device Info 57 Logs 58 Help 59 Technical Specifications 60 Safety Statements 62 D-Link DCS-6210 User Manual 3
User Manual
Page 4
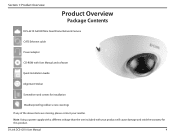
D-Link DCS-6210 User Manual 4 Note: Using a power supply with a different voltage than the one included with User Manual and software Quick Installation Guide Alignment Sticker Screwdriver and screws for installation Weatherproofing rubber screw coverings If any of the above items are missing, please contact your product will cause damage and void the warranty for this product. Section 1: Product Overview Product Overview Package Contents DCS‑6210 Full HD Mini Fixed Dome Network Camera CAT5 Ethernet cable Power adapter CD-ROM with your reseller.
D-Link DCS-6210 User Manual 4 Note: Using a power supply with a different voltage than the one included with User Manual and software Quick Installation Guide Alignment Sticker Screwdriver and screws for installation Weatherproofing rubber screw coverings If any of the above items are missing, please contact your product will cause damage and void the warranty for this product. Section 1: Product Overview Product Overview Package Contents DCS‑6210 Full HD Mini Fixed Dome Network Camera CAT5 Ethernet cable Power adapter CD-ROM with your reseller.
User Manual
Page 5
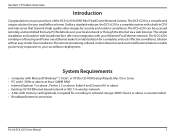
... Wizard), Mac OS or Linux • PC with your local network or through the Internet via a web browser. The DCS-6210 vandal-proof housing and Power over your Ethernet/Fast Ethernet network. The remote monitoring, infrared, motion detection and event notifications features... a built-in CPU and web server that transmits high quality video images for recording to your small office or home. The DCS-6210 is recommended. • Broadband Internet connection D-Link DCS-6210 User Manual 5 SDHC Class 6 or above ; at least 128MB RAM • Internet Explorer 7 or above , Firefox 3.5...
... Wizard), Mac OS or Linux • PC with your local network or through the Internet via a web browser. The DCS-6210 vandal-proof housing and Power over your Ethernet/Fast Ethernet network. The remote monitoring, infrared, motion detection and event notifications features... a built-in CPU and web server that transmits high quality video images for recording to your small office or home. The DCS-6210 is recommended. • Broadband Internet connection D-Link DCS-6210 User Manual 5 SDHC Class 6 or above ; at least 128MB RAM • Internet Explorer 7 or above , Firefox 3.5...
User Manual
Page 6
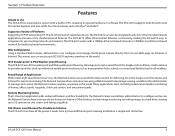
...Applications With today's high-speed Internet services, the Network Camera can provide the ideal solution for traditional wired environments. D-Link DCS-6210 User Manual 6 Broad Range of its own Web page via Intranet or Internet. Section 1: Product Overview Features Simple to Use The... DCS-6210 is simple and clutter free. The DCS-6210 offers Ethernet/Fast Ethernet connectivity, making the DCS-6210 easy to 32 cameras on one screen, and taking snapshots. IK10 Vandal-proof & IP66 Weather-...
...Applications With today's high-speed Internet services, the Network Camera can provide the ideal solution for traditional wired environments. D-Link DCS-6210 User Manual 6 Broad Range of its own Web page via Intranet or Internet. Section 1: Product Overview Features Simple to Use The... DCS-6210 is simple and clutter free. The DCS-6210 offers Ethernet/Fast Ethernet connectivity, making the DCS-6210 easy to 32 cameras on one screen, and taking snapshots. IK10 Vandal-proof & IP66 Weather-...
User Manual
Page 7
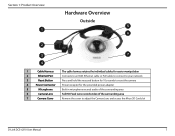
... Fixed Lens records video of the surrounding area 7 Camera Cover Remove the cover to adjust the Camera Lens and access the Micro SD Card slot D-Link DCS-6210 User Manual 7
... Fixed Lens records video of the surrounding area 7 Camera Cover Remove the cover to adjust the Camera Lens and access the Micro SD Card slot D-Link DCS-6210 User Manual 7
User Manual
Page 8
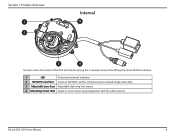
Section 1: Product Overview 1 2 Internal 4 3 4 You can access the inside of the DCS-6210 by loosening the 3 security screws, then lifting the cover off of the camera. 1 LED Power and network indicator. 2 SD/SDHC Card Slot Insert an SD/SDHC card for storing internal recorded images and video. 3 Adjustable Lens Seat Adjustable triple ring lens mount. 4 Mounting Screw Hole Guide to assist correct casing alignment with the cable channel. D-Link DCS-6210 User Manual 8
Section 1: Product Overview 1 2 Internal 4 3 4 You can access the inside of the DCS-6210 by loosening the 3 security screws, then lifting the cover off of the camera. 1 LED Power and network indicator. 2 SD/SDHC Card Slot Insert an SD/SDHC card for storing internal recorded images and video. 3 Adjustable Lens Seat Adjustable triple ring lens mount. 4 Mounting Screw Hole Guide to assist correct casing alignment with the cable channel. D-Link DCS-6210 User Manual 8
User Manual
Page 9
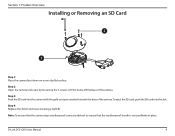
... Installing or Removing an SD Card 2 3 Step 1: Place the camera face down on a non-slip flat surface. Step 3: Push the SD card into the slot. D-Link DCS-6210 User Manual 9 To eject the SD card, push the SD card into the camera with the gold contacts oriented towards the base of the camera...
... Installing or Removing an SD Card 2 3 Step 1: Place the camera face down on a non-slip flat surface. Step 3: Push the SD card into the slot. D-Link DCS-6210 User Manual 9 To eject the SD card, push the SD card into the camera with the gold contacts oriented towards the base of the camera...
User Manual
Page 10
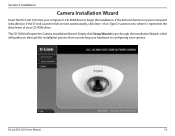
...D: represents the drive letter of your computer's CD-ROM drive to begin the installation. D-Link DCS-6210 User Manual 10 If the Autorun function on your computer is disabled, or if the D-Link Launcher fails to configuring your hardware to start automatically, click Start > Run. The CD-ROM... will guide you through the installation process from connecting your camera. Section 2: Installation Camera Installation Wizard Insert the DCS-6210 CD into your CD-ROM ...
...D: represents the drive letter of your computer's CD-ROM drive to begin the installation. D-Link DCS-6210 User Manual 10 If the Autorun function on your computer is disabled, or if the D-Link Launcher fails to configuring your hardware to start automatically, click Start > Run. The CD-ROM... will guide you through the installation process from connecting your camera. Section 2: Installation Camera Installation Wizard Insert the DCS-6210 CD into your CD-ROM ...
User Manual
Page 11
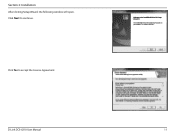
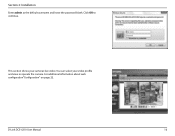
D-Link DCS-6210 User Manual 11 Click Next to accept the License Agreement. Click Yes to continue. Section 2: Installation After clicking Setup Wizard, the following window will open.
D-Link DCS-6210 User Manual 11 Click Next to accept the License Agreement. Click Yes to continue. Section 2: Installation After clicking Setup Wizard, the following window will open.
User Manual
Page 12
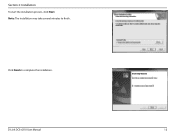
Section 2: Installation To start the installation process, click Next. Click Finish to finish. D-Link DCS-6210 User Manual 12 Note: The installation may take several minutes to complete the installation.
Section 2: Installation To start the installation process, click Next. Click Finish to finish. D-Link DCS-6210 User Manual 12 Note: The installation may take several minutes to complete the installation.
User Manual
Page 13
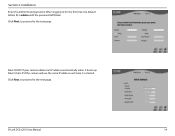
If your network does not use a DHCP server, the network camera's default static IP 192.168.0.20 will appear and display the MAC address and IP address of your camera(s). Start > D-Link > Setup Wizard SE The Setup Wizard will be displayed. Click the Wizard button to continue. D-Link DCS-6210 User Manual 13 Section 2: Installation Click on your Windows Start menu. If you have a DHCP server on the D-Link Setup Wizard SE icon that was created in your network, a valid IP Address will be displayed.
If your network does not use a DHCP server, the network camera's default static IP 192.168.0.20 will appear and display the MAC address and IP address of your camera(s). Start > D-Link > Setup Wizard SE The Setup Wizard will be displayed. Click the Wizard button to continue. D-Link DCS-6210 User Manual 13 Section 2: Installation Click on your Windows Start menu. If you have a DHCP server on the D-Link Setup Wizard SE icon that was created in your network, a valid IP Address will be displayed.
User Manual
Page 14
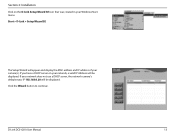
When logging in for the first time, the default Admin ID is started. Section 2: Installation Enter the Admin ID and password. Select DHCP if your camera obtains an IP address automatically when it is admin with the password left blank. Click Next, to proceed to the next page. D-Link DCS-6210 User Manual 14 Select static IP if the camera will use the same IP address each time it boots up. Click Next, to proceed to the next page.
When logging in for the first time, the default Admin ID is started. Section 2: Installation Enter the Admin ID and password. Select DHCP if your camera obtains an IP address automatically when it is admin with the password left blank. Click Next, to proceed to the next page. D-Link DCS-6210 User Manual 14 Select static IP if the camera will use the same IP address each time it boots up. Click Next, to proceed to the next page.
User Manual
Page 15
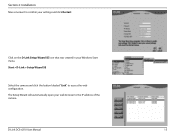
Section 2: Installation Take a moment to access the web configuration. D-Link DCS-6210 User Manual 15 Start > D-Link > Setup Wizard SE Select the camera and click the button labeled "Link" to confirm your settings and click Restart. The Setup Wizard will automatically open your Windows Start menu. Click on the D-Link Setup Wizard SE icon that was created in your web browser to the IP address of the camera.
Section 2: Installation Take a moment to access the web configuration. D-Link DCS-6210 User Manual 15 Start > D-Link > Setup Wizard SE Select the camera and click the button labeled "Link" to confirm your settings and click Restart. The Setup Wizard will automatically open your Windows Start menu. Click on the D-Link Setup Wizard SE icon that was created in your web browser to the IP address of the camera.
User Manual
Page 16
D-Link DCS-6210 User Manual 16 Click OK to continue. This section shows your video profile and view or operate the camera. You can select your camera's live video. For additional information about web configuration"Configuration" on page 22. Section 2: Installation Enter admin as the default username and leave the password blank.
D-Link DCS-6210 User Manual 16 Click OK to continue. This section shows your video profile and view or operate the camera. You can select your camera's live video. For additional information about web configuration"Configuration" on page 22. Section 2: Installation Enter admin as the default username and leave the password blank.
User Manual
Page 17
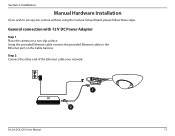
Using the provided Ethernet cable connect the provided Ethernet cable to set up your network.. 1 2 D-Link DCS-6210 User Manual 17 Section 2: Installation Manual Hardware Installation If you wish to the Ethernet port on a non-slip surface. General connection with 12 V DC Power Adaptor Step 1 Place the camera on the Cable harness Step 2 Connect the other end of the Ethernet cable your camera without using the Camera Setup Wizard, please follow these steps.
Using the provided Ethernet cable connect the provided Ethernet cable to set up your network.. 1 2 D-Link DCS-6210 User Manual 17 Section 2: Installation Manual Hardware Installation If you wish to the Ethernet port on a non-slip surface. General connection with 12 V DC Power Adaptor Step 1 Place the camera on the Cable harness Step 2 Connect the other end of the Ethernet cable your camera without using the Camera Setup Wizard, please follow these steps.
User Manual
Page 18
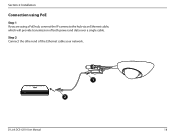
Step 2 Connect the other end of both power and data over a single cable. Section 2: Installation Connection using PoE Step 1 If you are using a PoE hub, connect the IP camera to the hub via an Ethernet cable, which will provide transmission of the Ethernet cable your network.. 1 2 D-Link DCS-6210 User Manual 18
Step 2 Connect the other end of both power and data over a single cable. Section 2: Installation Connection using PoE Step 1 If you are using a PoE hub, connect the IP camera to the hub via an Ethernet cable, which will provide transmission of the Ethernet cable your network.. 1 2 D-Link DCS-6210 User Manual 18
User Manual
Page 19
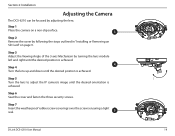
... is achieved Step 6 Seat the cover and fasten the three security screws. Step 7 Insert the weatherproof rubber screw coverings over the screws ensuring a tight seal. 5 D-Link DCS-6210 User Manual 19 Section 2: Installation Adjusting the Camera The DCS-6210 can be focused by adjusting the lens.
... is achieved Step 6 Seat the cover and fasten the three security screws. Step 7 Insert the weatherproof rubber screw coverings over the screws ensuring a tight seal. 5 D-Link DCS-6210 User Manual 19 Section 2: Installation Adjusting the Camera The DCS-6210 can be focused by adjusting the lens.
User Manual
Page 20
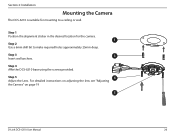
Step 1 Position the alignment sticker in the desired location for mounting to make required holes approximately 25mm deep. Section 2: Installation Mounting the Camera The DCS-6210 is suitable for the camera. 1 Step 2 Use a 6mm drill bit to a ceiling or wall. Step 3 3 Insert wall anchors. Step 4 Affix the DCS-6210 base using the screws provided. For detailed instructions on adjusting the lens see "Adjusting the Camera" on page 19 5 D-Link DCS-6210 User Manual 20 Step 5 4 Adjust the Lens.
Step 1 Position the alignment sticker in the desired location for mounting to make required holes approximately 25mm deep. Section 2: Installation Mounting the Camera The DCS-6210 is suitable for the camera. 1 Step 2 Use a 6mm drill bit to a ceiling or wall. Step 3 3 Insert wall anchors. Step 4 Affix the DCS-6210 base using the screws provided. For detailed instructions on adjusting the lens see "Adjusting the Camera" on page 19 5 D-Link DCS-6210 User Manual 20 Step 5 4 Adjust the Lens.
User Manual
Page 21
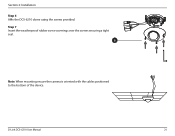
Step 7 Insert the weatherproof rubber screw coverings over the screws ensuring a tight seal. 6 Note: When mounting ensure the camera is oriented with the cables positioned to the bottom of the device. D-Link DCS-6210 User Manual 21 Section 2: Installation Step 6 Affix the DCS-6210 dome using the screws provided.
Step 7 Insert the weatherproof rubber screw coverings over the screws ensuring a tight seal. 6 Note: When mounting ensure the camera is oriented with the cables positioned to the bottom of the device. D-Link DCS-6210 User Manual 21 Section 2: Installation Step 6 Affix the DCS-6210 dome using the screws provided.


