
Product Manual
Page 2
... Configuration Backup & Restore ...18 Function Tree ...19 Device Information...19 i D-Link EasySmart Switch User Manual Table of Contents Table of Contents ...i About This Guide...1 Terms/Usage...1 Copyright and Trademarks ...1 Product Introduction ...2 DGS-1100-16 ...2 Front Panel ...2 Rear Panel...2 DGS-1100-24 ...3 Front Panel ...3 Rear Panel...3 Hardware Installation ...4 Step 1: Unpacking...4 Step 2: Switch Installation...4 Desktop or Shelf Installation...4 Rack Installation ...4 Step 3 -
... Configuration Backup & Restore ...18 Function Tree ...19 Device Information...19 i D-Link EasySmart Switch User Manual Table of Contents Table of Contents ...i About This Guide...1 Terms/Usage...1 Copyright and Trademarks ...1 Product Introduction ...2 DGS-1100-16 ...2 Front Panel ...2 Rear Panel...2 DGS-1100-24 ...3 Front Panel ...3 Rear Panel...3 Hardware Installation ...4 Step 1: Unpacking...4 Step 2: Switch Installation...4 Desktop or Shelf Installation...4 Rack Installation ...4 Step 3 -

Product Manual
Page 3
Rack mount Instructions ...37 ii Ethernet Technology...34 Gigabit Ethernet Technology ...34 Fast Ethernet Technology...34 Switching Technology ...34 Appendix B - D-Link EasySmart Switch User Manual System > System Settings ...20 System > Port Settings...21 System > Trap Settings For SmartConsole 21 System > Password Access Control ...22 L2 Features > Port Trunking......
Rack mount Instructions ...37 ii Ethernet Technology...34 Gigabit Ethernet Technology ...34 Fast Ethernet Technology...34 Switching Technology ...34 Appendix B - D-Link EasySmart Switch User Manual System > System Settings ...20 System > Port Settings...21 System > Trap Settings For SmartConsole 21 System > Password Access Control ...22 L2 Features > Port Trunking......

Product Manual
Page 4
... This Guide This guide provides instructions to install the D-Link Gigabit Ethernet EasySmart Switch DGS-1100-16/24, how to use of D-Link Corporation; Hardware Installation: Step-by -step. Terms/Usage In this document to refer to terms "switch", "bridge" and "switching hubs" interchangeably, and both are registered trademarks of D-Link Corporation is strictly forbidden. A NOTE indicates important information that...
... This Guide This guide provides instructions to install the D-Link Gigabit Ethernet EasySmart Switch DGS-1100-16/24, how to use of D-Link Corporation; Hardware Installation: Step-by -step. Terms/Usage In this document to refer to terms "switch", "bridge" and "switching hubs" interchangeably, and both are registered trademarks of D-Link Corporation is strictly forbidden. A NOTE indicates important information that...

Product Manual
Page 5
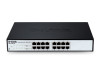
... connected to legacy devices which do not support IEEE 802.3az, D-Link Green Technologies can save energy without compromising any performance. Light off: No link. DGS-1100-16 16-Port 10/100/1000Mpbs EasySmart Switch Front Panel Figure 1 - Link/Act/Speed LED (Ports 1-16): Flashing: Indicates a network link through the corresponding port. Reset: By pressing the Reset button for small and...
... connected to legacy devices which do not support IEEE 802.3az, D-Link Green Technologies can save energy without compromising any performance. Light off: No link. DGS-1100-16 16-Port 10/100/1000Mpbs EasySmart Switch Front Panel Figure 1 - Link/Act/Speed LED (Ports 1-16): Flashing: Indicates a network link through the corresponding port. Reset: By pressing the Reset button for small and...

Product Manual
Page 6
... LED (Ports 1-24): Flashing: Indicates a network link through the corresponding port. DGS-1100-24 Rear Panel Power: Connect the supplied AC power cable to the default settings. All previous changes will be lost. DGS-1100-24 24-Port 10/100/1000Mpbs EasySmart Switch Front Panel D-Link EasySmart Switch User Manual Figure 3 - Light off: No link. DGS-1100-24 Front Panel Power LED: The...
... LED (Ports 1-24): Flashing: Indicates a network link through the corresponding port. DGS-1100-24 Rear Panel Power: Connect the supplied AC power cable to the default settings. All previous changes will be lost. DGS-1100-24 24-Port 10/100/1000Mpbs EasySmart Switch Front Panel D-Link EasySmart Switch User Manual Figure 3 - Light off: No link. DGS-1100-24 Front Panel Power LED: The...

Product Manual
Page 7
...the mounting brackets to see that there is found missing or damaged, please contact the local reseller for palm size switches). 4 D-Link EasySmart Switch User Manual 2 Hardware Installation This chapter provides unpacking and installation information for replacement. If any item is proper heat... dissipation and adequate ventilation around it is missing or damaged, please contact your local D-Link reseller for the D-Link EasySmart Switch. One D-Link EasySmart Switch One AC power cord Four rubber feet Screws and two mounting brackets One accessory kit for a ground ...
...the mounting brackets to see that there is found missing or damaged, please contact the local reseller for palm size switches). 4 D-Link EasySmart Switch User Manual 2 Hardware Installation This chapter provides unpacking and installation information for replacement. If any item is proper heat... dissipation and adequate ventilation around it is missing or damaged, please contact your local D-Link reseller for the D-Link EasySmart Switch. One D-Link EasySmart Switch One AC power cord Four rubber feet Screws and two mounting brackets One accessory kit for a ground ...

Product Manual
Page 8
... to the connection of the equipment to the branch circuit (e.g. C) Mechanical Loading - Attach the mounting brackets to the Switch Then, use of the equipment in an environment compatible with the equipment rack to supply connections other than room ambient.... following safety Instructions when installing: A) Elevated Operating Ambient - Mount the Switch in the rack. Particular attention should be given to mount the switch in the rack or chassis Please be maintained. Mounting of power strips)." 5 E) Reliable Earthing - D-Link EasySmart Switch User Manual Figure 6 -
... to the connection of the equipment to the branch circuit (e.g. C) Mechanical Loading - Attach the mounting brackets to the Switch Then, use of the equipment in an environment compatible with the equipment rack to supply connections other than room ambient.... following safety Instructions when installing: A) Elevated Operating Ambient - Mount the Switch in the rack. Particular attention should be given to mount the switch in the rack or chassis Please be maintained. Mounting of power strips)." 5 E) Reliable Earthing - D-Link EasySmart Switch User Manual Figure 6 -

Product Manual
Page 9
...to 6 AWG copper conductor is grounded and surge protected). Grounding the Switch This section describes how to connect the EasySmart Switch to the switch. The length of the cable depends on the switch and the rack are securely attached. You must complete this procedure before ... of the switch and to local and national installation requirements. Step 3: Insert the ground screw into the rear of the switch to a protective ground: Step 1: Verify if the system power is installed. D-Link EasySmart Switch User Manual Step 3 - Figure 8 -Plugging the switch into an outlet...
...to 6 AWG copper conductor is grounded and surge protected). Grounding the Switch This section describes how to connect the EasySmart Switch to the switch. The length of the cable depends on the switch and the rack are securely attached. You must complete this procedure before ... of the switch and to local and national installation requirements. Step 3: Insert the ground screw into the rear of the switch to a protective ground: Step 1: Verify if the system power is installed. D-Link EasySmart Switch User Manual Step 3 - Figure 8 -Plugging the switch into an outlet...

Product Manual
Page 10
...'s IP address should have an IP address in the same range as the switch. Each switch can allow only one user to access to manage multiple D-Link EasySmart Switches, the SmartConsole Utility is easier to access the Web-Based Management at a ...or later version Mozilla Firefox 1.5/2.0 or later version Connecting to the Switch You will need to change the IP address of D-Link EasySmart Switch. Each switch can allow one user to initialize multiple EasySmart Switches. D-Link EasySmart Switch User Manual 3 Getting Started This chapter introduces the management interface of ...
...'s IP address should have an IP address in the same range as the switch. Each switch can allow only one user to access to manage multiple D-Link EasySmart Switches, the SmartConsole Utility is easier to access the Web-Based Management at a ...or later version Mozilla Firefox 1.5/2.0 or later version Connecting to the Switch You will need to change the IP address of D-Link EasySmart Switch. Each switch can allow one user to initialize multiple EasySmart Switches. D-Link EasySmart Switch User Manual 3 Getting Started This chapter introduces the management interface of ...

Product Manual
Page 11
...factory-default IP address) in the Monitor List. The default password is manual installation. 8 D-Link EasySmart Switch User Manual Figure 10 -Connected Ethernet cable Login Web-based Management In order to login and configure the switch via an Ethernet connection, the PC must have an IP address of 10.x.y.z (where x/y is...255.0.0.0. For example, if the switch has an IP address of 10.90.90.90, the PC should have an IP address in the same subnet as it appears in the address bar. There are two options for discovering D-Link Smart Switches and EasySmart Switches within the same L2 network ...
...factory-default IP address) in the Monitor List. The default password is manual installation. 8 D-Link EasySmart Switch User Manual Figure 10 -Connected Ethernet cable Login Web-based Management In order to login and configure the switch via an Ethernet connection, the PC must have an IP address of 10.x.y.z (where x/y is...255.0.0.0. For example, if the switch has an IP address of 10.90.90.90, the PC should have an IP address in the same subnet as it appears in the address bar. There are two options for discovering D-Link Smart Switches and EasySmart Switches within the same L2 network ...
Product Manual
Page 12
.... 5. Insert the Utility CD into your CD-Rom or DVD-Rom) and click OK. 4. The autorun program will guide you can open the SmartConsole Utility. 6. D-Link EasySmart Switch User Manual NOTE: Please be sure to Chapter 4 SmartConsole Utility 9 After successfully installing the SmartConsole Utility, you through the process. 4. Upon completion, go to discover...
.... 5. Insert the Utility CD into your CD-Rom or DVD-Rom) and click OK. 4. The autorun program will guide you can open the SmartConsole Utility. 6. D-Link EasySmart Switch User Manual NOTE: Please be sure to Chapter 4 SmartConsole Utility 9 After successfully installing the SmartConsole Utility, you through the process. 4. Upon completion, go to discover...
Product Manual
Page 13
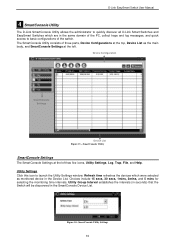
..., Device Configurations at the top, Device List as monitored device in the SmartConsole Device List. Figure 14- D-Link EasySmart Switch User Manual 4 SmartConsole Utility The D-Link SmartConsole Utility allows the administrator to quickly discover all D-Link Smart Switches and EasySmart Switches which were selected as the main body, and SmartConsole Settings at the left has five icons, Utility...
..., Device Configurations at the top, Device List as monitored device in the SmartConsole Device List. Figure 14- D-Link EasySmart Switch User Manual 4 SmartConsole Utility The D-Link SmartConsole Utility allows the administrator to quickly discover all D-Link Smart Switches and EasySmart Switches which were selected as the main body, and SmartConsole Settings at the left has five icons, Utility...

Product Manual
Page 14
...received, IP denotes where it comes from and Status shows the content of the SmartConsole Utility and the device. Click OK to exit Figure 16 - Click View Trap to show the events of this trap message. Click Clear Log to clear all entries. SmartConsole Trap The trap icon...SmartConsole Utility and the device. SmartConsole Log Trap Click this icon to launch the Log window. Click Clear Trap to clear all log entries. D-Link EasySmart Switch User Manual NOTE: If the Group Interval is set to 0, IGMP Snooping must be disabled in the SmartConsole Settings will not be discovered. ...
...received, IP denotes where it comes from and Status shows the content of the SmartConsole Utility and the device. Click OK to exit Figure 16 - Click View Trap to show the events of this trap message. Click Clear Log to clear all entries. SmartConsole Trap The trap icon...SmartConsole Utility and the device. SmartConsole Log Trap Click this icon to launch the Log window. Click Clear Trap to clear all log entries. D-Link EasySmart Switch User Manual NOTE: If the Group Interval is set to 0, IGMP Snooping must be disabled in the SmartConsole Settings will not be discovered. ...

Product Manual
Page 15
... IP, and DHCP Client Setting of the Device List in an appointed filename and file path. Here you will see below options: D-Link EasySmart Switch User Manual Figure 17 - SmartConsole Help Device Configuration The Device Configuration in the Confirm Password box and then click OK 12 Click on ...this icon to launch the Device Settings window. Monitor Save As: Records the setting of the Switch. Figure 18 - To apply the configuration, insert the correct device password in the SmartConsole Utility has five icons: Device Settings Device Password...
... IP, and DHCP Client Setting of the Device List in an appointed filename and file path. Here you will see below options: D-Link EasySmart Switch User Manual Figure 17 - SmartConsole Help Device Configuration The Device Configuration in the Confirm Password box and then click OK 12 Click on ...this icon to launch the Device Settings window. Monitor Save As: Records the setting of the Switch. Figure 18 - To apply the configuration, insert the correct device password in the SmartConsole Utility has five icons: Device Settings Device Password...

Product Manual
Page 16
...reason. 13 Input the correct password of same model name from the Device List. SmartConsole Device Settings NOTE: The EasySmart Switch automatically sends out discovery packets to launch the Device Password Manager window. Click on this icon to maintain the connection ...between the devices and SmartConsole Utility. D-Link EasySmart Switch User Manual Figure 19 - Device Password Manager Select a switch from the Device List. Figure 20 - SmartConsole Device Password Manager Multi Firmware Upgrade Select one ) ...
...reason. 13 Input the correct password of same model name from the Device List. SmartConsole Device Settings NOTE: The EasySmart Switch automatically sends out discovery packets to launch the Device Password Manager window. Click on this icon to maintain the connection ...between the devices and SmartConsole Utility. D-Link EasySmart Switch User Manual Figure 19 - Device Password Manager Select a switch from the Device List. Figure 20 - SmartConsole Device Password Manager Multi Firmware Upgrade Select one ) ...

Product Manual
Page 17
... + and insert a device IP address to display all the Web Smart and EasySmart switches located in the device list. button to launch your internet browser (eg. D-Link EasySmart Switch User Manual Figure 21 - Figure 22 - The Internet Explorer). Here you can configure the Switch through the Web-based Management utility. You may also get into Discover...
... + and insert a device IP address to display all the Web Smart and EasySmart switches located in the device list. button to launch your internet browser (eg. D-Link EasySmart Switch User Manual Figure 21 - Figure 22 - The Internet Explorer). Here you can configure the Switch through the Web-based Management utility. You may also get into Discover...

Product Manual
Page 18
D-Link EasySmart Switch User Manual Figure 24 - The icon will collect the trap and ...current Firmware version of the device. SmartConsole Delete device Device List This list displays all discovered Web Smart and EasySmart switches on the network. SmartConsole Device List Definitions of the device. Product Name: Displays the device product name.... LLDP: Displays the LLDP (Link Layer Discovery Protocol) status of the device. The in the monitor means the device was detected as system log or trap to . This feature is not available for EasySmart switches. Location: Displays where the ...
D-Link EasySmart Switch User Manual Figure 24 - The icon will collect the trap and ...current Firmware version of the device. SmartConsole Delete device Device List This list displays all discovered Web Smart and EasySmart switches on the network. SmartConsole Device List Definitions of the device. Product Name: Displays the device product name.... LLDP: Displays the LLDP (Link Layer Discovery Protocol) status of the device. The in the monitor means the device was detected as system log or trap to . This feature is not available for EasySmart switches. Location: Displays where the ...

Product Manual
Page 19
Under the username is the Web-based Management screen. The three main areas are the Tool Bar on the D-Link logo at the upper-left corner of the function tree. By choosing different functions in the Main Configuration Screen. The...end this to the local D-Link website. 16 Web-based Management Above is the Logout button. NOTE: If you will still be configured for essential utility functions like firmware and configuration management. D-Link EasySmart Switch User Manual 5 Configuration The features and functions of the D-Link EasySmart Switch can change all the settings in...
Under the username is the Web-based Management screen. The three main areas are the Tool Bar on the D-Link logo at the upper-left corner of the function tree. By choosing different functions in the Main Configuration Screen. The...end this to the local D-Link website. 16 Web-based Management Above is the Logout button. NOTE: If you will still be configured for essential utility functions like firmware and configuration management. D-Link EasySmart Switch User Manual 5 Configuration The features and functions of the D-Link EasySmart Switch can change all the settings in...

Product Manual
Page 20
D-Link EasySmart Switch User Manual Tool Bar > Save Menu The Save Menu provides Save Configuration. Figure 28- Figure 29 - Tool Menu > ...you have made to the device to your inventories for the Switch. Save Menu Save Configuration Select to save the firmware to switch's non-volatile RAM. Tool Menu Reboot Device Provide a safe way to restart the switch. All configuration settings in non-volatile RAM will reboot. ... System, Reboot Device, Firmware Upgrade and Configuration Backup & Restore. Click Browse to factory default and then the Switch will be reset to browse your disk.
D-Link EasySmart Switch User Manual Tool Bar > Save Menu The Save Menu provides Save Configuration. Figure 28- Figure 29 - Tool Menu > ...you have made to the device to your inventories for the Switch. Save Menu Save Configuration Select to save the firmware to switch's non-volatile RAM. Tool Menu Reboot Device Provide a safe way to restart the switch. All configuration settings in non-volatile RAM will reboot. ... System, Reboot Device, Firmware Upgrade and Configuration Backup & Restore. Click Browse to factory default and then the Switch will be reset to browse your disk.

Product Manual
Page 21
... upgrade is incomplete. Configuration Backup & Restore Allow the current configuration settings to be lost 18 Click Browse to or from the file. D-Link EasySmart Switch User Manual Figure 32 - Click Restore after restore and all current configurations will be saved to a file (not including the password), and... if necessary, you want to your disk. The Switch may crash if the Firmware Upgrade is complete. Tool Menu > Configure Backup and Restore Backup or restore the configuration file to browse ...
... upgrade is incomplete. Configuration Backup & Restore Allow the current configuration settings to be lost 18 Click Browse to or from the file. D-Link EasySmart Switch User Manual Figure 32 - Click Restore after restore and all current configurations will be saved to a file (not including the password), and... if necessary, you want to your disk. The Switch may crash if the Firmware Upgrade is complete. Tool Menu > Configure Backup and Restore Backup or restore the configuration file to browse ...

