

Quick Installation Guide
Page 2
System Requirements • A notebook computer with an available 32-bit Cardbus Type II slot • Windows® XP SP2 or Windows 2000 SP4 • 20MB Hard Disk Space • CD-ROM Drive • An 802.11g or 802.11b access point (for Infrastructure mode), or another 802.11n or 802.11g wireless adapter (for Ad-Hoc mode.) Package Contents D-Link DWA-645 Wireless Notebook Adapter Manual, software, and warranty on CD If any of the above items are missing, please contact your reseller. 2
System Requirements • A notebook computer with an available 32-bit Cardbus Type II slot • Windows® XP SP2 or Windows 2000 SP4 • 20MB Hard Disk Space • CD-ROM Drive • An 802.11g or 802.11b access point (for Infrastructure mode), or another 802.11n or 802.11g wireless adapter (for Ad-Hoc mode.) Package Contents D-Link DWA-645 Wireless Notebook Adapter Manual, software, and warranty on CD If any of the above items are missing, please contact your reseller. 2

Quick Installation Guide
Page 5
...the autorun screen appears, click Install Drivers. 5 Turn on your computer, go to Start > Run. Adapter Installation Warning: Do NOT install the DWA-645 Cardbus Adapter into your CD-ROM drive). In the run box type "D:\DWA645.exe" (where D: represents the drive letter of your computer before ... software from the D-Link CD. The steps and screens are shown in the CD-ROM drive. The step-by-step instructions that follow are similar for the other Windows operating systems. If the CD Autorun function does not automatically start on the computer and Insert the D-Link DWA-645 Driver CD in...
...the autorun screen appears, click Install Drivers. 5 Turn on your computer, go to Start > Run. Adapter Installation Warning: Do NOT install the DWA-645 Cardbus Adapter into your CD-ROM drive). In the run box type "D:\DWA645.exe" (where D: represents the drive letter of your computer before ... software from the D-Link CD. The steps and screens are shown in the CD-ROM drive. The step-by-step instructions that follow are similar for the other Windows operating systems. If the CD Autorun function does not automatically start on the computer and Insert the D-Link DWA-645 Driver CD in...
Quick Installation Guide
Page 6
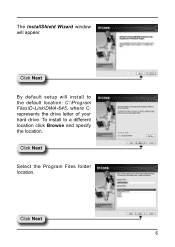
Click Next By default setup will appear. Click Next Select the Program Files folder location. To install to the default location: C:\Program Files\D-Link\DWA-645, where C: represents the drive letter of your hard drive. Click Next 6 The InstallShield Wizard window will install to a different location click Browse and specify the location.
Click Next By default setup will appear. Click Next Select the Program Files folder location. To install to the default location: C:\Program Files\D-Link\DWA-645, where C: represents the drive letter of your hard drive. Click Next 6 The InstallShield Wizard window will install to a different location click Browse and specify the location.

Quick Installation Guide
Page 7
If the Found New Hardware Wizard appears, click Cancel. Click Next Enter the network name (SSID) manually. If you are using Windows® XP (SP2), you will automatically be brought to the site survey page. Click Next 7 Click Scan to use either the D-Link utility or the built-in Windows® Wireless utility. Insert the adapter into an available cardbus slot on your computer. If you enter the SSID incorrectly, you will now appear. Click Next The D-Link configuration wizard will have the option to display the site survey page.
If the Found New Hardware Wizard appears, click Cancel. Click Next Enter the network name (SSID) manually. If you are using Windows® XP (SP2), you will automatically be brought to the site survey page. Click Next 7 Click Scan to use either the D-Link utility or the built-in Windows® Wireless utility. Insert the adapter into an available cardbus slot on your computer. If you enter the SSID incorrectly, you will now appear. Click Next The D-Link configuration wizard will have the option to display the site survey page.
Quick Installation Guide
Page 9
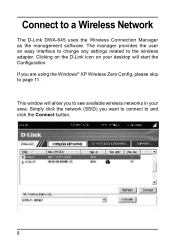
The manager provides the user an easy interface to change any settings related to page 11. If you are using the Windows® XP Wireless Zero Config, please skip to the wireless adapter. Simply click the network (SSID) you to see available wireless networks in your desktop will start the Configuration. This window will allow you want to connect to a Wireless Network The D-Link DWA-645 uses the Wireless Connection Manager as the management software. Clicking on the D-Link icon on your area. Connect to and click the Connect button. 9
The manager provides the user an easy interface to change any settings related to page 11. If you are using the Windows® XP Wireless Zero Config, please skip to the wireless adapter. Simply click the network (SSID) you to see available wireless networks in your desktop will start the Configuration. This window will allow you want to connect to a Wireless Network The D-Link DWA-645 uses the Wireless Connection Manager as the management software. Clicking on the D-Link icon on your area. Connect to and click the Connect button. 9
Quick Installation Guide
Page 11
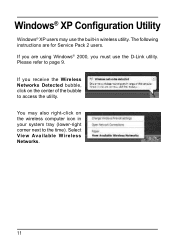
If you are for Service Pack 2 users. If you must use the built-in your system tray (lower-right corner next to page 9. Select View Available Wireless Networks. 11 Please refer to the time). You may use the D-Link utility. Windows® XP Configuration Utility Windows® XP users may also right-click on the center of the bubble to access the utility. The following instructions are using Windows® 2000, you receive the Wireless Networks Detected bubble, click on the wireless computer icon in wireless utility.
If you are for Service Pack 2 users. If you must use the built-in your system tray (lower-right corner next to page 9. Select View Available Wireless Networks. 11 Please refer to the time). You may use the D-Link utility. Windows® XP Configuration Utility Windows® XP users may also right-click on the center of the bubble to access the utility. The following instructions are using Windows® 2000, you receive the Wireless Networks Detected bubble, click on the wireless computer icon in wireless utility.
Quick Installation Guide
Page 12
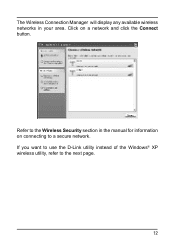
Click on connecting to a secure network. If you want to use the D-Link utility instead of the Windows® XP wireless utility, refer to the Wireless Security section in your area. Refer to the next page. 12 The Wireless Connection Manager will display any available wireless networks in the manual for information on a network and click the Connect button.
Click on connecting to a secure network. If you want to use the D-Link utility instead of the Windows® XP wireless utility, refer to the Wireless Security section in your area. Refer to the next page. 12 The Wireless Connection Manager will display any available wireless networks in the manual for information on a network and click the Connect button.
Quick Installation Guide
Page 13
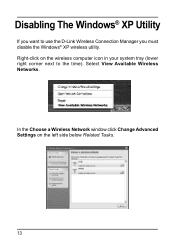
Select View Available Wireless Networks. Right-click on the left side below Related Tasks. 13 In the Choose a Wireless Network window click Change Advanced Settings on the wireless computer icon in your system tray (lower right corner next to use the D-Link Wireless Connection Manager you must disable the Windows® XP wireless utility. Disabling The Windows® XP Utility If you want to the time).
Select View Available Wireless Networks. Right-click on the left side below Related Tasks. 13 In the Choose a Wireless Network window click Change Advanced Settings on the wireless computer icon in your system tray (lower right corner next to use the D-Link Wireless Connection Manager you must disable the Windows® XP wireless utility. Disabling The Windows® XP Utility If you want to the time).
Quick Installation Guide
Page 14
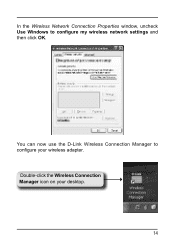
You can now use the D-Link Wireless Connection Manager to configure my wireless network settings and then click OK. Double-click the Wireless Connection Manager icon on your wireless adapter. In the Wireless Network Connection Properties window, uncheck Use Windows to configure your desktop. 14
You can now use the D-Link Wireless Connection Manager to configure my wireless network settings and then click OK. Double-click the Wireless Connection Manager icon on your wireless adapter. In the Wireless Network Connection Properties window, uncheck Use Windows to configure your desktop. 14

