
Product Manual
Page 2
Using the Extension Cord ...... 9 Getting Started 10 Using the Configuration Utility with Windows OS 13 Using the Configuration Utility with Macintosh OS 20 Networking Basics 25 Troubleshooting 38 Technical Specifications 41 Contacting Technical Support 43 Warranty and Registration 44 2 Contents Package Contents 3 Introduction 4 Wireless Basics 6 Inserting and Removing the DWL-122;
Using the Extension Cord ...... 9 Getting Started 10 Using the Configuration Utility with Windows OS 13 Using the Configuration Utility with Macintosh OS 20 Networking Basics 25 Troubleshooting 38 Technical Specifications 41 Contacting Technical Support 43 Warranty and Registration 44 2 Contents Package Contents 3 Introduction 4 Wireless Basics 6 Inserting and Removing the DWL-122;
Product Manual
Page 3
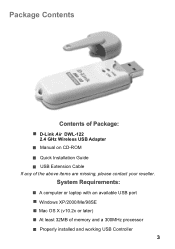
Package Contents Contents of Package: D-Link Air DWL-122 2.4 GHz Wireless USB Adapter Manual on CD-ROM Quick Installation Guide USB Extension Cable If any of memory and a 300MHz processor Properly installed and working USB Controller 3 System Requirements: A computer or laptop with an available USB port Windows XP/2000/Me/98SE Mac OS X (v10.2x or later) At least 32MB of the above items are missing, please contact your reseller.
Package Contents Contents of Package: D-Link Air DWL-122 2.4 GHz Wireless USB Adapter Manual on CD-ROM Quick Installation Guide USB Extension Cable If any of memory and a 300MHz processor Properly installed and working USB Controller 3 System Requirements: A computer or laptop with an available USB port Windows XP/2000/Me/98SE Mac OS X (v10.2x or later) At least 32MB of the above items are missing, please contact your reseller.

Product Manual
Page 4
...DWL-122 automatically connects to other D-Link wireless products as soon as a download for Mac users. 2Not all servers can connect to a wireless network at home, at the office or at regular intervals. The adapter works with Apple Mac OS X (10.2x or later) Jaguar, Microsoft Windows XP, Windows... to any wireless hotspot. With transfer rates up and running on a laptop or desktop Windows and Macintosh-based computer and also includes a standard USB extension cable. The DWL-122 connects to achieve the best available wireless signal reception - whether that it 's active. or...
...DWL-122 automatically connects to other D-Link wireless products as soon as a download for Mac users. 2Not all servers can connect to a wireless network at home, at the office or at regular intervals. The adapter works with Apple Mac OS X (10.2x or later) Jaguar, Microsoft Windows XP, Windows... to any wireless hotspot. With transfer rates up and running on a laptop or desktop Windows and Macintosh-based computer and also includes a standard USB extension cable. The DWL-122 connects to achieve the best available wireless signal reception - whether that it 's active. or...

Product Manual
Page 10
... Inserting the DWL-122 Insert the DWL-122 into the DWL-122. Using the DWL-122 with the extension cord Plug one end of the screen (for WinXP service pack I and above ) that resides in the taskbar at right appears, highlight the DWL-122. Removing the DWL-122 (Windows XP) After installing the DWL-122, the icon... below will notify you when it is safe to remove the DWL-122 from the USB port, you disengage the DWL122 from the USB port....
... Inserting the DWL-122 Insert the DWL-122 into the DWL-122. Using the DWL-122 with the extension cord Plug one end of the screen (for WinXP service pack I and above ) that resides in the taskbar at right appears, highlight the DWL-122. Removing the DWL-122 (Windows XP) After installing the DWL-122, the icon... below will notify you when it is safe to remove the DWL-122 from the USB port, you disengage the DWL122 from the USB port....
Product Manual
Page 14
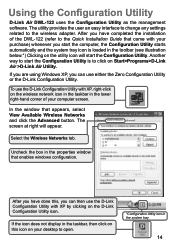
... tab. Uncheck the box in the system tray 14 In the window that enables windows configuration. After you have completed the installation of your computer screen. If you are using Windows XP, you can then use the D-Link Configuration Utility with your desktop to open. *Confi...64257;guration Utility is loaded in the lower right-hand corner of the DWL-122 (refer to the wireless adapter. If the icon does not display in the taskbar, then click on this , you can use the D-Link Configuration Utility with XP, right-click on the wireless network icon...
... tab. Uncheck the box in the system tray 14 In the window that enables windows configuration. After you have completed the installation of your computer screen. If you are using Windows XP, you can then use the D-Link Configuration Utility with your desktop to open. *Confi...64257;guration Utility is loaded in the lower right-hand corner of the DWL-122 (refer to the wireless adapter. If the icon does not display in the taskbar, then click on this , you can use the D-Link Configuration Utility with XP, right-click on the wireless network icon...

Product Manual
Page 15
...is Auto. ing in this manual for an optimal speed up to a maximum of the access point or router to which the DWL- 122 is associated Link Info SSID: The Service Set Identifier is the name assigned to the access point or router. Wireless Mode: Either ... Disabled here. Channel: The default setting is de- fault. Rescan Button: Rescans for the strongest signal with the current SSID and associates with Windows OS (continued) Status: Displays the MAC address of 11Mbps. Signal Strength: Displays the signal strength of these two modes.) Encryption: You can...
...is Auto. ing in this manual for an optimal speed up to a maximum of the access point or router to which the DWL- 122 is associated Link Info SSID: The Service Set Identifier is the name assigned to the access point or router. Wireless Mode: Either ... Disabled here. Channel: The default setting is de- fault. Rescan Button: Rescans for the strongest signal with the current SSID and associates with Windows OS (continued) Status: Displays the MAC address of 11Mbps. Signal Strength: Displays the signal strength of these two modes.) Encryption: You can...

Product Manual
Page 16
...used when connecting directly to a computer equipped with a wireless adapter in this window. Click Apply to a specific WLAN (Wireless Local Area Network) must use the same SSID. Data Encryption: Select Enabled or Disabled. the DWL-122 is visible to -Peer environment. Keys 1-4: Select the default key. Access...in a Peer-to all devices on the pull-down menu; IP Settings: When you click IP Settings in the Configuration window, the pop-up screen above will automatically adjust to the WLAN using an access point. (This is a code for representing English letters...
...used when connecting directly to a computer equipped with a wireless adapter in this window. Click Apply to a specific WLAN (Wireless Local Area Network) must use the same SSID. Data Encryption: Select Enabled or Disabled. the DWL-122 is visible to -Peer environment. Keys 1-4: Select the default key. Access...in a Peer-to all devices on the pull-down menu; IP Settings: When you click IP Settings in the Configuration window, the pop-up screen above will automatically adjust to the WLAN using an access point. (This is a code for representing English letters...
Product Manual
Page 17
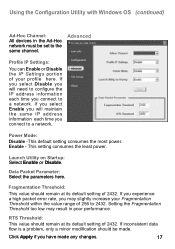
...;cation should remain at its default setting of 256 to a network. Data Packet Parameter: Select the parameters here. Using the Configuration Utility with Windows OS (continued) Ad-Hoc Channel: All devices in poor performance. Fragmentation Threshold: This value should be set to a network. If you select Disable you will...
...;cation should remain at its default setting of 256 to a network. Data Packet Parameter: Select the parameters here. Using the Configuration Utility with Windows OS (continued) Ad-Hoc Channel: All devices in poor performance. Fragmentation Threshold: This value should be set to a network. If you select Disable you will...
Product Manual
Page 18
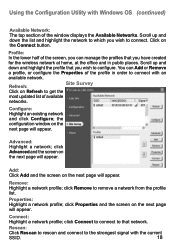
...64257;gure: Highlight an existing network and click Configure; Connect: Highlight a network profile; Using the Configuration Utility with Windows OS (continued) Available Network: The top section of the profile in public places. Advanced: Highlight a network; click Advanced and ... of the screen, you can Add or Remove a profile, or configure the Properties of the window displays the Available Networks. the configuration window on the Connect button. Remove: Highlight a network profile; click Connect to connect to configure....
...64257;gure: Highlight an existing network and click Configure; Connect: Highlight a network profile; Using the Configuration Utility with Windows OS (continued) Available Network: The top section of the profile in public places. Advanced: Highlight a network; click Advanced and ... of the screen, you can Add or Remove a profile, or configure the Properties of the window displays the Available Networks. the configuration window on the Connect button. Remove: Highlight a network profile; click Connect to connect to configure....
Product Manual
Page 19
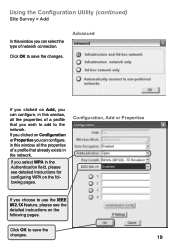
If you choose to the network. Using the Configuration Utility (continued) Site Survey > Add In this window, all the properties of network connection. Configuration, Add or Properties If you select WPA in the Authentication field, please see the detailed ... the type of a profile that already exists in the network. Advanced If you clicked on Add, you can configure, in this window, all the properties of a profile that you wish to add to use the IEEE 802.1X feature, please see detailed instructions for con...
If you choose to the network. Using the Configuration Utility (continued) Site Survey > Add In this window, all the properties of network connection. Configuration, Add or Properties If you select WPA in the Authentication field, please see the detailed ... the type of a profile that already exists in the network. Advanced If you clicked on Add, you can configure, in this window, all the properties of a profile that you wish to add to use the IEEE 802.1X feature, please see detailed instructions for con...

Product Manual
Page 20
Inner Authentication Protocol. For an explanation of the terms shown in this window please see the following : IEEE 802.1X Select Enabled. Click Authentication Config Advanced Security Settings Select the EAP Type you want to configure its settings, please do the following pages. Configure the information needed for authenticating. Trusted CA List. Click OK. 20 Using the Configuration Utility (continued) Site Survey > Configuration > 802.1X To use 802.1x and to use.
Inner Authentication Protocol. For an explanation of the terms shown in this window please see the following : IEEE 802.1X Select Enabled. Click Authentication Config Advanced Security Settings Select the EAP Type you want to configure its settings, please do the following pages. Configure the information needed for authenticating. Trusted CA List. Click OK. 20 Using the Configuration Utility (continued) Site Survey > Configuration > 802.1X To use 802.1x and to use.
Product Manual
Page 28
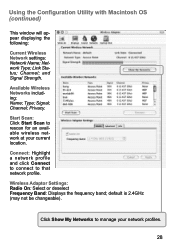
... or deselect Frequency Band: Displays the frequency band; Connect: Highlight a network profile and click Connect to connect to manage your current location. Link Status; Channel; and Signal Strength. Start Scan: Click Start Scan to rescan for an available wireless network at your network profiles....Click Show My Networks to that network profile. Using the Configuration Utility with Macintosh OS (continued) This window will appear displaying the following: Current Wireless Network settings: Network Name; default is 2.4GHz (may not be changeable). Channel;
... or deselect Frequency Band: Displays the frequency band; Connect: Highlight a network profile and click Connect to connect to manage your current location. Link Status; Channel; and Signal Strength. Start Scan: Click Start Scan to rescan for an available wireless network at your network profiles....Click Show My Networks to that network profile. Using the Configuration Utility with Macintosh OS (continued) This window will appear displaying the following: Current Wireless Network settings: Network Name; default is 2.4GHz (may not be changeable). Channel;
Product Manual
Page 32
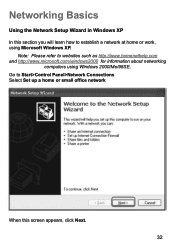
Note: Please refer to Start>Control Panel>Network Connections Select Set up a home or small office network When this section you will learn how to establish a network at home or work, using Windows 2000/Me/98SE. Go to websites such as http://www.homenethelp.com and http://www.microsoft.com/windows2000 for information about networking computers using Microsoft Windows XP. Networking Basics Using the Network Setup Wizard in Windows XP In this screen appears, click Next. 32
Note: Please refer to Start>Control Panel>Network Connections Select Set up a home or small office network When this section you will learn how to establish a network at home or work, using Windows 2000/Me/98SE. Go to websites such as http://www.homenethelp.com and http://www.microsoft.com/windows2000 for information about networking computers using Microsoft Windows XP. Networking Basics Using the Network Setup Wizard in Windows XP In this screen appears, click Next. 32

Product Manual
Page 33
Networking Basics (continued) Please follow all the instructions in this window: Click Next. Click Next. 33 In the following window, select the best description of your computer connects to the internet through a gateway/router, select the second option as shown. If your computer.
Networking Basics (continued) Please follow all the instructions in this window: Click Next. Click Next. 33 In the following window, select the best description of your computer connects to the internet through a gateway/router, select the second option as shown. If your computer.
Product Manual
Page 36
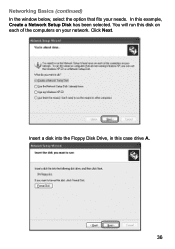
Click Next. Insert a disk into the Floppy Disk Drive, in this disk on each of the computers on your needs. You will run this case drive A. 36 Networking Basics (continued) In the window below, select the option that fits your network. In this example, Create a Network Setup Disk has been selected.
Click Next. Insert a disk into the Floppy Disk Drive, in this disk on each of the computers on your needs. You will run this case drive A. 36 Networking Basics (continued) In the window below, select the option that fits your network. In this example, Create a Network Setup Disk has been selected.
Product Manual
Page 39
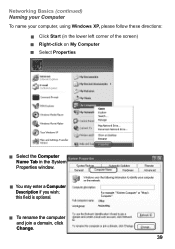
this field is optional. To rename the computer and join a domain, click Change. 39 Networking Basics (continued) Naming your Computer To name your computer, using Windows XP, please follow these directions: Click Start (in the lower left corner of the screen) Right-click on My Computer Select Properties Select the Computer Name Tab in the System Properties window. You may enter a Computer Description if you wish;
this field is optional. To rename the computer and join a domain, click Change. 39 Networking Basics (continued) Naming your Computer To name your computer, using Windows XP, please follow these directions: Click Start (in the lower left corner of the screen) Right-click on My Computer Select Properties Select the Computer Name Tab in the System Properties window. You may enter a Computer Description if you wish;
Product Manual
Page 40
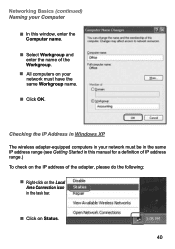
... The wireless adapter-equipped computers in your network must be in the same IP address range (see Getting Started in this window, enter the Computer name. Select Workgroup and enter the name of the adapter, please do the following: Right-click on the Local Area ...
... The wireless adapter-equipped computers in your network must be in the same IP address range (see Getting Started in this window, enter the Computer name. Select Workgroup and enter the name of the adapter, please do the following: Right-click on the Local Area ...
Product Manual
Page 41
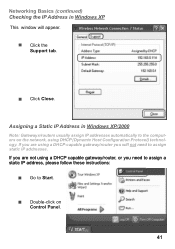
... to Start. Double-click on the network, using DHCP (Dynamic Host Configuration Protocol) technology. Networking Basics (continued) Checking the IP Address in Windows XP/2000 Note: Gateways/routers usually assign IP addresses automatically to the computers on Control Panel. 41 If you are using a DHCP capable gateway/router...
... to Start. Double-click on the network, using DHCP (Dynamic Host Configuration Protocol) technology. Networking Basics (continued) Checking the IP Address in Windows XP/2000 Note: Gateways/routers usually assign IP addresses automatically to the computers on Control Panel. 41 If you are using a DHCP capable gateway/router...
Product Manual
Page 42
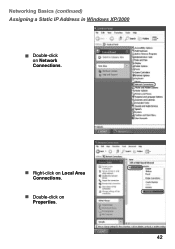
Networking Basics (continued) Assigning a Static IP Address in Windows XP/2000 Double-click on Network Connections. Right-click on Local Area Connections. Double-click on Properties. 42
Networking Basics (continued) Assigning a Static IP Address in Windows XP/2000 Double-click on Network Connections. Right-click on Local Area Connections. Double-click on Properties. 42
Product Manual
Page 43
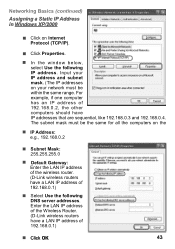
... subnet mask. (The IP addresses on your network must be within the same range. Enter the LAN IP address of the Wireless Router. (D-Link wireless routers have IP addresses that are sequential, like 192.168.0.3 and 192.168.0.4. The subnet mask must be the same for all the...192.168.0.2, the other computers should have a LAN IP address of 192.168.0.1) Click OK 43 Networking Basics (continued) Assigning a Static IP Address in Windows XP/2000 Click on the IP Address: e.g., 192.168.0.2 Subnet Mask: 255.255.255.0 Default Gateway: Enter the ...
... subnet mask. (The IP addresses on your network must be within the same range. Enter the LAN IP address of the Wireless Router. (D-Link wireless routers have IP addresses that are sequential, like 192.168.0.3 and 192.168.0.4. The subnet mask must be the same for all the...192.168.0.2, the other computers should have a LAN IP address of 192.168.0.1) Click OK 43 Networking Basics (continued) Assigning a Static IP Address in Windows XP/2000 Click on the IP Address: e.g., 192.168.0.2 Subnet Mask: 255.255.255.0 Default Gateway: Enter the ...

