
Product Manual
Page 2
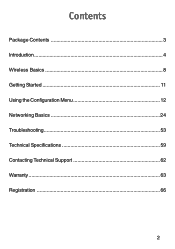
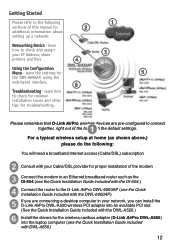
Contents Package Contents 3 Introduction 4 Wireless Basics 8 Getting Started 11 Using the Configuration Menu 12 Networking Basics 24 Troubleshooting 53 Technical Specifications 59 Contacting Technical Support 62 Warranty 63 Registration 66 2
Contents Package Contents 3 Introduction 4 Wireless Basics 8 Getting Started 11 Using the Configuration Menu 12 Networking Basics 24 Troubleshooting 53 Technical Specifications 59 Contacting Technical Support 62 Warranty 63 Registration 66 2
Product Manual
Page 3
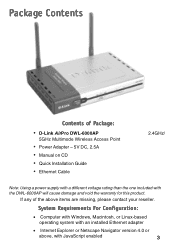
...Configuration: • Computer with Windows, Macintosh, or Linux-based operating system with an installed Ethernet adapter • Internet Explorer or Netscape Navigator version 4.0 or above items are missing, please contact your reseller. Package Contents Contents of the above , with the DWL-6000AP... will cause damage and void the warranty for this product. If any of Package: • D-Link AirPro DWL-6000AP 5GHz Multimode Wireless Access Point • Power Adapter - 5V DC, 2.5A ...
...Configuration: • Computer with Windows, Macintosh, or Linux-based operating system with an installed Ethernet adapter • Internet Explorer or Netscape Navigator version 4.0 or above items are missing, please contact your reseller. Package Contents Contents of the above , with the DWL-6000AP... will cause damage and void the warranty for this product. If any of Package: • D-Link AirPro DWL-6000AP 5GHz Multimode Wireless Access Point • Power Adapter - 5V DC, 2.5A ...
Product Manual
Page 6
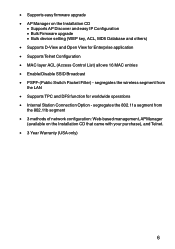
...) 6 segregates the wireless segment from the 802.11b segment • 3 methods of network configuration: Web-based management, APManager (available on the Installation CD • Supports AP Discover and easy IP Configuration • Bulk Firmware upgrade • Bulk device setting (WEP key, ACL, MD5 Database and... segregates the 802.11a segment from the LAN • Supports TPC and DFS function for Enterprise application • Supports Telnet Configuration • MAC layer ACL (Access Control List) allows 16 MAC entries • Enable/Disable SSID Broadcast • PSPF-(Public Switch Packet...
...) 6 segregates the wireless segment from the 802.11b segment • 3 methods of network configuration: Web-based management, APManager (available on the Installation CD • Supports AP Discover and easy IP Configuration • Bulk Firmware upgrade • Bulk device setting (WEP key, ACL, MD5 Database and... segregates the 802.11a segment from the LAN • Supports TPC and DFS function for Enterprise application • Supports Telnet Configuration • MAC layer ACL (Access Control List) allows 16 MAC entries • Enable/Disable SSID Broadcast • PSPF-(Public Switch Packet...
Product Manual
Page 8
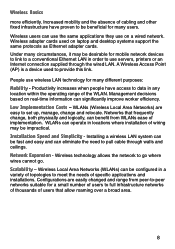
... installation of wiring may be impractical. Increased mobility and the absence of cabling and other fixed infrastructure have access to be configured in order to full infrastructure networks of thousands of users that frequently change and relocate. Management decisions based on a wired ...network. WLANs can eliminate the need to pull cable through the wired LAN. Configurations are easy to provide this link. Productivity increases when people have proven to data in any location within the operating range of implementation. People use ...
... installation of wiring may be impractical. Increased mobility and the absence of cabling and other fixed infrastructure have access to be configured in order to full infrastructure networks of thousands of users that frequently change and relocate. Management decisions based on a wired ...network. WLANs can eliminate the need to pull cable through the wired LAN. Configurations are easy to provide this link. Productivity increases when people have proven to data in any location within the operating range of implementation. People use ...
Product Manual
Page 12
...the Quick Installation Guide included with the DWL-A520.) Install the drivers for the wireless cardbus adapter (D-Link AirPro DWL-A650) into the laptop computer (see the Quick Installation Guide included with the DWL-6000AP.) If you are pre-configured to check for common installation issues and... other tips for 5 the DWL-6000AP, using the web-based interface. 6...
...the Quick Installation Guide included with the DWL-A520.) Install the drivers for the wireless cardbus adapter (D-Link AirPro DWL-A650) into the laptop computer (see the Quick Installation Guide included with the DWL-6000AP.) If you are pre-configured to check for common installation issues and... other tips for 5 the DWL-6000AP, using the web-based interface. 6...

Product Manual
Page 13
....0 (Please see Networking Basics in your network, you are not using for initial configuration must have an IP Address within the IP Address Range of the DWL-6000AP. The computer that you are using to the computer that you are using a D-Link router in this manual for information on Assigning a Static IP Address.) Factory...
....0 (Please see Networking Basics in your network, you are not using for initial configuration must have an IP Address within the IP Address Range of the DWL-6000AP. The computer that you are using to the computer that you are using a D-Link router in this manual for information on Assigning a Static IP Address.) Factory...
Product Manual
Page 14
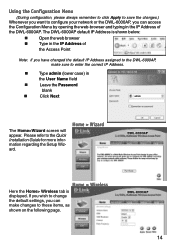
... aaddmminin The Home>Wizard screen will appear. Type admin (lower case) in the IP Address of the DWL-6000AP. The DWL-6000AP default IP Address is displayed. Using the Configuration Menu (During configuration, please always remember to click Apply to save the changes.) Whenever you want to enter the correct IP... in the IP Address of the Access Point Note: if you have changed the default IP Address assigned to the DWL-6000AP, make sure to configure your network or the DWL-6000AP, you can make changes to the Quick Installation Guide for more information regarding the Setup Wizard.
... aaddmminin The Home>Wizard screen will appear. Type admin (lower case) in the IP Address of the DWL-6000AP. The DWL-6000AP default IP Address is displayed. Using the Configuration Menu (During configuration, please always remember to click Apply to save the changes.) Whenever you want to enter the correct IP... in the IP Address of the Access Point Note: if you have changed the default IP Address assigned to the DWL-6000AP, make sure to configure your network or the DWL-6000AP, you can make changes to the Quick Installation Guide for more information regarding the Setup Wizard.
Product Manual
Page 15
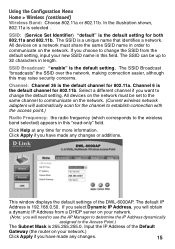
... you select Dynamic IP Address, you will obtain a dynamic IP Address from the default setting, input your new SSID name in this field. Using the Configuration Menu Home > Wireless (continued) Wireless Band: Choose 802.11a or 802.11b. If you want to change the SSID from a DHCP server on your ... the AP Manager to determine the IP Address dynamically assigned to 32 characters in this may raise security concerns. Input the IP Address of the DWL-6000AP. The SSID can be set to the same channel to communicate on the network must share the same SSID name in order to the wireless...
... you select Dynamic IP Address, you will obtain a dynamic IP Address from the default setting, input your new SSID name in this field. Using the Configuration Menu Home > Wireless (continued) Wireless Band: Choose 802.11a or 802.11b. If you want to change the SSID from a DHCP server on your ... the AP Manager to determine the IP Address dynamically assigned to 32 characters in this may raise security concerns. Input the IP Address of the DWL-6000AP. The SSID can be set to the same channel to communicate on the network must share the same SSID name in order to the wireless...
Product Manual
Page 16
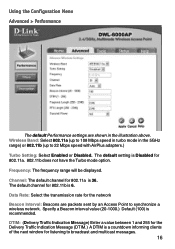
Using the Configuration Menu Advanced > Performance The default Performance settings are packets sent by an Access Point to synchronize a wireless network. DTIM: (Delivery Traffic Indication Message) Enter a value ...
Using the Configuration Menu Advanced > Performance The default Performance settings are packets sent by an Access Point to synchronize a wireless network. DTIM: (Delivery Traffic Indication Message) Enter a value ...
Product Manual
Page 17
... will be changed. If you may wish to limit the distance of 256 to the value range between 256 and 2346 are recommended. Using the Configuration Menu Fragment Length: This value should remain at its default setting of 2346. If you experience a high packet error rate, you encounter inconsistent data flow...
... will be changed. If you may wish to limit the distance of 256 to the value range between 256 and 2346 are recommended. Using the Configuration Menu Fragment Length: This value should remain at its default setting of 2346. If you experience a high packet error rate, you encounter inconsistent data flow...
Product Manual
Page 18
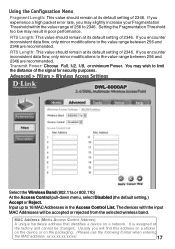
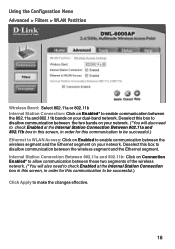
... be successful.) Ethernet to WLAN Access: Click on Enabled to enable communication between the 802.11a and 802.11b bands on your network. Using the Configuration Menu Advanced > Filters > WLAN Partition Wireless Band: Select 802.11a or 802.11b Internal Station Connection: Click on Enabled* to enable communication between the wireless...
... be successful.) Ethernet to WLAN Access: Click on Enabled to enable communication between the 802.11a and 802.11b bands on your network. Using the Configuration Menu Advanced > Filters > WLAN Partition Wireless Band: Select 802.11a or 802.11b Internal Station Connection: Click on Enabled* to enable communication between the wireless...
Product Manual
Page 19
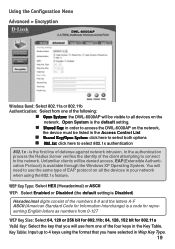
... List Shared Key/Open System: click here to select both options 802.1x: click here to use from one of the following: Open System: the DWL-6000AP will need to select 802.1x authentication 802.1x - WEP Key Type: Select HEX (Hexadecimal) or ASCII WEP: Select Enabled or Disabled (the default ... 802.1x feature. Key Table: Input up to the network. Unfamiliar clients will use the same type of EAP protocol on the network. Using the Configuration Menu Advanced > Encryption Wireless Band: Select 802.11a or 802.11b Authentication: Select from one of the four keys in the Key Table. is a ...
... List Shared Key/Open System: click here to select both options 802.1x: click here to use from one of the following: Open System: the DWL-6000AP will need to select 802.1x authentication 802.1x - WEP Key Type: Select HEX (Hexadecimal) or ASCII WEP: Select Enabled or Disabled (the default ... 802.1x feature. Key Table: Input up to the network. Unfamiliar clients will use the same type of EAP protocol on the network. Using the Configuration Menu Advanced > Encryption Wireless Band: Select 802.11a or 802.11b Authentication: Select from one of the four keys in the Key Table. is a ...
Product Manual
Page 20
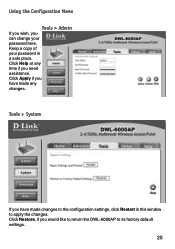
Using the Configuration Menu Tools > Admin If you wish, you have made changes to the configuration settings, click Restart in a safe place. Tools > System If you can change your password in this window to its factory default settings. 20 Click Restore, if you have made any time if you need assistance. Click Apply if you would like to return the DWL-6000AP to apply the changes. Click Help at any changes. Keep a copy of your password here.
Using the Configuration Menu Tools > Admin If you wish, you have made changes to the configuration settings, click Restart in a safe place. Tools > System If you can change your password in this window to its factory default settings. 20 Click Restore, if you have made any time if you need assistance. Click Apply if you would like to return the DWL-6000AP to apply the changes. Click Help at any changes. Keep a copy of your password here.
Product Manual
Page 21
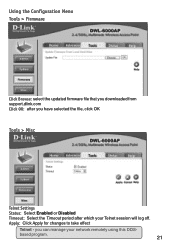
Apply: Click Apply for changes to take effect Telnet - Using the Configuration Menu Tools > Firmware Click Browse: select the updated firmware file that you downloaded from support.dlink.com Click OK: after which your network remotely using this DOSbased program. 21 you have selected the file, click OK Tools > Misc Telnet Settings Status: Select Enabled or Disabled Timeout: Select the Timeout period after you can manage your Telnet session will log off.
Apply: Click Apply for changes to take effect Telnet - Using the Configuration Menu Tools > Firmware Click Browse: select the updated firmware file that you downloaded from support.dlink.com Click OK: after which your network remotely using this DOSbased program. 21 you have selected the file, click OK Tools > Misc Telnet Settings Status: Select Enabled or Disabled Timeout: Select the Timeout period after you can manage your Telnet session will log off.
Product Manual
Page 22
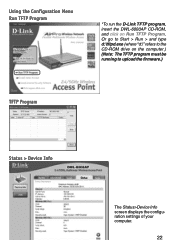
Or go to Start > Run > and type d:\tftpd.exe (where "d:\" refers to the CD-ROM drive on Run TFTP Program. Using the Configuration Menu Run TFTP Program *To run the D-Link TFTP program, insert the DWL-6000AP CD-ROM, and click on the computer.) (Note: The TFTP program must be running to upload the firmware.) TFTP Program Status > Device Info The Status>Device Info screen displays the configuration settings of your computer. 22
Or go to Start > Run > and type d:\tftpd.exe (where "d:\" refers to the CD-ROM drive on Run TFTP Program. Using the Configuration Menu Run TFTP Program *To run the D-Link TFTP program, insert the DWL-6000AP CD-ROM, and click on the computer.) (Note: The TFTP program must be running to upload the firmware.) TFTP Program Status > Device Info The Status>Device Info screen displays the configuration settings of your computer. 22
Product Manual
Page 23
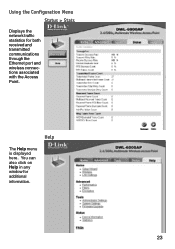
Help The Help menu is displayed here. Using the Configuration Menu Status > Stats Displays the network traffic statistics for additional information. 23 You can also click on Help in any window for both received and transmitted communications through the Ethernet port and wireless connections associated with the Access Point.
Help The Help menu is displayed here. Using the Configuration Menu Status > Stats Displays the network traffic statistics for additional information. 23 You can also click on Help in any window for both received and transmitted communications through the Ethernet port and wireless connections associated with the Access Point.
Product Manual
Page 27
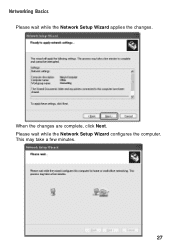
Please wait while the Network Setup Wizard configures the computer. This may take a few minutes. 27 When the changes are complete, click Next. Networking Basics Please wait while the Network Setup Wizard applies the changes.
Please wait while the Network Setup Wizard configures the computer. This may take a few minutes. 27 When the changes are complete, click Next. Networking Basics Please wait while the Network Setup Wizard applies the changes.
Product Manual
Page 30
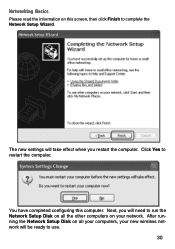
You have completed configuring this screen, then click Finish to use. 30 After running the Network Setup Disk on your new wireless network will be ready to complete the Network Setup Wizard. Next, you will take effect when you restart the computer. Click Yes to run the Network Setup Disk on all the other computers on all your computers, your network. The new settings will need to restart the computer. Networking Basics Please read the information on this computer.
You have completed configuring this screen, then click Finish to use. 30 After running the Network Setup Disk on your new wireless network will be ready to complete the Network Setup Wizard. Next, you will take effect when you restart the computer. Click Yes to run the Network Setup Disk on all the other computers on all your computers, your network. The new settings will need to restart the computer. Networking Basics Please read the information on this computer.
Product Manual
Page 33
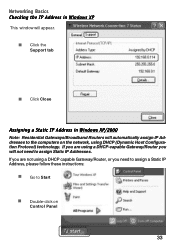
... XP/2000 Note: Residential Gateways/Broadband Routers will automatically assign IP Addresses to assign Static IP Addresses. If you are not using DHCP (Dynamic Host Configuration Protocol) technology. If you are using a DHCP-capable Gateway/Router you need to the computers on Control Panel 33 Click the Support tab Click Close...
... XP/2000 Note: Residential Gateways/Broadband Routers will automatically assign IP Addresses to assign Static IP Addresses. If you are not using DHCP (Dynamic Host Configuration Protocol) technology. If you are using a DHCP-capable Gateway/Router you need to the computers on Control Panel 33 Click the Support tab Click Close...
Product Manual
Page 36
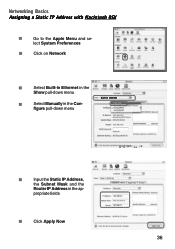
Networking Basics Assigning a Static IP Address with Macintosh OSX Go to the Apple Menu and select System Preferences cClick on Network Select Built-in Ethernet in the Show pull-down menu Select Manually in the Configure pull-down menu Built-in Ethernet Input the Static IP Address, the Subnet Mask and the Router IP Address in the appropriate fields Click Apply Now 36
Networking Basics Assigning a Static IP Address with Macintosh OSX Go to the Apple Menu and select System Preferences cClick on Network Select Built-in Ethernet in the Show pull-down menu Select Manually in the Configure pull-down menu Built-in Ethernet Input the Static IP Address, the Subnet Mask and the Router IP Address in the appropriate fields Click Apply Now 36


