

User Guide
Page 7
Touch the DEST screen button. 5. Touch the Change screen button. 6. Setting the Search Area 1. Insert the DVD map disc into the radio CD slot. 3. You will automatically be stopped to perform this operation. See page 2-21 for more details. 1-6 Overview Entering an Address, ...to the Destination menu. Touch the appropriate Search Area numbered screen button that contains the final destination you wish to turn the audio and navigation system on with a map disc inserted, push the NAV hard key. 4. Press the power/volume knob to enter. If the radio is already on . 2.
Touch the DEST screen button. 5. Touch the Change screen button. 6. Setting the Search Area 1. Insert the DVD map disc into the radio CD slot. 3. You will automatically be stopped to perform this operation. See page 2-21 for more details. 1-6 Overview Entering an Address, ...to the Destination menu. Touch the appropriate Search Area numbered screen button that contains the final destination you wish to turn the audio and navigation system on with a map disc inserted, push the NAV hard key. 4. Press the power/volume knob to enter. If the radio is already on . 2.
User Guide
Page 8
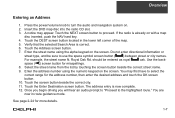
...example, the street name N. Once you begin driving you will hear an audio prompt to "Proceed to turn the audio and navigation system on with a map disc inserted, push the NAV hard key. 4. Touch the NEXT screen button to use the space symbol screen button ( ) between street or city names.... should be sure to proceed. Select the street name from the list by touching the screen button beside the correct street name. 9. Insert the DVD map disc into the radio CD slot. 3. You may appear. Royal Oak Rd. space ( ) screen button for more details. 1-7 Touch the DEST screen...
...example, the street name N. Once you begin driving you will hear an audio prompt to "Proceed to turn the audio and navigation system on with a map disc inserted, push the NAV hard key. 4. Touch the NEXT screen button to use the space symbol screen button ( ) between street or city names.... should be sure to proceed. Select the street name from the list by touching the screen button beside the correct street name. 9. Insert the DVD map disc into the radio CD slot. 3. You may appear. Royal Oak Rd. space ( ) screen button for more details. 1-7 Touch the DEST screen...
User Guide
Page 9
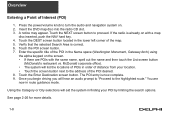
...navigation system on. 2. Touch the POI screen button. 7. A notice may appear. The POI entry is correct. 6. Using the Category or City selections will aid the system in route guidance mode. You are POIs with a map disc inserted, push the NAV hard key. 4. See page 2-26 for more details. 1-8 Insert the DVD map disc...9. Touch the Enter Destination screen button. Overview Entering a Point of the map. 5. McDonald corporate office). • The system will hear an audio prompt to "Proceed to the address of the POI desired. 8. Once you begin driving you will list the ...
...navigation system on. 2. Touch the POI screen button. 7. A notice may appear. The POI entry is correct. 6. Using the Category or City selections will aid the system in route guidance mode. You are POIs with a map disc inserted, push the NAV hard key. 4. See page 2-26 for more details. 1-8 Insert the DVD map disc...9. Touch the Enter Destination screen button. Overview Entering a Point of the map. 5. McDonald corporate office). • The system will hear an audio prompt to "Proceed to the address of the POI desired. 8. Once you begin driving you will list the ...

User Guide
Page 10
...turn the audio and navigation system on with a map disc inserted, push the NAV hard key. 3. Touch the Nav (navigation) menu screen button. 4. Touch the Address screen button and then enter all address information. 7. Press the power/volume knob to proceed. Insert the DVD map disc into the radio CD... details. Touch the Memory Points screen button. 5. Touch the Register Point screen button to turn the audio and navigation system on with a map disc inserted, push the NAV hard key. 3. Touch the Register Point screen button to proceed. Touch the NEXT screen button to store the ...
...turn the audio and navigation system on with a map disc inserted, push the NAV hard key. 3. Touch the Nav (navigation) menu screen button. 4. Touch the Address screen button and then enter all address information. 7. Press the power/volume knob to proceed. Insert the DVD map disc into the radio CD... details. Touch the Memory Points screen button. 5. Touch the Register Point screen button to turn the audio and navigation system on with a map disc inserted, push the NAV hard key. 3. Touch the Register Point screen button to proceed. Touch the NEXT screen button to store the ...

User Guide
Page 11
... one of the Destination screen. 5. Touch the DEST screen button. 4. To cancel guidance prior to turn the audio and navigation system on. 2. From the map screen, touch the Nav Options screen button. 2. Touch the Yes screen button to the highlighted route." Overview Using Your Home or Preset Destinations These ... Canceling Guidance Guidance will be canceled once you will hear an audio prompt to "Proceed to confirm cancellation. 1-10 Insert the DVD map disc into the radio CD slot. 3. Once you begin driving, or if you are already driving, you arrive at the bottom of the ...
... one of the Destination screen. 5. Touch the DEST screen button. 4. To cancel guidance prior to turn the audio and navigation system on. 2. From the map screen, touch the Nav Options screen button. 2. Touch the Yes screen button to the highlighted route." Overview Using Your Home or Preset Destinations These ... Canceling Guidance Guidance will be canceled once you will hear an audio prompt to "Proceed to confirm cancellation. 1-10 Insert the DVD map disc into the radio CD slot. 3. Once you begin driving, or if you are already driving, you arrive at the bottom of the ...
User Guide
Page 67
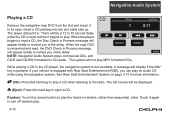
...NAV key is not available. See Rear Seat Entertainment System on page 3-15 for CD audio. NOTE: Navigation Audio System plays commercial CDs, and CD-R and CD-RW formatted for more information. (CD): Press this hard key to play a CD when listening to play the tracks in the CD player, the navigation system... will appear briefly to play. Navigation Audio System Playing a CD Remove the navigation map DVD from the slot and return it to turn off random play. 3-10 The system will be a 12 to 15 second delay while the CD is read a CD, the Disc Check in . Insert a CD partway into...
...NAV key is not available. See Rear Seat Entertainment System on page 3-15 for CD audio. NOTE: Navigation Audio System plays commercial CDs, and CD-R and CD-RW formatted for more information. (CD): Press this hard key to play a CD when listening to play the tracks in the CD player, the navigation system... will appear briefly to play. Navigation Audio System Playing a CD Remove the navigation map DVD from the slot and return it to turn off random play. 3-10 The system will be a 12 to 15 second delay while the CD is read a CD, the Disc Check in . Insert a CD partway into...

Installation Guide
Page 8
... equipped). • Install three screws. 15. Test Radio. • Make sure parking brake is set. • Start vehicle. • Turn radio On. • Load DVD Navigation Disc. • Once disc checking is in position in an open, outside area so the GPS antenna can link up to the satellites. • If the radio stations... and fuse. 8 For 2003-2006 Denali and Escalade EXT & ESV & ASP Conversion Connect Battery Negative Cable. 16. Make sure the vehicle is complete, press the "NAV" button if the navigation screen doesn't appear automatically. 14.
... equipped). • Install three screws. 15. Test Radio. • Make sure parking brake is set. • Start vehicle. • Turn radio On. • Load DVD Navigation Disc. • Once disc checking is in position in an open, outside area so the GPS antenna can link up to the satellites. • If the radio stations... and fuse. 8 For 2003-2006 Denali and Escalade EXT & ESV & ASP Conversion Connect Battery Negative Cable. 16. Make sure the vehicle is complete, press the "NAV" button if the navigation screen doesn't appear automatically. 14.

Installation Guide
Page 17
Install 30A fuse in rear, as well as amp connections and fuse. Make sure the vehicle is complete, press the "NAV" button if the navigation screen doesn't appear automatically. 17. Radio/Amp Fuse 20. For 2003-2006 Non-Class 2 Bose Amp Equipped Chevy and GMC Trucks and SUVs 17 ...Test Radio. • Make sure parking brake is set. • Start vehicle. • Turn radio On. • Load DVD Navigation Disc. • Once disc checking is in position in an open, outside area so the GPS antenna can link up to the satellites. • If the radio stations...
Install 30A fuse in rear, as well as amp connections and fuse. Make sure the vehicle is complete, press the "NAV" button if the navigation screen doesn't appear automatically. 17. Radio/Amp Fuse 20. For 2003-2006 Non-Class 2 Bose Amp Equipped Chevy and GMC Trucks and SUVs 17 ...Test Radio. • Make sure parking brake is set. • Start vehicle. • Turn radio On. • Load DVD Navigation Disc. • Once disc checking is in position in an open, outside area so the GPS antenna can link up to the satellites. • If the radio stations...

