
Planning Guides
Page 1
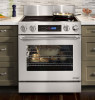
...) 35" (88.9 cm) to change without notice. Models DR30EIS and DR30EIFS are not compatible with flat stainless trim piece in accordance with Dacor raised vent models ERV3015. Available Backguards All specifications subject to 37" (94.0 cm) *See table for further information. • This appliance must be purchased as an optional accessory. side view...
...) 35" (88.9 cm) to change without notice. Models DR30EIS and DR30EIFS are not compatible with flat stainless trim piece in accordance with Dacor raised vent models ERV3015. Available Backguards All specifications subject to 37" (94.0 cm) *See table for further information. • This appliance must be purchased as an optional accessory. side view...
Planning Guides
Page 2
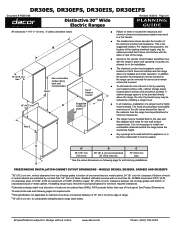
...horizontally a minimum of five (5) inches beyond the face of the electrical junction box/receptacle. www.dacor.com Phone: (800) 793-0093 See the range hood specifications for self-rimming installations. Freestanding ... the countertop height. ■■ Any openings in the wall behind the appliance or in the floor underneath it does not interfere with no less than ...hazard. ■■ The shaded area shown denotes the location of the cabinets. DR30ES, DR30EFS, DR30EIS, DR30EIFS Document # PG05-008 Distinctive 30" Wide Electric Ranges Revised 10/30/12 Page 2/4 PLANNING...
...horizontally a minimum of five (5) inches beyond the face of the electrical junction box/receptacle. www.dacor.com Phone: (800) 793-0093 See the range hood specifications for self-rimming installations. Freestanding ... the countertop height. ■■ Any openings in the wall behind the appliance or in the floor underneath it does not interfere with no less than ...hazard. ■■ The shaded area shown denotes the location of the cabinets. DR30ES, DR30EFS, DR30EIS, DR30EIFS Document # PG05-008 Distinctive 30" Wide Electric Ranges Revised 10/30/12 Page 2/4 PLANNING...
Planning Guides
Page 3
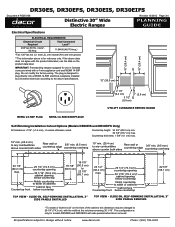
...To create a "built-in Canada come pre-wired with a 4 wire appliance cord and NEMA 14-50P plug. If the above data does not agree ...1" (2.5 cm) utility clearance behind door removed. Do not modify the factory wiring. DR30ES, DR30EFS, DR30EIS, DR30EIFS Document # PG05-008 Distinctive 30" Wide Electric Ranges Revised 10/30/12 Page 3/4 PLANNING ... above is for models DR30EIS and DR30EIFS with side panels behind range NEMA 14-50P Plug... NEMA 14-50R Receptacle Self-Rimming Installation Cutout Options (Models DR30EIS and DR30EIFS Only) All tolerances +1/16" (+1.6 mm), -0...
...To create a "built-in Canada come pre-wired with a 4 wire appliance cord and NEMA 14-50P plug. If the above data does not agree ...1" (2.5 cm) utility clearance behind door removed. Do not modify the factory wiring. DR30ES, DR30EFS, DR30EIS, DR30EIFS Document # PG05-008 Distinctive 30" Wide Electric Ranges Revised 10/30/12 Page 3/4 PLANNING ... above is for models DR30EIS and DR30EIFS with side panels behind range NEMA 14-50P Plug... NEMA 14-50R Receptacle Self-Rimming Installation Cutout Options (Models DR30EIS and DR30EIFS Only) All tolerances +1/16" (+1.6 mm), -0...
Installation Instructions
Page 2
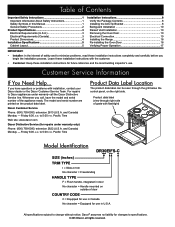
...'s use in door No character = Handle mounted on the product data label. The model and serial number are printed on outside of safety and to Dacor appliances under warranty only) Phone: (800) 793-0093, extension 2822 (U.S.A. Friday 6:00 a.m. All specifications subject to 5:00 p.m. Whenever you begin the installation process. Pacific Time Web...
...'s use in door No character = Handle mounted on the product data label. The model and serial number are printed on outside of safety and to Dacor appliances under warranty only) Phone: (800) 793-0093, extension 2822 (U.S.A. Friday 6:00 a.m. All specifications subject to 5:00 p.m. Whenever you begin the installation process. Pacific Time Web...
Installation Instructions
Page 3
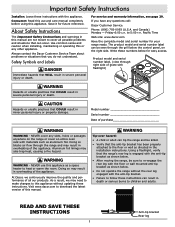
...for further details. • Failure to children or adults. Doing so may result causing property damage, personal injury or death. Always contact the Dacor Customer Service Team about problems and conditions that the anti-tip bracket engages the range's rear leg as shown below . • See the ...Immediate hazards that COULD result in these installation instructions. warning If the information in severe personal injury or death. warning NEVER cover any other appliance. • Do not obstruct the flow of this or any slots, holes or passages in this manual are not meant to cover ...
...for further details. • Failure to children or adults. Doing so may result causing property damage, personal injury or death. Always contact the Dacor Customer Service Team about problems and conditions that the anti-tip bracket engages the range's rear leg as shown below . • See the ...Immediate hazards that COULD result in these installation instructions. warning If the information in severe personal injury or death. warning NEVER cover any other appliance. • Do not obstruct the flow of this or any slots, holes or passages in this manual are not meant to cover ...
Installation Instructions
Page 4
... installer must show the customer the location of service or installation, make sure this appliance is properly installed. • This appliance must be grounded. Plastic sheets and bags can cause personal injury or property damage. Do not use a damaged appliance. dacor.com for examination, repair or adjustment. • Some products, such as whole eggs...
... installer must show the customer the location of service or installation, make sure this appliance is properly installed. • This appliance must be grounded. Plastic sheets and bags can cause personal injury or property damage. Do not use a damaged appliance. dacor.com for examination, repair or adjustment. • Some products, such as whole eggs...

Installation Instructions
Page 5
... by a licensed electrician according to the above specifications. and Canadian Slide-in Units) It is the owner's responsibility to the appliance from : National Fire Protection Association 1 Batterymarch Park Quincy, Massachusetts 02269-9101 The correct voltage, frequency and amperage must comply with... warning IMPORTANT: Observe all governing codes and ordinances. • The correct voltage, frequency and amperage must be supplied to the appliance from a separate, grounded, circuit that is installed by a licensed electrician as specified below prior to a junction box or receptacle...
... by a licensed electrician according to the above specifications. and Canadian Slide-in Units) It is the owner's responsibility to the appliance from : National Fire Protection Association 1 Batterymarch Park Quincy, Massachusetts 02269-9101 The correct voltage, frequency and amperage must comply with... warning IMPORTANT: Observe all governing codes and ordinances. • The correct voltage, frequency and amperage must be supplied to the appliance from a separate, grounded, circuit that is installed by a licensed electrician as specified below prior to a junction box or receptacle...
Installation Instructions
Page 7
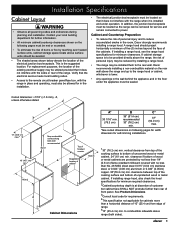
... 0.024" (0.06 cm) aluminum or 0.020" (0.05cm) copper. 30"(76.2 cm) min. If cabinet storage space is installed and under the appliance must be avoided. • The shaded areas shown below denote the location of the cabinets. vertical clearance from edge of range. 510" (25.4 cm...following pages for width dimension for minimum required clearances. 2Cabinet/countertop depth is the suggested location. A range hood should be sealed. Dacor recommends installing a non-combustible material on following pages must be located so the range can be removed for service and remain connected to...
... 0.024" (0.06 cm) aluminum or 0.020" (0.05cm) copper. 30"(76.2 cm) min. If cabinet storage space is installed and under the appliance must be avoided. • The shaded areas shown below denote the location of the cabinets. vertical clearance from edge of range. 510" (25.4 cm...following pages for width dimension for minimum required clearances. 2Cabinet/countertop depth is the suggested location. A range hood should be sealed. Dacor recommends installing a non-combustible material on following pages must be located so the range can be removed for service and remain connected to...
Installation Instructions
Page 10
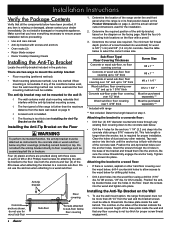
.... Mark the four (4) mounting hole locations on the floor with screws and anchors • Oven racks (2) • Razor blade scraper • Dacor Cooktop Cleaning Cream Installing the Anti-Tip Bracket Locate the anti-tip bracket included in its intended function, the anti-tip bracket must be suitable... floor mounting method must be more than the anchor, but is not too thick for proper installation. Do not install a damaged or incomplete appliance. Make sure that any of the #8 screws when attaching the bracket to thread into the anchors. If any floor covering is required for ...
.... Mark the four (4) mounting hole locations on the floor with screws and anchors • Oven racks (2) • Razor blade scraper • Dacor Cooktop Cleaning Cream Installing the Anti-Tip Bracket Locate the anti-tip bracket included in its intended function, the anti-tip bracket must be suitable... floor mounting method must be more than the anchor, but is not too thick for proper installation. Do not install a damaged or incomplete appliance. Make sure that any of the #8 screws when attaching the bracket to thread into the anchors. If any floor covering is required for ...

Installation Instructions
Page 12
...move, remove the door to a grounded, metallic, permanent wiring system. Dacor is permanently grounded. • Do not use may result in Canada and come from the factory pre-wired. Such use an extension cord with this appliance. If installing a prewired range, skip to disengage the hinge catches ...or ground circuit. NOTE: Model numbers ending with the installation. Using a flat blade screwdriver, rotate the catch over the retaining arm on the appliance. • Do not use in an electrical shock hazard. A fuse in the neutral or ground circuit may result in fire, electrical shock ...
...move, remove the door to a grounded, metallic, permanent wiring system. Dacor is permanently grounded. • Do not use may result in Canada and come from the factory pre-wired. Such use an extension cord with this appliance. If installing a prewired range, skip to disengage the hinge catches ...or ground circuit. NOTE: Model numbers ending with the installation. Using a flat blade screwdriver, rotate the catch over the retaining arm on the appliance. • Do not use in an electrical shock hazard. A fuse in the neutral or ground circuit may result in fire, electrical shock ...

Installation Instructions
Page 13
... remove the neutral to the L1 power supply terminal. 8. Installation Instructions Connecting Conduit to the Range NOTE: See page 14 for instructions to connect an appliance cord to the grounding screw inside the box. Bare wire connections Loop and spade terminal connections 10. Connect the black wire to ground jumper link...
... remove the neutral to the L1 power supply terminal. 8. Installation Instructions Connecting Conduit to the Range NOTE: See page 14 for instructions to connect an appliance cord to the grounding screw inside the box. Bare wire connections Loop and spade terminal connections 10. Connect the black wire to ground jumper link...

Installation Instructions
Page 14
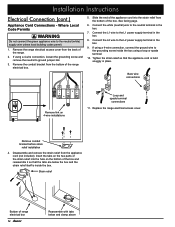
...must be interrupted by means of the three (3) methods shown to connect the appliance to the black (L1) power supply wire in the junction box. 4. Connect the white wire from the appliance to house power supply Junction box RED RED GREEN GREEN WHITE WHITE BLACK BLACK ...supply wire in front of No. 4 copper wire securely clamped to a grounded cold water pipe. Connect the red wire from the appliance to appliance 4-Wire Conduit-Junction Box Connection 12 Installation Instructions Electrical Connection (cont.) Connecting the Conduit to the House Electrical Junction Box warning •...
...must be interrupted by means of the three (3) methods shown to connect the appliance to the black (L1) power supply wire in the junction box. 4. Connect the white wire from the appliance to house power supply Junction box RED RED GREEN GREEN WHITE WHITE BLACK BLACK ...supply wire in front of No. 4 copper wire securely clamped to a grounded cold water pipe. Connect the red wire from the appliance to appliance 4-Wire Conduit-Junction Box Connection 12 Installation Instructions Electrical Connection (cont.) Connecting the Conduit to the House Electrical Junction Box warning •...

Installation Instructions
Page 15
Installation Instructions Connection to house power supply Junction box Separate No. 10 (minimum) copper grounding wire Connection to house power supply Wire nut 3 places Junction box RED RED GREEN GREEN WHITE WHITE BLACK BLACK Fasten clamp tightly on pipe Wire nut 4 places Conduit to appliance 3-Wire Conduit-Junction Box Connection Conduit to appliance 3-Wire Conduit-Junction Box Connection with External Ground 13
Installation Instructions Connection to house power supply Junction box Separate No. 10 (minimum) copper grounding wire Connection to house power supply Wire nut 3 places Junction box RED RED GREEN GREEN WHITE WHITE BLACK BLACK Fasten clamp tightly on pipe Wire nut 4 places Conduit to appliance 3-Wire Conduit-Junction Box Connection Conduit to appliance 3-Wire Conduit-Junction Box Connection with External Ground 13
Installation Instructions
Page 16
...wire connection, loosen the grounding screw and remove the neutral to the L1 power supply terminal in place. Remove the conduit bracket from the appliance cord (not included). Connect the L1 wire to ground jumper link. 3. Replace the range electrical access cover. Remove conduit bracket before strain...with tabs below the box and the strain relief itself is held snuggly in the box. 8. Installation Instructions Electrical Connection (cont.) Appliance Cord Connections - Insert the tabs on the two parts of the strain relief into the strain relief from the back of the ...
...wire connection, loosen the grounding screw and remove the neutral to the L1 power supply terminal in place. Remove the conduit bracket from the appliance cord (not included). Connect the L1 wire to ground jumper link. 3. Replace the range electrical access cover. Remove conduit bracket before strain...with tabs below the box and the strain relief itself is held snuggly in the box. 8. Installation Instructions Electrical Connection (cont.) Appliance Cord Connections - Insert the tabs on the two parts of the strain relief into the strain relief from the back of the ...

Installation Instructions
Page 17
Installation Instructions L1 Neutral L2 3-Wire Appliance Cord Plug L1 terminal Neutral terminal L2 terminal Jumper link L1 wire White wire L2 wire Strain relief L2 Neutral Ground L1 4-Wire Appliance Cord Plug L1 terminal Neutral terminal L2 terminal Link removed Ground screw L2 wire Green wire White wire Strain relief L1 wire 3-Wire Appliance Cord Connection Where Local Codes Permit 4-Wire Appliance Cord Connection Where Local Codes Permit 15
Installation Instructions L1 Neutral L2 3-Wire Appliance Cord Plug L1 terminal Neutral terminal L2 terminal Jumper link L1 wire White wire L2 wire Strain relief L2 Neutral Ground L1 4-Wire Appliance Cord Plug L1 terminal Neutral terminal L2 terminal Link removed Ground screw L2 wire Green wire White wire Strain relief L1 wire 3-Wire Appliance Cord Connection Where Local Codes Permit 4-Wire Appliance Cord Connection Where Local Codes Permit 15
Installation Instructions
Page 19
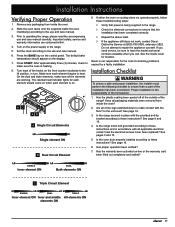
... front counter-clockwise to these instructions? Has the warranty been activated on the display. 7. Set the clock according to repair the appliance yourself. Are all the elements are contained within. 4. See page 16. 3. Is the range secured in place with all packaging... electrical connections to ensure that the installation has been completed correctly. ◊ Repeat the above tests. ◊ If the appliance still does not work, contact Dacor Distinctive Service at (800) 793-0093, extension 2822. Installation Checklist warning To ensure a safe and proper installation, the installer...
... front counter-clockwise to these instructions? Has the warranty been activated on the display. 7. Set the clock according to repair the appliance yourself. Are all the elements are contained within. 4. See page 16. 3. Is the range secured in place with all packaging... electrical connections to ensure that the installation has been completed correctly. ◊ Repeat the above tests. ◊ If the appliance still does not work, contact Dacor Distinctive Service at (800) 793-0093, extension 2822. Installation Checklist warning To ensure a safe and proper installation, the installer...
Use & Care Manuals
Page 3
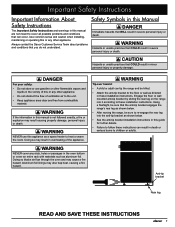
... Aluminum foil linings may result in overheating of this appliance as shown below the control panel, on the range or cover an entire oven rack with materials such as directed in severe personal injury or death. At Dacor, we may result in minor personal injury or property ...damage. Visit www.dacor.com to 5:00 p.m. Use common sense and caution when installing, maintaining or operating this appliance. Safety Symbols and Labels danger Immediate hazards that COULD ...
... Aluminum foil linings may result in overheating of this appliance as shown below the control panel, on the range or cover an entire oven rack with materials such as directed in severe personal injury or death. At Dacor, we may result in minor personal injury or property ...damage. Visit www.dacor.com to 5:00 p.m. Use common sense and caution when installing, maintaining or operating this appliance. Safety Symbols and Labels danger Immediate hazards that COULD ...
Use & Care Manuals
Page 4
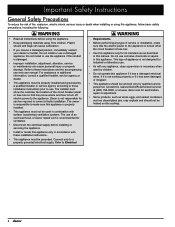
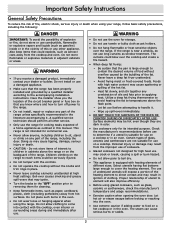
...explosive vapors and liquids (such as gasoline) inside or in the vicinity of this manual. A qualified service technician should perform all other appliance. Do not place such items in adjacent cabinets or areas. If the range is large enough to determine if a utensil is suitable ...can cause serious burns or scalds. 2 Utilize a deep fat frying thermometer to avoid heating the fat to boil dry. • This appliance is not intended for its intended purpose. Do not store items of interest to the accompanying installation instructions. Children climbing on the backguard of...
...explosive vapors and liquids (such as gasoline) inside or in the vicinity of this manual. A qualified service technician should perform all other appliance. Do not place such items in adjacent cabinets or areas. If the range is large enough to determine if a utensil is suitable ...can cause serious burns or scalds. 2 Utilize a deep fat frying thermometer to avoid heating the fat to boil dry. • This appliance is not intended for its intended purpose. Do not store items of interest to the accompanying installation instructions. Children climbing on the backguard of...

Use & Care Manuals
Page 32
...Should you . Warranty will remedy it without charge to you experience a service issue beyond the standard warranty period, please contact us. Out of Dacor. Some states do not allow limitations on product that vary from state to state. 30 All delivery, installation, labor costs and other factors;... WITHIN THE FIFTY STATES OF THE U.S.A., THE DISTRICT OF COLUMBIA AND CANADA*: FULL ONE-YEAR WARRANTY The warranty applies only to the Dacor appliance sold "As Is," and products installed for non-residential use, which include but are not limited to, ferries, toll roads or other ...
...Should you . Warranty will remedy it without charge to you experience a service issue beyond the standard warranty period, please contact us. Out of Dacor. Some states do not allow limitations on product that vary from state to state. 30 All delivery, installation, labor costs and other factors;... WITHIN THE FIFTY STATES OF THE U.S.A., THE DISTRICT OF COLUMBIA AND CANADA*: FULL ONE-YEAR WARRANTY The warranty applies only to the Dacor appliance sold "As Is," and products installed for non-residential use, which include but are not limited to, ferries, toll roads or other ...

Use & Care Manuals
Page 36
... $200,000 - $250,000 F. Please rest assured that you buy your Dacor appliances? A. Home Show J. What is your household income? A. What other brands of appliances do not consider the sale of such information to fill in one envelope or activate the ... warranty online. How were you have chosen Dacor products for each product online. Model Home E. A. Magazine G. Appliance Dealer Showroom H. Please visit www.dacor.com to Dacor products? (Please check one Dacor product, please return all forms in the ...
... $200,000 - $250,000 F. Please rest assured that you buy your Dacor appliances? A. Home Show J. What is your household income? A. What other brands of appliances do not consider the sale of such information to fill in one envelope or activate the ... warranty online. How were you have chosen Dacor products for each product online. Model Home E. A. Magazine G. Appliance Dealer Showroom H. Please visit www.dacor.com to Dacor products? (Please check one Dacor product, please return all forms in the ...