
Planning Guides
Page 1
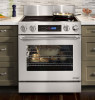
...Inch Optional on models DR30ES and DR30EFS are compatible with the accompanying installation instructions. DR30ES, DR30EFS, DR30EIS, DR30EIFS Document # PG05-008 Distinctive™ 30" Wide Electric Ranges Revised 10/30/12 Page 1/4 PLANNING GUIDE Product Dimensions All tolerances ±1/16" (±1.6 mm...This appliance must be purchased as an optional accessory. warning • Observe all models Models DR30EIS and DR30EIFS come equipped from the factory with a raised vent. www.dacor.com Phone: (800) 793-0093 The trim on all governing codes and ordinances during ...
...Inch Optional on models DR30ES and DR30EFS are compatible with the accompanying installation instructions. DR30ES, DR30EFS, DR30EIS, DR30EIFS Document # PG05-008 Distinctive™ 30" Wide Electric Ranges Revised 10/30/12 Page 1/4 PLANNING GUIDE Product Dimensions All tolerances ±1/16" (±1.6 mm...This appliance must be purchased as an optional accessory. warning • Observe all models Models DR30EIS and DR30EIFS come equipped from the factory with a raised vent. www.dacor.com Phone: (800) 793-0093 The trim on all governing codes and ordinances during ...
Planning Guides
Page 2
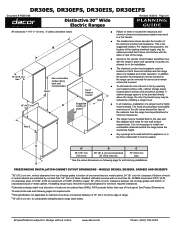
... code and following page for rear wall surface requirements. All specifications subject to bottom of range. 510" (25.4 cm) min. DR30ES, DR30EFS, DR30EIS, DR30EIFS Document # PG05-008 Distinctive 30" Wide Electric Ranges Revised 10/30/12 Page 2/4 PLANNING GUIDE All tolerances +1/16" (+1.6 mm), -0 ... sides). If installing range hood, check the hood specifications for in the installation. ■■ The electrical junction box/receptacle must be allowed for minimum required clearances. 2Cabinet/countertop depth is the suggested location. www.dacor.com Phone: (800) 793-0093...
... code and following page for rear wall surface requirements. All specifications subject to bottom of range. 510" (25.4 cm) min. DR30ES, DR30EFS, DR30EIS, DR30EIFS Document # PG05-008 Distinctive 30" Wide Electric Ranges Revised 10/30/12 Page 2/4 PLANNING GUIDE All tolerances +1/16" (+1.6 mm), -0 ... sides). If installing range hood, check the hood specifications for in the installation. ■■ The electrical junction box/receptacle must be allowed for minimum required clearances. 2Cabinet/countertop depth is the suggested location. www.dacor.com Phone: (800) 793-0093...
Planning Guides
Page 3
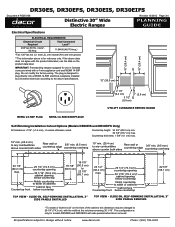
... 2 1/2" (6.4 cm) 3 1/2" (8.9 cm) 1" (2.5 cm) utility clearance behind door removed. www.dacor.com Phone: (800) 793-0093 DR30ES, DR30EFS, DR30EIS, DR30EIFS Document # PG05-008 Distinctive 30" Wide Electric Ranges Revised 10/30/12 Page 3/4 PLANNING GUIDE 10" (25.4 cm) 10" (25.4 cm) Electrical ...N1) and one ground. **This information above is for models DR30EIS and DR30EIFS with side panels behind range NEMA 14-50P Plug NEMA 14-50R Receptacle Self-Rimming Installation Cutout Options (Models DR30EIS and DR30EIFS Only) All tolerances +1/16" (+1.6 mm), -0 unless...
... 2 1/2" (6.4 cm) 3 1/2" (8.9 cm) 1" (2.5 cm) utility clearance behind door removed. www.dacor.com Phone: (800) 793-0093 DR30ES, DR30EFS, DR30EIS, DR30EIFS Document # PG05-008 Distinctive 30" Wide Electric Ranges Revised 10/30/12 Page 3/4 PLANNING GUIDE 10" (25.4 cm) 10" (25.4 cm) Electrical ...N1) and one ground. **This information above is for models DR30EIS and DR30EIFS with side panels behind range NEMA 14-50P Plug NEMA 14-50R Receptacle Self-Rimming Installation Cutout Options (Models DR30EIS and DR30EIFS Only) All tolerances +1/16" (+1.6 mm), -0 unless...
Planning Guides
Page 4
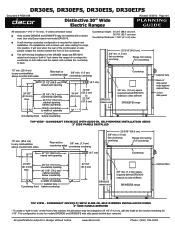
... (50.2 cm) to 22 3/4" (57.8 cm) ERV3015 raised vent 3/8" min. (1.0 cm) space required behind ERV3015 chassis to clear stiffener DR30EI[F]S range Top View - Countertop front 29 1/4" (74.3 cm) countertop opening 30 1/16" (76.2 cm) cabinet opening below countertop Notch countertop to width ...max. This configuration is required for models DR30EIS and DR30EIFS with side panels behind ERV3015 chassis to clear stiffener DR30EI[F]S range Cabinet face Top View - Countertop height: 34 3/4" (88.3 cm) min. 36 7/8" (93.7 cm) max. www.dacor.com Phone: (800) 793-0093 Downdraft...
... (50.2 cm) to 22 3/4" (57.8 cm) ERV3015 raised vent 3/8" min. (1.0 cm) space required behind ERV3015 chassis to clear stiffener DR30EI[F]S range Top View - Countertop front 29 1/4" (74.3 cm) countertop opening 30 1/16" (76.2 cm) cabinet opening below countertop Notch countertop to width ...max. This configuration is required for models DR30EIS and DR30EIFS with side panels behind ERV3015 chassis to clear stiffener DR30EI[F]S range Cabinet face Top View - Countertop height: 34 3/4" (88.3 cm) min. 36 7/8" (93.7 cm) max. www.dacor.com Phone: (800) 793-0093 Downdraft...
Installation Instructions
Page 1
Installation Instructions Distinctive™ Electric Range Models: DR30ES, DR30EIS, DR30EFS and DR30EIFS Part No. 105906 Rev. B
Installation Instructions Distinctive™ Electric Range Models: DR30ES, DR30EIS, DR30EFS and DR30EIFS Part No. 105906 Rev. B
Installation Instructions
Page 2
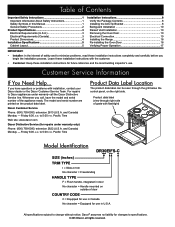
...Customer: Keep these installation instructions completely and carefully before you have the model and serial number of the appliance ready. For repairs to Dacor appliances under warranty only) Phone: (800) 793-0093, extension 2822 (U.S.A. Product data label (view through the grill below the control... the Anti-Tip Bracket 8 Backguard Installation 10 Raised Vent Installation 10 Removing the Oven Door 10 Electrical Connection 10 Installing the Range 16 Re-installing the Oven Door 16 Verifying Proper Operation 17 IMPORTANT: • Installer: In the interest of safety and to...
...Customer: Keep these installation instructions completely and carefully before you have the model and serial number of the appliance ready. For repairs to Dacor appliances under warranty only) Phone: (800) 793-0093, extension 2822 (U.S.A. Product data label (view through the grill below the control... the Anti-Tip Bracket 8 Backguard Installation 10 Raised Vent Installation 10 Removing the Oven Door 10 Electrical Connection 10 Installing the Range 16 Re-installing the Oven Door 16 Verifying Proper Operation 17 IMPORTANT: • Installer: In the interest of safety and to...
Installation Instructions
Page 3
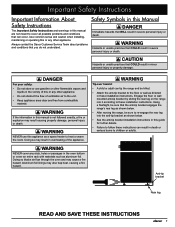
...; Failure to follow these installation instructions. danger For your safety: • Do not store or use this appliance as shown below . • After moving the range, be sure to re-engage the rear leg into it according to these installation instructions. Engage the floor or wall mounted anti-tip bracket by...Safety Instructions and warnings in this manual are not meant to cover all possible problems and conditions that you do not understand. Always contact the Dacor Customer Service Team about problems and conditions that can result in death or serious burns to children or adults.
...; Failure to follow these installation instructions. danger For your safety: • Do not store or use this appliance as shown below . • After moving the range, be sure to re-engage the rear leg into it according to these installation instructions. Engage the floor or wall mounted anti-tip bracket by...Safety Instructions and warnings in this manual are not meant to cover all possible problems and conditions that you do not understand. Always contact the Dacor Customer Service Team about problems and conditions that can result in death or serious burns to children or adults.

Installation Instructions
Page 5
... National Fire Protection Association 1 Batterymarch Park Quincy, Massachusetts 02269-9101 The correct voltage, frequency and amperage must be supplied to the range must: ◊ Meet NEMA standards and have a minimum rating of the line (L1 and L2). The electrical installation, including ... Using an appliance cord: ◊ A 4-wire appliance cord equipped with a NEMA 14-50P plug connected to the ratings on the range rating label. Product Specifications warning IMPORTANT: Observe all governing codes and ordinances. • The correct voltage, frequency and amperage must be supplied...
... National Fire Protection Association 1 Batterymarch Park Quincy, Massachusetts 02269-9101 The correct voltage, frequency and amperage must be supplied to the range must: ◊ Meet NEMA standards and have a minimum rating of the line (L1 and L2). The electrical installation, including ... Using an appliance cord: ◊ A 4-wire appliance cord equipped with a NEMA 14-50P plug connected to the ratings on the range rating label. Product Specifications warning IMPORTANT: Observe all governing codes and ordinances. • The correct voltage, frequency and amperage must be supplied...
Installation Instructions
Page 7
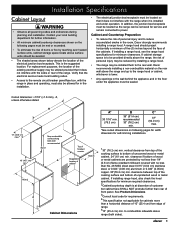
... breaker panel/fuse box, with the range when it does not interfere with the range in the floor under operation. Dacor recommends installing a non-combustible material on the rear wall above the range and up to the range hood or cabinet, whichever is to ... cm) max. *See cutout dimensions on the following pages for width dimension for in the room, Dacor strongly recommends installing a range hood. vertical clearance from edge of the range. Installation Specifications Cabinet Layout warning • Observe all governing codes and ordinances during planning and installation. ...
... breaker panel/fuse box, with the range when it does not interfere with the range in the floor under operation. Dacor recommends installing a non-combustible material on the rear wall above the range and up to the range hood or cabinet, whichever is to ... cm) max. *See cutout dimensions on the following pages for width dimension for in the room, Dacor strongly recommends installing a range hood. vertical clearance from edge of the range. Installation Specifications Cabinet Layout warning • Observe all governing codes and ordinances during planning and installation. ...

Installation Instructions
Page 8
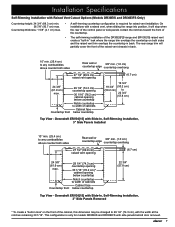
...) Countertop height: 34 3/4" (88.3 cm) min. • 36 7/8" (93.7 cm) max. The self-rimming installation of the DR30EI[F]S range creates a "built-in look where the range trim overlaps the countertop on the front of cabinets Cabinet face below countertop 19 7/8" 19 7/8" (50.5 cm) (50.5 cm) to ... width of the countertop. This configuration is only for models DR30EIS and DR30EIFS with the width at the notches remaining 30 1/16". Countertop thickness: 1 5/8" (4.1 cm) max. • On self-rimming installations when sliding the range into position, it will stop when the rear of the...
...) Countertop height: 34 3/4" (88.3 cm) min. • 36 7/8" (93.7 cm) max. The self-rimming installation of the DR30EI[F]S range creates a "built-in look where the range trim overlaps the countertop on the front of cabinets Cabinet face below countertop 19 7/8" 19 7/8" (50.5 cm) (50.5 cm) to ... width of the countertop. This configuration is only for models DR30EIS and DR30EIFS with the width at the notches remaining 30 1/16". Countertop thickness: 1 5/8" (4.1 cm) max. • On self-rimming installations when sliding the range into position, it will stop when the rear of the...
Installation Instructions
Page 9
... panels contact the notches toward the front of the countertop. • The self-rimming installation of the DR30EI[F]S range and ERV30[15] raised vent create a "built-in back. installations with Raised Vent Cutout Options (Models DR30EIS and DR30EIFS Only) Countertop height: 34 3/4" (88.3 cm) min. • A self-rimming countertop configuration is only for...
... panels contact the notches toward the front of the countertop. • The self-rimming installation of the DR30EI[F]S range and ERV30[15] raised vent create a "built-in back. installations with Raised Vent Cutout Options (Models DR30EIS and DR30EIFS Only) Countertop height: 34 3/4" (88.3 cm) min. • A self-rimming countertop configuration is only for...
Installation Instructions
Page 10
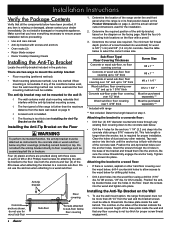
...linoleum. Installing the Anti-Tip Bracket on the floor with screws and anchors • Oven racks (2) • Razor blade scraper • Dacor Cooktop Cleaning Cream Installing the Anti-Tip Bracket Locate the anti-tip bracket included in its intended function, the anti-tip bracket must be ...(4) of #8 or #12 Phillips head screws for proper installation. Anti-tip bracket Concrete anchors shown, do not use the wall mount option, the range front panel must be purchased separately ** * Included with the top of the bracket and thread them into the concrete slab using a drill bit ...
...linoleum. Installing the Anti-Tip Bracket on the floor with screws and anchors • Oven racks (2) • Razor blade scraper • Dacor Cooktop Cleaning Cream Installing the Anti-Tip Bracket Locate the anti-tip bracket included in its intended function, the anti-tip bracket must be ...(4) of #8 or #12 Phillips head screws for proper installation. Anti-tip bracket Concrete anchors shown, do not use the wall mount option, the range front panel must be purchased separately ** * Included with the top of the bracket and thread them into the concrete slab using a drill bit ...

Installation Instructions
Page 11
...) Anchor, 4 places: use for the installation. Using a pencil, make a dot next to 26 1/4 (66.7 cm) Range front CL CL panel 2 3/16" (5.6 cm) 10 1/2" (26.3 cm) Range front panel Top View - If the bit contacts the base plate the location will support wall installation of the anti-tip...3/4" screw, 4 places Back wall Top hole, indicates bracket center line Cabinet face below countertop Anti-tip bracket front hole locations 21 3/8" (54.3 cm) Range center line CL Cabinet face below . To install the bracket, place it against the wall in the mounting location. Location of the...
...) Anchor, 4 places: use for the installation. Using a pencil, make a dot next to 26 1/4 (66.7 cm) Range front CL CL panel 2 3/16" (5.6 cm) 10 1/2" (26.3 cm) Range front panel Top View - If the bit contacts the base plate the location will support wall installation of the anti-tip...3/4" screw, 4 places Back wall Top hole, indicates bracket center line Cabinet face below countertop Anti-tip bracket front hole locations 21 3/8" (54.3 cm) Range center line CL Cabinet face below . To install the bracket, place it against the wall in the mounting location. Location of the...

Installation Instructions
Page 12
... a grounded, metallic, permanent wiring system. Before proceeding: 1. Raised Vent Installation If installing a raised vent, install it before moving the range into position. Electrical Connection warning • Before proceeding, turn on the appliance. • Do not use in the neutral or ground ...not lift or carry the oven door by the door handle. 1. Dacor is connected to do not proceed with a -C are four possible ways to about a 15° angle from improper installation. • This range must be increased slightly. Call the selling dealer or a licensed electrician...
... a grounded, metallic, permanent wiring system. Before proceeding: 1. Raised Vent Installation If installing a raised vent, install it before moving the range into position. Electrical Connection warning • Before proceeding, turn on the appliance. • Do not use in the neutral or ground ...not lift or carry the oven door by the door handle. 1. Dacor is connected to do not proceed with a -C are four possible ways to about a 15° angle from improper installation. • This range must be increased slightly. Call the selling dealer or a licensed electrician...

Installation Instructions
Page 13
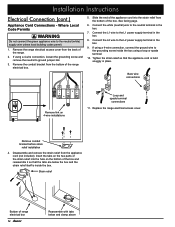
... a 4-wire connection, loosen the grounding screw and remove the neutral to the grounding screw inside the box. Connect the white wire to the range. 1. If using a 4-wire connection, connect the green wire to ground jumper link. 3. Before connecting the wires, slide the strain relief nut... over the wires and thread it onto the conduit strain relief inside the box. Replace the range electrical access cover. 3-Wire Conduit Connection Where Local Codes Permit L1 terminal Neutral terminal L2 terminal Link removed Grounding screw Red wire Green ...
... a 4-wire connection, loosen the grounding screw and remove the neutral to the grounding screw inside the box. Connect the white wire to the range. 1. If using a 4-wire connection, connect the green wire to ground jumper link. 3. Before connecting the wires, slide the strain relief nut... over the wires and thread it onto the conduit strain relief inside the box. Replace the range electrical access cover. 3-Wire Conduit Connection Where Local Codes Permit L1 terminal Neutral terminal L2 terminal Link removed Grounding screw Red wire Green ...

Installation Instructions
Page 14
... to connect the appliance to a grounded cold water pipe. If using a 4-wire connection, connect the green wire to bare metal at both ends. With the range positioned directly in the junction box. 5. Depending upon local codes, utilize one of No. 4 copper wire securely clamped to a grounded supply wire in the junction...
... to connect the appliance to a grounded cold water pipe. If using a 4-wire connection, connect the green wire to bare metal at both ends. With the range positioned directly in the junction box. 5. Depending upon local codes, utilize one of No. 4 copper wire securely clamped to a grounded supply wire in the junction...
Installation Instructions
Page 16
...end of the appliance cord into the hole on 4-wire installations Loop and spade terminal connections 11. Remove the conduit bracket from the bottom of range electrical box 14 Reassemble with tabs below the box and the strain relief itself is held snuggly in the box. 9. See facing page. ... wire to the L2 power supply terminal in place. Tighten the strain relief so that the tabs are below and clamp above Remove the range electrical access cover from the appliance cord (not included). Remove conduit bracket before strain relief installation 4. Connect the L2 wire to the L1...
...end of the appliance cord into the hole on 4-wire installations Loop and spade terminal connections 11. Remove the conduit bracket from the bottom of range electrical box 14 Reassemble with tabs below the box and the strain relief itself is held snuggly in the box. 9. See facing page. ... wire to the L2 power supply terminal in place. Tighten the strain relief so that the tabs are below and clamp above Remove the range electrical access cover from the appliance cord (not included). Remove conduit bracket before strain relief installation 4. Connect the L2 wire to the L1...

Installation Instructions
Page 18
...bottom corners of the door. Re-installing the Oven Door warning To avoid personal injury or damage to the door from freestanding installation since the range top overhangs the countertop cutout. 1. See diagram below . 5. Re-adjust the legs to level and change the height if necessary. Slide the... to open and close the door completely to ensure that it is slightly different from it at countertop height. 3. Installation Instructions Installing the Range Peel off its hinges: • Make sure that the anti-tip bracket covers the rear leg. Measure from the floor to make sure...
...bottom corners of the door. Re-installing the Oven Door warning To avoid personal injury or damage to the door from freestanding installation since the range top overhangs the countertop cutout. 1. See diagram below . 5. Re-adjust the legs to level and change the height if necessary. Slide the... to open and close the door completely to ensure that it is slightly different from it at countertop height. 3. Installation Instructions Installing the Range Peel off its hinges: • Make sure that the anti-tip bracket covers the rear leg. Measure from the floor to make sure...
Installation Instructions
Page 19
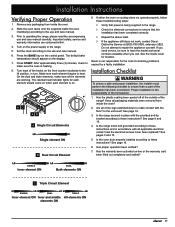
...have the model and serial numbers available when you need service, be sure to the range. 5. On the dual and triple elements, make sure all of the installation has been overlooked. Dacor is not responsible for each element should appear on -line or the warranty card been...and in turn. Has the warranty been activated on the display. 7. Remove any packaging from inside the oven chamber(s) according to operating the range, please read the accompanying use and care manual. 3. Important safety, service and warranty information are working. Turn each element begins to repair...
...have the model and serial numbers available when you need service, be sure to the range. 5. On the dual and triple elements, make sure all of the installation has been overlooked. Dacor is not responsible for each element should appear on -line or the warranty card been...and in turn. Has the warranty been activated on the display. 7. Remove any packaging from inside the oven chamber(s) according to operating the range, please read the accompanying use and care manual. 3. Important safety, service and warranty information are working. Turn each element begins to repair...
Use & Care Manuals
Page 1
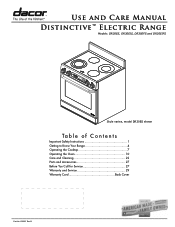
Use and Care Manual Distinctive™ Electric Range Models: DR30ES, DR30EIS, DR30EFS and DR30EIFS Style varies, model DR30ES shown Ta b le o f C o nt e nt s Important Safety Instructions 1 Getting to Know Your Range 4 Operating the Cooktop 7 Operating the Oven 10 Care and Cleaning 22 Parts and Accessories 27 Before You Call for Service 27 Warranty and Service 29 Warranty Card Back Cover Part No. 105907 Rev B
Use and Care Manual Distinctive™ Electric Range Models: DR30ES, DR30EIS, DR30EFS and DR30EIFS Style varies, model DR30ES shown Ta b le o f C o nt e nt s Important Safety Instructions 1 Getting to Know Your Range 4 Operating the Cooktop 7 Operating the Oven 10 Care and Cleaning 22 Parts and Accessories 27 Before You Call for Service 27 Warranty and Service 29 Warranty Card Back Cover Part No. 105907 Rev B


