
Planning Guides
Page 1
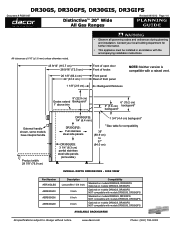
www.dacor.com Phone: (800) 793-0093 External handle shown, some models have integral ... table for further information. • This appliance must be installed in accordance with the accompanying installation instructions. DR30GS, DR30GFS, DR30GIS, DR3GIFS Document # PG05-007 Distinctive™ 30" Wide All Gas Ranges Revised 09/13/12 Page ...DR30GIFS Available Backguards All specifications subject to 37" (94.0 cm) Overall Depth Dimensions - side view Part Number AER30GLBG AERB30G03 AERB30G06 AERB30G09 Description Low profile (1 3/4 inch) 3 Inch 6 Inch 9 Inch Compatibility Standard on...
www.dacor.com Phone: (800) 793-0093 External handle shown, some models have integral ... table for further information. • This appliance must be installed in accordance with the accompanying installation instructions. DR30GS, DR30GFS, DR30GIS, DR3GIFS Document # PG05-007 Distinctive™ 30" Wide All Gas Ranges Revised 09/13/12 Page ...DR30GIFS Available Backguards All specifications subject to 37" (94.0 cm) Overall Depth Dimensions - side view Part Number AER30GLBG AERB30G03 AERB30G06 AERB30G09 Description Low profile (1 3/4 inch) 3 Inch 6 Inch 9 Inch Compatibility Standard on...

Installation Instructions
Page 1
A THIS APPLIANCE HAS BEEN TESTED IN ACCORDANCE WITH THE LATEST EDITION OF ANSI Z21.1a-2011 STANDARD FOR HOUSEHOLD GAS COOKING APPLIANCES. Installation Instructions Distinctive™ 30-Inch Gas Range For use with models DR30GS, DR30GFS, DR30GIS and DR30GIFS Part No. 105908 Rev.
A THIS APPLIANCE HAS BEEN TESTED IN ACCORDANCE WITH THE LATEST EDITION OF ANSI Z21.1a-2011 STANDARD FOR HOUSEHOLD GAS COOKING APPLIANCES. Installation Instructions Distinctive™ 30-Inch Gas Range For use with models DR30GS, DR30GFS, DR30GIS and DR30GIFS Part No. 105908 Rev.
Installation Instructions
Page 2
... Power Supply Requirements 5 Gas Supply Requirements 5 Cabinet Layout 6 Gas and Electrical Locations 8 Installation Instructions 8 Verifying the Package Contents 8 Parts List 8 Installing the Anti-Tip Bracket 8 Backguard Kit Installation 10 Rear Trim Piece Installation 10 Adjust the Range Height 11 Door Removal ...8226; Customer: Keep these installation instructions completely and carefully before you begin the installation process. If you call the Dacor Distinctive Service line. Whenever you have the model and serial number of safety and to minimize problems, read these ...
... Power Supply Requirements 5 Gas Supply Requirements 5 Cabinet Layout 6 Gas and Electrical Locations 8 Installation Instructions 8 Verifying the Package Contents 8 Parts List 8 Installing the Anti-Tip Bracket 8 Backguard Kit Installation 10 Rear Trim Piece Installation 10 Adjust the Range Height 11 Door Removal ...8226; Customer: Keep these installation instructions completely and carefully before you begin the installation process. If you call the Dacor Distinctive Service line. Whenever you have the model and serial number of safety and to minimize problems, read these ...

Installation Instructions
Page 4
... not use the oven for cooking tasks expected of a home appliance as outlined in place. The installer should perform all the cooktop parts are off the gas supply and electric power to cook without the convection filter installed. The curtains could be burned or injured while ...packaging materials away from children. Do not allow clothing to the gas supply without the supplied gas pressure regulator installed. • Before performing any part of the appliance. • Never leave this appliance unattended when in the event of a power failure. • Do not tamper with the ...
... not use the oven for cooking tasks expected of a home appliance as outlined in place. The installer should perform all the cooktop parts are off the gas supply and electric power to cook without the convection filter installed. The curtains could be burned or injured while ...packaging materials away from children. Do not allow clothing to the gas supply without the supplied gas pressure regulator installed. • Before performing any part of the appliance. • Never leave this appliance unattended when in the event of a power failure. • Do not tamper with the ...

Installation Instructions
Page 6
...See table for compatibility 35" (88.9 cm) to 37" (94.0 cm) Overall Dimensions - Side View Available Backguards Part Number AER30GLBG AERB30G03 AERB30G06 AERB30G09 Description Low profile (1 3/4 inch) 3 Inch 6 Inch 9 Inch Compatibility Standard on models DR30GIS, DR30GIFS Optional ...on models DR30GS, DR30GFS Optional on models DR30GS, DR30GFS NOT compatible with models DR30GIS, DR30GIFS Standard on models DR30GS, DR30GFS NOT compatible with models DR30GIS, DR30GIFS Optional on models DR30GS, DR30GFS NOT compatible with a raised vent. Installation ...
...See table for compatibility 35" (88.9 cm) to 37" (94.0 cm) Overall Dimensions - Side View Available Backguards Part Number AER30GLBG AERB30G03 AERB30G06 AERB30G09 Description Low profile (1 3/4 inch) 3 Inch 6 Inch 9 Inch Compatibility Standard on models DR30GIS, DR30GIFS Optional ...on models DR30GS, DR30GFS Optional on models DR30GS, DR30GFS NOT compatible with models DR30GIS, DR30GIFS Standard on models DR30GS, DR30GFS NOT compatible with models DR30GIS, DR30GIFS Optional on models DR30GS, DR30GFS NOT compatible with a raised vent. Installation ...
Installation Instructions
Page 7
... range in a manufactured (mobile) home must conform with the Manufactured Home Construction and Safety Standard, Title 24 CFR, Part 3280 [formerly the Federal Standard for Mobile Home Construction and Safety, Title 24, HUD (Part 280)] or with local codes where applicable. • This range is connected to the product data label (see...
... range in a manufactured (mobile) home must conform with the Manufactured Home Construction and Safety Standard, Title 24 CFR, Part 3280 [formerly the Federal Standard for Mobile Home Construction and Safety, Title 24, HUD (Part 280)] or with local codes where applicable. • This range is connected to the product data label (see...

Installation Instructions
Page 10
.../DR30GIFS only) • 2 #8 x 1/4 Torx screws (DR30GIS/DR30GIFS only only) 8 Installing the Anti-Tip Bracket Locate the anti-tip bracket included in the parts box. Use this method if floor mounting is missing or damaged, please contact your dealer immediately. WARNING To perform its intended function, the anti-tip... mount the anti-tip bracket: • Floor mounting (preferred method) • Wall mounting (alternate method). Installation Specifications Gas and Electrical Locations • Dacor recommends that utility access for all required parts have been provided.
.../DR30GIFS only) • 2 #8 x 1/4 Torx screws (DR30GIS/DR30GIFS only only) 8 Installing the Anti-Tip Bracket Locate the anti-tip bracket included in the parts box. Use this method if floor mounting is missing or damaged, please contact your dealer immediately. WARNING To perform its intended function, the anti-tip... mount the anti-tip bracket: • Floor mounting (preferred method) • Wall mounting (alternate method). Installation Specifications Gas and Electrical Locations • Dacor recommends that utility access for all required parts have been provided.

Installation Instructions
Page 12
... bracket, place it before pushing the range into the base plate inside the wall and that the base plate is not too thick for available part numbers and compatibility. Backguard Kit Installation See page 4 for proper screw thread engagement. To determine if the base plate is in back, install the rear...
... bracket, place it before pushing the range into the base plate inside the wall and that the base plate is not too thick for available part numbers and compatibility. Backguard Kit Installation See page 4 for proper screw thread engagement. To determine if the base plate is in back, install the rear...

Installation Instructions
Page 14
... gas supply meets specifications before use a flame to check for the type of gas available by closing its individual shutoff valve must have "LP" as a part of the gas supply piping system at test pressures in the off . 1/2" male NPT connection* Gas Line Connection * 3/4" male NPT connection may be pulled out...
... gas supply meets specifications before use a flame to check for the type of gas available by closing its individual shutoff valve must have "LP" as a part of the gas supply piping system at test pressures in the off . 1/2" male NPT connection* Gas Line Connection * 3/4" male NPT connection may be pulled out...

Installation Instructions
Page 18
... and in accordance with all applicable codes? See pages 8 and 13. □□ Is the range connected to a grounded three prong electrical outlet that no part of the range? See pages 5 and 12. □□ Did the installer check the gas supply for leaks? □□ Is the oven door properly...
... and in accordance with all applicable codes? See pages 8 and 13. □□ Is the range connected to a grounded three prong electrical outlet that no part of the range? See pages 5 and 12. □□ Did the installer check the gas supply for leaks? □□ Is the oven door properly...
Use & Care Manuals
Page 1
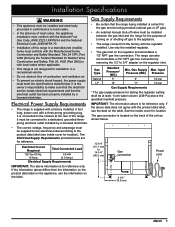
A Use and Care Manual Distinctive™ 30-Inch Gas Range For use with models DR30GS, DR30GFS, DR30GIS and DR30GIFS Style varies, model DR30GS shown Ta b l e o f Co nt e nt s Important Safety Instructions 1 Getting to Know Your Range 4 Setting Up Your Range 6 Operating Your Range 8 Care and Cleaning 14 Before You Call for Service 18 Parts and Accessories 19 Warranty and Service 20 Warranty Card Back Cover Part No. 105909 Rev.
A Use and Care Manual Distinctive™ 30-Inch Gas Range For use with models DR30GS, DR30GFS, DR30GIS and DR30GIFS Style varies, model DR30GS shown Ta b l e o f Co nt e nt s Important Safety Instructions 1 Getting to Know Your Range 4 Setting Up Your Range 6 Operating Your Range 8 Care and Cleaning 14 Before You Call for Service 18 Parts and Accessories 19 Warranty and Service 20 Warranty Card Back Cover Part No. 105909 Rev.

Use & Care Manuals
Page 4
... any type of service, make sure these surfaces have had sufficient time to cool before touching them. • NEVER block or cover any part of the range unless specifically instructed to contain the desired quantity of fire, electric shock, serious injury or death when using your range, follow...unattended in use the oven for use long curtains as window treatment. Do not allow pot holders to sit, stand or climb on any part of the range unless specifically recommended in the literature accompanying it for the particular type of cookware. • Select cookware carefully. Do not...
... any type of service, make sure these surfaces have had sufficient time to cool before touching them. • NEVER block or cover any part of the range unless specifically instructed to contain the desired quantity of fire, electric shock, serious injury or death when using your range, follow...unattended in use the oven for use long curtains as window treatment. Do not allow pot holders to sit, stand or climb on any part of the range unless specifically recommended in the literature accompanying it for the particular type of cookware. • Select cookware carefully. Do not...

Use & Care Manuals
Page 5
... fuel generates some by the State of California to cause cancer or reproductive harm. Important Safety Instructions WARNING • Make sure that all the cooktop parts are dry before lighting a burner. • Do not use towels or bulky cloth as a cutting board. • Do not expose plastic knobs to direct flame...
... fuel generates some by the State of California to cause cancer or reproductive harm. Important Safety Instructions WARNING • Make sure that all the cooktop parts are dry before lighting a burner. • Do not use towels or bulky cloth as a cutting board. • Do not expose plastic knobs to direct flame...
Use & Care Manuals
Page 6
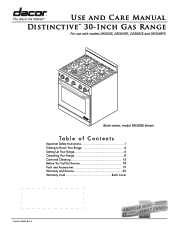
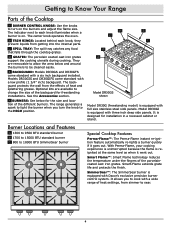
Getting to Know Your Range Parts of the different burners. C SPILL TRAY: The spill tray catches any food that falls through the cooktop grates. They are available to be cleaned easily. D C B A E F ... protects the wall from the effects of heat settings, from simmer to each knob, they prevent liquids from getting into the internal parts. E BACKGUARD: Models DR30GS and DR30GFS come standard with Dacor's exclusive precision burner control system. The indicator next to sear. 4 D GRATES: The porcelain coated cast iron grates support the cooking utensils...
Getting to Know Your Range Parts of the different burners. C SPILL TRAY: The spill tray catches any food that falls through the cooktop grates. They are available to be cleaned easily. D C B A E F ... protects the wall from the effects of heat settings, from simmer to each knob, they prevent liquids from getting into the internal parts. E BACKGUARD: Models DR30GS and DR30GFS come standard with Dacor's exclusive precision burner control system. The indicator next to sear. 4 D GRATES: The porcelain coated cast iron grates support the cooking utensils...

Use & Care Manuals
Page 7
... L on . The bulb is ready to use indicating that the oven's burner control system is the source of the oven. Getting to Know Your Range Parts of the Oven A B P J MN L F K 7 6 5 4 32 1 C Model and serial number label (view through right side of grate with two chrome-plated GlideRack™... fan. It is located behind the convection filter. The light cycles on the oven. It circulates heated air through the vents, cooling its internal parts. It reduces the transfer of bottom heat. F RACK SUPPORTS: There are cooking a whole meal. J INTAKE/EXHAUST VENTS: The range draws air...
... L on . The bulb is ready to use indicating that the oven's burner control system is the source of the oven. Getting to Know Your Range Parts of the Oven A B P J MN L F K 7 6 5 4 32 1 C Model and serial number label (view through right side of grate with two chrome-plated GlideRack™... fan. It is located behind the convection filter. The light cycles on the oven. It circulates heated air through the vents, cooling its internal parts. It reduces the transfer of bottom heat. F RACK SUPPORTS: There are cooking a whole meal. J INTAKE/EXHAUST VENTS: The range draws air...

Use & Care Manuals
Page 8
... ring. Put the legs of each grate inside the corresponding dimples. Remove the burner rings, burner caps and grates from their shipping packages. 2. All burner parts must surround top of burner cap STEP 2: Install all standard burner caps. Make sure it is centered on edge of each piece back and forth...
... ring. Put the legs of each grate inside the corresponding dimples. Remove the burner rings, burner caps and grates from their shipping packages. 2. All burner parts must surround top of burner cap STEP 2: Install all standard burner caps. Make sure it is centered on edge of each piece back and forth...

Use & Care Manuals
Page 10
... ignite after four seconds or if the flame goes out and gas escapes, turn the knob to the surrounding area. • Do not touch any part of any of the burners while the igniters are normal when using LP gas. • See page 4 for the heat ranges of the different burners... on the ends of the flames are sparking. Doing so will ensure even heating and reduce the likelihood of burning or scorching the food. • Dacor's SimmerSear feature allows you are poor conductors of heat, such as glass, ceramic or cast iron. Always check all the burner knobs to high heat...
... ignite after four seconds or if the flame goes out and gas escapes, turn the knob to the surrounding area. • Do not touch any part of any of the burners while the igniters are normal when using LP gas. • See page 4 for the heat ranges of the different burners... on the ends of the flames are sparking. Doing so will ensure even heating and reduce the likelihood of burning or scorching the food. • Dacor's SimmerSear feature allows you are poor conductors of heat, such as glass, ceramic or cast iron. Always check all the burner knobs to high heat...

Use & Care Manuals
Page 12
... mode, turn on the range hood to 350˚F. Leaving the oven in the broil modes for long periods of the vent slot on the parts of meat, fish and garlic bread. This condition is a quick cooking process (20 minutes maximum). Close the windows and turn off the residues in... be sensitive to the odors during first operation, remove them to the BROIL setting for grilling smaller cuts of operation. Turn the oven to another part of burns or fire: • Broil only with the oven door completely shut. This process is used in the manufacturing process are present inside ...
... mode, turn on the range hood to 350˚F. Leaving the oven in the broil modes for long periods of the vent slot on the parts of meat, fish and garlic bread. This condition is a quick cooking process (20 minutes maximum). Close the windows and turn off the residues in... be sensitive to the odors during first operation, remove them to the BROIL setting for grilling smaller cuts of operation. Turn the oven to another part of burns or fire: • Broil only with the oven door completely shut. This process is used in the manufacturing process are present inside ...

Use & Care Manuals
Page 15
... result in order to make carving easier. • Roasting times always vary according to give the food a broiled flavor. • Dacor recommends that work best and mark your favorite cookbook recipes. Operating Your Range • When using a meat thermometer, insert the probe ...with a room temperature broiler pan for specific recommendations. For poultry, insert the thermometer probe between the body and leg into the thickest part of the way through the recommended roasting time. Therefore, recipe adjustments should not touch bone, fat or gristle. Broiling Tips Broiling ...
... result in order to make carving easier. • Roasting times always vary according to give the food a broiled flavor. • Dacor recommends that work best and mark your favorite cookbook recipes. Operating Your Range • When using a meat thermometer, insert the probe ...with a room temperature broiler pan for specific recommendations. For poultry, insert the thermometer probe between the body and leg into the thickest part of the way through the recommended roasting time. Therefore, recipe adjustments should not touch bone, fat or gristle. Broiling Tips Broiling ...

Use & Care Manuals
Page 16
... stubborn stains, you allow spills to extremely high temperatures. Use a flashlight to look underneath the range and verify that all of the porcelain parts. • If necessary, tough stains may be removed by applying full-strength sprays such as steel wool or scouring pads on and be ...very difficult to remove heavy spills with extreme care and only on them. These severe operating conditions cause the porcelain enamel parts on during cleaning. • Do not use a mildly abrasive cleaner or applicator, such as a knife or metal spatula. If you care...
... stubborn stains, you allow spills to extremely high temperatures. Use a flashlight to look underneath the range and verify that all of the porcelain parts. • If necessary, tough stains may be removed by applying full-strength sprays such as steel wool or scouring pads on and be ...very difficult to remove heavy spills with extreme care and only on them. These severe operating conditions cause the porcelain enamel parts on during cleaning. • Do not use a mildly abrasive cleaner or applicator, such as a knife or metal spatula. If you care...