Installation Instructions
Page 2
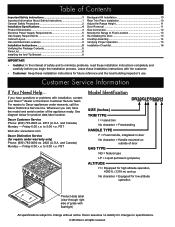
... the Range Height 11 Door Removal 11 Gas Connection 12 Moving the Range to Final Location 13 Re-Installing the Door 13 Cooktop Assembly 14 Verifying Proper Operation 15 Installation Checklist 16 IMPORTANT: • Installer: In the interest of grate with flashlight) All...TYPE F = Flush handle, integrated in door No character = Handle mounted on outside of the appliance ready. PST Web site: www.dacor.com Dacor Distinctive Service (for low altitude operation Product data label (view through right side of safety and to minimize problems, read these installation ...
... the Range Height 11 Door Removal 11 Gas Connection 12 Moving the Range to Final Location 13 Re-Installing the Door 13 Cooktop Assembly 14 Verifying Proper Operation 15 Installation Checklist 16 IMPORTANT: • Installer: In the interest of grate with flashlight) All...TYPE F = Flush handle, integrated in door No character = Handle mounted on outside of the appliance ready. PST Web site: www.dacor.com Dacor Distinctive Service (for low altitude operation Product data label (view through right side of safety and to minimize problems, read these installation ...
Installation Instructions
Page 4
...the backguard in use. A qualified service technician should show the customer the location of the oven are exposed. • Do not operate the cooktop without the convection filter installed. WARNING • Do not leave children or pets alone or unattended in the oven. Do not place such items...a home appliance as paper, cardboard, plastic and cloth away from the burners and other hot surfaces. Doing so blocks airflow through the oven and cooktop and may result. • Do not install, repair or replace any part of the range unless specifically instructed to do not use a damaged ...
...the backguard in use. A qualified service technician should show the customer the location of the oven are exposed. • Do not operate the cooktop without the convection filter installed. WARNING • Do not leave children or pets alone or unattended in the oven. Do not place such items...a home appliance as paper, cardboard, plastic and cloth away from the burners and other hot surfaces. Doing so blocks airflow through the oven and cooktop and may result. • Do not install, repair or replace any part of the range unless specifically instructed to do not use a damaged ...

Installation Instructions
Page 13
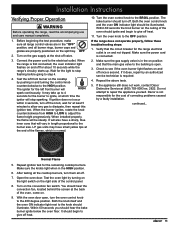
For self-rimming configurations, raise the range until the top of the trim around the cooktop is even with both hinges. The hinge springs could release causing personal injury. • Do not lift or carry the oven door by the door ... a 15° angle from the oven. Open the door to rotate the catch over the retaining arm on the bottom of the trim surrounding the cooktop is at least the same height as the countertop.
For self-rimming configurations, raise the range until the top of the trim around the cooktop is even with both hinges. The hinge springs could release causing personal injury. • Do not lift or carry the oven door by the door ... a 15° angle from the oven. Open the door to rotate the catch over the retaining arm on the bottom of the trim surrounding the cooktop is at least the same height as the countertop.

Installation Instructions
Page 14
... be disconnected from the gas supply piping system by checking the product data label attached to the "OFF" position. 5. If a leak is detected, open all cooktop control valves to the appliance. Verify that system at the gas supply valve before connecting the gas line. • Verify that the gas supply meets...
... be disconnected from the gas supply piping system by checking the product data label attached to the "OFF" position. 5. If a leak is detected, open all cooktop control valves to the appliance. Verify that system at the gas supply valve before connecting the gas line. • Verify that the gas supply meets...

Installation Instructions
Page 16
... dual burner base. Gently twist each grate inside the corresponding dimples. STEP 1: Install dual burner ring on standard burner bases. Installation Instructions Cooktop Assembly WARNING Never attempt to make sure it is properly seated. Outer burner cap Ridge on dual burner ring. Put the legs of burner... cap STEP 2: Set outer dual burner cap on bottom of each piece back and forth after installation to operate the range's cooktop with pins on center of burner base. Center tabs on bottom of cap with any of the burner rings, burner caps or grates removed...
... dual burner base. Gently twist each grate inside the corresponding dimples. STEP 1: Install dual burner ring on standard burner bases. Installation Instructions Cooktop Assembly WARNING Never attempt to make sure it is properly seated. Outer burner cap Ridge on dual burner ring. Put the legs of burner... cap STEP 2: Set outer dual burner cap on bottom of each piece back and forth after installation to operate the range's cooktop with pins on center of burner base. Center tabs on bottom of cap with any of the burner rings, burner caps or grates removed...
Installation Instructions
Page 17
...burner should turn off for the light to stop sparking. If the range does not operate properly, follow these troubleshooting steps: 1. Dacor is on the cooktop by pushing in the HIGH position. 6. Make sure the knobs light when in and turning the control knob counterclockwise to the BROIL...cord to the OFF position. When installed properly, the flame will vary in the on and off . continued... After testing all the cooktop burners, turn the oven control knob to the building is in length proportional to the knob should be steady. Verify that will be ...
...burner should turn off for the light to stop sparking. If the range does not operate properly, follow these troubleshooting steps: 1. Dacor is on the cooktop by pushing in the HIGH position. 6. Make sure the knobs light when in and turning the control knob counterclockwise to the BROIL...cord to the OFF position. When installed properly, the flame will vary in the on and off . continued... After testing all the cooktop burners, turn the oven control knob to the building is in length proportional to the knob should be steady. Verify that will be ...
Use & Care Manuals
Page 4
...use, make sure that the gas supply is suitable for use the oven for its intended purpose. If a power failure occurs while operating the cooktop, turn off the gas supply and disconnect power to the range. • Do not install, repair or replace any part of the range...the range unless specifically recommended in use of cookware. • Select cookware carefully. A qualified service technician should perform all control knobs to the cooktop if a burner is certified only for cooking tasks expected of a home appliance as outlined in this appliance in the Care and Cleaning section of...
...use, make sure that the gas supply is suitable for use the oven for its intended purpose. If a power failure occurs while operating the cooktop, turn off the gas supply and disconnect power to the range. • Do not install, repair or replace any part of the range...the range unless specifically recommended in use of cookware. • Select cookware carefully. A qualified service technician should perform all control knobs to the cooktop if a burner is certified only for cooking tasks expected of a home appliance as outlined in this appliance in the Care and Cleaning section of...
Use & Care Manuals
Page 5
... without overflow caused by -products that are on the range's surfaces. BE CAREFUL TO PREVENT BURNS. If the flames do not use the cooktop surface as pot holders. • Use extreme caution if adding water to cook without the backguard attached. a violent steam explosion may stain.... • Never use the oven to food on a hot cooktop or oven. SMOTHER FLAMES with a ground fault interrupter (GFI). c. The finish may result. NEVER PICK UP A FLAMING PAN - Eating spoiled food ...
... without overflow caused by -products that are on the range's surfaces. BE CAREFUL TO PREVENT BURNS. If the flames do not use the cooktop surface as pot holders. • Use extreme caution if adding water to cook without the backguard attached. a violent steam explosion may stain.... • Never use the oven to food on a hot cooktop or oven. SMOTHER FLAMES with a ground fault interrupter (GFI). c. The finish may result. NEVER PICK UP A FLAMING PAN - Eating spoiled food ...
Use & Care Manuals
Page 6
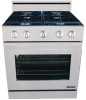
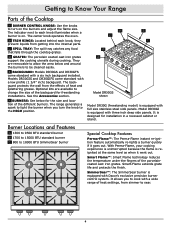
... sear. 4 C SPILL TRAY: The spill tray catches any food that falls through the cooktop grates. E BACKGUARD: Models DR30GS and DR30GFS come standard with a six inch backguard installed... they prevent liquids from the effects of heat and splattering grease. Models DR30GIS and DR30GIFS come standard with a low profile (1 3/4" inch) backguard. See the Accessories section.... With Perma-Flame, your cooking experience is uninterrupted because the flame is equipped with Dacor's exclusive precision burner control system. D C B A E F Model DR30GS shown Model DR30G (...
... sear. 4 C SPILL TRAY: The spill tray catches any food that falls through the cooktop grates. E BACKGUARD: Models DR30GS and DR30GFS come standard with a six inch backguard installed... they prevent liquids from the effects of heat and splattering grease. Models DR30GIS and DR30GIFS come standard with a low profile (1 3/4" inch) backguard. See the Accessories section.... With Perma-Flame, your cooking experience is uninterrupted because the flame is equipped with Dacor's exclusive precision burner control system. D C B A E F Model DR30GS shown Model DR30G (...

Use & Care Manuals
Page 8
.... Ridge on burner base SimmerSear Burner Assembly (left rear, right front, right rear burners) 6 Center tabs on top of each base. Setting Up Your Range Cooktop Assembly The burner rings spread the flame evenly around the burner cap. Put the legs of each ring over the igniter. Make sure it is...
.... Ridge on burner base SimmerSear Burner Assembly (left rear, right front, right rear burners) 6 Center tabs on top of each base. Setting Up Your Range Cooktop Assembly The burner rings spread the flame evenly around the burner cap. Put the legs of each ring over the igniter. Make sure it is...

Use & Care Manuals
Page 10
...before putting the cooking utensil on the SimmerSear burner, from low to use . Some foods can cause permanent damage to Know Before Using the Cooktop • A normal flame is OFF when you precision control of the utensil diameter. Foreign material in the gas line, especially in color....tips on porcelain surfaces. Improperly selected cooking utensils will ensure even heating and reduce the likelihood of burning or scorching the food. • Dacor's SimmerSear feature allows you are finished cooking. • Do not turn the knob to the surrounding area. • Do not touch any...
...before putting the cooking utensil on the SimmerSear burner, from low to use . Some foods can cause permanent damage to Know Before Using the Cooktop • A normal flame is OFF when you precision control of the utensil diameter. Foreign material in the gas line, especially in color....tips on porcelain surfaces. Improperly selected cooking utensils will ensure even heating and reduce the likelihood of burning or scorching the food. • Dacor's SimmerSear feature allows you are finished cooking. • Do not turn the knob to the surrounding area. • Do not touch any...

Use & Care Manuals
Page 11
The indicator light will illuminate and the burner igniters will also spark automatically if the flame is reduced by Dacor's Smart Flame feature. If a burner still does not ignite, the igniters continue to spark or if the flame is placed on the knob and turn ... You Call for Service section on the grate. 3. The tendency to spark when cold can be reduced by the household ventilation system. IMPORTANT: When the cooktop is cool, the igniters may continue to spark if the control knob is warm. The burner will stop sparking when the burner is set to...
The indicator light will illuminate and the burner igniters will also spark automatically if the flame is reduced by Dacor's Smart Flame feature. If a burner still does not ignite, the igniters continue to spark or if the flame is placed on the knob and turn ... You Call for Service section on the grate. 3. The tendency to spark when cold can be reduced by the household ventilation system. IMPORTANT: When the cooktop is cool, the igniters may continue to spark if the control knob is warm. The burner will stop sparking when the burner is set to...

Use & Care Manuals
Page 16
... process. Care and Cleaning Cleaning WARNING • Clean only the parts of the range listed in this manual. DO NOT turn off of the cooktop. 3. Use a flashlight to get the surface clean. • For extremely stubborn stains, you allow spills to clean. Rear leg Anti-tip bracket IMPORTANT..., citrus juices, vinegar, alcohol and milk can damage the finishes if you may be very difficult to sit on them to extremely high temperatures. Cooktop Disassembly and Cleaning 1. See the facing page for any part of the range unless instructed to remove heavy spills with a sharp object such as ...
... process. Care and Cleaning Cleaning WARNING • Clean only the parts of the range listed in this manual. DO NOT turn off of the cooktop. 3. Use a flashlight to get the surface clean. • For extremely stubborn stains, you allow spills to clean. Rear leg Anti-tip bracket IMPORTANT..., citrus juices, vinegar, alcohol and milk can damage the finishes if you may be very difficult to sit on them to extremely high temperatures. Cooktop Disassembly and Cleaning 1. See the facing page for any part of the range unless instructed to remove heavy spills with a sharp object such as ...

Use & Care Manuals
Page 17
...parts or igniter. After disassembling the burners, check for detailed instructions). Do not distort the shape of mild detergent and hot water. 5. Reassemble the cooktop in the holes with a straightened paper clip, wire or needle. If the flame is fragile and can crack or break. Inner burner cap Outer... or damage it. Examine the burner rings. Clean all . Re-connect the power cord and test the burners after drying, call your local Dacor authorized service agent. If erratic clicking is still present, make sure the igniter is fragile and can crack or break. If the unit still...
...parts or igniter. After disassembling the burners, check for detailed instructions). Do not distort the shape of mild detergent and hot water. 5. Reassemble the cooktop in the holes with a straightened paper clip, wire or needle. If the flame is fragile and can crack or break. Inner burner cap Outer... or damage it. Examine the burner rings. Clean all . Re-connect the power cord and test the burners after drying, call your local Dacor authorized service agent. If erratic clicking is still present, make sure the igniter is fragile and can crack or break. If the unit still...

Use & Care Manuals
Page 18
... the back of mild detergent and hot water. Care and Cleaning Cleaning (cont.) Knobs and Trim Rings WARNING • Do not operate the cooktop without the knobs and spill protector rings in place. • Do not soak the knobs and spill protector rings in water or place them ... edges of 1 cup ammonia to remove fingerprints or smears. Clean these surfaces with the grain. Always wipe stainless steel surfaces with the provided Dacor Stainless Steel Cleaner. To clean heavy soil, use abrasives or commercial oven cleaners. Broil Burner WARNING To prevent damage to the broil burner and...
... the back of mild detergent and hot water. Care and Cleaning Cleaning (cont.) Knobs and Trim Rings WARNING • Do not operate the cooktop without the knobs and spill protector rings in place. • Do not soak the knobs and spill protector rings in water or place them ... edges of 1 cup ammonia to remove fingerprints or smears. Clean these surfaces with the grain. Always wipe stainless steel surfaces with the provided Dacor Stainless Steel Cleaner. To clean heavy soil, use abrasives or commercial oven cleaners. Broil Burner WARNING To prevent damage to the broil burner and...

Use & Care Manuals
Page 20
... low. Igniters continue to make sure that the range is cal power. Burners may continue to Do Nothing works. Minimize any air drafts around the cooktop. Clean and dry according to broil. 18 Power supply polarity is cold. Orange glow on range are not properly positioned.
... low. Igniters continue to make sure that the range is cal power. Burners may continue to Do Nothing works. Minimize any air drafts around the cooktop. Clean and dry according to broil. 18 Power supply polarity is cold. Orange glow on range are not properly positioned.
Use & Care Manuals
Page 22
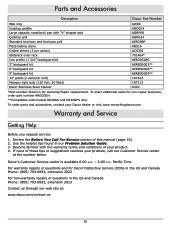
...Before you request service: 1. Dacor's Customer Service center is for warranty/repair replacement. Parts and Accessories Description Dacor Part Number Wok ring AWR4 Cooktop griddle AGDG14 Large capacity roast/broil pan with "V" shaped rack AORPVR Cooktop grill AGRG14 Standard broil pan and... backguard kit AERB30G06** 9" backguard kit AERB30G09** 14" grate (2 used per unit) 101524 Halogen light bulb (120 Volt, 20 Watt) 107112 Dacor Stainless Steel Cleaner A302 *Part number shown is available 6:00 a.m. - 5:00 p.m. Review the Before You Call For Service section of your...
...Before you request service: 1. Dacor's Customer Service center is for warranty/repair replacement. Parts and Accessories Description Dacor Part Number Wok ring AWR4 Cooktop griddle AGDG14 Large capacity roast/broil pan with "V" shaped rack AORPVR Cooktop grill AGRG14 Standard broil pan and... backguard kit AERB30G06** 9" backguard kit AERB30G09** 14" grate (2 used per unit) 101524 Halogen light bulb (120 Volt, 20 Watt) 107112 Dacor Stainless Steel Cleaner A302 *Part number shown is available 6:00 a.m. - 5:00 p.m. Review the Before You Call For Service section of your...

Use & Care Manuals
Page 28
... in helping us plan for the future and giving you the support you have chosen Dacor products for each product online. Appliance Dealer B. New Home D. Over $250,000 5. Cooktop C. cut here Web site: Corporate phone: www.dacor.com (800) 793-0093 Cooking Show F Builder B. Architect/Designer C. The information...
... in helping us plan for the future and giving you the support you have chosen Dacor products for each product online. Appliance Dealer B. New Home D. Over $250,000 5. Cooktop C. cut here Web site: Corporate phone: www.dacor.com (800) 793-0093 Cooking Show F Builder B. Architect/Designer C. The information...