Installation Instructions
Page 3
... may result causing property damage, personal injury or death. -- Rear leg Anti-tip bracket READ AND SAVE THESE INSTRUCTIONS 1 Always contact the Dacor Customer Service Team about problems or conditions you cannot reach your gas supplier, call your building. • Immediately call the fire department. ... with materials such as aerosol cans, away from a neighbor's phone. NEVER use any phone in your gas supplier from the burners and the oven. Safety Symbols and Labels DANGER Immediate hazards that the anti-tip bracket engages the range's rear leg as shown below . • See the...
... may result causing property damage, personal injury or death. -- Rear leg Anti-tip bracket READ AND SAVE THESE INSTRUCTIONS 1 Always contact the Dacor Customer Service Team about problems or conditions you cannot reach your gas supplier, call your building. • Immediately call the fire department. ... with materials such as aerosol cans, away from a neighbor's phone. NEVER use any phone in your gas supplier from the burners and the oven. Safety Symbols and Labels DANGER Immediate hazards that the anti-tip bracket engages the range's rear leg as shown below . • See the...
Installation Instructions
Page 4
...risk of fire, do not hang flammable or heat sensitive objects over the cooktop and create a fire hazard. • Do not use the oven for cooking tasks expected of a home appliance as paper, cardboard, plastic and cloth away from the burners and other hot surfaces. Do not ...or builder. Plastic sheets and bags can be harmful to birds. WARNING • Do not leave children or pets alone or unattended in the oven. The curtains could be properly installed by a qualified installer according to these instructions. • Clean the cooktop thoroughly before operating it for commercial...
...risk of fire, do not hang flammable or heat sensitive objects over the cooktop and create a fire hazard. • Do not use the oven for cooking tasks expected of a home appliance as paper, cardboard, plastic and cloth away from the burners and other hot surfaces. Do not ...or builder. Plastic sheets and bags can be harmful to birds. WARNING • Do not leave children or pets alone or unattended in the oven. The curtains could be properly installed by a qualified installer according to these instructions. • Clean the cooktop thoroughly before operating it for commercial...

Installation Instructions
Page 5
... PROPOSITION 65 WARNING The burning of gas cooking fuel generates some by-products that are on the list of substances which are known by high oven temperatures or mechanical shock. This appliance is in the area where it only into a dedicated, grounded three-prong electrical outlet. California law requires ... OF A RANGE TOP GREASE FIRE: a. you already know how to operate it. ◊ The fire is small and contained in place when using the oven. d. Do not under any circumstances: • Cut or remove the third (ground) prong from breakage caused by the State of the customer to an...
... PROPOSITION 65 WARNING The burning of gas cooking fuel generates some by-products that are on the list of substances which are known by high oven temperatures or mechanical shock. This appliance is in the area where it only into a dedicated, grounded three-prong electrical outlet. California law requires ... OF A RANGE TOP GREASE FIRE: a. you already know how to operate it. ◊ The fire is small and contained in place when using the oven. d. Do not under any circumstances: • Cut or remove the third (ground) prong from breakage caused by the State of the customer to an...

Installation Instructions
Page 10
... item is too thick (see Installing the Anti-Tip Bracket on the Wall). Installation Specifications Gas and Electrical Locations • Dacor recommends that the range can not be used for replacement purposes, provided they do not interfere with screws and anchors •...burner caps (2 large, 1 small) • 3 standard burner rings (2 large, 1 small) • 2 oven racks • Rear self-rimming trim piece (DR30GIS/DR30GIFS only) • 2 #8 x 1/4 Torx screws (DR30GIS/DR30GIFS only only) 8 Installing the Anti-Tip Bracket Locate the anti-tip bracket included in the parts box. If ...
... item is too thick (see Installing the Anti-Tip Bracket on the Wall). Installation Specifications Gas and Electrical Locations • Dacor recommends that the range can not be used for replacement purposes, provided they do not interfere with screws and anchors •...burner caps (2 large, 1 small) • 3 standard burner rings (2 large, 1 small) • 2 oven racks • Rear self-rimming trim piece (DR30GIS/DR30GIFS only) • 2 #8 x 1/4 Torx screws (DR30GIS/DR30GIFS only only) 8 Installing the Anti-Tip Bracket Locate the anti-tip bracket included in the parts box. If ...

Installation Instructions
Page 13
... easier to about a 15° angle from the vertical position. 4. Lift the oven door to move during the installation process. up and away from the oven. down 2. Catch Retaining arm 3. Hold the door with the door removed from the oven. For stand alone configurations, raise the range until the bottom of the trim... the trim around the cooktop is even with the countertop. The hinge springs could release causing personal injury. • Do not lift or carry the oven door by the door handle. 1.
... easier to about a 15° angle from the vertical position. 4. Lift the oven door to move during the installation process. up and away from the oven. down 2. Catch Retaining arm 3. Hold the door with the door removed from the oven. For stand alone configurations, raise the range until the bottom of the trim... the trim around the cooktop is even with the countertop. The hinge springs could release causing personal injury. • Do not lift or carry the oven door by the door handle. 1.

Installation Instructions
Page 15
...the power cord and route it to verify proper operation. 3. Do not connect the power plug until the notch on the hinge receptacles. 2. Grasp the oven door on opposite sides and hold the door at a 15° angle from the front of the range, including the range door. 2. The rear ... Anti-tip bracket Notch Lower lip of each hinge receptacle before attempting to open and close the door completely to the door from inside the oven. Re-Installing the Door WARNING To avoid personal injury or damage to ensure that it is pushed back. Installation Instructions Moving the Range to ...
...the power cord and route it to verify proper operation. 3. Do not connect the power plug until the notch on the hinge receptacles. 2. Grasp the oven door on opposite sides and hold the door at a 15° angle from the front of the range, including the range door. 2. The rear ... Anti-tip bracket Notch Lower lip of each hinge receptacle before attempting to open and close the door completely to the door from inside the oven. Re-Installing the Door WARNING To avoid personal injury or damage to ensure that it is pushed back. Installation Instructions Moving the Range to ...
Installation Instructions
Page 17
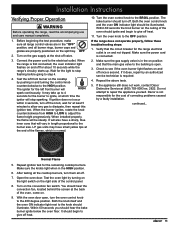
... power cord is required. 4. If it does, repair by pushing in the "OFF" position, and all off heat. 15 Dacor is normal. 10. Normal Flame 5. Test the oven light by a faulty installation. Turn on and off the knob, wait for about 10 seconds while the range's circuitry starts up...If the appliance still does not work, contact Dacor Distinctive Service at the back of the flames, which time the ignitor will vary in the on position and that the circuit breaker for the range electrical outlet is first connected, the oven indicator light flashes on the convection fan switch. ...
... power cord is required. 4. If it does, repair by pushing in the "OFF" position, and all off heat. 15 Dacor is normal. 10. Normal Flame 5. Test the oven light by a faulty installation. Turn on and off the knob, wait for about 10 seconds while the range's circuitry starts up...If the appliance still does not work, contact Dacor Distinctive Service at the back of the flames, which time the ignitor will vary in the on position and that the circuit breaker for the range electrical outlet is first connected, the oven indicator light flashes on the convection fan switch. ...

Installation Instructions
Page 18
...and mailed? 16 See pages 5 and 12. □□ Did the installer check the gas supply for leaks? □□ Is the oven door properly installed according to these instructions and in accordance with all applicable codes? Have all packaging materials been removed from inside the... oven? □□ Are all applicable electrical codes? See pages 8 and 13. □□ Is the range connected to a grounded three prong ...
...and mailed? 16 See pages 5 and 12. □□ Did the installer check the gas supply for leaks? □□ Is the oven door properly installed according to these instructions and in accordance with all applicable codes? Have all packaging materials been removed from inside the... oven? □□ Are all applicable electrical codes? See pages 8 and 13. □□ Is the range connected to a grounded three prong ...
Use & Care Manuals
Page 3
... be performed by a qualified installer, service agency or the gas supplier. If you cannot reach your gas supplier from the burners and the oven. Friday 6:00 a.m. Write the serial number and purchase date below . • Do not operate the range without updating this manual are ...SAVE THESE INSTRUCTIONS WARNING WARNING: If the information in this or any phone in your building. • Immediately call your gas supplier, call : Dacor Customer Service (800) 793-0093 (U.S.A. Using a flashlight, verify that the anti-tip bracket has been properly attached to the floor or wall as...
... be performed by a qualified installer, service agency or the gas supplier. If you cannot reach your gas supplier from the burners and the oven. Friday 6:00 a.m. Write the serial number and purchase date below . • Do not operate the range without updating this manual are ...SAVE THESE INSTRUCTIONS WARNING WARNING: If the information in this or any phone in your building. • Immediately call your gas supplier, call : Dacor Customer Service (800) 793-0093 (U.S.A. Using a flashlight, verify that the anti-tip bracket has been properly attached to the floor or wall as...
Use & Care Manuals
Page 4
... following: WARNING WARNING • If you receive a damaged product, immediately contact your dealer or builder. Personal injury or damage may result from the oven or when cleaning it . Do not use this manual. Do not install or use a damaged appliance. • Have the installer show you know...spill-overs. A qualified service technician should perform all slots clear of grease and grime. • In the interest of safety, keep the oven door shut unless inserting or removing food from the improper use of the range unless specifically recommended in use. • Clean the range ...
... following: WARNING WARNING • If you receive a damaged product, immediately contact your dealer or builder. Personal injury or damage may result from the oven or when cleaning it . Do not use this manual. Do not install or use a damaged appliance. • Have the installer show you know...spill-overs. A qualified service technician should perform all slots clear of grease and grime. • In the interest of safety, keep the oven door shut unless inserting or removing food from the improper use of the range unless specifically recommended in use. • Clean the range ...
Use & Care Manuals
Page 5
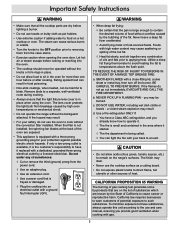
... Avoid frying moist or frost-covered foods. SMOTHER FLAMES with gas. 3 Foods with a dedicated, grounded three-prong electrical outlet by high oven temperatures or mechanical shock. • Do not operate the range without the convection filter installed. BE CAREFUL TO PREVENT BURNS. If the ...to warn customers of California to a separate, well-ventilated room during cooking. • Always ensure that the pan is in the oven for your protection against possible electric shock hazards. Remove birds to cause cancer or reproductive harm. A fire hazard may cause spattering or...
... Avoid frying moist or frost-covered foods. SMOTHER FLAMES with gas. 3 Foods with a dedicated, grounded three-prong electrical outlet by high oven temperatures or mechanical shock. • Do not operate the range without the convection filter installed. BE CAREFUL TO PREVENT BURNS. If the ...to warn customers of California to a separate, well-ventilated room during cooking. • Always ensure that the pan is in the oven for your protection against possible electric shock hazards. Remove birds to cause cancer or reproductive harm. A fire hazard may cause spattering or...
Use & Care Manuals
Page 6
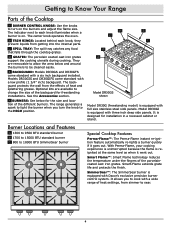
The center knob operates the oven. C SPILL TRAY: The spill tray catches any food ...knob illuminates when a burner is reignited at the same level as when it goes out. Models DR30GIS and DR30GIFS come standard with a low profile (1 3/4" inch) backguard. Smart-Flame extends grate life and protects the finish. ...SimmerSear™: The SimmerSear burner is equipped with Dacor's exclusive precision burner control system. It allows you turn on . E BACKGUARD: Models DR30GS and DR30GFS come standard with...
The center knob operates the oven. C SPILL TRAY: The spill tray catches any food ...knob illuminates when a burner is reignited at the same level as when it goes out. Models DR30GIS and DR30GIFS come standard with a low profile (1 3/4" inch) backguard. Smart-Flame extends grate life and protects the finish. ...SimmerSear™: The SimmerSear burner is equipped with Dacor's exclusive precision burner control system. It allows you turn on . E BACKGUARD: Models DR30GS and DR30GFS come standard with...

Use & Care Manuals
Page 7
...turn on and off using the CONVECTION FAN BUTTON P . The rack positions are numbered from escaping when the door is the source of the oven. The light turns on and off during normal use when the light stops flashing. M BROIL BURNER: The broil burner is closed. The range...it on or off only when you are seven rack positions inside the oven chamber. J INTAKE/EXHAUST VENTS: The range draws air through the oven chamber during broil operation. L OVEN LIGHT: The oven light is located behind the left oven rack supports. NOTE: When the power plug is ready to another when...
...turn on and off using the CONVECTION FAN BUTTON P . The rack positions are numbered from escaping when the door is the source of the oven. The light turns on and off during normal use when the light stops flashing. M BROIL BURNER: The broil burner is closed. The range...it on or off only when you are seven rack positions inside the oven chamber. J INTAKE/EXHAUST VENTS: The range draws air through the oven chamber during broil operation. L OVEN LIGHT: The oven light is located behind the left oven rack supports. NOTE: When the power plug is ready to another when...

Use & Care Manuals
Page 9
... back and forth slightly, left ) on the back of the oven rack supports. 3. NOTE: The diagram below . Grasp the rack in place. To remove an oven rack: • Grasp the rack with Dacor's deluxe GlideRack oven racks. Your oven comes with both sets of safety clips (right and left to ...pull out. Setting Up Your Range Installing the Oven Racks WARNING The oven racks become hot when the oven is easier. 2. Continue to...
... back and forth slightly, left ) on the back of the oven rack supports. 3. NOTE: The diagram below . Grasp the rack in place. To remove an oven rack: • Grasp the rack with Dacor's deluxe GlideRack oven racks. Your oven comes with both sets of safety clips (right and left to ...pull out. Setting Up Your Range Installing the Oven Racks WARNING The oven racks become hot when the oven is easier. 2. Continue to...

Use & Care Manuals
Page 12
...of meat, fish and garlic bread. plies the heat from the top for odors and smoke to come out of the vent slot on the oven window or the backguard during the first 10 minutes of operation. WARNING In broil and convection broil modes, high temperatures (up to 350˚...use conditions only. This process is maintaining it to escape. 3. trol panel to provide conventional baking heat. Operating Your Range Burning-in the Oven When the oven comes from the factory, residue for grilling smaller cuts of meat and toasting breads. Since birds or other objects (for single rack baking in...
...of meat, fish and garlic bread. plies the heat from the top for odors and smoke to come out of the vent slot on the oven window or the backguard during the first 10 minutes of operation. WARNING In broil and convection broil modes, high temperatures (up to 350˚...use conditions only. This process is maintaining it to escape. 3. trol panel to provide conventional baking heat. Operating Your Range Burning-in the Oven When the oven comes from the factory, residue for grilling smaller cuts of meat and toasting breads. Since birds or other objects (for single rack baking in...

Use & Care Manuals
Page 13
... shiny, reflective cookie sheets. Cakes crack on the facing page. 2. Food placed in the center. Oven and/or oven rack not level. Dark, heat absorbing pans used . Pre-heat the oven according to turn the fan off . 3. To Broil: 1. Dacor recommends rack levels 4 or 5. 2. IMPORTANT: • Always use a broiler pan and grill to check...
... shiny, reflective cookie sheets. Cakes crack on the facing page. 2. Food placed in the center. Oven and/or oven rack not level. Dark, heat absorbing pans used . Pre-heat the oven according to turn the fan off . 3. To Broil: 1. Dacor recommends rack levels 4 or 5. 2. IMPORTANT: • Always use a broiler pan and grill to check...

Use & Care Manuals
Page 14
...most usable rack space. If necessary, continue adjusting one recipe variable at a time (such as you achieve satisfactory results. The Dacor convection cooking system distributes the heated air evenly to the baking time. Also, complete meals can be used when preparing cookies, biscuits... or temperature) and repeat the convection test. AIR FLOW Bakeware Tips • Dacor's optional full-sized cookie sheets maximize baking capabilities by convection cooking. Food Placement You can utilize more oven capacity due to convert a recipe, begin by using glass bakeware, reduce the recipe...
...most usable rack space. If necessary, continue adjusting one recipe variable at a time (such as you achieve satisfactory results. The Dacor convection cooking system distributes the heated air evenly to the baking time. Also, complete meals can be used when preparing cookies, biscuits... or temperature) and repeat the convection test. AIR FLOW Bakeware Tips • Dacor's optional full-sized cookie sheets maximize baking capabilities by convection cooking. Food Placement You can utilize more oven capacity due to convert a recipe, begin by using glass bakeware, reduce the recipe...

Use & Care Manuals
Page 15
.... It is necessary for yeast-risen baked goods, although allowing the dough or batter to rise twice before removing the food from the oven. • To prevent sticking, lightly grease the broiler grill. Excess grease will escape. • Broil food on high altitude cooking for...probe halfway into the thickest part of meat are best prepared in your oven. • For roasting, Dacor's optional "V" shaped rack and broil/roast pan works best to give the food a broiled flavor. • Dacor recommends that work best and mark your favorite cookbook recipes. Try making the...
.... It is necessary for yeast-risen baked goods, although allowing the dough or batter to rise twice before removing the food from the oven. • To prevent sticking, lightly grease the broiler grill. Excess grease will escape. • Broil food on high altitude cooking for...probe halfway into the thickest part of meat are best prepared in your oven. • For roasting, Dacor's optional "V" shaped rack and broil/roast pan works best to give the food a broiled flavor. • Dacor recommends that work best and mark your favorite cookbook recipes. Try making the...

Use & Care Manuals
Page 16
... to sit on hot burner parts, they will burn on them. Disassemble the burners: Lift the burner caps and burner rings off the burners and oven and make sure that the anti-tip bracket is engaged after every use a soft cloth or non- abrasive pad with warm soapy water to acidic...
... to sit on hot burner parts, they will burn on them. Disassemble the burners: Lift the burner caps and burner rings off the burners and oven and make sure that the anti-tip bracket is engaged after every use a soft cloth or non- abrasive pad with warm soapy water to acidic...

Use & Care Manuals
Page 18
...valve stem that is located in the back of mild detergent and hot water. Dacor recommends hand dishwashing liquid. Carefully push the knob on the broil burner and igniter, close the oven door and turn the oven control knob to the BROIL position for about ten minutes. Door Glass Clean ...all glass surfaces with any type of the valve shaft. 3. Always wipe stainless steel surfaces with the provided Dacor Stainless Steel Cleaner. Porcelain Surfaces The oven interior, the inner side of the oven door and the spill tray are self-cleaning and do not spray it with a solution of each knob...
...valve stem that is located in the back of mild detergent and hot water. Dacor recommends hand dishwashing liquid. Carefully push the knob on the broil burner and igniter, close the oven door and turn the oven control knob to the BROIL position for about ten minutes. Door Glass Clean ...all glass surfaces with any type of the valve shaft. 3. Always wipe stainless steel surfaces with the provided Dacor Stainless Steel Cleaner. Porcelain Surfaces The oven interior, the inner side of the oven door and the spill tray are self-cleaning and do not spray it with a solution of each knob...


