
Planning Guides
Page 1
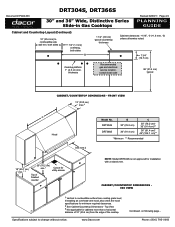
... Combustible rear wall 2 1/2" (6.4 cm) min. Cabinet and Countertop Layout Installation of cooktop to combustible wall is less than 2 1/2" (Figure 2). When installing a backguard, use only Dacor model numbers AEB3009 (DRT304S), AEB3609 or AEB3612 (DRT366S). to combustible rear wall COOKTOP WIDTH (A) DRT304S 29 7/8" (75.9 cm) DRT366S 35 7/8" (91.1 cm) 28 1/8" (71.4 cm) 25 7/8" (65.7 cm) 1 5/8" (4.1 cm) cooking...
... Combustible rear wall 2 1/2" (6.4 cm) min. Cabinet and Countertop Layout Installation of cooktop to combustible wall is less than 2 1/2" (Figure 2). When installing a backguard, use only Dacor model numbers AEB3009 (DRT304S), AEB3609 or AEB3612 (DRT366S). to combustible rear wall COOKTOP WIDTH (A) DRT304S 29 7/8" (75.9 cm) DRT366S 35 7/8" (91.1 cm) 28 1/8" (71.4 cm) 25 7/8" (65.7 cm) 1 5/8" (4.1 cm) cooking...
Planning Guides
Page 2
... 2 Model No. DRT304S DRT366S B 30" (76.2 cm) 36" (91.4 cm) C 30" (76.2 cm)* 36" (91.4 cm)** 36" (91.4 cm)* 42" (106.7 cm)** * Minimum ** Recommended 18" (45.7 cm) min.1, 3 30" (76.2 cm) min.1 Top of 10" (25.4 cm) from cooktop grate level; www.Dacor.com Continued. Phone: ...(800) 7943-.010593 Document # PG04-003 DRT304S, DRT366S 30" and 36" Wide, Distinctive Series Slide-in Gas Cooktops Revised 02/03/11 Page 2/4 PLANNING GUIDE Cabinet and Countertop Layout (Continued) 10"...
... 2 Model No. DRT304S DRT366S B 30" (76.2 cm) 36" (91.4 cm) C 30" (76.2 cm)* 36" (91.4 cm)** 36" (91.4 cm)* 42" (106.7 cm)** * Minimum ** Recommended 18" (45.7 cm) min.1, 3 30" (76.2 cm) min.1 Top of 10" (25.4 cm) from cooktop grate level; www.Dacor.com Continued. Phone: ...(800) 7943-.010593 Document # PG04-003 DRT304S, DRT366S 30" and 36" Wide, Distinctive Series Slide-in Gas Cooktops Revised 02/03/11 Page 2/4 PLANNING GUIDE Cabinet and Countertop Layout (Continued) 10"...

Planning Guides
Page 3
... cm) 1" (2.5 cm) D D CL Cabinet face below countertop overhang B Cabinet/Countertop Cutout Dimensions without notice. DRT304S DRT366S B - Top View Model No. Cutout Width 30" (76.2 cm) 36" (91.4 cm) D 13 3/8" (....5 cm) 3/8" (1.3 cm) countertop overhang Gas/electrical utility cut-out in Gas Cooktops Revised 02/03/11 Page 3/4 PLANNING GUIDE Cabinet and Countertop Layout (Continued) Cutout...electrical are routed through bottom 10" (25.4 cm) min. Document # PG04-003 DRT304S, DRT366S 30" and 36" Wide, Distinctive Series Slide-in right rear corner of chassis Increase countertop...
... cm) 1" (2.5 cm) D D CL Cabinet face below countertop overhang B Cabinet/Countertop Cutout Dimensions without notice. DRT304S DRT366S B - Top View Model No. Cutout Width 30" (76.2 cm) 36" (91.4 cm) D 13 3/8" (....5 cm) 3/8" (1.3 cm) countertop overhang Gas/electrical utility cut-out in Gas Cooktops Revised 02/03/11 Page 3/4 PLANNING GUIDE Cabinet and Countertop Layout (Continued) Cutout...electrical are routed through bottom 10" (25.4 cm) min. Document # PG04-003 DRT304S, DRT366S 30" and 36" Wide, Distinctive Series Slide-in right rear corner of chassis Increase countertop...

Planning Guides
Page 4
... behind cutout Stiffener 28 5/16" (71.9 cm) Countertop DRT366 cooktop 3/8" min. (1.0 cm) space behind raised vent chassis to change without notice. Raised vent is not approved for hold down bolts 1/2" (1.3 cm) countertop overhang Countertop Countertop Cabinet/Countertop Cutout Dimensions with raised vent - www.Dacor.com Phone: (800) 7943-.010793 to below countertop overhang...
... behind cutout Stiffener 28 5/16" (71.9 cm) Countertop DRT366 cooktop 3/8" min. (1.0 cm) space behind raised vent chassis to change without notice. Raised vent is not approved for hold down bolts 1/2" (1.3 cm) countertop overhang Countertop Countertop Cabinet/Countertop Cutout Dimensions with raised vent - www.Dacor.com Phone: (800) 7943-.010793 to below countertop overhang...
Installation Instructions
Page 1
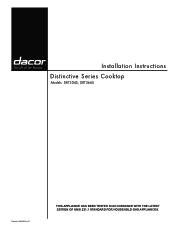
E THIS APPLIANCE HAS BEEN TESTED IN ACCORDANCE WITH THE LATEST EDITION OF ANSI Z21.1 STANDARD FOR HOUSEHOLD GAS APPLIANCES. Installation Instructions Distinctive Series Cooktop Models: DRT304S, DRT366S Part No. 106522 Rev.
E THIS APPLIANCE HAS BEEN TESTED IN ACCORDANCE WITH THE LATEST EDITION OF ANSI Z21.1 STANDARD FOR HOUSEHOLD GAS APPLIANCES. Installation Instructions Distinctive Series Cooktop Models: DRT304S, DRT366S Part No. 106522 Rev.
Installation Instructions
Page 2
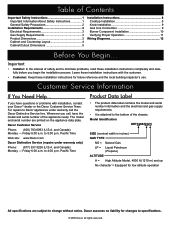
... the bottom of safety and to specifications. © 2009 Dacor, all rights reserved. to change without notice. Friday 6:00 a.m. Dacor Customer Service Phone: (800) 793-0093 (U.S.A. Model Identification DRT366S/NG/H SIZE (nominal width in inches) GAS TYPE NG... Requirements 3 Gas Supply Requirements 3 Product Dimensions 3 Cabinet and Countertop Layout 4 Cabinet/Cutout Dimensions 5 Installation Instructions 8 Cooktop Installation 8 Knob Installation 9 Gas Line Connection 9 Burner Component Installation 10 Verifying Proper Operation 11 Wiring Diagrams 12 Before You...
... the bottom of safety and to specifications. © 2009 Dacor, all rights reserved. to change without notice. Friday 6:00 a.m. Dacor Customer Service Phone: (800) 793-0093 (U.S.A. Model Identification DRT366S/NG/H SIZE (nominal width in inches) GAS TYPE NG... Requirements 3 Gas Supply Requirements 3 Product Dimensions 3 Cabinet and Countertop Layout 4 Cabinet/Cutout Dimensions 5 Installation Instructions 8 Cooktop Installation 8 Knob Installation 9 Gas Line Connection 9 Burner Component Installation 10 Verifying Proper Operation 11 Wiring Diagrams 12 Before You...

Installation Instructions
Page 3
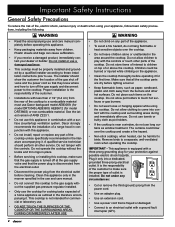
...and overheating of potential exposure to the use any other appliance. NEVER cover any other appliance. • Always contact the Dacor Customer Service Team about problems and conditions that can fight the fire with gas. California law requires businesses to warn customers of... Safety Instructions • The Important Safety Instructions and warnings in this manual are known by -products that are on the cooktop and cooktop chassis. See Customer Service Information. caution Hazards or unsafe practices that WILL result in minor personal injury or property damage. DANGER...
...and overheating of potential exposure to the use any other appliance. NEVER cover any other appliance. • Always contact the Dacor Customer Service Team about problems and conditions that can fight the fire with gas. California law requires businesses to warn customers of... Safety Instructions • The Important Safety Instructions and warnings in this manual are known by -products that are on the cooktop and cooktop chassis. See Customer Service Information. caution Hazards or unsafe practices that WILL result in minor personal injury or property damage. DANGER...
Installation Instructions
Page 4
...cooktop. IMPORTANT - Do not store items of interest to use long curtains as paper, cardboard, plastic and cloth away from children. The curtains could be burned or injured while climbing on top of outlet is the responsibility of the customer. • Installations with a three prong grounding plug for model DRT366S... Read the accompanying use . • DO NOT TOUCH THE SURFACES OF THE COOKTOP OR THE SURROUNDING AREAS DURING OR IMMEDIATELY AFTER USE. • Do not climb on the cooktop. Dacor strongly recommends the installation of a range hood in conjunction with the controls or ...
...cooktop. IMPORTANT - Do not store items of interest to use long curtains as paper, cardboard, plastic and cloth away from children. The curtains could be burned or injured while climbing on top of outlet is the responsibility of the customer. • Installations with a three prong grounding plug for model DRT366S... Read the accompanying use . • DO NOT TOUCH THE SURFACES OF THE COOKTOP OR THE SURROUNDING AREAS DURING OR IMMEDIATELY AFTER USE. • Do not climb on the cooktop. Dacor strongly recommends the installation of a range hood in conjunction with the controls or ...
Installation Instructions
Page 5
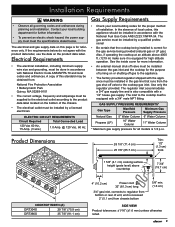
...* Maximum gas supply pressure for the gas service being provided (natural gas or LP gas). Also, if operating the cooktop at an altitude above countertop 7 3/4" (19.7 cm) A COOKTOP WIDTH (A) DRT304S 29 7/8" (75.9 cm) DRT366S 35 7/8" (91.1 cm) 4" (10.2 cm) Power cord 32" (81.3 cm) long 3/4" gas inlet,... The electrical outlet must be done in accordance with the product data label, use the data on or shutting off valve to the cooktop itself is also compatible with National Electric Code ANSI/NFPA 70 and local codes and ordinances. The regulator inlet accommodates a 3/4" gas ...
...* Maximum gas supply pressure for the gas service being provided (natural gas or LP gas). Also, if operating the cooktop at an altitude above countertop 7 3/4" (19.7 cm) A COOKTOP WIDTH (A) DRT304S 29 7/8" (75.9 cm) DRT366S 35 7/8" (91.1 cm) 4" (10.2 cm) Power cord 32" (81.3 cm) long 3/4" gas inlet,... The electrical outlet must be done in accordance with the product data label, use the data on or shutting off valve to the cooktop itself is also compatible with National Electric Code ANSI/NFPA 70 and local codes and ordinances. The regulator inlet accommodates a 3/4" gas ...
Installation Instructions
Page 6
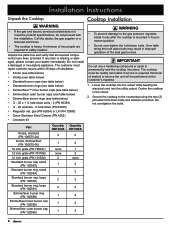
... 2 1/2" FIGURE 2 • Carefully check the location where the cooktop is less than 2 1/2" (Figure 2). When installing a backguard, use only Dacor model numbers AEB3009 (for model DRT304S), AEB3609, AEB3612 (for model DRT366S). * Consult local codes and ordinances for minimum corner radius, reinforcement ... outlet. 4 If installing another appliance in the room, Dacor strongly recommends installing a range hood. to combustible rear wall FIGURE 1 Combustible rear wall Backguard mandatory if gap from the cooktop is to help avoid cracking. Consult the countertop manufacturer's instructions...
... 2 1/2" FIGURE 2 • Carefully check the location where the cooktop is less than 2 1/2" (Figure 2). When installing a backguard, use only Dacor model numbers AEB3009 (for model DRT304S), AEB3609, AEB3612 (for model DRT366S). * Consult local codes and ordinances for minimum corner radius, reinforcement ... outlet. 4 If installing another appliance in the room, Dacor strongly recommends installing a range hood. to combustible rear wall FIGURE 1 Combustible rear wall Backguard mandatory if gap from the cooktop is to help avoid cracking. Consult the countertop manufacturer's instructions...

Installation Instructions
Page 7
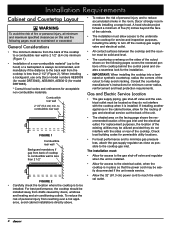
... a raised vent. Top View 3 Not applicable for cabinets more than a horizontal distance of 10" (25.4 cm) from cooktop grate level; Continued on following pages... 5 both sides 1/2" (1.3 cm) overhang, both sides B 1 1/2" (3.8 cm) typical countertop thickness 7 3/4" (19.7 cm...Cabinet/Countertop Dimensions ISO View 1 Vertical to combustible side wall min. Front View 13" (33.0 cm) max.3 C Hood See note 2 Cooktop Model B C DRT304S 30" (76.2 cm) 30" (76.2 cm)* 36" (91.4 cm)** DRT366S 36" (91.4 cm) 36" (91.4 cm)* 42" (106.7 cm)** * Minimum ** Recommended 18" (45.7 cm) min.1, ...
... a raised vent. Top View 3 Not applicable for cabinets more than a horizontal distance of 10" (25.4 cm) from cooktop grate level; Continued on following pages... 5 both sides 1/2" (1.3 cm) overhang, both sides B 1 1/2" (3.8 cm) typical countertop thickness 7 3/4" (19.7 cm...Cabinet/Countertop Dimensions ISO View 1 Vertical to combustible side wall min. Front View 13" (33.0 cm) max.3 C Hood See note 2 Cooktop Model B C DRT304S 30" (76.2 cm) 30" (76.2 cm)* 36" (91.4 cm)** DRT366S 36" (91.4 cm) 36" (91.4 cm)* 42" (106.7 cm)** * Minimum ** Recommended 18" (45.7 cm) min.1, ...
Installation Instructions
Page 8
Top View Cooktop Model DRT304S DRT366S B - Raised Vent Cutout NA 33 1/2" (85.1 cm) Approved Raised Vent Models None* ERV3615** * Model DRT304 is not compatible with DRT cooktops having a serial number starting with a raised vent. ** Use only raised vent model specified. for hold down bolts 1" thick mounting platform min. 2" (5.1 cm) 1" (2.5 cm) D D CL Cabinet ...
Top View Cooktop Model DRT304S DRT366S B - Raised Vent Cutout NA 33 1/2" (85.1 cm) Approved Raised Vent Models None* ERV3615** * Model DRT304 is not compatible with DRT cooktops having a serial number starting with a raised vent. ** Use only raised vent model specified. for hold down bolts 1" thick mounting platform min. 2" (5.1 cm) 1" (2.5 cm) D D CL Cabinet ...

Installation Instructions
Page 9
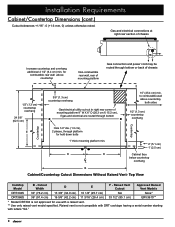
Cabinet/Countertop Cutout Dimensions With Raised Vent- Side View 7 to clear stiffener Use Dacor raised vent, model ERV3615 only 28 5/16" (71.9 cm) Countertop DRT366 cooktop Control panel Cabinet face IMPORTANT: See raised vent installation instructions for duct system layout/planning Minimum countertop height: 30 1/4" (76.8 cm) Cabinet/...gas and electrical connections 1" (2.5 cm) thick mounting platform min. Installation Requirements 2 5/8" (6.7 cm) 3/8" (1.0 cm) min. Hole 1/2" dia. (1.3 cm), 2 places, through the bottom of the cooktop when installed with a raised vent.
Cabinet/Countertop Cutout Dimensions With Raised Vent- Side View 7 to clear stiffener Use Dacor raised vent, model ERV3615 only 28 5/16" (71.9 cm) Countertop DRT366 cooktop Control panel Cabinet face IMPORTANT: See raised vent installation instructions for duct system layout/planning Minimum countertop height: 30 1/4" (76.8 cm) Cabinet/...gas and electrical connections 1" (2.5 cm) thick mounting platform min. Installation Requirements 2 5/8" (6.7 cm) 3/8" (1.0 cm) min. Hole 1/2" dia. (1.3 cm), 2 places, through the bottom of the cooktop when installed with a raised vent.
Installation Instructions
Page 10
...) SimmerSear outer burner cap (PN 102586) Quantity DRT304S 3 1 none none 2 1 1 2 2 1 1 1 Quantity DRT366S 4 2 1 2 none 2 2 2 2 2 2 2 8 If any item is heavy. The cooktop must report cosmetic issues within 30 days of sealant to the gas pressure regulator, install it . A minimum of the dual gas...8226; ¼ - 20 washers - 2 hold down (PN 83203) • Regulator nat. gas (PN 62834) or LP (PN 72980) • Dacor Stainless Steel Cleaner (PN A302) • Literature kit WARNING • To prevent damage to service the unit will be readily removable if service is mounted...
...) SimmerSear outer burner cap (PN 102586) Quantity DRT304S 3 1 none none 2 1 1 2 2 1 1 1 Quantity DRT366S 4 2 1 2 none 2 2 2 2 2 2 2 8 If any item is heavy. The cooktop must report cosmetic issues within 30 days of sealant to the gas pressure regulator, install it . A minimum of the dual gas...8226; ¼ - 20 washers - 2 hold down (PN 83203) • Regulator nat. gas (PN 62834) or LP (PN 72980) • Dacor Stainless Steel Cleaner (PN A302) • Literature kit WARNING • To prevent damage to service the unit will be readily removable if service is mounted...
Installation Instructions
Page 11
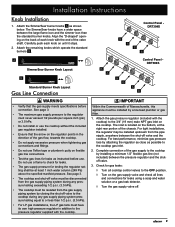
... the shut-off valve must be disconnected from the gas supply piping system during any pressure testing exceeding 1/2 p.s.i. (3.5 kPa). • The cooktop must have a wider space between the large flame icon and the simmer icon than 1/2 p.s.i. (3.5 kPa). • For LP gas installations,... shut-off valve and the cooktop. Check for gas leaks: ◊ Turn all cooktop control valves to the cooktop gas inlet. 2. The SimmerSear knobs have its own high-pressure regulator in the direction of the valve shaft. B A B B Control Panel DRT366S A B important Within the Commonwealth of ...
... the shut-off valve must be disconnected from the gas supply piping system during any pressure testing exceeding 1/2 p.s.i. (3.5 kPa). • The cooktop must have a wider space between the large flame icon and the simmer icon than 1/2 p.s.i. (3.5 kPa). • For LP gas installations,... shut-off valve and the cooktop. Check for gas leaks: ◊ Turn all cooktop control valves to the cooktop gas inlet. 2. The SimmerSear knobs have its own high-pressure regulator in the direction of the valve shaft. B A B B Control Panel DRT366S A B important Within the Commonwealth of ...

Installation Instructions
Page 12
...edge of the SimmerSear burner base(s). Put the hole on the center of the burner parts removed. • Do not attempt to operate the cooktop with any of the SimmerSear burner base(s). Make sure that the rubber feet are two different sizes. Install the SimmerSear burner ring(s) on the ... Burner Assembly 1. Set the outer SimmerSear burner cap(s) on top. 3. Install the standard burner rings on top of the spill trays. On model DRT366S, the center grate is centered on top of burner cap Hole in the center of the burner base. Grate Installation Gently set the grates on...
...edge of the SimmerSear burner base(s). Put the hole on the center of the burner parts removed. • Do not attempt to operate the cooktop with any of the SimmerSear burner base(s). Make sure that the rubber feet are two different sizes. Install the SimmerSear burner ring(s) on the ... Burner Assembly 1. Set the outer SimmerSear burner cap(s) on top. 3. Install the standard burner rings on top of the spill trays. On model DRT366S, the center grate is centered on top of burner cap Hole in the center of the burner base. Grate Installation Gently set the grates on...
Installation Instructions
Page 13
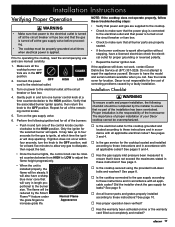
... warning To ensure a safe and proper installation, the following ignition test for all applicable codes? See page 9. □□ Are all the cooktop burner con- See page 10. □□ Has proper operation been verified? □□ Has the warranty been activated on the gas supply...length proportional to have a licensed electrician check the electrical outlet for location. The importance of proper installation of your Dacor cooktop cannot be overemphasized. □□ Is the electrical outlet for the gas to these instructions? See page 3. □□ Is...
... warning To ensure a safe and proper installation, the following ignition test for all applicable codes? See page 9. □□ Are all the cooktop burner con- See page 10. □□ Has proper operation been verified? □□ Has the warranty been activated on the gas supply...length proportional to have a licensed electrician check the electrical outlet for location. The importance of proper installation of your Dacor cooktop cannot be overemphasized. □□ Is the electrical outlet for the gas to these instructions? See page 3. □□ Is...
Use & Care Manuals
Page 1
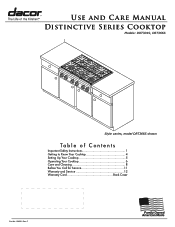
C Use and Care Manual Distinctive Series Cooktop Models: DRT304S, DRT366S Style varies, model DRT366S shown Ta b le o f C o nt e nt s Important Safety Instructions 1 Getting to Know Your Cooktop 4 Setting Up Your Cooktop 5 Operating Your Cooktop 6 Care and Cleaning 8 Before You Call for Service 11 Warranty and Service 12 Warranty Card Back Cover Part No. 106521 Rev.
C Use and Care Manual Distinctive Series Cooktop Models: DRT304S, DRT366S Style varies, model DRT366S shown Ta b le o f C o nt e nt s Important Safety Instructions 1 Getting to Know Your Cooktop 4 Setting Up Your Cooktop 5 Operating Your Cooktop 6 Care and Cleaning 8 Before You Call for Service 11 Warranty and Service 12 Warranty Card Back Cover Part No. 106521 Rev.
Use & Care Manuals
Page 3
...fire department. California law requires businesses to warn customers of the chassis. and Canada) Monday - The numbers are on the cooktop or cooktop chassis. Also keep items that are found on a label on the under side of potential exposure to cause cancer or ...explosive materials in adjacent cabinets or areas. Doing so blocks air flow through the cooktop and may also trap heat, causing a fire hazard. Model number Serial number Date of purchase Since Dacor continuously improves the quality and performance of your building. • From a neighbor...
...fire department. California law requires businesses to warn customers of the chassis. and Canada) Monday - The numbers are on the cooktop or cooktop chassis. Also keep items that are found on a label on the under side of potential exposure to cause cancer or ...explosive materials in adjacent cabinets or areas. Doing so blocks air flow through the cooktop and may also trap heat, causing a fire hazard. Model number Serial number Date of purchase Since Dacor continuously improves the quality and performance of your building. • From a neighbor...
Use & Care Manuals
Page 4
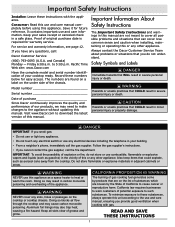
... Safety Instructions General Safety Precautions To reduce the risk of the cooktop to a combustible vertical surface must use Dacor backguard model AEB3009 (for model DRT304S), AEB3609, AEB3612 (for model DRT366S) or a non-combustible material. • Make sure that the cooktop has been properly installed and grounded by a qualified installer according to the accompanying installation...
... Safety Instructions General Safety Precautions To reduce the risk of the cooktop to a combustible vertical surface must use Dacor backguard model AEB3009 (for model DRT304S), AEB3609, AEB3612 (for model DRT366S) or a non-combustible material. • Make sure that the cooktop has been properly installed and grounded by a qualified installer according to the accompanying installation...


