
Planning Guides
Page 1
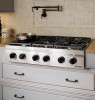
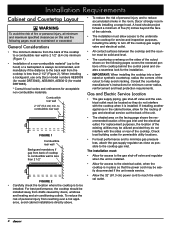
...unit, end is recessed 2" (5.1 cm) from the cooktop is 1/2 p.s.i. www.Dacor.com Phone: (800) 7943-.010493 When installing a backguard, use only Dacor model numbers AEB3009 (DRT304S), AEB3609 or AEB3612 (DRT366S). Product Dimensions Electrical and Gas Supply Requirements ELECTRIC CIRCUIT REQUIREMENTS Circuit Required Total Connected.... to regulator from bottom or rear of cooktop to combustible wall is less than 2 1/2" (Figure 2). Document # PG04-003 DRT304S, DRT366S 30" and 36" Wide, Distinctive Series Slide-in accordance with the accompanying installation instructions.
...unit, end is recessed 2" (5.1 cm) from the cooktop is 1/2 p.s.i. www.Dacor.com Phone: (800) 7943-.010493 When installing a backguard, use only Dacor model numbers AEB3009 (DRT304S), AEB3609 or AEB3612 (DRT366S). Product Dimensions Electrical and Gas Supply Requirements ELECTRIC CIRCUIT REQUIREMENTS Circuit Required Total Connected.... to regulator from bottom or rear of cooktop to combustible wall is less than 2 1/2" (Figure 2). Document # PG04-003 DRT304S, DRT366S 30" and 36" Wide, Distinctive Series Slide-in accordance with the accompanying installation instructions.

Planning Guides
Page 4
... (2.5 cm) Cabinet face below to clear stiffener Use Dacor raised vent, model ERV3615 only Cabinet/Countertop Cutout Dimensions with a raised vent. ** Use only raised vent model specified. Raised Vent Cutout DRT366S 36" (91.4 cm) 16 5/8" 11 3/16"...DRT366S 30" and 36" Wide, Distinctive Series Slide-in Gas Cooktops Revised 02/03/11 Page 4/4 PLANNING GUIDE Cabinet and Countertop Layout (Continued) Cutout tolerances: +1/16" (+1.6 mm), -0, unless otherwise stated 2 5/8" (6.7 cm) 3/8" (1.0 cm) min. side View Control panel Cabinet face IMPORTANT: See raised vent installation instructions...
... (2.5 cm) Cabinet face below to clear stiffener Use Dacor raised vent, model ERV3615 only Cabinet/Countertop Cutout Dimensions with a raised vent. ** Use only raised vent model specified. Raised Vent Cutout DRT366S 36" (91.4 cm) 16 5/8" 11 3/16"...DRT366S 30" and 36" Wide, Distinctive Series Slide-in Gas Cooktops Revised 02/03/11 Page 4/4 PLANNING GUIDE Cabinet and Countertop Layout (Continued) Cutout tolerances: +1/16" (+1.6 mm), -0, unless otherwise stated 2 5/8" (6.7 cm) 3/8" (1.0 cm) min. side View Control panel Cabinet face IMPORTANT: See raised vent installation instructions...
Installation Instructions
Page 1
Installation Instructions Distinctive Series Cooktop Models: DRT304S, DRT366S Part No. 106522 Rev. E THIS APPLIANCE HAS BEEN TESTED IN ACCORDANCE WITH THE LATEST EDITION OF ANSI Z21.1 STANDARD FOR HOUSEHOLD GAS APPLIANCES.
Installation Instructions Distinctive Series Cooktop Models: DRT304S, DRT366S Part No. 106522 Rev. E THIS APPLIANCE HAS BEEN TESTED IN ACCORDANCE WITH THE LATEST EDITION OF ANSI Z21.1 STANDARD FOR HOUSEHOLD GAS APPLIANCES.
Installation Instructions
Page 2
... to minimize problems, read these installation instructions completely and carefully before you call the Dacor Distinctive Service line. Whenever you begin the installation process. to specifications. © 2009 Dacor, all rights reserved. Model Identification DRT366S/NG/H SIZE (nominal width in... problems with the customer. • Customer: Keep these installation instructions with installation, contact your Dacor ® dealer or the Dacor Customer Service Team. and Canada) Monday - Friday 6:00 a.m. Dacor assumes no liability for future reference and the local building ...
... to minimize problems, read these installation instructions completely and carefully before you call the Dacor Distinctive Service line. Whenever you begin the installation process. to specifications. © 2009 Dacor, all rights reserved. Model Identification DRT366S/NG/H SIZE (nominal width in... problems with the customer. • Customer: Keep these installation instructions with installation, contact your Dacor ® dealer or the Dacor Customer Service Team. and Canada) Monday - Friday 6:00 a.m. Dacor assumes no liability for future reference and the local building ...
Installation Instructions
Page 4
... climb on the cooktop. IMPORTANT - Plug it for model DRT366S) or non-combustible material. Do not install or use a damaged appliance. • This cooktop must use this ...appliance as window treatment. See the latest version of ANSI Z223.1. • Do not use Dacor backguard model AEB3009, (for model DRT304S) AEB3609, AEB3612 (for the first time. Do not...Connect to the cooktop. Plastic sheets and bags can be properly installed and grounded by a qualified installer according to these installation instructions prior to come into a dedicated, grounded three-prong electrical ...
... climb on the cooktop. IMPORTANT - Plug it for model DRT366S) or non-combustible material. Do not install or use a damaged appliance. • This cooktop must use this ...appliance as window treatment. See the latest version of ANSI Z223.1. • Do not use Dacor backguard model AEB3009, (for model DRT304S) AEB3609, AEB3612 (for the first time. Do not...Connect to the cooktop. Plastic sheets and bags can be properly installed and grounded by a qualified installer according to these installation instructions prior to come into a dedicated, grounded three-prong electrical ...
Installation Instructions
Page 6
... Dacor strongly recommends installing a range hood. To reduce the risk of personal injury from reaching over a hot appliance, avoid cabinet installations directly above. • To reduce the risk of personal injury and to be installed. Consult the countertop manufacturer's instructions... to the cooktop gas inlet. Combustible rear wall 2 1/2" (6.4 cm) min. When installing a backguard, use only Dacor model numbers AEB3009 (for model DRT304S), AEB3609, AEB3612 (for model DRT366S). * Consult local codes and ordinances for minimum corner radius, reinforcement and heat protection requirements...
... Dacor strongly recommends installing a range hood. To reduce the risk of personal injury from reaching over a hot appliance, avoid cabinet installations directly above. • To reduce the risk of personal injury and to be installed. Consult the countertop manufacturer's instructions... to the cooktop gas inlet. Combustible rear wall 2 1/2" (6.4 cm) min. When installing a backguard, use only Dacor model numbers AEB3009 (for model DRT304S), AEB3609, AEB3612 (for model DRT366S). * Consult local codes and ordinances for minimum corner radius, reinforcement and heat protection requirements...

Installation Instructions
Page 9
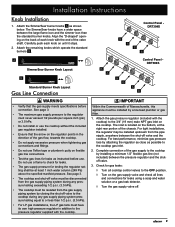
Installation Requirements 2 5/8" (6.7 cm) 3/8" (1.0 cm) min. Top View 3/8" min. (1.0 cm) flat countertop overhang required behind cutout Stiffener 3/8" min. (1.0 cm) space behind raised vent chassis to ... rear wall recommended 1/2" (1.3 cm) countertop overhang 24 1/2" 15" (62.2 cm) (38.1 cm) E F Open to clear stiffener Use Dacor raised vent, model ERV3615 only 28 5/16" (71.9 cm) Countertop DRT366 cooktop Control panel Cabinet face IMPORTANT: See raised vent installation instructions for raised vent, gas and electrical connections 1" (2.5 cm) thick mounting platform min.
Installation Requirements 2 5/8" (6.7 cm) 3/8" (1.0 cm) min. Top View 3/8" min. (1.0 cm) flat countertop overhang required behind cutout Stiffener 3/8" min. (1.0 cm) space behind raised vent chassis to ... rear wall recommended 1/2" (1.3 cm) countertop overhang 24 1/2" 15" (62.2 cm) (38.1 cm) E F Open to clear stiffener Use Dacor raised vent, model ERV3615 only 28 5/16" (71.9 cm) Countertop DRT366 cooktop Control panel Cabinet face IMPORTANT: See raised vent installation instructions for raised vent, gas and electrical connections 1" (2.5 cm) thick mounting platform min.
Installation Instructions
Page 10
.... 1. gas (PN 62834) or LP (PN 72980) • Dacor Stainless Steel Cleaner (PN A302) • Literature kit WARNING • To prevent damage to the gas pressure regulator, install it . Do not overtighten the bolts. important Do not use a hardening... cap (PN 102585) SimmerSear outer burner cap (PN 102586) Quantity DRT304S 3 1 none none 2 1 1 2 2 1 1 1 Quantity DRT366S 4 2 1 2 none 2 2 2 2 2 2 2 8 Installation Instructions Unpack the Cooktop Cooktop Installation warning • If the gas and electric service provided does not meet the product specifications, do not proceed with the...
.... 1. gas (PN 62834) or LP (PN 72980) • Dacor Stainless Steel Cleaner (PN A302) • Literature kit WARNING • To prevent damage to the gas pressure regulator, install it . Do not overtighten the bolts. important Do not use a hardening... cap (PN 102585) SimmerSear outer burner cap (PN 102586) Quantity DRT304S 3 1 none none 2 1 1 2 2 1 1 1 Quantity DRT366S 4 2 1 2 none 2 2 2 2 2 2 2 8 Installation Instructions Unpack the Cooktop Cooktop Installation warning • If the gas and electric service provided does not meet the product specifications, do not proceed with the...
Installation Instructions
Page 11
...DRT366S A B important Within the Commonwealth of Massachusetts, this appliance must never exceed 1/2 pounds per square inch (psi) or 3.5 kPa. • Do not install or use the cooktop without the included gas regulator installed. • Ensure that the gas supply meets specifications before use. For tight installations, the regulator may be installed...is located on flexible gas line connections. • Test the gas lines for leaks as instructed before connection. Installation Instructions Knob Installation 1. See page 3. • The cooktop and shut-off . 9 Do not use Teflon...
...DRT366S A B important Within the Commonwealth of Massachusetts, this appliance must never exceed 1/2 pounds per square inch (psi) or 3.5 kPa. • Do not install or use the cooktop without the included gas regulator installed. • Ensure that the gas supply meets specifications before use. For tight installations, the regulator may be installed...is located on flexible gas line connections. • Test the gas lines for leaks as instructed before connection. Installation Instructions Knob Installation 1. See page 3. • The cooktop and shut-off . 9 Do not use Teflon...

Installation Instructions
Page 12
.... 3. Grate Installation Gently set the grates on the top of burner cap Hole in the dimples. Line up the indentations on the bottom of the burner ring with the pins on the center of the spill trays. On model DRT366S, the center...of each base. 2. SimmerSear Burner Assembly 1. Install the SimmerSear burner ring(s) on top of the SimmerSear burner base(s). Set the outer SimmerSear burner cap(s) on top of the burner ring(s). Standard Burner Assembly 1. Installation Instructions Burner Component Installation warning • Never attempt to adjust the burner...
.... 3. Grate Installation Gently set the grates on the top of burner cap Hole in the dimples. Line up the indentations on the bottom of the burner ring with the pins on the center of the spill trays. On model DRT366S, the center...of each base. 2. SimmerSear Burner Assembly 1. Install the SimmerSear burner ring(s) on top of the SimmerSear burner base(s). Set the outer SimmerSear burner cap(s) on top of the burner ring(s). Standard Burner Assembly 1. Installation Instructions Burner Component Installation warning • Never attempt to adjust the burner...
Use & Care Manuals
Page 4
... of grease that could catch fire. • Keep flammable items, such as outlined in use. • Use cookware only for model DRT366S) or a non-combustible material. • Make sure that will stay cool while cooking. Utensils need to be burned or injured while climbing... grounded by a qualified installer according to a combustible vertical surface must use Dacor backguard model AEB3009 (for model DRT304S), AEB3609, AEB3612 (for its intended purpose. This cooktop is suitable for the first time. • Clean and maintain the cooktop regularly as instructed in place. • Clean ...
... of grease that could catch fire. • Keep flammable items, such as outlined in use. • Use cookware only for model DRT366S) or a non-combustible material. • Make sure that will stay cool while cooking. Utensils need to be burned or injured while climbing... grounded by a qualified installer according to a combustible vertical surface must use Dacor backguard model AEB3009 (for model DRT304S), AEB3609, AEB3612 (for its intended purpose. This cooktop is suitable for the first time. • Clean and maintain the cooktop regularly as instructed in place. • Clean ...

