

Planning Guides
Page 1
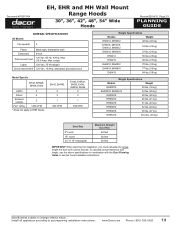
...Overall Dimensions Electrical access Model EH/EHR3012 EH/EHR3612 EH/EHR4212 EH/EHR4812 MH3012 MH3612 MH4812 EH/EHR3018 EH/EHR3618 EH/EHR4218 EH/EHR4818 EH/EHR5418 MH3018 MH3618 MH4818 Overall Dimensions A B 29 7/8" (75.9 cm) 35 7/8" (91.1 cm) 41 7/8" (106.4 cm) 26 ... and electrical wiring can be installed in use. Check the manufacturers specifications for further information. • This appliance must be connected from either the top or the back of the hood. 25" Min.* (63.5 cm... local building department for the cooktop or range. www.Dacor.com Phone: (800) 793-0093 7.4
...Overall Dimensions Electrical access Model EH/EHR3012 EH/EHR3612 EH/EHR4212 EH/EHR4812 MH3012 MH3612 MH4812 EH/EHR3018 EH/EHR3618 EH/EHR4218 EH/EHR4818 EH/EHR5418 MH3018 MH3618 MH4818 Overall Dimensions A B 29 7/8" (75.9 cm) 35 7/8" (91.1 cm) 41 7/8" (106.4 cm) 26 ... and electrical wiring can be installed in use. Check the manufacturers specifications for further information. • This appliance must be connected from either the top or the back of the hood. 25" Min.* (63.5 cm... local building department for the cooktop or range. www.Dacor.com Phone: (800) 793-0093 7.4
Planning Guides
Page 2
.... (21 kg) EHR4218 51 lbs. (23 kg) EHR4812 52 lbs. (24 kg) EHR4818 59 lbs. (27 kg) EHR5418 66.4 lbs. (30 kg) Duct Size 8" round 10" round 3¼" X 10" rectangular Maximum Straight Duct Run 60 feet...IMPORTANT: When planning the installation, you must calculate the actual length the duct work cannot exceed. Install all appliances according to accompanying installation instructions. Document # PG07-004 EH, EHR and MH Wall Mount Range Hoods 30",... Duct Planning Guide or see the hood installation instructions. www.Dacor.com Phone: (800) 793-0093 7.5 Max. Max. (10.0 Amp.
.... (21 kg) EHR4218 51 lbs. (23 kg) EHR4812 52 lbs. (24 kg) EHR4818 59 lbs. (27 kg) EHR5418 66.4 lbs. (30 kg) Duct Size 8" round 10" round 3¼" X 10" rectangular Maximum Straight Duct Run 60 feet...IMPORTANT: When planning the installation, you must calculate the actual length the duct work cannot exceed. Install all appliances according to accompanying installation instructions. Document # PG07-004 EH, EHR and MH Wall Mount Range Hoods 30",... Duct Planning Guide or see the hood installation instructions. www.Dacor.com Phone: (800) 793-0093 7.5 Max. Max. (10.0 Amp.

Planning Guides
Page 3
... Dimensions 19 ¾" (50.2 cm) CL 9 7/8" (25.1 cm) Electrical access holes 7/8" Dia. (5.1 cm) CL 6 1/8" (15.6 cm) E*** Bottom of the hood. www.Dacor.com Phone: (800) 793-0093 7.6 Install all appliances according to change without notice. Document # PG07-004 EH, EHR and MH Wall Mount Range Hoods 30", 36", 42", 48", 54" Wide...
... Dimensions 19 ¾" (50.2 cm) CL 9 7/8" (25.1 cm) Electrical access holes 7/8" Dia. (5.1 cm) CL 6 1/8" (15.6 cm) E*** Bottom of the hood. www.Dacor.com Phone: (800) 793-0093 7.6 Install all appliances according to change without notice. Document # PG07-004 EH, EHR and MH Wall Mount Range Hoods 30", 36", 42", 48", 54" Wide...
Installation Instructions
Page 2
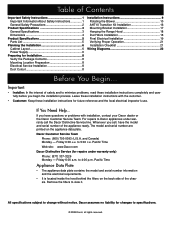
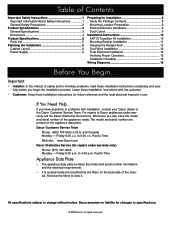
If you begin the installation process. to change without notice. All specifications subject to 4:00 p.m. For repairs to Dacor appliances under warranty only) Phone: (877) 337-3226 Monday - The model and serial number are printed on the back side of safety ... and carefully before you have the model and serial number of the appliance ready. to view it. Remove the filters to 5:00 p.m. Dacor Customer Service Team Phone: (800) 793-0093 (U.S.A. Pacific Time Web site: www.Dacor.com Dacor Distinctive Service (for future reference and the local electrical inspector's use....
If you begin the installation process. to change without notice. All specifications subject to 4:00 p.m. For repairs to Dacor appliances under warranty only) Phone: (877) 337-3226 Monday - The model and serial number are printed on the back side of safety ... and carefully before you have the model and serial number of the appliance ready. to view it. Remove the filters to 5:00 p.m. Dacor Customer Service Team Phone: (800) 793-0093 (U.S.A. Pacific Time Web site: www.Dacor.com Dacor Distinctive Service (for future reference and the local electrical inspector's use....

Installation Instructions
Page 3
... cannot be vented to prevent back drafting. Use common sense and caution when installing, maintaining or operating this or any other appliance. warning Hazards or unsafe practices that could explode, such as those published by the manufacturer. Also keep items that COULD result...and the American Society for proper combustion and exhausting of gases through the flue(chimney) of this or any other appliance. • Always contact the Dacor Customer Service Team about problems and conditions that can occur. Do not store flammable or explosive materials in this unit...
... cannot be vented to prevent back drafting. Use common sense and caution when installing, maintaining or operating this or any other appliance. warning Hazards or unsafe practices that could explode, such as those published by the manufacturer. Also keep items that COULD result...and the American Society for proper combustion and exhausting of gases through the flue(chimney) of this or any other appliance. • Always contact the Dacor Customer Service Team about problems and conditions that can occur. Do not store flammable or explosive materials in this unit...

Installation Instructions
Page 4
...Never allow foreign objects, such as instructed in use only. Important Safety Instructions CAUTION For general ventilating use . Contact the nearest Dacor authorized service representative at (800) 793-0093, or at the fuse box circuit breaker and lock the electrical panel door to ...these installation instructions and the requirements specified by a qualified installer according to prevent power from being switched on an appliance. Consult the range or cooktop installation instructions for examination, repair or adjustment. • Keep all other window coverings that the...
...Never allow foreign objects, such as instructed in use only. Important Safety Instructions CAUTION For general ventilating use . Contact the nearest Dacor authorized service representative at (800) 793-0093, or at the fuse box circuit breaker and lock the electrical panel door to ...these installation instructions and the requirements specified by a qualified installer according to prevent power from being switched on an appliance. Consult the range or cooktop installation instructions for examination, repair or adjustment. • Keep all other window coverings that the...

Installation Instructions
Page 8
... install a fuse in accordance with the National Electric code ANSI/NFPA* (or latest revision) and local codes and ordinances. *A copy of this appliance is to an electrical junction box. E Electrical access 25" Min. (63.5 cm) MINIMUM CABINET WIDTH Models E EH3012, EH3018, MH3012, MH3018... Association 1 Batterymarch Park Quincy, Massachusetts 02269-9101 • The ground terminal on the hood must be centered horizontally over a hot appliance, cabinet storage space located directly above the range should be installed. It is required. The hood must be connected to a grounded,...
... install a fuse in accordance with the National Electric code ANSI/NFPA* (or latest revision) and local codes and ordinances. *A copy of this appliance is to an electrical junction box. E Electrical access 25" Min. (63.5 cm) MINIMUM CABINET WIDTH Models E EH3012, EH3018, MH3012, MH3018... Association 1 Batterymarch Park Quincy, Massachusetts 02269-9101 • The ground terminal on the hood must be centered horizontally over a hot appliance, cabinet storage space located directly above the range should be installed. It is required. The hood must be connected to a grounded,...

Installation Instructions
Page 10
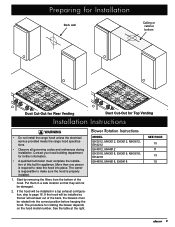
... Hood location Duct Cutout 1. The line will be installed only by a licensed electrician. • Observe all hood mounting locations. Do not install a damaged or incomplete appliance. See page 4 for the range hood on the back wall. Preparing for Installation Verify the Package Contents Electrical Service Installation Unpack the parts box and...
... Hood location Duct Cutout 1. The line will be installed only by a licensed electrician. • Observe all hood mounting locations. Do not install a damaged or incomplete appliance. See page 4 for the range hood on the back wall. Preparing for Installation Verify the Package Contents Electrical Service Installation Unpack the parts box and...
Installation Instructions
Page 11
... so that they will not be damaged. 2. If the hood will exhaust out of the hood. See the table at the right. Put them in appliance. The procedure for further information. • A qualified technician must complete the installation of this built-in a safe location so that air will be rotated into...
... so that they will not be damaged. 2. If the hood will exhaust out of the hood. See the table at the right. Put them in appliance. The procedure for further information. • A qualified technician must complete the installation of this built-in a safe location so that air will be rotated into...

Installation Instructions
Page 23
... that the installation has been completed correctly. • Repeat the above test. • If the hood still does not work completely installed? Dacor is supplied to the hood. • Check the electrical connections to these instructions and in accordance with duct tape? See page 18. □...card or during initialization. 4. Touch and release the FAN key repeatedly, three times. Do not attempt to repair the appliance yourself. Do not attempt to repair the appliance yourself. Touch the LIGHTS feature key. If you call. See page 18. □□ Are the filters properly...
... that the installation has been completed correctly. • Repeat the above test. • If the hood still does not work completely installed? Dacor is supplied to the hood. • Check the electrical connections to these instructions and in accordance with duct tape? See page 18. □...card or during initialization. 4. Touch and release the FAN key repeatedly, three times. Do not attempt to repair the appliance yourself. Do not attempt to repair the appliance yourself. Touch the LIGHTS feature key. If you call. See page 18. □□ Are the filters properly...
Installation Instructions
Page 30
...Team. For repairs to minimize problems, read these installation instructions for repairs under warranty call the Dacor Distinctive Service line. Whenever you have the model and serial number of the appliance ready. to change without notice. If you call, have questions or problems with the customer. ... The model and serial number are printed on the back side of safety and to Dacor appliances under warranty only) Phone: (877) 337-3226 Monday - Pacific Time Web site: www.Dacor.com Dacor Distinctive Service (for future reference and the local electrical inspector's use. to view it....
...Team. For repairs to minimize problems, read these installation instructions for repairs under warranty call the Dacor Distinctive Service line. Whenever you have the model and serial number of the appliance ready. to change without notice. If you call, have questions or problems with the customer. ... The model and serial number are printed on the back side of safety and to Dacor appliances under warranty only) Phone: (877) 337-3226 Monday - Pacific Time Web site: www.Dacor.com Dacor Distinctive Service (for future reference and the local electrical inspector's use. to view it....

Installation Instructions
Page 31
...), and the American Society for proper combustion and exhausting of gases through the flue(chimney) of this or any other appliance. • Always contact the Dacor Customer Service Team about problems and conditions that could explode, such as gasoline) inside or in accordance with all possible ... COULD result in adjacent cabinets or areas. DANGER To avoid the possibility of explosion or fire, do not damage electrical wiring and other appliance. TO REDUCE THE RISK OF FIRE, ELECTRIC SHOCK, OR INJURY TO PERSONS, OBSERVE THE FOLLOWING: a) Installation work and electrical wiring must...
...), and the American Society for proper combustion and exhausting of gases through the flue(chimney) of this or any other appliance. • Always contact the Dacor Customer Service Team about problems and conditions that could explode, such as gasoline) inside or in accordance with all possible ... COULD result in adjacent cabinets or areas. DANGER To avoid the possibility of explosion or fire, do not damage electrical wiring and other appliance. TO REDUCE THE RISK OF FIRE, ELECTRIC SHOCK, OR INJURY TO PERSONS, OBSERVE THE FOLLOWING: a) Installation work and electrical wiring must...
Installation Instructions
Page 32
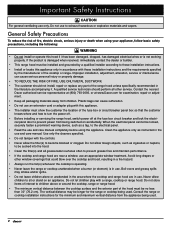
General Safety Precautions To reduce the risk of fire, electric shock, serious injury or death when using the appliance. Contact the nearest Dacor authorized service representative at (800) 793-0093, or at the fuse box circuit breaker and lock the electrical panel ...turn the power off. • Before installing or servicing the range hood, switch power off at www.Dacor.com for examination, repair or adjustment. • Keep all packaging materials away from the appliance being used . 2 Improper installation, adjustment, alteration, service or maintenance can cause suffocation. • Do...
General Safety Precautions To reduce the risk of fire, electric shock, serious injury or death when using the appliance. Contact the nearest Dacor authorized service representative at (800) 793-0093, or at the fuse box circuit breaker and lock the electrical panel ...turn the power off. • Before installing or servicing the range hood, switch power off at www.Dacor.com for examination, repair or adjustment. • Keep all packaging materials away from the appliance being used . 2 Improper installation, adjustment, alteration, service or maintenance can cause suffocation. • Do...

Installation Instructions
Page 36
... installed by a licensed electrician. Make certain that they can be installed only by a licensed electrician. • Do not ground the appliance or appliance wiring to a gas pipeline or to the neutral (white) power supply wire. • Do not install a fuse in the neutral...EHR3018 E 30" (76.2 cm) EHR3612, EHR3618 36" (91.5 cm) EHR4212, EHR4218 42" (106.7 cm) EHR4812, EHR4818 48" (121.9 cm) EHR5418 54" (137.2 cm) All tolerances: +1/16", -0, unless otherwise stated important See the diagram for minimum installed distance from : National Fire Protection Association 1 Batterymarch...
... installed by a licensed electrician. Make certain that they can be installed only by a licensed electrician. • Do not ground the appliance or appliance wiring to a gas pipeline or to the neutral (white) power supply wire. • Do not install a fuse in the neutral...EHR3018 E 30" (76.2 cm) EHR3612, EHR3618 36" (91.5 cm) EHR4212, EHR4218 42" (106.7 cm) EHR4812, EHR4818 48" (121.9 cm) EHR5418 54" (137.2 cm) All tolerances: +1/16", -0, unless otherwise stated important See the diagram for minimum installed distance from : National Fire Protection Association 1 Batterymarch...

Installation Instructions
Page 38
... 8" 45° elbow 3 feet 10" 45° elbow 2 feet 24" straight duct between the studs site preparation and installation. Do not install a damaged or incomplete appliance. • Determine the number, size and type of installa- Mounting Location Preparation tion and the weight chart on the type of Make sure you have...
... 8" 45° elbow 3 feet 10" 45° elbow 2 feet 24" straight duct between the studs site preparation and installation. Do not install a damaged or incomplete appliance. • Determine the number, size and type of installa- Mounting Location Preparation tion and the weight chart on the type of Make sure you have...

Installation Instructions
Page 40
... AHT10 for Installation Prepare the transition for further information. • A qualified technician must be mounted to raise the hood into one of the unit using Dacor transition kit AHT10. The owner is responsible to make sure the hood is required to the back of the hood. If the hood will be... top of the hood to the rear before installing the hood on a large flat surface. 3. Using the existing screws, attach the cover plate removed in appliance. Install the transition before hanging the hood. 2.
... AHT10 for Installation Prepare the transition for further information. • A qualified technician must be mounted to raise the hood into one of the unit using Dacor transition kit AHT10. The owner is responsible to make sure the hood is required to the back of the hood. If the hood will be... top of the hood to the rear before installing the hood on a large flat surface. 3. Using the existing screws, attach the cover plate removed in appliance. Install the transition before hanging the hood. 2.

Installation Instructions
Page 45
... main power switch is on the fan speed indicator increases and that with all applicable electrical codes? Do not attempt to repair the appliance yourself. The control panel will flash several times during initialization. 4. Touch the FAN feature key once and release. See the inside ...; Has proper operation been verified? □□ Has the warranty been activated on page 12? □□ Is the duct work , contact Dacor Distinctive Service at low speed. Verify that the installation has been completed correctly. • Repeat the above test. • If the hood still ...
... main power switch is on the fan speed indicator increases and that with all applicable electrical codes? Do not attempt to repair the appliance yourself. The control panel will flash several times during initialization. 4. Touch the FAN feature key once and release. See the inside ...; Has proper operation been verified? □□ Has the warranty been activated on page 12? □□ Is the duct work , contact Dacor Distinctive Service at low speed. Verify that the installation has been completed correctly. • Repeat the above test. • If the hood still ...

Use & Care Manuals
Page 3
...common sense and caution when installing, maintaining or operating this manual. WARNING WARNING - Model number Serial number Date of purchase At Dacor, we continuously improve the quality and performance of all possible problems and situations that could explode, such as a tag, to ...download the latest version of this appliance without updating these instructions with the appliance. DANGER To avoid the possibility of original purchase date is required for your sales receipt or canceled check....
...common sense and caution when installing, maintaining or operating this manual. WARNING WARNING - Model number Serial number Date of purchase At Dacor, we continuously improve the quality and performance of all possible problems and situations that could explode, such as a tag, to ...download the latest version of this appliance without updating these instructions with the appliance. DANGER To avoid the possibility of original purchase date is required for your sales receipt or canceled check....

Use & Care Manuals
Page 4
When the electrical panel cannot be allowed to accumulate on an appliance. If you have a Class ABC extinguisher, and you receive a damaged product, immediately contact your dealer or builder. Do not let children play with the controls. &#... when cooking at high settings. Always turn off at the fuse or junction box and lock the electrical panel door to prevent power from the appliance being used . • To reduce the risk of a range top grease fire: a. d. SMOTHER FLAMES with your back to an exit. 2 a violent steam explosion may be...
When the electrical panel cannot be allowed to accumulate on an appliance. If you have a Class ABC extinguisher, and you receive a damaged product, immediately contact your dealer or builder. Do not let children play with the controls. &#... when cooking at high settings. Always turn off at the fuse or junction box and lock the electrical panel door to prevent power from the appliance being used . • To reduce the risk of a range top grease fire: a. d. SMOTHER FLAMES with your back to an exit. 2 a violent steam explosion may be...

Use & Care Manuals
Page 7
... the filter opening. 3. Proper cleaning is necessary to the type and amount of cooking. See page 4 for replacement part numbers). On hoods with Dacor Cook Top Cleaning Creme. The release lever must be achieved by cleaning soiled components as soon as possible. Dry the filter(s) completely before cleaning. ...WARNING To avoid the risk of fire, electric shock or personal injury: • Turn off the cooktop or range and make sure that the appliance and range hood are located on the bottom of the hood, directly above the hood rim). Hold the filter in this manual. • ...
... the filter opening. 3. Proper cleaning is necessary to the type and amount of cooking. See page 4 for replacement part numbers). On hoods with Dacor Cook Top Cleaning Creme. The release lever must be achieved by cleaning soiled components as soon as possible. Dry the filter(s) completely before cleaning. ...WARNING To avoid the risk of fire, electric shock or personal injury: • Turn off the cooktop or range and make sure that the appliance and range hood are located on the bottom of the hood, directly above the hood rim). Hold the filter in this manual. • ...