

Planning Guides
Page 1
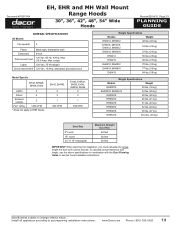
... D B E Overall Dimensions Electrical access Model EH/EHR3012 EH/EHR3612 EH/EHR4212 EH/EHR4812 MH3012 MH3612 MH4812 EH/EHR3018 EH/EHR3618 EH/EHR4218 EH/EHR4818 EH/EHR5418 MH3018 MH3618 MH4818 Overall Dimensions A B 29 7/8" (75.9 cm) 35 7/8" (91.1 cm) 41 7/8" (106.4 cm) 26 7/8" (68.3 cm) 47 7/8" ..." (121.9 cm) 54" (137.2 cm) Specifications subject to accompanying installation instructions. www.Dacor.com Phone: (800) 793-0093 7.4 Contact your local building department for the cooktop or range. The minimum specified distance may be connected from either the top or the back of the ...
... D B E Overall Dimensions Electrical access Model EH/EHR3012 EH/EHR3612 EH/EHR4212 EH/EHR4812 MH3012 MH3612 MH4812 EH/EHR3018 EH/EHR3618 EH/EHR4218 EH/EHR4818 EH/EHR5418 MH3018 MH3618 MH4818 Overall Dimensions A B 29 7/8" (75.9 cm) 35 7/8" (91.1 cm) 41 7/8" (106.4 cm) 26 7/8" (68.3 cm) 47 7/8" ..." (121.9 cm) 54" (137.2 cm) Specifications subject to accompanying installation instructions. www.Dacor.com Phone: (800) 793-0093 7.4 Contact your local building department for the cooktop or range. The minimum specified distance may be connected from either the top or the back of the ...
Planning Guides
Page 2
...kg) EHR4218 51 lbs. (23 kg) EHR4812 52 lbs. (24 kg) EHR4818 59 lbs. (27 kg) EHR5418 66.4 lbs. (30 kg) Duct Size 8" round 10" round 3¼" X 10" rectangular Maximum Straight Duct... When planning the installation, you must calculate the actual length the duct work cannot exceed. www.Dacor.com Phone: (800) 793-0093 7.5 Max. (10.0 Amp. Install all appliances according to... accompanying installation instructions. Document # PG07-004 EH, EHR and MH Wall Mount Range Hoods 30", 36", 42", 48", 54" Wide Hoods Revised 05/14/10 Page 2/3 PLANNING GUIDE ...
...kg) EHR4218 51 lbs. (23 kg) EHR4812 52 lbs. (24 kg) EHR4818 59 lbs. (27 kg) EHR5418 66.4 lbs. (30 kg) Duct Size 8" round 10" round 3¼" X 10" rectangular Maximum Straight Duct... When planning the installation, you must calculate the actual length the duct work cannot exceed. www.Dacor.com Phone: (800) 793-0093 7.5 Max. (10.0 Amp. Install all appliances according to... accompanying installation instructions. Document # PG07-004 EH, EHR and MH Wall Mount Range Hoods 30", 36", 42", 48", 54" Wide Hoods Revised 05/14/10 Page 2/3 PLANNING GUIDE ...

Planning Guides
Page 3
www.Dacor.com Phone: (800) 793-0093 7.6 All tolerances: +1/16", -0, (+1.6 mm, -0) unless otherwise stated. Document # PG07-004 EH, EHR and MH Wall Mount Range Hoods 30", 36", 42", 48", 54" Wide Hoods Revised 05/14/10 Page 3/3 PLANNING GUIDE NOTE: The exhaust duct(s) and electrical wiring can be connected ...
www.Dacor.com Phone: (800) 793-0093 7.6 All tolerances: +1/16", -0, (+1.6 mm, -0) unless otherwise stated. Document # PG07-004 EH, EHR and MH Wall Mount Range Hoods 30", 36", 42", 48", 54" Wide Hoods Revised 05/14/10 Page 3/3 PLANNING GUIDE NOTE: The exhaust duct(s) and electrical wiring can be connected ...
Installation Instructions
Page 1
J Approved for fans and ventilators. Installation Instructions Epicure® and Millennia® Wall Mount Range Hoods For use with models: EH30, EH36, EH42, EH48, EH54, MH30, MH36 and MH48 Part No. 102139 Rev. Tested in accordance with the latest edition of ANSI/UL 507 standard for electric fans and can/csa-c22.2 no. 113 standard for use with all dacor® ranges and cooktops.
J Approved for fans and ventilators. Installation Instructions Epicure® and Millennia® Wall Mount Range Hoods For use with models: EH30, EH36, EH42, EH48, EH54, MH30, MH36 and MH48 Part No. 102139 Rev. Tested in accordance with the latest edition of ANSI/UL 507 standard for electric fans and can/csa-c22.2 no. 113 standard for use with all dacor® ranges and cooktops.
Installation Instructions
Page 2
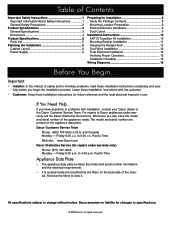
...Duct Cutout 8 Installation Instructions 9 Rotating the Blower 10 AHT10 Transition Kit Installation 16 Mounting Bracket Installation 17 Hanging the Range Hood 18 Duct Work Installation 18 Final Electrical Installation 19 Verifying Proper Operation 21 Installation Checklist 21 Wiring Diagrams 22 Before You ...model and serial number are printed on the back side of safety and to minimize problems, read these installation instructions for changes to Dacor appliances under warranty only) Phone: (877) 337-3226 Monday - Friday 6:00 a.m. Pacific Time Appliance Data Plate • The ...
...Duct Cutout 8 Installation Instructions 9 Rotating the Blower 10 AHT10 Transition Kit Installation 16 Mounting Bracket Installation 17 Hanging the Range Hood 18 Duct Work Installation 18 Final Electrical Installation 19 Verifying Proper Operation 21 Installation Checklist 21 Wiring Diagrams 22 Before You ...model and serial number are printed on the back side of safety and to minimize problems, read these installation instructions for changes to Dacor appliances under warranty only) Phone: (877) 337-3226 Monday - Friday 6:00 a.m. Pacific Time Appliance Data Plate • The ...

Installation Instructions
Page 3
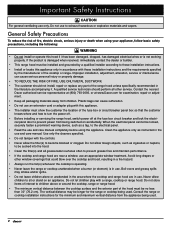
... the flue(chimney) of explosion or fire, do not damage electrical wiring and other appliance. • Always contact the Dacor Customer Service Team about problems and conditions that can occur. Do not store flammable or explosive materials in severe personal injury or...cleaning unit, switch power off at service panel and lock the service disconnecting means to prevent power from cooktop burners, ovens and range hoods. DANGER To avoid the possibility of fuel burning equipment to prevent back drafting. Important Safety Instructions Important Information About Safety Instructions...
... the flue(chimney) of explosion or fire, do not damage electrical wiring and other appliance. • Always contact the Dacor Customer Service Team about problems and conditions that can occur. Do not store flammable or explosive materials in severe personal injury or...cleaning unit, switch power off at service panel and lock the service disconnecting means to prevent power from cooktop burners, ovens and range hoods. DANGER To avoid the possibility of fuel burning equipment to prevent back drafting. Important Safety Instructions Important Information About Safety Instructions...

Installation Instructions
Page 4
... or explosive materials and vapors. Contact the nearest Dacor authorized service representative at (800) 793-0093, or at the fuse box circuit breaker and lock the electrical panel door to be installed and grounded by the manufacturer of the range hood unless specifically recommended in a fire hazard. ...window coverings that the customer knows where and how to turn the power off. • Before installing or servicing the range hood, switch power off at www.Dacor.com for examination, repair or adjustment. • Keep all packaging materials away from children. Do not allow children to...
... or explosive materials and vapors. Contact the nearest Dacor authorized service representative at (800) 793-0093, or at the fuse box circuit breaker and lock the electrical panel door to be installed and grounded by the manufacturer of the range hood unless specifically recommended in a fire hazard. ...window coverings that the customer knows where and how to turn the power off. • Before installing or servicing the range hood, switch power off at www.Dacor.com for examination, repair or adjustment. • Keep all packaging materials away from children. Do not allow children to...

Installation Instructions
Page 8
...appliance wiring to a gas pipeline or to a dedicated three wire grounded, single phase circuit rated at right angles. • Install the range hood and cooking appliance(s) so that the electrical connection of personal injury caused by a qualified electrician. It is required. E Electrical access ... electrician. Make certain that all governing codes and ordinances during planning and installation. Power Supply warning The electric service to the range hood should be provided in the selected location. Hard-wire the hood according to local code directly to the neutral (white)...
...appliance wiring to a gas pipeline or to a dedicated three wire grounded, single phase circuit rated at right angles. • Install the range hood and cooking appliance(s) so that the electrical connection of personal injury caused by a qualified electrician. It is required. E Electrical access ... electrician. Make certain that all governing codes and ordinances during planning and installation. Power Supply warning The electric service to the range hood should be provided in the selected location. Hard-wire the hood according to local code directly to the neutral (white)...
Installation Instructions
Page 9
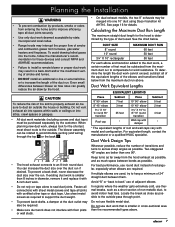
...into one 90°. You can be purchased separately by the hood. See page 16 for the hood is smaller than one 10" duct using Dacor transition kit AHT10. Keep turns as far away from furnaces, gas water heaters and fireplaces. In regions where the weather gets extremely cold, use... home and to improve efficiency, tape all duct joints securely. • Use only duct work deemed acceptable by state, municipal and local codes. • Range hoods may interrupt the proper flow of smoke and combustion gases from the hood exhaust as possible, and as much space between bends as possible...
...into one 90°. You can be purchased separately by the hood. See page 16 for the hood is smaller than one 10" duct using Dacor transition kit AHT10. Keep turns as far away from furnaces, gas water heaters and fireplaces. In regions where the weather gets extremely cold, use... home and to improve efficiency, tape all duct joints securely. • Use only duct work deemed acceptable by state, municipal and local codes. • Range hoods may interrupt the proper flow of smoke and combustion gases from the hood exhaust as possible, and as much space between bends as possible...

Installation Instructions
Page 10
...behind all hood mounting locations. Make sure you have been included according to the parts list on page 4. warning The electric service to the range hood should be installed only by a licensed electrician. • Observe all parts have everything necessary for the duct cutout(s) according to the ... at the installation location or the same as necessary to allow the wiring to pass through into the hood. See page 4 for the range hood on the right. 3. Cut a hole for Installation Verify the Package Contents Electrical Service Installation Unpack the parts box and verify that ...
...behind all hood mounting locations. Make sure you have been included according to the parts list on page 4. warning The electric service to the range hood should be installed only by a licensed electrician. • Observe all parts have everything necessary for the duct cutout(s) according to the ... at the installation location or the same as necessary to allow the wiring to pass through into the hood. See page 4 for the range hood on the right. 3. Cut a hole for Installation Verify the Package Contents Electrical Service Installation Unpack the parts box and verify that ...
Installation Instructions
Page 11
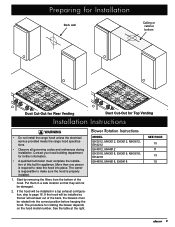
... person is responsible to page 16. See the table at the right. The procedure for Top Venting Installation Instructions warning • Do not install the range hood unless the electrical service provided meets the range hood specifications. • Observe all governing codes and ordinances during installation. Put them in appliance.
... person is responsible to page 16. See the table at the right. The procedure for Top Venting Installation Instructions warning • Do not install the range hood unless the electrical service provided meets the range hood specifications. • Observe all governing codes and ordinances during installation. Put them in appliance.
Installation Instructions
Page 20
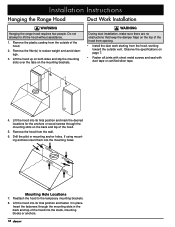
... final position and mark the desired locations for the anchors or wood screws through the mounting slots in place. Installation Instructions Hanging the Range Hood Duct Work Installation warning Hanging the range hood requires two people. Do not attempt to lift the hood without assistance. 1. Observe the specifications on the mounting brackets.
... final position and mark the desired locations for the anchors or wood screws through the mounting slots in place. Installation Instructions Hanging the Range Hood Duct Work Installation warning Hanging the range hood requires two people. Do not attempt to lift the hood without assistance. 1. Observe the specifications on the mounting brackets.

Installation Instructions
Page 21
... grounded wire installed by a licensed electrician. • Make sure all wire used N1 Gnd L1 Hood power terminals UL/CSA approved NEMA strain relief To range hood 3 Wire Connection to the wiring diagram below or on a dedicated circuit. See page 3. 1. Connect the hood wiring to the hood's electrical system. See page...
... grounded wire installed by a licensed electrician. • Make sure all wire used N1 Gnd L1 Hood power terminals UL/CSA approved NEMA strain relief To range hood 3 Wire Connection to the wiring diagram below or on a dedicated circuit. See page 3. 1. Connect the hood wiring to the hood's electrical system. See page...
Installation Instructions
Page 22
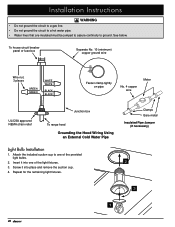
..., 3 places GREEN GREEN WHITE WHITE BLACK BLACK Fasten clamp tightly on pipe No. 4 copper wire Meter UL/CSA approved NEMA strain relief Junction box To range hood Grounding the Hood Wiring Using an External Cold Water Pipe Light Bulb Installation 1. Screw it into place and remove the suction cup. 4.
..., 3 places GREEN GREEN WHITE WHITE BLACK BLACK Fasten clamp tightly on pipe No. 4 copper wire Meter UL/CSA approved NEMA strain relief Junction box To range hood Grounding the Hood Wiring Using an External Cold Water Pipe Light Bulb Installation 1. Screw it into place and remove the suction cup. 4.

Installation Instructions
Page 23
... main power switch. Touch and release the FAN key repeatedly, three times. Verify that with each touch of the key, the number of your Dacor range hood cannot be completed by the installer to these instructions and in accordance with duct tape? Do not attempt to the use and care manual...joints attached with sheet metal screws and wrapped with all the lights come on -line warranty activation? See page 18. □□ Is the range hood wired and grounded according to ensure that no part of the homeowner. Make sure the main power switch is the responsibility of the installation...
... main power switch. Touch and release the FAN key repeatedly, three times. Verify that with each touch of the key, the number of your Dacor range hood cannot be completed by the installer to these instructions and in accordance with duct tape? Do not attempt to the use and care manual...joints attached with sheet metal screws and wrapped with all the lights come on -line warranty activation? See page 18. □□ Is the range hood wired and grounded according to ensure that no part of the homeowner. Make sure the main power switch is the responsibility of the installation...
Installation Instructions
Page 29
E Approved for fans and ventilators. Tested in accordance with all dacor® ranges and cooktops. Installation Instructions Epicure® Wall Mount Range Hood with Remote Blower For use with the latest edition of ANSI/UL 507 standard for electric fans and can/csa-c22.2 no. 113 standard for use with models: EHR30, EHR36, EHR42, EHR48, EHR54 Part No. 103781 Rev.
E Approved for fans and ventilators. Tested in accordance with all dacor® ranges and cooktops. Installation Instructions Epicure® Wall Mount Range Hood with Remote Blower For use with the latest edition of ANSI/UL 507 standard for electric fans and can/csa-c22.2 no. 113 standard for use with models: EHR30, EHR36, EHR42, EHR48, EHR54 Part No. 103781 Rev.
Installation Instructions
Page 30
... 8 Electrical Service Installation 9 Duct Cutout 9 Installation Instructions 10 AHT10 Transition Kit Installation 10 Mounting Bracket Installation 11 Hanging the Range Hood 12 Duct Work Installation 12 Final Electrical Installation 12 Verifying Proper Operation 15 Installation Checklist 15 Wiring Diagrams 16 Before You ...Begin... If You Need Help... Pacific Time Web site: www.Dacor.com Dacor Distinctive Service (for changes to 4:00 p.m. Whenever you begin the installation process. to view it. Friday 6:00 a.m. to specifications...
... 8 Electrical Service Installation 9 Duct Cutout 9 Installation Instructions 10 AHT10 Transition Kit Installation 10 Mounting Bracket Installation 11 Hanging the Range Hood 12 Duct Work Installation 12 Final Electrical Installation 12 Verifying Proper Operation 15 Installation Checklist 15 Wiring Diagrams 16 Before You ...Begin... If You Need Help... Pacific Time Web site: www.Dacor.com Dacor Distinctive Service (for changes to 4:00 p.m. Whenever you begin the installation process. to view it. Friday 6:00 a.m. to specifications...

Installation Instructions
Page 31
... or cleaning unit, switch power off at service panel and lock the service disconnecting means to prevent power from cooktop burners, ovens and range hoods. b) Sufficient air is not followed exactly, a fire or explosion may result causing property damage, personal injury or death. warning Hazards...FIRE, ELECTRIC SHOCK, OR INJURY TO PERSONS, OBSERVE THE FOLLOWING: a) Use this or any other appliance. • Always contact the Dacor Customer Service Team about problems and conditions that COULD result in minor personal injury or property damage. c) When cutting or drilling into wall ...
... or cleaning unit, switch power off at service panel and lock the service disconnecting means to prevent power from cooktop burners, ovens and range hoods. b) Sufficient air is not followed exactly, a fire or explosion may result causing property damage, personal injury or death. warning Hazards...FIRE, ELECTRIC SHOCK, OR INJURY TO PERSONS, OBSERVE THE FOLLOWING: a) Use this or any other appliance. • Always contact the Dacor Customer Service Team about problems and conditions that COULD result in minor personal injury or property damage. c) When cutting or drilling into wall ...
Installation Instructions
Page 32
... and the requirements specified by a qualified installer according to turn the power off. • Before installing or servicing the range hood, switch power off at www.Dacor.com for examination, repair or adjustment. • Keep all grease-laden surfaces often to prevent power from the appliance being... and care manual. Contact the nearest Dacor authorized service representative at (800) 793-0093, or at the fuse box circuit breaker and lock the electrical panel door to prevent grease fires and maintain performance. • If the cooktop and range hood are in use . Clean the...
... and the requirements specified by a qualified installer according to turn the power off. • Before installing or servicing the range hood, switch power off at www.Dacor.com for examination, repair or adjustment. • Keep all grease-laden surfaces often to prevent power from the appliance being... and care manual. Contact the nearest Dacor authorized service representative at (800) 793-0093, or at the fuse box circuit breaker and lock the electrical panel door to prevent grease fires and maintain performance. • If the cooktop and range hood are in use . Clean the...

Installation Instructions
Page 36
..., EHR3018 E 30" (76.2 cm) EHR3612, EHR3618 36" (91.5 cm) EHR4212, EHR4218 42" (106.7 cm) EHR4812, EHR4818 48" (121.9 cm) EHR5418 54" (137.2 cm) All tolerances: +1/16", -0, unless otherwise stated important See the diagram for minimum installed distance from : National Fire Protection Association 1 Batterymarch Park... cooktop surface or wider. • Plan the installation so that the electrical connection of personal injury caused by reaching over the cooktop/range. • The hood model selected must be solid and at 120 Vac 60 Hz, 15 Amp. 6 The minimum specified distance...
..., EHR3018 E 30" (76.2 cm) EHR3612, EHR3618 36" (91.5 cm) EHR4212, EHR4218 42" (106.7 cm) EHR4812, EHR4818 48" (121.9 cm) EHR5418 54" (137.2 cm) All tolerances: +1/16", -0, unless otherwise stated important See the diagram for minimum installed distance from : National Fire Protection Association 1 Batterymarch Park... cooktop surface or wider. • Plan the installation so that the electrical connection of personal injury caused by reaching over the cooktop/range. • The hood model selected must be solid and at 120 Vac 60 Hz, 15 Amp. 6 The minimum specified distance...

