Planning Guides
Page 1
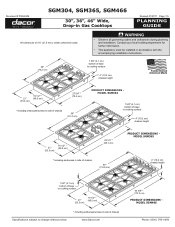
www.Dacor.com 44 5/8" * (113.3 cm) Product dimensions model sgm466 Phone: (800) 7934-0.5093 Document # PG04-004 SGM304, SGM365, SGM466 30", 36", 46" Wide, Drop-in side of base to change without notice. warning • Observe all governing codes and ordinances during planning ... sgm365 4" (10.2 cm) chassis height 1 5/8" (4.1 cm) bottom of chassis Specifications subject to cooking surface 21" (53.3 cm) 19 1/2" * (49.5 cm) * including embosses/screws in Gas Cooktops Revised 01/27/11 Page 1/5 PLANNING GUIDE All tolerances ±1/16" (±1.6 mm), unless otherwise noted.
www.Dacor.com 44 5/8" * (113.3 cm) Product dimensions model sgm466 Phone: (800) 7934-0.5093 Document # PG04-004 SGM304, SGM365, SGM466 30", 36", 46" Wide, Drop-in side of base to change without notice. warning • Observe all governing codes and ordinances during planning ... sgm365 4" (10.2 cm) chassis height 1 5/8" (4.1 cm) bottom of chassis Specifications subject to cooking surface 21" (53.3 cm) 19 1/2" * (49.5 cm) * including embosses/screws in Gas Cooktops Revised 01/27/11 Page 1/5 PLANNING GUIDE All tolerances ±1/16" (±1.6 mm), unless otherwise noted.
Planning Guides
Page 2
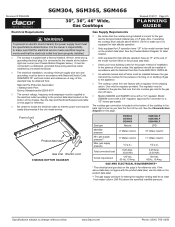
...pressure** 5" Water column 11" Water column Max. Gas and Electrical Requirements* * The electrical and gas data on the product data label. www.Dacor.com Phone: (800) 7934-0.6093 It must be done in accordance with a 1/2" regulator. See the Chassis Bottom Diagram for label location. ...3/4" regulator, approved for testing the regulator setting shall be easily disconnected if the unit needs service. SGM304, SGM365, SGM466 Document # PG04-004 30", 36", 46" Wide, Gas Cooktops Revised 01/27/11 Page 2/5 PLANNING GUIDE Electrical Requirements WARNING To prevent an electric shock hazard, the...
...pressure** 5" Water column 11" Water column Max. Gas and Electrical Requirements* * The electrical and gas data on the product data label. www.Dacor.com Phone: (800) 7934-0.6093 It must be done in accordance with a 1/2" regulator. See the Chassis Bottom Diagram for label location. ...3/4" regulator, approved for testing the regulator setting shall be easily disconnected if the unit needs service. SGM304, SGM365, SGM466 Document # PG04-004 30", 36", 46" Wide, Gas Cooktops Revised 01/27/11 Page 2/5 PLANNING GUIDE Electrical Requirements WARNING To prevent an electric shock hazard, the...
Planning Guides
Page 3
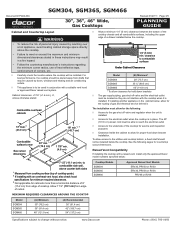
...7 1/2" (19.1 cm) min. Allow 7 1/2" (19.1 cm) from edge of cooktop. www.Dacor.com Phone: (800) 7934-0.7093 Document # PG04-004 SGM304, SGM365, SGM466 30", 36", 46" Wide, Gas Cooktops Revised 01/27/11 Page 3/5 PLANNING GUIDE Cabinet and Countertop Layout WARNING • To reduce...may result in conjunction with a suitable vent hood or approved Dacor raised vent system. If installing another appliance in these instructions may be installed. Minimum Required Clearances Around the Cooktop Cooktop Models SGM304 SGM365 SGM466 Approved Raised Vent Models ERV30, PRV30 or RV30 ERV36...
...7 1/2" (19.1 cm) min. Allow 7 1/2" (19.1 cm) from edge of cooktop. www.Dacor.com Phone: (800) 7934-0.7093 Document # PG04-004 SGM304, SGM365, SGM466 30", 36", 46" Wide, Gas Cooktops Revised 01/27/11 Page 3/5 PLANNING GUIDE Cabinet and Countertop Layout WARNING • To reduce...may result in conjunction with a suitable vent hood or approved Dacor raised vent system. If installing another appliance in these instructions may be installed. Minimum Required Clearances Around the Cooktop Cooktop Models SGM304 SGM365 SGM466 Approved Raised Vent Models ERV30, PRV30 or RV30 ERV36...

Planning Guides
Page 4
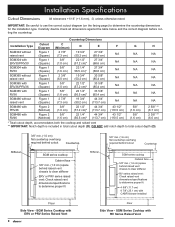
...(50.2 cm) 27 3/4" (68.6 cm) NA SGM304 with ERV30 or PRV30 SGM304 with RV30 SGM365 without raised vent SGM365 with ERV36 or PRV36 SGM365 with RV36 SGM466 without notice. www.Dacor.com Phone: (800) 7934-0.8093 sgm Series Cooktop with RV Series Raised Vent Specifications subject to determine proper... all dimensions against the table below and the correct diagram before cutting the countertop. Document # PG04-004 SGM304, SGM365, SGM466 30", 36", 46" Wide, Gas Cooktops Revised 01/27/11 Page 4/5 PLANNING GUIDE Cutout Dimensions Cutout tolerances +1/16" (+1.6 mm), -0, unless otherwise...
...(50.2 cm) 27 3/4" (68.6 cm) NA SGM304 with ERV30 or PRV30 SGM304 with RV30 SGM365 without raised vent SGM365 with ERV36 or PRV36 SGM365 with RV36 SGM466 without notice. www.Dacor.com Phone: (800) 7934-0.8093 sgm Series Cooktop with RV Series Raised Vent Specifications subject to determine proper... all dimensions against the table below and the correct diagram before cutting the countertop. Document # PG04-004 SGM304, SGM365, SGM466 30", 36", 46" Wide, Gas Cooktops Revised 01/27/11 Page 4/5 PLANNING GUIDE Cutout Dimensions Cutout tolerances +1/16" (+1.6 mm), -0, unless otherwise...

Planning Guides
Page 5
... E (both sides) 1 7/8" min. (4.8 cm) Figure 1 - Document # PG04-004 SGM304, SGM365, SGM466 30", 36", 46" Wide, Gas Cooktops Cutout tolerances +1/16" (+1.6 mm), -0, unless otherwise noted Rear wall Revised 01/27/11 Page... 5/5 PLANNING GUIDE Vertical combustible surface C D 4 1/4" (10.8 cm) min. to change without notice. Notched Countertop Cutout Diagram Specifications subject to combustible side wall above countertop (both sides) 1 7/8" min. (4.8 cm) Figure 2 - www.Dacor...
... E (both sides) 1 7/8" min. (4.8 cm) Figure 1 - Document # PG04-004 SGM304, SGM365, SGM466 30", 36", 46" Wide, Gas Cooktops Cutout tolerances +1/16" (+1.6 mm), -0, unless otherwise noted Rear wall Revised 01/27/11 Page... 5/5 PLANNING GUIDE Vertical combustible surface C D 4 1/4" (10.8 cm) min. to change without notice. Notched Countertop Cutout Diagram Specifications subject to combustible side wall above countertop (both sides) 1 7/8" min. (4.8 cm) Figure 2 - www.Dacor...

Installation Instructions
Page 2
...responsible for future reference and the local electrical inspector's use. Friday 6:00 a.m. Pacific Time Web site: www.Dacor.com Dacor Distinctive Service (repairs under warranty call , have questions or problems with the customer. • Customer: Keep ... Dimensions 3 Electrical Requirements 4 Gas Supply Requirements 4 Cabinet and Countertop Layout 5 Installation Instructions 8 Verify Package Contents 8 Installing the Cooktop 8 Connecting the Gas Line 8 Installing the Burner Components 9 Verifying Proper Operation 9 Installation Checklist 10 Parts List 11 Wiring Diagrams ...
...responsible for future reference and the local electrical inspector's use. Friday 6:00 a.m. Pacific Time Web site: www.Dacor.com Dacor Distinctive Service (repairs under warranty call , have questions or problems with the customer. • Customer: Keep ... Dimensions 3 Electrical Requirements 4 Gas Supply Requirements 4 Cabinet and Countertop Layout 5 Installation Instructions 8 Verify Package Contents 8 Installing the Cooktop 8 Connecting the Gas Line 8 Installing the Burner Components 9 Verifying Proper Operation 9 Installation Checklist 10 Parts List 11 Wiring Diagrams ...

Installation Instructions
Page 3
...8226; The Important Safety Instructions and warnings in these substances, always operate this or any other appliance. • Always contact the Dacor Customer Service Team about problems and conditions that could explode, such as gasoline) on or in the vicinity of this unit according to... cause cancer or reproductive harm. NEVER PICK UP A FLAMING PAN - NEVER cover any slots, holes or passages on the cooktop and cooktop chassis. See Customer Service Information. Do not store flammable or explosive materials in carbon monoxide poisoning and overheating of the appliance. DO...
...8226; The Important Safety Instructions and warnings in these substances, always operate this or any other appliance. • Always contact the Dacor Customer Service Team about problems and conditions that could explode, such as gasoline) on or in the vicinity of this unit according to... cause cancer or reproductive harm. NEVER PICK UP A FLAMING PAN - NEVER cover any slots, holes or passages on the cooktop and cooktop chassis. See Customer Service Information. Do not store flammable or explosive materials in carbon monoxide poisoning and overheating of the appliance. DO...

Installation Instructions
Page 4
.... • To avoid a fire hazard, do not use the cooktop to an electrical outlet with a surface (countertop) ventilation system. Dacor strongly recommends the installation of a range hood in conjunction with the cooktop and surrounding areas during and immediately after use. • Do not... use this appliance only in the manner specified in the area around the cooktop. Clean this appliance in...
.... • To avoid a fire hazard, do not use the cooktop to an electrical outlet with a surface (countertop) ventilation system. Dacor strongly recommends the installation of a range hood in conjunction with the cooktop and surrounding areas during and immediately after use. • Do not... use this appliance only in the manner specified in the area around the cooktop. Clean this appliance in...

Installation Instructions
Page 6
...; Check your local building codes for the gas service being provided (natural gas or LP gas). gas supply pressure Total connected load Circuit requirement SGM304 SGM365 SGM466 Natural gas 4" Water column 5" Water column 1/2 p.s.i. 0.25 Amp. (0.03 kW) 120 Vac, 60 Hz, 15 Amp. SGM304LP...least 1 inch water column (249 Pa) above 4000 ft. (1219 m) make sure that the electrical service meets electrical requirements and that the cooktop being installed is supplied with a 3/4" regulator, approved for connection to a 1/2" house gas supply. Gas and Electrical Requirements* * The electrical and...
...; Check your local building codes for the gas service being provided (natural gas or LP gas). gas supply pressure Total connected load Circuit requirement SGM304 SGM365 SGM466 Natural gas 4" Water column 5" Water column 1/2 p.s.i. 0.25 Amp. (0.03 kW) 120 Vac, 60 Hz, 15 Amp. SGM304LP...least 1 inch water column (249 Pa) above 4000 ft. (1219 m) make sure that the electrical service meets electrical requirements and that the cooktop being installed is supplied with a 3/4" regulator, approved for connection to a 1/2" house gas supply. Gas and Electrical Requirements* * The electrical and...

Installation Instructions
Page 7
...is to be used in conjunction with a raised vent, install only the approved Dacor model numbers specified below the cooktop. For best performance, the cooktop should not be installed below : Cooktop Models SGM304 SGM365 SGM466 Approved Raised Vent Models ERV30, PRV30 or RV30 ERV36, PRV36 or... RV36 PRV46 or RV46 Model SGM304 SGM365 SGM466 A: Minimum 30" (76.2 cm) 36" (91.4 cm) 48" (121.9 cm) A: Recommended 36" (91.4 cm) 42" (106.7 cm) 54" (137.2 cm) 5 Raised Vent Compatibility If installing the cooktop with a suitable vent hood or approved Dacor raised vent system. All tolerances...
...is to be used in conjunction with a raised vent, install only the approved Dacor model numbers specified below the cooktop. For best performance, the cooktop should not be installed below : Cooktop Models SGM304 SGM365 SGM466 Approved Raised Vent Models ERV30, PRV30 or RV30 ERV36, PRV36 or... RV36 PRV46 or RV46 Model SGM304 SGM365 SGM466 A: Minimum 30" (76.2 cm) 36" (91.4 cm) 48" (121.9 cm) A: Recommended 36" (91.4 cm) 42" (106.7 cm) 54" (137.2 cm) 5 Raised Vent Compatibility If installing the cooktop with a suitable vent hood or approved Dacor raised vent system. All tolerances...
Installation Instructions
Page 8
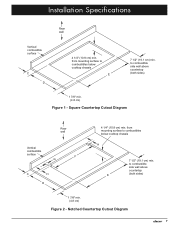
...fit 4 5/8" (11.7 cm) 9 7/8" (25.1 cm) with RV Series Raised Vent Countertop Dimensions Installation Type SGM304 without raised vent SGM304 with ERV30/PRV30 SGM304 with RV30 SGM365 without raised vent SGM365 with ERV36/PRV36 SGM365 with RV36 SGM466 without raised vent SGM466 with PRV46 Cutout ... and the correct diagram before cutting the countertop. Stiffener 3/8" min. (1.0 cm) flat countertop overhang required behind cutout Countertop SGM series cooktop Cabinet face 3/8" min. (1.0 cm) space behind raised vent chassis to clear stiffener ERV or PRV series raised vent: Check raised ...
...fit 4 5/8" (11.7 cm) 9 7/8" (25.1 cm) with RV Series Raised Vent Countertop Dimensions Installation Type SGM304 without raised vent SGM304 with ERV30/PRV30 SGM304 with RV30 SGM365 without raised vent SGM365 with ERV36/PRV36 SGM365 with RV36 SGM466 without raised vent SGM466 with PRV46 Cutout ... and the correct diagram before cutting the countertop. Stiffener 3/8" min. (1.0 cm) flat countertop overhang required behind cutout Countertop SGM series cooktop Cabinet face 3/8" min. (1.0 cm) space behind raised vent chassis to clear stiffener ERV or PRV series raised vent: Check raised ...
Installation Instructions
Page 9
... sides) 1 7/8" min. (4.8 cm) Figure 1 - Notched Countertop Cutout Diagram 7 Installation Specifications Rear wall Vertical combustible surface C D 4 1/4" (10.8 cm) min. from mounting surface to combustibles below cooktop chassis E 7 1/2" (19.1 cm) min. from mounting surface to combustibles below cooktop chassis H 7 1/2" (19.1 cm) min. Square Countertop Cutout Diagram Rear wall Vertical combustible surface F G C H D 4 1/4" (10.8 cm) min.
... sides) 1 7/8" min. (4.8 cm) Figure 1 - Notched Countertop Cutout Diagram 7 Installation Specifications Rear wall Vertical combustible surface C D 4 1/4" (10.8 cm) min. from mounting surface to combustibles below cooktop chassis E 7 1/2" (19.1 cm) min. from mounting surface to combustibles below cooktop chassis H 7 1/2" (19.1 cm) min. Square Countertop Cutout Diagram Rear wall Vertical combustible surface F G C H D 4 1/4" (10.8 cm) min.
Installation Instructions
Page 10
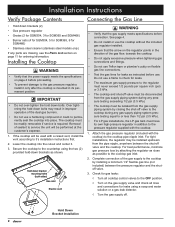
...regulator installed. • Ensure that the arrow on the regulator points in the direction of sealant to the pressure regulator supplied with the cooktop) to it . 3. Do not use . Complete connection of the dual gas burners. • Do not use a hardening compound...Hold Down Bracket Installation 8 The cooktop must be installed upstream from the gas supply piping system by closing the shut-off . Installation Instructions Verify Package Contents Connecting the Gas Line • Hold down brackets (2) • Gas pressure regulator • Grates (2 for SGM304, 3 for SGM365 and SGM466)...
...regulator installed. • Ensure that the arrow on the regulator points in the direction of sealant to the pressure regulator supplied with the cooktop) to it . 3. Do not use . Complete connection of the dual gas burners. • Do not use a hardening compound...Hold Down Bracket Installation 8 The cooktop must be installed upstream from the gas supply piping system by closing the shut-off . Installation Instructions Verify Package Contents Connecting the Gas Line • Hold down brackets (2) • Gas pressure regulator • Grates (2 for SGM304, 3 for SGM365 and SGM466)...
Installation Instructions
Page 11
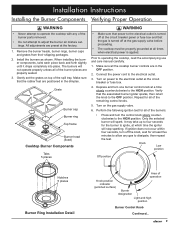
...burners as shown. The burners will not operate properly unless all of the burner parts removed. • Do not attempt to operating the cooktop, read the accompanying use and care manual carefully. 1. Connect the power cord to the HIGH position. Perform the following ignition test for... burner will stop sparking. Remove the burner heads, burner rings, burner caps and grates from their shipping packages. 2. Repeat for all the cooktop burner controls are properly seated. 3. Make sure that the associated burner igniter sparks, then return the knob to ignite, at a time slowly...
...burners as shown. The burners will not operate properly unless all of the burner parts removed. • Do not attempt to operating the cooktop, read the accompanying use and care manual carefully. 1. Connect the power cord to the HIGH position. Perform the following ignition test for... burner will stop sparking. Remove the burner heads, burner rings, burner caps and grates from their shipping packages. 2. Repeat for all the cooktop burner controls are properly seated. 3. Make sure that the associated burner igniter sparks, then return the knob to ignite, at a time slowly...
Installation Instructions
Page 12
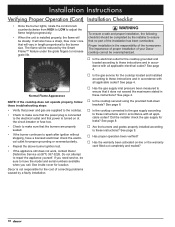
Normal Flame Appearance NOTE: If the cooktop does not operate properly, follow these instructions and in accordance with all applicable electrical codes? If you call. See inside cover for leaks? Dacor is not responsible for proper grounding or reversed polarity. • ... these instructions? See page 4. □□ Is the gas service for the cooktop grounded and located according to these instructions? Proper installation is the responsibility of your Dacor cooktop cannot be reduced by a faulty installation. Installation Instructions Verifying Proper Operation (Cont) ...
Normal Flame Appearance NOTE: If the cooktop does not operate properly, follow these instructions and in accordance with all applicable electrical codes? If you call. See inside cover for leaks? Dacor is not responsible for proper grounding or reversed polarity. • ... these instructions? See page 4. □□ Is the gas service for the cooktop grounded and located according to these instructions? Proper installation is the responsibility of your Dacor cooktop cannot be reduced by a faulty installation. Installation Instructions Verifying Proper Operation (Cont) ...
Use & Care Manuals
Page 1
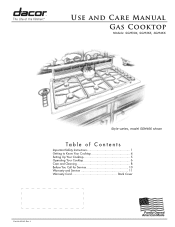
Use and Care Manual Gas Cooktop Models: SGM304, SGM365, SGM466 Style varies, model SGM466 shown Ta ble o f Co nt e nt s Important Safety Instructions 1 Getting to Know Your Cooktop 4 Setting Up Your Cooktop 5 Operating Your Cooktop 6 Care and Cleaning 8 Before You Call for Service 10 Warranty and Service 11 Warranty Card Back Cover Part No. 65140 Rev. J
Use and Care Manual Gas Cooktop Models: SGM304, SGM365, SGM466 Style varies, model SGM466 shown Ta ble o f Co nt e nt s Important Safety Instructions 1 Getting to Know Your Cooktop 4 Setting Up Your Cooktop 5 Operating Your Cooktop 6 Care and Cleaning 8 Before You Call for Service 10 Warranty and Service 11 Warranty Card Back Cover Part No. 65140 Rev. J
Use & Care Manuals
Page 3
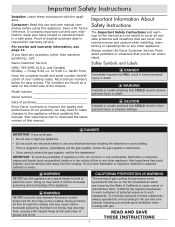
Keep your cooktop ready. Proof of original purchase date is required for future reference. and Canada) Monday - Pacific Time Have the complete model and serial number identification of this appliance. Visit www.Dacor.com to download the latest version of your sales receipt or canceled check in a ...space heater to improve the quality and performance of California to these substances, always operate this appliance as aerosol cans away from the cooktop. WARNING NEVER cover the slots between the burner control knobs and the trim rings on the under side of substances which are not...
Keep your cooktop ready. Proof of original purchase date is required for future reference. and Canada) Monday - Pacific Time Have the complete model and serial number identification of this appliance. Visit www.Dacor.com to download the latest version of your sales receipt or canceled check in a ...space heater to improve the quality and performance of California to these substances, always operate this appliance as aerosol cans away from the cooktop. WARNING NEVER cover the slots between the burner control knobs and the trim rings on the under side of substances which are not...
Use & Care Manuals
Page 4
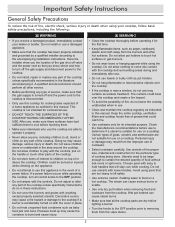
... utensils. Important Safety Instructions General Safety Precautions To reduce the risk of fire, electric shock, serious injury or death when using your cooktop, follow basic safety precautions, including the following: WARNING • If you the location of the gas shut off valve and the ...holders when removing food and cookware from the improper use towels or bulky cloth as window treatment. Keep the entire cooktop, ventilation filters and cooktop hoods free of the cooktop. The curtains could catch fire. • Use cookware only for the first time. • Keep flammable items,...
... utensils. Important Safety Instructions General Safety Precautions To reduce the risk of fire, electric shock, serious injury or death when using your cooktop, follow basic safety precautions, including the following: WARNING • If you the location of the gas shut off valve and the ...holders when removing food and cookware from the improper use towels or bulky cloth as window treatment. Keep the entire cooktop, ventilation filters and cooktop hoods free of the cooktop. The curtains could catch fire. • Use cookware only for the first time. • Keep flammable items,...
Use & Care Manuals
Page 5
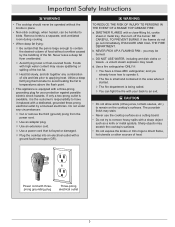
...b. NEVER PICK UP A FLAMING PAN - Use a fire extinguisher ONLY if: ◊ You have it replaced with high water content may scratch the cooktop's surfaces. • Do not expose the knobs or trim rings to temperatures above the flash point. • This appliance is frayed or damaged. ...◊ Plug the cooktop into an electrical outlet with threeprong grounding plug Three-prong electrical outlet 3 Remove birds to a separate, well-ventilated room during cooking. •...
...b. NEVER PICK UP A FLAMING PAN - Use a fire extinguisher ONLY if: ◊ You have it replaced with high water content may scratch the cooktop's surfaces. • Do not expose the knobs or trim rings to temperatures above the flash point. • This appliance is frayed or damaged. ...◊ Plug the cooktop into an electrical outlet with threeprong grounding plug Three-prong electrical outlet 3 Remove birds to a separate, well-ventilated room during cooking. •...
Use & Care Manuals
Page 6
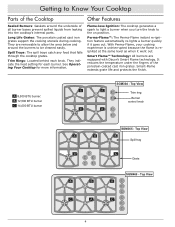
... the fingers of the porcelain-coated cast iron grates. A 8,500 BTU burner: B 12,500 BTU burner C 14,000 BTU burner SGM304 - Trim Rings: Located behind each burner. Smart Flame™ Technology: All burners are removable to allow the area below and around the... underside of all burner bases prevent spilled liquids from leaking into the cooktop's internal parts. Top View A B Trim ring Burner control knob C A SGM365 - Top View A B A C A C 4 They are equipped with Dacor's Smart Flame technology. They indicate the heat setting for more information. Perma-Flame...
... the fingers of the porcelain-coated cast iron grates. A 8,500 BTU burner: B 12,500 BTU burner C 14,000 BTU burner SGM304 - Trim Rings: Located behind each burner. Smart Flame™ Technology: All burners are removable to allow the area below and around the... underside of all burner bases prevent spilled liquids from leaking into the cooktop's internal parts. Top View A B Trim ring Burner control knob C A SGM365 - Top View A B A C A C 4 They are equipped with Dacor's Smart Flame technology. They indicate the heat setting for more information. Perma-Flame...


