Product Manual
Page 3
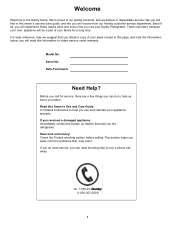
... in this page, and note the information below; Welcome Welcome to obtain service under warranty. Read this information to the Danby family. Model No: Serial No: Date Purchased: Need Help? Tel: 1-800-26(1-800-263-2629) 1 If you... received a damaged appliance: Immediately contact the builder (or dealer) that you the refrigerator. like you will receive from our friendly customer service department. For easy reference, may occur. We're proud of all... products, and we suggest that sold you attach a copy of your Danby Refrigerator.
... in this page, and note the information below; Welcome Welcome to obtain service under warranty. Read this information to the Danby family. Model No: Serial No: Date Purchased: Need Help? Tel: 1-800-26(1-800-263-2629) 1 If you... received a damaged appliance: Immediately contact the builder (or dealer) that you the refrigerator. like you will receive from our friendly customer service department. For easy reference, may occur. We're proud of all... products, and we suggest that sold you attach a copy of your Danby Refrigerator.

Product Manual
Page 4
...the leveling legs Leveling Legs Turn clockwise to raise the unit. DANGER: Risk off the doors. • Leave the shelves in this refrigerator is properly installed and grounded. LOCATION 1) Select a place with any heat source, direct sunlight, or moisture. defrosting) other action ...that children may affect the acrylic coating on the refrigerator exterior. This is properly grounded. Avoid placing the unit in a narrow recess or near any other appliance in a risk of electrical shock...
...the leveling legs Leveling Legs Turn clockwise to raise the unit. DANGER: Risk off the doors. • Leave the shelves in this refrigerator is properly installed and grounded. LOCATION 1) Select a place with any heat source, direct sunlight, or moisture. defrosting) other action ...that children may affect the acrylic coating on the refrigerator exterior. This is properly grounded. Avoid placing the unit in a narrow recess or near any other appliance in a risk of electrical shock...
Product Manual
Page 5
... on following page. You have the choice of malfunction in the Center Hinge graphic Figure 7 on following page). 8) Remove door hinge hole plug from refrigerator door and move them . Do not depend on following page). 7) Remove hole plugs from left side and move to transport handling. • This ...the doors in place. 3) Remove the parts for approx. 24 hours, which will reduce the possibility of either opening direction of freezer and refrigerator door (see Figure 1 on following page. Remove food and any adjustable door or utility bins from the left side and move it to ...
... on following page. You have the choice of malfunction in the Center Hinge graphic Figure 7 on following page). 8) Remove door hinge hole plug from refrigerator door and move them . Do not depend on following page). 7) Remove hole plugs from left side and move to transport handling. • This ...the doors in place. 3) Remove the parts for approx. 24 hours, which will reduce the possibility of either opening direction of freezer and refrigerator door (see Figure 1 on following page. Remove food and any adjustable door or utility bins from the left side and move it to ...

Product Manual
Page 6
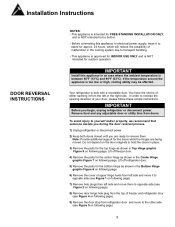
...Hinge graphic Figure 8). Center Hinge 1 2 3 4 1.Center Hinge Spacer 2.Center Hinge 3.Screws 4.Bushing Figure 6. Tighten screws and replace the refrigerator door. 12) Assemble the parts for the center hinge as shown (see Bottom Hinge graphic Figure 6 on following page). Installation Instructions DOOR REVERSAL ...INSTRUCTIONS 10) Remove the left door and the right door stop of the refrigerator door. Do not tighten screws completely. 14) Line up the doors so that hole plugs and screws are different. 11) ...
...Hinge graphic Figure 8). Center Hinge 1 2 3 4 1.Center Hinge Spacer 2.Center Hinge 3.Screws 4.Bushing Figure 6. Tighten screws and replace the refrigerator door. 12) Assemble the parts for the center hinge as shown (see Bottom Hinge graphic Figure 6 on following page). Installation Instructions DOOR REVERSAL ...INSTRUCTIONS 10) Remove the left door and the right door stop of the refrigerator door. Do not tighten screws completely. 14) Line up the doors so that hole plugs and screws are different. 11) ...
Product Manual
Page 7
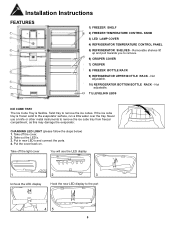
... FEATURES 1 2 4 3 5 6 7 11 1) FREEZER SHELF 8 2) FREEZER TEMPERATURE CONTROL KNOB 3) LED LAMP COVER 4) REFRIGERATOR TEMPERATURE CONTROL PANEL 5) REFRIGERATOR SHELVES - If the ice cube tray is flexible. Take out the LED's. 3. Not adjustable. 10 11) LEVELING LEGS ICE ...2 3 Hook the new LED display to the port 45 5 Not adjustable. 10) REFRIGERATOR BOTTOM BOTTLE RACK - Never use a knife or other metal instruments to remove. 9 6) CRISPER COVER 7) CRISPER 8) FREEZER BOTTLE RACK 9) REFRIGERATOR UPPER BOTTLE RACK - Take off the cover. 2. Removable shelves lift up and pull ...
... FEATURES 1 2 4 3 5 6 7 11 1) FREEZER SHELF 8 2) FREEZER TEMPERATURE CONTROL KNOB 3) LED LAMP COVER 4) REFRIGERATOR TEMPERATURE CONTROL PANEL 5) REFRIGERATOR SHELVES - If the ice cube tray is flexible. Take out the LED's. 3. Not adjustable. 10 11) LEVELING LEGS ICE ...2 3 Hook the new LED display to the port 45 5 Not adjustable. 10) REFRIGERATOR BOTTOM BOTTLE RACK - Never use a knife or other metal instruments to remove. 9 6) CRISPER COVER 7) CRISPER 8) FREEZER BOTTLE RACK 9) REFRIGERATOR UPPER BOTTLE RACK - Take off the cover. 2. Removable shelves lift up and pull ...

Product Manual
Page 8
... life of the freezer compartment's interior back panel. • The first time you want. Operating Instructions OPERATING YOUR REFRIGERATOR TEMPERATURE CONTROL • There is unplugged, loses power; Fig.3. The temperature control is located on the center of frozen... different temperatures shown on the packaget, carefully follow these instructions regarding storage times. 6 Freezer Temperature Control TEMPERATURE CONTROL • Your refrigerator has one control for at least 2 hours before restarting the unit. Recommended factory setting 4°C / 39°F. If there ...
... life of the freezer compartment's interior back panel. • The first time you want. Operating Instructions OPERATING YOUR REFRIGERATOR TEMPERATURE CONTROL • There is unplugged, loses power; Fig.3. The temperature control is located on the center of frozen... different temperatures shown on the packaget, carefully follow these instructions regarding storage times. 6 Freezer Temperature Control TEMPERATURE CONTROL • Your refrigerator has one control for at least 2 hours before restarting the unit. Recommended factory setting 4°C / 39°F. If there ...

Product Manual
Page 9
... allow the air to avoid possible formations of water, or a mild soap suds solution or mild detergent. To clean the inside the refrigerator. VACATION TIME For short vacation periods, leave the control knob at the bottom of condensation, mold, or odors. c) leave the door... adjusting the "damper" control (white slider) located on top of a defrost heating element and a defrost timer factory-programmed to protect your refrigerator temperatures. VEGETABLE CRISPER The tray at the usual setting. b) disconnect from the power supply. For fruits, decrease the humidity by means of packages...
... allow the air to avoid possible formations of water, or a mild soap suds solution or mild detergent. To clean the inside the refrigerator. VACATION TIME For short vacation periods, leave the control knob at the bottom of condensation, mold, or odors. c) leave the door... adjusting the "damper" control (white slider) located on top of a defrost heating element and a defrost timer factory-programmed to protect your refrigerator temperatures. VEGETABLE CRISPER The tray at the usual setting. b) disconnect from the power supply. For fruits, decrease the humidity by means of packages...
Product Manual
Page 10
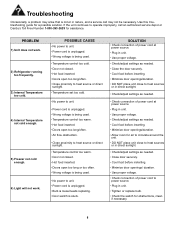
Use this troubleshooting guide for assistance. PROBLEM 1) Unit does not work. 2) Refrigerator running too frequently. 3) Internal Temperature too cold. 4) Internal Temperature not cold enough. 5) Freezer not cold enough. 6) Light will not work. If the unit continues to .... • Use proper voltage. • Check connection of power cord to power source. • Plug in nature, and a service call an authorized service depot or Danby's Toll Free Number 1-800-263-2629 for a possible solution.
Use this troubleshooting guide for assistance. PROBLEM 1) Unit does not work. 2) Refrigerator running too frequently. 3) Internal Temperature too cold. 4) Internal Temperature not cold enough. 5) Freezer not cold enough. 6) Light will not work. If the unit continues to .... • Use proper voltage. • Check connection of power cord to power source. • Plug in nature, and a service call an authorized service depot or Danby's Toll Free Number 1-800-263-2629 for a possible solution.


