Owner Manual
Page 7
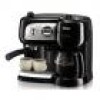
...they could be used . This is complete. I Delayed start-up button J Minute set button K Hour set button L 1-5 cups button M 1-5 cups indicator light N Espresso water tank O Drip coffee water tank O 1 Chlorine filter holder (if fitted) O2 Chlorine filter (if fitted) P Drip coffee "AccuFlavor Selector" Q Water tank cover...could reduce the safety of the appliance. • The power cord must never be replaced by qualified personnel. • Never install the machine in environments where the temperature may reach 0°C (32 F) or lower (the appliance may not be damaged if the water freezes)....
...they could be used . This is complete. I Delayed start-up button J Minute set button K Hour set button L 1-5 cups button M 1-5 cups indicator light N Espresso water tank O Drip coffee water tank O 1 Chlorine filter holder (if fitted) O2 Chlorine filter (if fitted) P Drip coffee "AccuFlavor Selector" Q Water tank cover...could reduce the safety of the appliance. • The power cord must never be replaced by qualified personnel. • Never install the machine in environments where the temperature may reach 0°C (32 F) or lower (the appliance may not be damaged if the water freezes)....
Owner Manual
Page 8
...After programming the appliance, to open the valve on the right (fig. 6). • Fill the tank with fresh clean water up . The espresso function will light up to the mark corresponding to the number of cups of coffee to be varied according to prepare drip coffee automatically. However...event of temporary power failure. Press the coffee "ON/OFF" button (fig. 4) for about 2 seconds until 0:00 flashes on . Note: The coffee machine features a "Flavor Savor" device inside the drip coffee filter holder. When the display stops flashing, the hour programmed is set , just press the AUTO button...
...After programming the appliance, to open the valve on the right (fig. 6). • Fill the tank with fresh clean water up . The espresso function will light up to the mark corresponding to the number of cups of coffee to be varied according to prepare drip coffee automatically. However...event of temporary power failure. Press the coffee "ON/OFF" button (fig. 4) for about 2 seconds until 0:00 flashes on . Note: The coffee machine features a "Flavor Savor" device inside the drip coffee filter holder. When the display stops flashing, the hour programmed is set , just press the AUTO button...
Owner Manual
Page 9
...selector knob to the position (fig. 14) and attach the filter holder to less than an inch from overflowing. HOW TO PREPARE ESPRESSO USING THE FILTER HOLDER FOR GROUND COFFEE 1.After preheating the appliance as described in the paragraph above, place the ground coffee filter in... is normal for coffee with the tamper (fig. 20). The AccuFlavor Selector changes the strength of the ground coffee is completely normal for espresso coffee machines. 3.Distribute the ground coffee evenly and press lightly with a strong (STRONG position) or light (LIGHT position) taste. Always remember to ...
...selector knob to the position (fig. 14) and attach the filter holder to less than an inch from overflowing. HOW TO PREPARE ESPRESSO USING THE FILTER HOLDER FOR GROUND COFFEE 1.After preheating the appliance as described in the paragraph above, place the ground coffee filter in... is normal for coffee with the tamper (fig. 20). The AccuFlavor Selector changes the strength of the ground coffee is completely normal for espresso coffee machines. 3.Distribute the ground coffee evenly and press lightly with a strong (STRONG position) or light (LIGHT position) taste. Always remember to ...
Owner Manual
Page 10
... milk inside the container and rotate the steam knob counter-clockwise (Fig.30). 2.With one cappuccino, first make all accessories the machine must be prepared. The cappuccino is hot. IMPORTANT: Always clean the cappuccino frother after using ground coffee. Proceed as follows: 1.Immerse... refrigerator temperature. 5.Remove the cappuccino maker by rotating the steam knob clockwise. 8.Pour the frothed milk into the cups containing the espresso prepared previously. NOTE: Use pods conforming to the ESE standard indicated on the filter holder and extract. 6.To turn the appliance ...
... milk inside the container and rotate the steam knob counter-clockwise (Fig.30). 2.With one cappuccino, first make all accessories the machine must be prepared. The cappuccino is hot. IMPORTANT: Always clean the cappuccino frother after using ground coffee. Proceed as follows: 1.Immerse... refrigerator temperature. 5.Remove the cappuccino maker by rotating the steam knob clockwise. 8.Pour the frothed milk into the cups containing the espresso prepared previously. NOTE: Use pods conforming to the ESE standard indicated on the filter holder and extract. 6.To turn the appliance ...
Owner Manual
Page 11
... on . 4.Make sure the filter holder is unplugged from the outlet; • Using a screwdriver, unscrew the screw fixing the espresso boiler outlet (fig. 45); • Clean the boiler with a pin (see fig. 41). • Replace the filter....inspecting against the light) that it upwards (fig. 35). CLEANING THE BOILER OUTLET About every 300 coffees, the espresso boiler outlet must be removed from the filter holder (fig. 36). • Unscrew the cap of citric ... 300 coffees, clean the filter holder for descaling espresso coffee machines. Failure to "O". Make sure the holes in water.
... on . 4.Make sure the filter holder is unplugged from the outlet; • Using a screwdriver, unscrew the screw fixing the espresso boiler outlet (fig. 45); • Clean the boiler with a pin (see fig. 41). • Replace the filter....inspecting against the light) that it upwards (fig. 35). CLEANING THE BOILER OUTLET About every 300 coffees, the espresso boiler outlet must be removed from the filter holder (fig. 36). • Unscrew the cap of citric ... 300 coffees, clean the filter holder for descaling espresso coffee machines. Failure to "O". Make sure the holes in water.
Owner Manual
Page 13
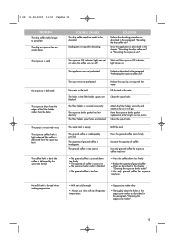
... unit". The quantity of ground coffee • Clean as described in the chapter "Cleaning the espresso boiler outlet" • Use only ground coffee for espresso machines No milk froth is inserted incorrectly The espresso boiler gasket has lost elasticity The filter holder spout holes are blocked Clean the spout holes The filter holder is...
... unit". The quantity of ground coffee • Clean as described in the chapter "Cleaning the espresso boiler outlet" • Use only ground coffee for espresso machines No milk froth is inserted incorrectly The espresso boiler gasket has lost elasticity The filter holder spout holes are blocked Clean the spout holes The filter holder is...

