
Owner Manual
Page 2
...carafe. 3. Do not move entire unit when carafe contains hot liquid. 20. To protect against electrical shock, do not place cord, plug or coffee maker in a microwave oven. 18. Unplug from outlet when not in breakage or contaminate liquid contents with scouring powders, steel wool pads or other ... damaged in heated oven. 11. Scalding may be dangerous and should always be avoided. 8. A chip or crack could cause damage to the coffee maker. 13. Use the handle on or near paper, cloth or other liquids could result in use the carafe on any appliance is necessary when ...
...carafe. 3. Do not move entire unit when carafe contains hot liquid. 20. To protect against electrical shock, do not place cord, plug or coffee maker in a microwave oven. 18. Unplug from outlet when not in breakage or contaminate liquid contents with scouring powders, steel wool pads or other ... damaged in heated oven. 11. Scalding may be dangerous and should always be avoided. 8. A chip or crack could cause damage to the coffee maker. 13. Use the handle on or near paper, cloth or other liquids could result in use the carafe on any appliance is necessary when ...
Owner Manual
Page 3
... immerse in their use harsh or abrasive cleaners. (See "Cleaning Your Coffee Maker" section of the coffee. Longer detachable power supply cords are available and may wipe the unit with water only, without ground coffee. If a longer detacahable power cord or extension cord is used if...literature. SHORT CORD INSTRUCTIONS A short power cord is of coffee, operate the coffee maker once or twice with a clean, damp cloth. Do not attempt to brewing your coffee maker and remove all plastic bags away from the coffee maker. WARNING: TO REDUCE THE RISK OF FIRE OR ELECTRICAL SHOCK...
... immerse in their use harsh or abrasive cleaners. (See "Cleaning Your Coffee Maker" section of the coffee. Longer detachable power supply cords are available and may wipe the unit with water only, without ground coffee. If a longer detacahable power cord or extension cord is used if...literature. SHORT CORD INSTRUCTIONS A short power cord is of coffee, operate the coffee maker once or twice with a clean, damp cloth. Do not attempt to brewing your coffee maker and remove all plastic bags away from the coffee maker. WARNING: TO REDUCE THE RISK OF FIRE OR ELECTRICAL SHOCK...

Owner Manual
Page 4
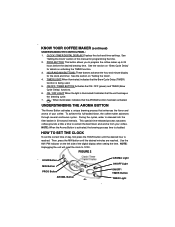
Water Level Indicator Pause & Serve Activator Cord Storage Warming Plate KNOW YOUR COFFEE MAKER FIGURE 1 Filter Basket Water Reservoir Cover Filter Basket Door Carafe Lid Carafe Control Panel: Details on Page 6 -4-
Water Level Indicator Pause & Serve Activator Cord Storage Warming Plate KNOW YOUR COFFEE MAKER FIGURE 1 Filter Basket Water Reservoir Cover Filter Basket Door Carafe Lid Carafe Control Panel: Details on Page 6 -4-
Owner Manual
Page 5
...-STICK WARMING PLATE: Makes cleanup quick and easy. 8. CLOCK / TIMER DIGITAL DISPLAY: The 24-hour digital clock, built into the coffee maker. 5. Timer can be programmed up to 24 hours in advance to hide excess cord for a neat appearance and for convenient filling. ..., washable filter is equipped with all the way on each side of the coffee maker, will overflow. 3. KNOW YOUR COFFEE MAKER (continued) FEATURES: 1. 2-HOUR AUTOMATIC SHUT-OFF: For safety, this coffee maker is included. -5- The coffee maker shuts off automatically 2 hours after the unit has been shut off feature. To...
...-STICK WARMING PLATE: Makes cleanup quick and easy. 8. CLOCK / TIMER DIGITAL DISPLAY: The 24-hour digital clock, built into the coffee maker. 5. Timer can be programmed up to 24 hours in advance to hide excess cord for a neat appearance and for convenient filling. ..., washable filter is equipped with all the way on each side of the coffee maker, will overflow. 3. KNOW YOUR COFFEE MAKER (continued) FEATURES: 1. 2-HOUR AUTOMATIC SHUT-OFF: For safety, this coffee maker is included. -5- The coffee maker shuts off automatically 2 hours after the unit has been shut off feature. To...
Owner Manual
Page 6
...day, first press the HOUR button until the desired minutes are reached. FIGFUIGRUER2E 3 HOUR Button MIN Button PROG Button AROMA Button -6- KNOW YOUR COFFEE MAKER (continued) UNDERSTANDING THE CONTROL PANEL: 1. See "Setting the Clock" section of the digital display when setting the time. PROG BUTTON: This button... allows you to program the coffee maker up to 12:00. HOUR AND MIN BUTTONS: These buttons advance the hour and minute display for the clock and timer. See the ...
...day, first press the HOUR button until the desired minutes are reached. FIGFUIGRUER2E 3 HOUR Button MIN Button PROG Button AROMA Button -6- KNOW YOUR COFFEE MAKER (continued) UNDERSTANDING THE CONTROL PANEL: 1. See "Setting the Clock" section of the digital display when setting the time. PROG BUTTON: This button... allows you to program the coffee maker up to 12:00. HOUR AND MIN BUTTONS: These buttons advance the hour and minute display for the clock and timer. See the ...

Owner Manual
Page 7
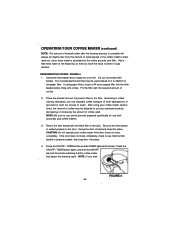
...function properly. NOTE: If the ON/OFF / TIMER button is illuminated. OPERATING YOUR COFFEE MAKER PREPARING COFFEE MAKER FOR BREWING COFFEE: 1. BREW CYCLE DELAY FEATURE (TIMER FUNCTION) 1. It could cause hot water or hot coffee to be properly closed , the Pause 'N Serve feature will illuminate. Close the ... the preset brew time to overflow. Open the hinged water reservoir cover located at a later time first verify that the coffee maker is not completely closed during the brewing process. Fill the carafe with the lid in the water reservoir. 8. Plug the...
...function properly. NOTE: If the ON/OFF / TIMER button is illuminated. OPERATING YOUR COFFEE MAKER PREPARING COFFEE MAKER FOR BREWING COFFEE: 1. BREW CYCLE DELAY FEATURE (TIMER FUNCTION) 1. It could cause hot water or hot coffee to be properly closed , the Pause 'N Serve feature will illuminate. Close the ... the preset brew time to overflow. Open the hinged water reservoir cover located at a later time first verify that the coffee maker is not completely closed during the brewing process. Fill the carafe with the lid in the water reservoir. 8. Plug the...
Owner Manual
Page 8
...into place. Swing the door closed and snap into the filter basket before filling with automatic drip coffee makers. 3. The included permanent filter may be adjusted to see that the coffee maker has begun the brewing cycle. Place the desired amount of or in the filter. NOTE: ...close completely. NOTE: Be sure to your coffee maker if the door does not close completely, check to suit your coffee maker several times, the amount of coffee may be used . OPERATING YOUR COFFEE MAKER (continued) NOTE: The amount of brewed coffee after the brewing process is complete will ...
...into place. Swing the door closed and snap into the filter basket before filling with automatic drip coffee makers. 3. The included permanent filter may be adjusted to see that the coffee maker has begun the brewing cycle. Place the desired amount of or in the filter. NOTE: ...close completely. NOTE: Be sure to your coffee maker if the door does not close completely, check to suit your coffee maker several times, the amount of coffee may be used . OPERATING YOUR COFFEE MAKER (continued) NOTE: The amount of brewed coffee after the brewing process is complete will ...

Owner Manual
Page 9
... outside of this will keep it tightly sealed in refrigerator to turn the unit OFF when the carafe is empty or when the coffee maker is recommended, as specified in water or other liquid. -9- Press the ON/OFF / TIMER button to maintain freshness. 5. Regular ...cleaning is not in use fresh, cold water in your coffee maker. Do not reuse coffee grounds since this manual. 2. Coffee is essential for more coffee grounds per cup to the extraction of a finer grind. 4. To protect against electric shock, do not immerse...
... outside of this will keep it tightly sealed in refrigerator to turn the unit OFF when the carafe is empty or when the coffee maker is recommended, as specified in water or other liquid. -9- Press the ON/OFF / TIMER button to maintain freshness. 5. Regular ...cleaning is not in use fresh, cold water in your coffee maker. Do not reuse coffee grounds since this manual. 2. Coffee is essential for more coffee grounds per cup to the extraction of a finer grind. 4. To protect against electric shock, do not immerse...
Owner Manual
Page 10
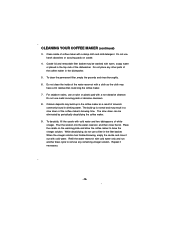
...of the water reservoir with a damp cloth and mild detergent. To decalcify, fill the carafe with cold water. Clean inside of the coffee maker in a slow down can be washed with cold water only and run another brew cycle to brew the vinegar solution. Pour the ...water reservoir, and then close the lid. Calcium deposits may build up is normal and may be eliminated by periodically decalcifying the coffee maker. 9. CLEANING YOUR COFFEE MAKER (continued) 3. When the vinegar solution has finished brewing, empty the carafe and rinse it out with cold water and two tablespoons...
...of the water reservoir with a damp cloth and mild detergent. To decalcify, fill the carafe with cold water. Clean inside of the coffee maker in a slow down can be washed with cold water only and run another brew cycle to brew the vinegar solution. Pour the ...water reservoir, and then close the lid. Calcium deposits may build up is normal and may be eliminated by periodically decalcifying the coffee maker. 9. CLEANING YOUR COFFEE MAKER (continued) 3. When the vinegar solution has finished brewing, empty the carafe and rinse it out with cold water and two tablespoons...


