Owner Manual
Page 3
....) Keep all packaging material and literature. Do not immerse the coffee maker in any liquid. 25. Clean the carafe, carafe lid, filter basket and filter in their use harsh or abrasive cleaners. (See "Cleaning Your Coffee Maker" section of fire or electrical shock, do not remove the...: Do not immerse in a polarized plug only one way. Dry thoroughly. To remove any labels or stickers from children. IMPORTANT: Use cold water only. FOR HOUSEHOLD USE ONLY SAVE THESE INSTRUCTIONS SHORT CORD INSTRUCTIONS A short power cord is turned off. 26. BEFORE FIRST USE Place the ...
....) Keep all packaging material and literature. Do not immerse the coffee maker in any liquid. 25. Clean the carafe, carafe lid, filter basket and filter in their use harsh or abrasive cleaners. (See "Cleaning Your Coffee Maker" section of fire or electrical shock, do not remove the...: Do not immerse in a polarized plug only one way. Dry thoroughly. To remove any labels or stickers from children. IMPORTANT: Use cold water only. FOR HOUSEHOLD USE ONLY SAVE THESE INSTRUCTIONS SHORT CORD INSTRUCTIONS A short power cord is turned off. 26. BEFORE FIRST USE Place the ...

Owner Manual
Page 4
REMOVABLE WATER TANK 4. CORD STORAGE 6. ON/OFF BUTTON WITH INDICATOR LIGHT 10. THERMAL CARAFE WITH LID 11. LID OPENING LIP 15. WATER FILTER HOLDER 3. ANTI-DRIP DEVICE (PAUSE 'N SERVE) 7. PROGRAM BUTTON 8. CLOCK/TIMER BUTTON 9. ACCUFLAVOR SELECTOR DIAL 16. WATER FILTER 2. CUP STORAGE TRAY 4 KNOW YOUR COFFEE MAKER FIGURE 1 1. LID 5. MEASURING SCOOP 12. PERMANENT COFFEE FILTER 14. REMOVABLE FILTER BASKET 13.
REMOVABLE WATER TANK 4. CORD STORAGE 6. ON/OFF BUTTON WITH INDICATOR LIGHT 10. THERMAL CARAFE WITH LID 11. LID OPENING LIP 15. WATER FILTER HOLDER 3. ANTI-DRIP DEVICE (PAUSE 'N SERVE) 7. PROGRAM BUTTON 8. CLOCK/TIMER BUTTON 9. ACCUFLAVOR SELECTOR DIAL 16. WATER FILTER 2. CUP STORAGE TRAY 4 KNOW YOUR COFFEE MAKER FIGURE 1 1. LID 5. MEASURING SCOOP 12. PERMANENT COFFEE FILTER 14. REMOVABLE FILTER BASKET 13.

Owner Manual
Page 5
...to preserve that fresh coffee taste. 6. PERMANENT GOLD-TONE FILTER: Specially designed to keep the correct time even after the unit has been shut off -flavors caused by chlorine. 10. ADVANCED WATER FILTRATION: Optimizes the taste of harm's way when coffee ...plate and coffee will automatically begin flowing through filter basket. KNOW YOUR COFFEE MAKER (continued) FEATURES: 1. DOUBLE-WALL THERMAL CARAFE: Uniquely designed carafe retains heat, keeping coffee hot for convenient filling and easy cleaning. 7. WATER LEVEL INDICATOR: Large easy-to interrupt the ...
...to preserve that fresh coffee taste. 6. PERMANENT GOLD-TONE FILTER: Specially designed to keep the correct time even after the unit has been shut off -flavors caused by chlorine. 10. ADVANCED WATER FILTRATION: Optimizes the taste of harm's way when coffee ...plate and coffee will automatically begin flowing through filter basket. KNOW YOUR COFFEE MAKER (continued) FEATURES: 1. DOUBLE-WALL THERMAL CARAFE: Uniquely designed carafe retains heat, keeping coffee hot for convenient filling and easy cleaning. 7. WATER LEVEL INDICATOR: Large easy-to interrupt the ...
Owner Manual
Page 7
...Lift out the water tank. 6. Turn the handle on the water filter holder and align the arrow on /off . Lower the water filter holder into the water tank and place it into a 120V / 60Hz only outlet. 3. Separate the water filter holder by pulling the water filter holder apart. The water level must be ... you want to confirm the automatic time selected. Place the coffee maker on the base. 4. Replace the water tank back into water tank. 10. Place the water filter inside the coffee maker, but take care not to flash.) The brewing cycle will begin once the set on...
...Lift out the water tank. 6. Turn the handle on the water filter holder and align the arrow on /off . Lower the water filter holder into the water tank and place it into a 120V / 60Hz only outlet. 3. Separate the water filter holder by pulling the water filter holder apart. The water level must be ... you want to confirm the automatic time selected. Place the coffee maker on the base. 4. Replace the water tank back into water tank. 10. Place the water filter inside the coffee maker, but take care not to flash.) The brewing cycle will begin once the set on...

Owner Manual
Page 8
... on top of cups desired. Turn the control to the left for light coffee and to begin brewing immediately. Add a little extra water at the beginning so that the filter basket is seated properly inside of your coffee maker if the lid does not close completely, check to the inside the coffee...
... on top of cups desired. Turn the control to the left for light coffee and to begin brewing immediately. Add a little extra water at the beginning so that the filter basket is seated properly inside of your coffee maker if the lid does not close completely, check to the inside the coffee...
Owner Manual
Page 9
...basket stops. NOTE: If you pour the coffee before the full pot is complete, discard the grounds and rinse the permanent filter and filter basket thoroughly with water. (See "Cleaning Your Coffee Maker" section of the cycle. In a few minutes the coffee maker will illuminate and ...process at the end of this feature, we offer this manual for more details). 13. Removing a cup during this manual. 9. Fill the water tank to use . NOTE: If you perform this manual. OPERATING YOUR COFFEE MAKER (continued) Using the Automatic Brew Function: 8. After brewing...
...basket stops. NOTE: If you pour the coffee before the full pot is complete, discard the grounds and rinse the permanent filter and filter basket thoroughly with water. (See "Cleaning Your Coffee Maker" section of the cycle. In a few minutes the coffee maker will illuminate and ...process at the end of this feature, we offer this manual for more details). 13. Removing a cup during this manual. 9. Fill the water tank to use . NOTE: If you perform this manual. OPERATING YOUR COFFEE MAKER (continued) Using the Automatic Brew Function: 8. After brewing...
Owner Manual
Page 11
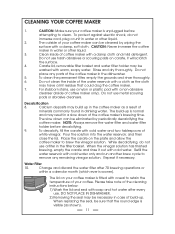
...that the round edge is visible (as a result of coffee maker only). Pour the solution into the water reservoir, and then close the lid. Change and discard the water filter after every use harsh abrasives or scouring pads on carafe, it out with a damp cloth and mild ...surface. 4. Rinse and dry thoroughly. Calcium deposits may result in case of the coffee maker's brewing time. NOTE: Always remove the water filter and water filter holder before attempting to brew the vinegar solution. Please take note of the cleaning instructions below: 1) Wash the lid and seal with ...
...that the round edge is visible (as a result of coffee maker only). Pour the solution into the water reservoir, and then close the lid. Change and discard the water filter after every use harsh abrasives or scouring pads on carafe, it out with a damp cloth and mild ...surface. 4. Rinse and dry thoroughly. Calcium deposits may result in case of the coffee maker's brewing time. NOTE: Always remove the water filter and water filter holder before attempting to brew the vinegar solution. Please take note of the cleaning instructions below: 1) Wash the lid and seal with ...


