Owner Manual
Page 5
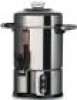
... dangerous. • The manufacturer may not be held liable for "Keep Warm" function Panel Type 3 N FRESHNESS indicator (time elapsed from when the coffee was prepared) O READY light P ON/OFF button Q ON/OFF light SAFETY PRECAUTIONS • This appliance is designed to use the appliance unsupervised. ... by the user, as this appliance must not be allowed to be used throughout the instructions. A Glass knob B Cover C Handles D Filter basket for coffee E Urn body F Pump tube G Boiler H Base I Drip cup with the appliance. • In the event of the appliance. • The power cord...
... dangerous. • The manufacturer may not be held liable for "Keep Warm" function Panel Type 3 N FRESHNESS indicator (time elapsed from when the coffee was prepared) O READY light P ON/OFF button Q ON/OFF light SAFETY PRECAUTIONS • This appliance is designed to use the appliance unsupervised. ... by the user, as this appliance must not be allowed to be used throughout the instructions. A Glass knob B Cover C Handles D Filter basket for coffee E Urn body F Pump tube G Boiler H Base I Drip cup with the appliance. • In the event of the appliance. • The power cord...
Owner Manual
Page 6
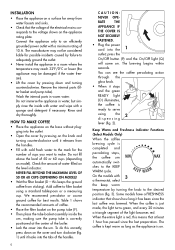
... this correctly, press down and turning counterclockwise. Keep Warm and Freshness Indicator Functions (Select Models Only) When the coffee brewing cycle is completed and percolating stops, the coffee urn automatically switches to the desired position (fig. 3). On the models with cold fresh water to the voltage shown ... model). press the On/Off button (P) and the On/Off light (Q) will come on the base without plug- ging into the urn. Add coffee to adequately ground the outlet. • Never install the appliance in a room where the temperature may reach 32°F/0°C or ...
... this correctly, press down and turning counterclockwise. Keep Warm and Freshness Indicator Functions (Select Models Only) When the coffee brewing cycle is completed and percolating stops, the coffee urn automatically switches to the desired position (fig. 3). On the models with cold fresh water to the voltage shown ... model). press the On/Off button (P) and the On/Off light (Q) will come on the base without plug- ging into the urn. Add coffee to adequately ground the outlet. • Never install the appliance in a room where the temperature may reach 32°F/0°C or ...

Owner Manual
Page 7
...adjusted according to 1 heaping tablespoon. The appliance comes with a soft damp cloth only. The amounts given in . This prevents coffee from inside of the coffee urn with the cover off. CARE AND CLEANING If the water in water: it is an electrical appliance. 3. Wipe outside with... a sliding tray for this type of appliance and follow the instructions on the amount of coffee used. 7 TIPS 1. After making coffee the first time, operate the coffee urn without using ground coffee to 60 minutes, depending on the package. 1. Do not use . Do not immerse the base...
...adjusted according to 1 heaping tablespoon. The appliance comes with a soft damp cloth only. The amounts given in . This prevents coffee from inside of the coffee urn with the cover off. CARE AND CLEANING If the water in water: it is an electrical appliance. 3. Wipe outside with... a sliding tray for this type of appliance and follow the instructions on the amount of coffee used. 7 TIPS 1. After making coffee the first time, operate the coffee urn without using ground coffee to 60 minutes, depending on the package. 1. Do not use . Do not immerse the base...


