Owner Manual
Page 5
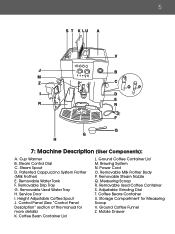
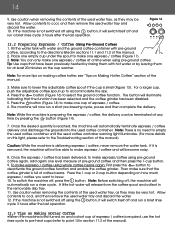
... Frother Body P. 5 7: Machine Description (User Components): A. Removable Used Water Tray H. Height Adjustable Coffee Spout J. Cup Warmer B. Control Panel (See "Control Panel Description" section of the manual for Measuring Scoop V. Mobile Drawer Power Cord O. Removable Used Coffee Container S. Adjustable Grinding Dial T. Patented Cappuccino System Frother (Milk Frother) E. Storage Compartment for more details...
... Frother Body P. 5 7: Machine Description (User Components): A. Removable Used Water Tray H. Height Adjustable Coffee Spout J. Cup Warmer B. Control Panel (See "Control Panel Description" section of the manual for Measuring Scoop V. Mobile Drawer Power Cord O. Removable Used Coffee Container S. Adjustable Grinding Dial T. Patented Cappuccino System Frother (Milk Frother) E. Storage Compartment for more details...
Owner Manual
Page 7
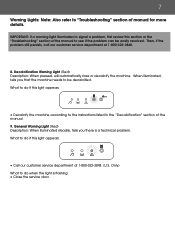
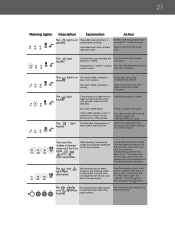
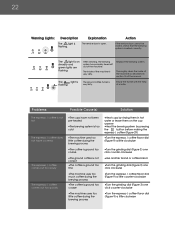
... problem, first review this light appears: • Decalcify the machine according to the instructions listed in the "Decalcification" section of the manual. 9. General Warning Light (Red) Description: When illuminated steadily, tells you that the machine needs to be easily resolved. Decalcification Warning ... Description: When pressed, will automatically rinse or decalcify the machine. What to do if this section or the "Troubleshooting" section of manual for more details. Only) What to do if this light appears: • Call our customer service department at 1-800-322-3848...
... problem, first review this light appears: • Decalcify the machine according to the instructions listed in the "Decalcification" section of the manual. 9. General Warning Light (Red) Description: When illuminated steadily, tells you that the machine needs to be easily resolved. Decalcification Warning ... Description: When pressed, will automatically rinse or decalcify the machine. What to do if this section or the "Troubleshooting" section of manual for more details. Only) What to do if this light appears: • Call our customer service department at 1-800-322-3848...
Owner Manual
Page 8
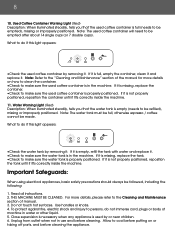
... details on or taking off parts, and before cleaning. To protect against fire, electric shock and injury to the Cleaning and Maintenance section of the manual for more details, please refer to persons, do not immerse cord, plugs or body of machine in use and before cleaning the appliance. Unplug from.... Close supervision is necessary when any appliance is not properly positioned, reposition the container until it . Note: Refer to the "Cleaning and Maintenance" section of manual. 3. 8 10.
... details on or taking off parts, and before cleaning. To protect against fire, electric shock and injury to the Cleaning and Maintenance section of the manual for more details, please refer to persons, do not immerse cord, plugs or body of machine in use and before cleaning the appliance. Unplug from.... Close supervision is necessary when any appliance is not properly positioned, reposition the container until it . Note: Refer to the "Cleaning and Maintenance" section of manual. 3. 8 10.
Owner Manual
Page 9
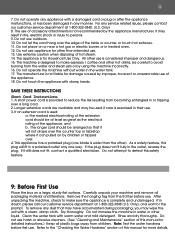
... is wider than intended use harsh or abrasive cleaners. (See "Cleaning and Maintenance" section of this manual for other than the other hot drinks, be at least as great as the electrical rating of this manual for the prompt. As a safety feature, this safety feature. 9: Before First Use Place the box on...
... is wider than intended use harsh or abrasive cleaners. (See "Cleaning and Maintenance" section of this manual for other than the other hot drinks, be at least as great as the electrical rating of this manual for the prompt. As a safety feature, this safety feature. 9: Before First Use Place the box on...
Owner Manual
Page 10
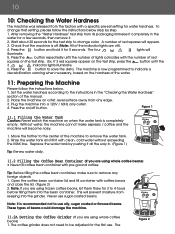
... "Checking the Water Hardness" section of the water. 11: Preparing the Machine Please follow the instructions below . 1. Place the machine on the hardness of the manual. 2. 10 10: Checking the Water Hardness The machine was released from seeping into the grinder. To change color.
... "Checking the Water Hardness" section of the water. 11: Preparing the Machine Please follow the instructions below . 1. Place the machine on the hardness of the manual. 2. 10 10: Checking the Water Hardness The machine was released from seeping into the grinder. To change color.
Owner Manual
Page 12
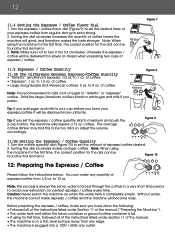
...; If using the machine for the first time, the correct position for first time, followed all of the instructions listed under Section 11 of the manual ("Preparing the Machine"). • The water tank and either the bean container or ground coffee container is recommended to add a bit of espresso /... regular, strong to maximum and push the 2-cup button, the machine will prepare a 12 oz. Turning the dial clockwise increases the quantity of the manual. • The machine is completely empty. Note: When using for the dial can make any edge. • The machine is forced through the ...
...; If using the machine for the first time, the correct position for first time, followed all of the instructions listed under Section 11 of the manual ("Preparing the Machine"). • The water tank and either the bean container or ground coffee container is recommended to add a bit of espresso /... regular, strong to maximum and push the 2-cup button, the machine will prepare a 12 oz. Turning the dial clockwise increases the quantity of the manual. • The machine is completely empty. Note: When using for the dial can make any edge. • The machine is forced through the ...
Owner Manual
Page 13
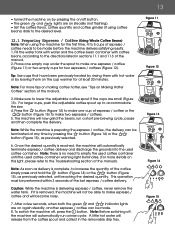
...into the used coffee container warning light illuminates. (For more tips on making coffee hotter, see "Tips on Making Hotter Coffee" section of the manual. 2. Caution: While the machine is removed, the machine will not be able to lower the adjustable coffee spout if the cups are on ...the machine is no need to make espresso / coffee and will release from the coffee spout and collect in sections 11.1 and 11.3 of the manual. 3. Press the button (Figure 14) to empty the used coffee container until reaching the desired quantity. Note: There is preparing the espresso / coffee...
...into the used coffee container warning light illuminates. (For more tips on making coffee hotter, see "Tips on Making Hotter Coffee" section of the manual. 2. Caution: While the machine is removed, the machine will not be able to lower the adjustable coffee spout if the cups are on ...the machine is no need to make espresso / coffee and will release from the coffee spout and collect in sections 11.1 and 11.3 of the manual. 3. Press the button (Figure 14) to empty the used coffee container until reaching the desired quantity. Note: There is preparing the espresso / coffee...
Owner Manual
Page 14
...20 minutes on the cup warmer. Once the desired quantity is delivering espresso / coffee, never remove the water tank. Place one cup of the manual). The machine will not be very hot. Allow contents to accommodate the size. 4. Once the espresso / coffee has been delivered, to make... espresso/coffee using pre-ground coffee. Note: For more details on how much espresso / coffee you want to make one level measure of the manual. 3. To switch the machine off , the machine will become noisy. 8. The button will switch itself off and run a rinse cycle. If...
...20 minutes on the cup warmer. Once the desired quantity is delivering espresso / coffee, never remove the water tank. Place one cup of the manual). The machine will not be very hot. Allow contents to accommodate the size. 4. Once the espresso / coffee has been delivered, to make... espresso/coffee using pre-ground coffee. Note: For more details on how much espresso / coffee you want to make one level measure of the manual. 3. To switch the machine off , the machine will become noisy. 8. The button will switch itself off and run a rinse cycle. If...
Owner Manual
Page 15
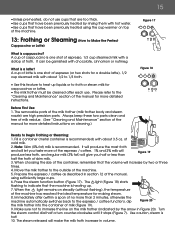
... cold milk. 2. Please refer to the "Cleaning and Maintenance" section of the manual, using the cup warmer on steadily (without flashing), the temperature of the manual for making steam. 8. Prepare the espresso / coffee as described in section 12 of the manual for more than Figure 19 half the froth of milk (Figure 19...
... cold milk. 2. Please refer to the "Cleaning and Maintenance" section of the manual, using the cup warmer on steadily (without flashing), the temperature of the manual for making steam. 8. Prepare the espresso / coffee as described in section 12 of the manual for more than Figure 19 half the froth of milk (Figure 19...
Owner Manual
Page 19
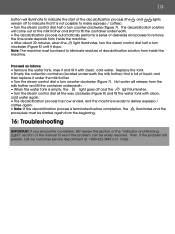
... started again from the beginning. 16: Troubleshooting IMPORTANT: If you encounter a problem, first review this section or the "Indicator and Warning LIghts" section of the manual to eliminate residues of decalcification solution from inside the machine. • After about 30 minutes, when the light illuminates, turn the steam control dial half...
... started again from the beginning. 16: Troubleshooting IMPORTANT: If you encounter a problem, first review this section or the "Indicator and Warning LIghts" section of the manual to eliminate residues of decalcification solution from inside the machine. • After about 30 minutes, when the light illuminates, turn the steam control dial half...
Owner Manual
Page 21
...is dirty or lined with the steam dial in the machine. Only). After cleaning, the brewing system has probably been left out of the manual. Check that a small stone is blocking the coffee grinder. Turn the steam dial clockwise all of lime scale in the open out correctly.... The light flashes. Leave the service door closed and the brewing system out of the manual. The flashes. light The pre-ground coffee has not been poured into the funnel with beans. Close the service door and press the ...
...is dirty or lined with the steam dial in the machine. Only). After cleaning, the brewing system has probably been left out of the manual. Check that a small stone is blocking the coffee grinder. Turn the steam dial clockwise all of lime scale in the open out correctly.... The light flashes. Leave the service door closed and the brewing system out of the manual. The flashes. light The pre-ground coffee has not been poured into the funnel with beans. Close the service door and press the ...
Owner Manual
Page 22
... as described in hot water or leave them on steadily and green lights are flashing. Replace the brewing system. Thoroughly clean the inside of the manual. Explanation The service door is on the cup warmer •Heat the brewing system by rinsing them in section 15 of the machine is flashing...
... as described in hot water or leave them on steadily and green lights are flashing. Replace the brewing system. Thoroughly clean the inside of the manual. Explanation The service door is on the cup warmer •Heat the brewing system by rinsing them in section 15 of the machine is flashing...
Owner Manual
Page 25
...is in lieu of all other than parts damaged in transit. If repairs become necessary, see contact information below: U.S. Residents of the manual for Mexico. Please refer to the back page of Mexico: Please refer to the Limited Warranty statement for De'Longhi addresses. Some states...Residents of its appliance. 25 This warranty applies to all accessories, spare parts or replacement parts, please contact our parts division at www.delonghi.com. In the event of the appliance, which has been subject to the appliance outside our factory or authorized service centers, nor shall ...
...is in lieu of all other than parts damaged in transit. If repairs become necessary, see contact information below: U.S. Residents of the manual for Mexico. Please refer to the back page of Mexico: Please refer to the Limited Warranty statement for De'Longhi addresses. Some states...Residents of its appliance. 25 This warranty applies to all accessories, spare parts or replacement parts, please contact our parts division at www.delonghi.com. In the event of the appliance, which has been subject to the appliance outside our factory or authorized service centers, nor shall ...

