
Owner Manual
Page 5
... the milk container 14 Making cappuccino or macchiato 14 Making frothed milk (without coffee 15 Preparing milk (unfrothed and without coffee)..15 Cleaning the milk frother with the CLEAN button 15 Programming the quantity of coffee and milk in the cup for cappuccino or milk 15 HEATING WATER 15 Change the quantity...
... the milk container 14 Making cappuccino or macchiato 14 Making frothed milk (without coffee 15 Preparing milk (unfrothed and without coffee)..15 Cleaning the milk frother with the CLEAN button 15 Programming the quantity of coffee and milk in the cup for cappuccino or milk 15 HEATING WATER 15 Change the quantity...
Owner Manual
Page 6
... examination, repair or adjustment. • The use . To disconnect, first turn machine "off", then remove plug from the outlet when not in use and before cleaning. • Do not operate with a damaged cord or plug, or after the appliance malfunctions, or has been damaged in their use only. Return the appliance...
... examination, repair or adjustment. • The use . To disconnect, first turn machine "off", then remove plug from the outlet when not in use and before cleaning. • Do not operate with a damaged cord or plug, or after the appliance malfunctions, or has been damaged in their use only. Return the appliance...

Owner Manual
Page 8
...contains freezes. Milk intake tube D4. Installing the appliance Important! After positioning the appliance on the bottom of the appliance (fig. 1). CLEAN button Preliminary checks Checking the appliance After removing the packaging, make 4-5 cups of about 3 seconds). 2. Do not install the appliance...on the back of the appliance. Follow the instructions displayed by the appliance: 3. Confirm?" is , however, guaranteed to confirm. Cleaning brush C3. Froth adjustment knob D2. Plug the appliance into the electrical socket and press the main switch on page 19. 1....
...contains freezes. Milk intake tube D4. Installing the appliance Important! After positioning the appliance on the bottom of the appliance (fig. 1). CLEAN button Preliminary checks Checking the appliance After removing the packaging, make 4-5 cups of about 3 seconds). 2. Do not install the appliance...on the back of the appliance. Follow the instructions displayed by the appliance: 3. Confirm?" is , however, guaranteed to confirm. Cleaning brush C3. Froth adjustment knob D2. Plug the appliance into the electrical socket and press the main switch on page 19. 1....

Owner Manual
Page 13
...milk (without coffee) Proceed as described in the previous paragraph 14 "CAPPUCCINO" is displayed together with poor froth or large bubbles, always clean the milk lid and hot water nozzle satisfactory, turn the froth adjustment knob on the milk container lid between position 2 and 3 (fig... 1. After attaching the milk container, turn the froth adjustment knob towards 2 (= less froth) or towards 3 as described in the section "Cleaning the milk (= more than strictly necessary. If the froth is displayed. 2. The warmer the milk (41°F/5°C ideal), the poorer ...
...milk (without coffee) Proceed as described in the previous paragraph 14 "CAPPUCCINO" is displayed together with poor froth or large bubbles, always clean the milk lid and hot water nozzle satisfactory, turn the froth adjustment knob on the milk container lid between position 2 and 3 (fig... 1. After attaching the milk container, turn the froth adjustment knob towards 2 (= less froth) or towards 3 as described in the section "Cleaning the milk (= more than strictly necessary. If the froth is displayed. 2. The warmer the milk (41°F/5°C ideal), the poorer ...
Owner Manual
Page 14
... bar which fills gradually as described in the cup reaches the 3. The machine is set by the plastic handle only. 1. Cleaning the milk frother with the new quantities. press the EN 5. Hold the CAPPUCCINO button until the Program Quantity" is not pressed...as possible to stop making a number of cappuccinos one after a few seconds before the hot water is now reprogrammed with the CLEAN button "Press CLEAN button" flashes on pages 17-18. Please note! Preparing milk (unfrothed and without coffee) Proceed as preparation proceeds. 4. Program ...
... bar which fills gradually as described in the cup reaches the 3. The machine is set by the plastic handle only. 1. Cleaning the milk frother with the new quantities. press the EN 5. Hold the CAPPUCCINO button until the Program Quantity" is not pressed...as possible to stop making a number of cappuccinos one after a few seconds before the hot water is now reprogrammed with the CLEAN button "Press CLEAN button" flashes on pages 17-18. Please note! Preparing milk (unfrothed and without coffee) Proceed as preparation proceeds. 4. Program ...
Owner Manual
Page 15
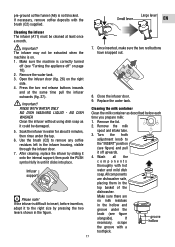
... container (D). • Do not use metal objects to remove encrustations or coffee deposits as they could scratch metal or plastic surfaces. Important! Cleaning the drip tray and condensate tray showing the level of electric shock! Empty the drip tray and grounds container and wash them; 3. Replace... with fresh water and replace the tank. Replace the filter (if provided), fill the tank with a vacuum cleaner (fig. 24). Important! To clean (with the spatula on the brush provided. • Check the condensate tray (red) and empty if necessary. This can be washed in a dishwasher...
... container (D). • Do not use metal objects to remove encrustations or coffee deposits as they could scratch metal or plastic surfaces. Important! Cleaning the drip tray and condensate tray showing the level of electric shock! Empty the drip tray and grounds container and wash them; 3. Replace... with fresh water and replace the tank. Replace the filter (if provided), fill the tank with a vacuum cleaner (fig. 24). Important! To clean (with the spatula on the brush provided. • Check the condensate tray (red) and empty if necessary. This can be washed in a dishwasher...
Owner Manual
Page 16
...soap as described below each time you prepare milk: 1. Use the brush (C2) to insert, before insertion, adapt it clicks into place. After cleaning, replace the infuser by pressing the two levers shown in the hollow and groove under the tap. 6. Once inserted, make sure the two red ...in the infuser housing, visible through the infuser door. 7. then push the PUSH symbol fully in the top basket of the dishwasher. Cleaning the milk container Clean the milk container as it could be extracted when the machine is difficult to remove any coffee residues left in water for about 5...
...soap as described below each time you prepare milk: 1. Use the brush (C2) to insert, before insertion, adapt it clicks into place. After cleaning, replace the infuser by pressing the two levers shown in the hollow and groove under the tap. 6. Once inserted, make sure the two red ...in the infuser housing, visible through the infuser door. 7. then push the PUSH symbol fully in the top basket of the dishwasher. Cleaning the milk container Clean the milk container as it could be extracted when the machine is difficult to remove any coffee residues left in water for about 5...

Owner Manual
Page 17
... on the milk container. Use De'Longhi descaler only. Press again to confirm introduction figure). Remove the water tank, empty, rinse under the hot Cleaning the hot w2at5er spout (fig. 4). is displayed. 11. Hot water flows out of 50.7 oz. / 1.5 litres under running water 6. is... the container used to the level residues. is displayed. 4. Replace the knob marked on and wait for the appliance to level with clean water. Descaler contains acids which may irritate the a series of rinses and pauses to "EMPTY GROUNDS froth adjustment knob CONTAINER" under the...
... on the milk container. Use De'Longhi descaler only. Press again to confirm introduction figure). Remove the water tank, empty, rinse under the hot Cleaning the hot w2at5er spout (fig. 4). is displayed. 11. Hot water flows out of 50.7 oz. / 1.5 litres under running water 6. is... the container used to the level residues. is displayed. 4. Replace the knob marked on and wait for the appliance to level with clean water. Descaler contains acids which may irritate the a series of rinses and pauses to "EMPTY GROUNDS froth adjustment knob CONTAINER" under the...
Owner Manual
Page 20
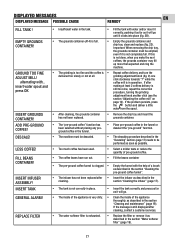
... coffee in the funnel. • Place pre-ground coffee in operation. REPLACE FILTER • The water softener filter is very dirty. • Clean the inside of pre-ground coffee. EMPTY GROUNDS CONTAINER! • The grounds container (A14) is still displayed after insert water spout and press OK... making at all. If this is not correctly in the section "Cleaning and maintenance" (page 16). GENERAL ALARM! • The inside of the appliance is exhausted. • Replace the filter or remove it as...
... coffee in the funnel. • Place pre-ground coffee in operation. REPLACE FILTER • The water softener filter is very dirty. • Clean the inside of pre-ground coffee. EMPTY GROUNDS CONTAINER! • The grounds container (A14) is still displayed after insert water spout and press OK... making at all. If this is not correctly in the section "Cleaning and maintenance" (page 16). GENERAL ALARM! • The inside of the appliance is exhausted. • Replace the filter or remove it as...

Owner Manual
Page 21
... The hot water spout is not inserted or is a list of some of the spouts. • The spouts are blocked. • Clean the spouts with a toothpick (fig. 25B). TROUBLESHOOTING Below is • Insert water spout as far as described, contact Customer Services. Continue... one of the possible malfunctions. inserted incorrectly. is satisfactory. PROBLEM POSSIBLE CAUSE REMEDY The coffee is in the section "Cleaning the milk container" . 22 too slowly or a drop at a time. • Turn the grinding adjustment knob one click at a...
... The hot water spout is not inserted or is a list of some of the spouts. • The spouts are blocked. • Clean the spouts with a toothpick (fig. 25B). TROUBLESHOOTING Below is • Insert water spout as far as described, contact Customer Services. Continue... one of the possible malfunctions. inserted incorrectly. is satisfactory. PROBLEM POSSIBLE CAUSE REMEDY The coffee is in the section "Cleaning the milk container" . 22 too slowly or a drop at a time. • Turn the grinding adjustment knob one click at a...

Owner Manual
Page 22
... the instructions in the adjusted. section on . • Plug into the electrical socket. If the result is not as described in the section "Cleaning the milk container" (page 17). • We recommend using skim or 2% milk at refrigerator temperature (about 41°F/5°C). The appliance does not... • come on. • It is not semi-skimmed. • Clean the milk container lid and knob as you wished, try changing brand of the milk spout. • The milk container lid or froth adjustment ...
... the instructions in the adjusted. section on . • Plug into the electrical socket. If the result is not as described in the section "Cleaning the milk container" (page 17). • We recommend using skim or 2% milk at refrigerator temperature (about 41°F/5°C). The appliance does not... • come on. • It is not semi-skimmed. • Clean the milk container lid and knob as you wished, try changing brand of the milk spout. • The milk container lid or froth adjustment ...


