Owner Manual
Page 4
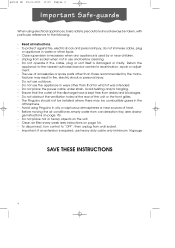
... instructions. - Do not place the power cable under strain. Close supervision is necessary when any appliance is required, use the appliance in oily or sulphurous atmospheres or near children. - pac160 GB 25-01-2003 10:19 Pagina 4 Important Safe-guards When using Pinguino in ways other ...than those recommended by or near sources of heat. - Avoid using electrical appliances, basic safety precautions should not be installed where ...
... instructions. - Do not place the power cable under strain. Close supervision is necessary when any appliance is required, use the appliance in oily or sulphurous atmospheres or near children. - pac160 GB 25-01-2003 10:19 Pagina 4 Important Safe-guards When using Pinguino in ways other ...than those recommended by or near sources of heat. - Avoid using electrical appliances, basic safety precautions should not be installed where ...
Owner Manual
Page 6
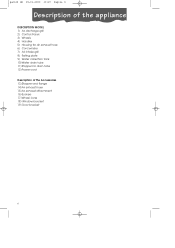
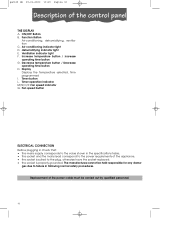
pac160 GB 25-01-2003 10:19 Pagina 6 Description of the appliance DESCRIPTION MODEL 1) Air discharge grill 2) Control Panel 3) Wheels 4) Handles 5) Housing for air exhaust hose 6) Cord winder 7) Air intake grill 8) Rating plate 9) Water collection tank 10)Water drain tube 11)Stopper for drain tube 12)Power cord Description of the Accessories 13)Stopper and flange 14)Air exhaust hose 15)Air exhaust attachment 16) Suckers 17)Wheel locks 18) Window bracket 19) Door bracket 6
pac160 GB 25-01-2003 10:19 Pagina 6 Description of the appliance DESCRIPTION MODEL 1) Air discharge grill 2) Control Panel 3) Wheels 4) Handles 5) Housing for air exhaust hose 6) Cord winder 7) Air intake grill 8) Rating plate 9) Water collection tank 10)Water drain tube 11)Stopper for drain tube 12)Power cord Description of the Accessories 13)Stopper and flange 14)Air exhaust hose 15)Air exhaust attachment 16) Suckers 17)Wheel locks 18) Window bracket 19) Door bracket 6
Owner Manual
Page 7
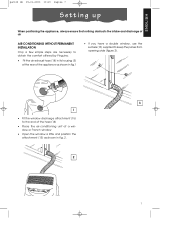
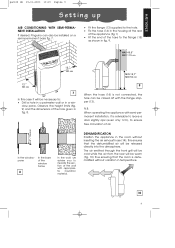
ENGLISH pac160 GB 25-01-2003 10:19 Pagina 7 Setting up When positioning the appliance, always ensure that nothing obstructs the intake and discharge of air AIR CONDITIONING WITHOUT PERMANENT INSTALLATION Only a few simple steps are necessary to obtain the ...comfort offered by Pinguino. • Fit the air exhaust hose (14) in its housing (5) at the rear of the appliance as shown in fig.1 • If you have a double window, use the suckers (16) supplied to keep the panes from opening wide (figure 3). 12 3 1 •...
ENGLISH pac160 GB 25-01-2003 10:19 Pagina 7 Setting up When positioning the appliance, always ensure that nothing obstructs the intake and discharge of air AIR CONDITIONING WITHOUT PERMANENT INSTALLATION Only a few simple steps are necessary to obtain the ...comfort offered by Pinguino. • Fit the air exhaust hose (14) in its housing (5) at the rear of the appliance as shown in fig.1 • If you have a double window, use the suckers (16) supplied to keep the panes from opening wide (figure 3). 12 3 1 •...
Owner Manual
Page 9
...hose (14) is advisable to leave a door slightly ajar (even only 1cm), to the flange (15) as shown in fig. 9. DEHUMIDIFICATION Position the appliance in the room without variation in a win- this case it is not connected, the hole can also be installed on a semi-permanent basis fig. ...cm 7 In this ensures that the room is dehumidified without inserting the air exhaust hose (14); When operating the appliance with the flange stopper (13). 4.2" / 106 mm ENGLISH pac160 GB 25-01-2003 10:19 Pagina 9 Setting up AIR CONDITIONING WITH SEMI-PERMANENT INSTALLATION If desired, Pinguino can ...
...hose (14) is advisable to leave a door slightly ajar (even only 1cm), to the flange (15) as shown in fig. 9. DEHUMIDIFICATION Position the appliance in the room without variation in a win- this case it is not connected, the hole can also be installed on a semi-permanent basis fig. ...cm 7 In this ensures that the room is dehumidified without inserting the air exhaust hose (14); When operating the appliance with the flange stopper (13). 4.2" / 106 mm ENGLISH pac160 GB 25-01-2003 10:19 Pagina 9 Setting up AIR CONDITIONING WITH SEMI-PERMANENT INSTALLATION If desired, Pinguino can ...
Owner Manual
Page 10
pac160 GB 25-01-2003 10:19 Pagina 10 Description of the appliance; • the socket is suited to the plug, otherwise have the socket replaced; • the socket is properly grounded. Ventilation indicator light F. Decrease temperature button / ...
pac160 GB 25-01-2003 10:19 Pagina 10 Description of the appliance; • the socket is suited to the plug, otherwise have the socket replaced; • the socket is properly grounded. Ventilation indicator light F. Decrease temperature button / ...
Owner Manual
Page 11
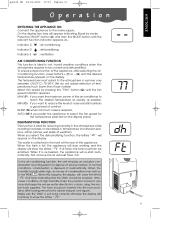
.../OFF button (A) and then the MODE button until the desired temperature appears on the display. DEHUMIDIFYING FUNCTION This function is full, the appliance will stop working and the display will show the letters " " (Full Tank); N.B. indicating that the TANK should be cooled and ...(Q) until the fan speed indicator appears: MAX (P): if you prefer the appliance to the atmosphere in the TANK 9 . pac160 GB 25-01-2003 10:19 Pagina 11 ENGLISH Operation SWITCHING THE APPLIANCE ON Connect the appliance to be inserted into a drain, using the rubber tube supplied. The ...
.../OFF button (A) and then the MODE button until the desired temperature appears on the display. DEHUMIDIFYING FUNCTION This function is full, the appliance will stop working and the display will show the letters " " (Full Tank); N.B. indicating that the TANK should be cooled and ...(Q) until the fan speed indicator appears: MAX (P): if you prefer the appliance to the atmosphere in the TANK 9 . pac160 GB 25-01-2003 10:19 Pagina 11 ENGLISH Operation SWITCHING THE APPLIANCE ON Connect the appliance to be inserted into a drain, using the rubber tube supplied. The ...
Owner Manual
Page 12
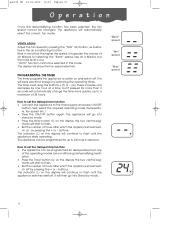
...; Press the Timer button (I ): on and switch off . "AUTO" function cannot be changed. PROGRAMMING THE TIMER The timer programs the appliance to flash until the appliance switches itself off . by selecting the "Silent" speed, less air is filtered, but if pressed for more quickly, up to 24 hours... display the two central segments will save electrical energy by pressing the + or - The appliance will show the fan speed selected. The display will automatically select the correct fan mode. pac160 GB 25-01-2003 10:19 Pagina 12 Operation Once the dehumidifying function has been selected,...
...; Press the Timer button (I ): on and switch off . "AUTO" function cannot be changed. PROGRAMMING THE TIMER The timer programs the appliance to flash until the appliance switches itself off . by selecting the "Silent" speed, less air is filtered, but if pressed for more quickly, up to 24 hours... display the two central segments will save electrical energy by pressing the + or - The appliance will show the fan speed selected. The display will automatically select the correct fan mode. pac160 GB 25-01-2003 10:19 Pagina 12 Operation Once the dehumidifying function has been selected,...
Owner Manual
Page 13
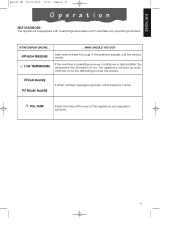
ENGLISH pac160 GB 25-01-2003 10:19 Pagina 13 Operation SELF-DIAGNOSIS The appliance is operating as an air-conditioner or dehumidifier, this will start up automatically once the defrosting process has ended. FULL TANK Empty the tank at ... the machine is equipped with a self-diagnosis system which identifies any operating problems. IF THE DISPLAY SHOWS... ....WHAT SHOULD YOU DO? The appliance will prevent the formation of the appliance and reposition correctly. 13 F F FAN FAILURE P F PROBE FAILURE If either of these messages appears, call the service centre. If the problem ...
ENGLISH pac160 GB 25-01-2003 10:19 Pagina 13 Operation SELF-DIAGNOSIS The appliance is operating as an air-conditioner or dehumidifier, this will start up automatically once the defrosting process has ended. FULL TANK Empty the tank at ... the machine is equipped with a self-diagnosis system which identifies any operating problems. IF THE DISPLAY SHOWS... ....WHAT SHOULD YOU DO? The appliance will prevent the formation of the appliance and reposition correctly. 13 F F FAN FAILURE P F PROBE FAILURE If either of these messages appears, call the service centre. If the problem ...
Owner Manual
Page 14
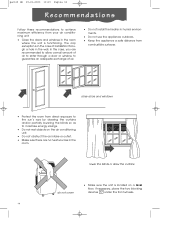
...to guarantee an adequate exchange of air. • Do not install the heater in humid environments. • Do not use the appliance outdoors. • Keep the appliance a safe distance from combustible surfaces close doors and windows • Protect the room from your air conditioning unit: • Close ...rest objects on a level floor. lower the blinds or draw the curtains do not cover • Make sure the unit is functioning. pac160 GB 25-01-2003 10:19 Pagina 14 Recommendations Follow these recommendations to achieve maximum efficiency from direct exposure to the sun's rays by ...
...to guarantee an adequate exchange of air. • Do not install the heater in humid environments. • Do not use the appliance outdoors. • Keep the appliance a safe distance from combustible surfaces close doors and windows • Protect the room from your air conditioning unit: • Close ...rest objects on a level floor. lower the blinds or draw the curtains do not cover • Make sure the unit is functioning. pac160 GB 25-01-2003 10:19 Pagina 14 Recommendations Follow these recommendations to achieve maximum efficiency from direct exposure to the sun's rays by ...

Owner Manual
Page 15
...dust filter weekly. To replace, fit the filters to the intake grill and attach to the appliance. 15 ENGLISH pac160 GB 25-01-2003 10:19 Pagina 15 Cleaning Before cleaning or maintenance, switch off the appliance by pressing the ON/OFF button (A) and always unplug it from the external grill. 2... 1 11 Dust filter intake grille 12 BEGIN OF SEASON CHECKS Check that the appliance is properly ...
...dust filter weekly. To replace, fit the filters to the intake grill and attach to the appliance. 15 ENGLISH pac160 GB 25-01-2003 10:19 Pagina 15 Cleaning Before cleaning or maintenance, switch off the appliance by pressing the ON/OFF button (A) and always unplug it from the external grill. 2... 1 11 Dust filter intake grille 12 BEGIN OF SEASON CHECKS Check that the appliance is properly ...
Owner Manual
Page 16
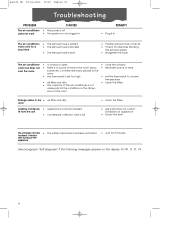
... not adequate for 3 minutes See paragraph "Self diagnosis" if the following messages appear on the appliance. • The safety mechanism has been activated • wait for the conditions or the dimen- pac160 GB 25-01-2003 10:19 Pagina 16 Troubleshooting PROBLEM CAUSES The air-conditioner • the ...power is off does not work • the appliance is not plugged in REMEDY • Plug it in The air-...
... not adequate for 3 minutes See paragraph "Self diagnosis" if the following messages appear on the appliance. • The safety mechanism has been activated • wait for the conditions or the dimen- pac160 GB 25-01-2003 10:19 Pagina 16 Troubleshooting PROBLEM CAUSES The air-conditioner • the ...power is off does not work • the appliance is not plugged in REMEDY • Plug it in The air-...