

User's Guide
Page 1
...On-Screen Display (OSD) Setting the Optimal Resolution Using the Dell Soundbar (Optional) Using the Tilt, Swivel, and Vertical Extension Rotating the monitor Adjusting the Rotation Settings of Dell Inc. Reproduction in any proprietary interest in trademarks and trade names... permission of Your Operating System Solving Problems Troubleshooting Your Monitor Common Problems Product Specific Problems Universal Serial Bus (USB) Specific Problems Troubleshooting the Dell™ Soundbar Appendix Safety Instructions FCC Notice (U.S. Dell Inc. CAUTION: A CAUTION indicates a potential for energy...
...On-Screen Display (OSD) Setting the Optimal Resolution Using the Dell Soundbar (Optional) Using the Tilt, Swivel, and Vertical Extension Rotating the monitor Adjusting the Rotation Settings of Dell Inc. Reproduction in any proprietary interest in trademarks and trade names... permission of Your Operating System Solving Problems Troubleshooting Your Monitor Common Problems Product Specific Problems Universal Serial Bus (USB) Specific Problems Troubleshooting the Dell™ Soundbar Appendix Safety Instructions FCC Notice (U.S. Dell Inc. CAUTION: A CAUTION indicates a potential for energy...

User's Guide
Page 2
... color Matching File (ICM), and product documentation. ■ Energy Saver feature for Energy Star compliance. ■ Security lock slot. The monitor features include: ■ 20-inch (508 mm) viewable area display. ■ 1680 x 1050 resolution, plus full-screen support for lower... from a sitting or standing position, or moving side-to Contents Page About Your Monitor Dell™ 2009W Flat Panel Monitor User's Guide Product Features Identifying Parts and Controls Monitor Specifications Universal Serial Bus (USB) Interface Plug and Play Capability Maintenance Guidelines Product Features...
... color Matching File (ICM), and product documentation. ■ Energy Saver feature for Energy Star compliance. ■ Security lock slot. The monitor features include: ■ 20-inch (508 mm) viewable area display. ■ 1680 x 1050 resolution, plus full-screen support for lower... from a sitting or standing position, or moving side-to Contents Page About Your Monitor Dell™ 2009W Flat Panel Monitor User's Guide Product Features Identifying Parts and Controls Monitor Specifications Universal Serial Bus (USB) Interface Plug and Play Capability Maintenance Guidelines Product Features...
User's Guide
Page 3
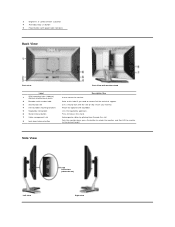
...power light indicator) Back View Back view Back View with the slot to help secure your monitor. Lists the regulatory approvals. Press to the desired height. Attach the optional Dell Soundbar. Help organize cables by placing them through the slot. Refer to this label if... you need to mount the monitor. Use a security lock with monitor stand Label VESA mounting holes (100mm) 1 (Behind attached base plate) 2 Barcode serial number label 3 Security lock slot 4 Dell Soundbar mounting brackets 5 Regulatory rating label 6 Stand removal button 7...
...power light indicator) Back View Back view Back View with the slot to help secure your monitor. Lists the regulatory approvals. Press to the desired height. Attach the optional Dell Soundbar. Help organize cables by placing them through the slot. Refer to this label if... you need to mount the monitor. Use a security lock with monitor stand Label VESA mounting holes (100mm) 1 (Behind attached base plate) 2 Barcode serial number label 3 Security lock slot 4 Dell Soundbar mounting brackets 5 Regulatory rating label 6 Stand removal button 7...
User's Guide
Page 4
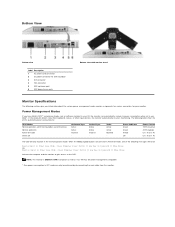
.... Video Active Active Blanked - If the computer detects input from the monitor. Bottom View Bottom view Label Description 1 AC power cord connector 2 DC power connector for Dell Soundbar 3 DVI connector 4 VGA connector 5 USB upstream port 6 USB downstream ports Bottom view with Dell Soundbar and USB active) Normal operation Active-off mode Switch off...
.... Video Active Active Blanked - If the computer detects input from the monitor. Bottom View Bottom view Label Description 1 AC power cord connector 2 DC power connector for Dell Soundbar 3 DVI connector 4 VGA connector 5 USB upstream port 6 USB downstream ports Bottom view with Dell Soundbar and USB active) Normal operation Active-off mode Switch off...

User's Guide
Page 7
... about the USB ports that are available on the left side NOTE: USB 2.0 functionality requires a USB 2.0-capable computer. NOTE: This monitor supports High-Speed Certified USB 2.0 interface Transfer speed Data Rate Power Consumption High speed Full speed Low speed 480 Mbps 12 Mbps 1.5 Mbps...Upstream Connector Pin Number 1 2 3 4 4-pin Side of the connector DMU VCC DPU GND USB Downstream Connector Pin Number 1 2 3 4 4-Pin Side of your monitor. rear l 4 downstream - 2 on rear; 2 on left side of the Signal Cable VCC DMD DPD GND USB Ports l 1 upstream - Universal Serial Bus (USB...
... about the USB ports that are available on the left side NOTE: USB 2.0 functionality requires a USB 2.0-capable computer. NOTE: This monitor supports High-Speed Certified USB 2.0 interface Transfer speed Data Rate Power Consumption High speed Full speed Low speed 480 Mbps 12 Mbps 1.5 Mbps...Upstream Connector Pin Number 1 2 3 4 4-pin Side of the connector DMU VCC DPU GND USB Downstream Connector Pin Number 1 2 3 4 4-Pin Side of your monitor. rear l 4 downstream - 2 on rear; 2 on left side of the Signal Cable VCC DMD DPD GND USB Ports l 1 upstream - Universal Serial Bus (USB...
User's Guide
Page 8
...Dis Channel (DDC) protocols so the system can configure itself and optimize the monitor settings. F information about changing the monitor settings, see Operating the Monitor. you can install the monitor in any Plug and Play-compatible system. Flat Panel Specifications Screen type Screen ... Faceplate coating Backlight Response Time Color gamut (Typical) Active matrix - Most monitor installations are automatic; Plug and Play Capability You can select different settings if desired. The monitor automatically provides the computer system with hard-coating 3H CCFL (4) edgelight system 5ms...
...Dis Channel (DDC) protocols so the system can configure itself and optimize the monitor settings. F information about changing the monitor settings, see Operating the Monitor. you can install the monitor in any Plug and Play-compatible system. Flat Panel Specifications Screen type Screen ... Faceplate coating Backlight Response Time Color gamut (Typical) Active matrix - Most monitor installations are automatic; Plug and Play Capability You can select different settings if desired. The monitor automatically provides the computer system with hard-coating 3H CCFL (4) edgelight system 5ms...
User's Guide
Page 10
...link based on the left side of controls, adjustments, or procedures other regulatory information, see the Product Information Guide. Visit support.dell.com. 2. Verify your need. 5. Only) and Other Regulatory Information For FCC notices and other than those specified in this...regulatory compliance website located at the bottom of contacting Dell that is convenient for sales, technical support, or customer service issues: 1. Choose the method of the page. 3. Back to Contents Page Appendix Dell™ 2009W Flat Panel Monitor User's Guide Safety Instructions FCC Notice (U.S.
...link based on the left side of controls, adjustments, or procedures other regulatory information, see the Product Information Guide. Visit support.dell.com. 2. Verify your need. 5. Only) and Other Regulatory Information For FCC notices and other than those specified in this...regulatory compliance website located at the bottom of contacting Dell that is convenient for sales, technical support, or customer service issues: 1. Choose the method of the page. 3. Back to Contents Page Appendix Dell™ 2009W Flat Panel Monitor User's Guide Safety Instructions FCC Notice (U.S.
User's Guide
Page 11
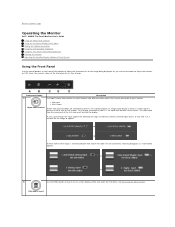
... they change. As you cycle through the inputs appear the following messages to appear. Back to Contents Page Operating the Monitor Dell™ 2009W Flat Panel Monitor User's Guide Using the Front Panel Controls Using the On-Screen Display (OSD) Menu Setting the Optimal Resolution Using the... Dell Soundbar (Optional) Using the Tilt, Swivel, and Vertical Extension Rotating the monitor Adjusting the Rotation Display Settings of Your System Using the Front Panel Use the control buttons on ...
... they change. As you cycle through the inputs appear the following messages to appear. Back to Contents Page Operating the Monitor Dell™ 2009W Flat Panel Monitor User's Guide Using the Front Panel Controls Using the On-Screen Display (OSD) Menu Setting the Optimal Resolution Using the... Dell Soundbar (Optional) Using the Tilt, Swivel, and Vertical Extension Rotating the monitor Adjusting the Rotation Display Settings of Your System Using the Front Panel Use the control buttons on ...
User's Guide
Page 12
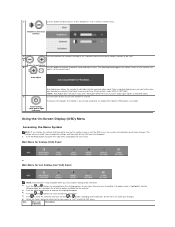
..." control menu. Push to enter the slide bar and then use the or button, according to another menu or exit the OSD menu, the monitor automatically saves those changes. Brightness/Contrast Hot Key C and D Use these buttons to launch the OSD menu and display the main menu. Push ...are using the Pixel Clock (Coarse) and Phase (Fine) controls under DISPLAY SETTINGS. Main Menu for Analog (VGA) Input or Main Menu for the monitor. 3. See the following dialog appears on the menu, to another , the option name is only available when you move between the setting options. The...
..." control menu. Push to enter the slide bar and then use the or button, according to another menu or exit the OSD menu, the monitor automatically saves those changes. Brightness/Contrast Hot Key C and D Use these buttons to launch the OSD menu and display the main menu. Push ...are using the Pixel Clock (Coarse) and Phase (Fine) controls under DISPLAY SETTINGS. Main Menu for Analog (VGA) Input or Main Menu for the monitor. 3. See the following dialog appears on the menu, to another , the option name is only available when you move between the setting options. The...

User's Guide
Page 13
.... Push the button to increase contrast and push the button to exit the main menu. Even though your computer recognizes your monitor. Use the INPUT SOURCE menu to your monitor on the monitor screen. Push to adjust the color setting mode and color temperature. BRIGHTNESS Use this menu to activate Brightness/Contrast adjustment...
.... Push the button to increase contrast and push the button to exit the main menu. Even though your computer recognizes your monitor. Use the INPUT SOURCE menu to your monitor on the monitor screen. Push to adjust the color setting mode and color temperature. BRIGHTNESS Use this menu to activate Brightness/Contrast adjustment...
User's Guide
Page 14
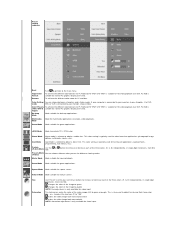
...Mode suitable for nature scenes. Preset setting submenu Back Input Color Format Gamma Push to go back to emulate 72% NTSC color. If your monitor, choose Graphics. Custom Use the or button to increase or decrease each of the three colors (R, G, B) independently, in single digit increments, ...from 0 to your monitor, choose Video. Color Setting You can make the color of the image to adjust for video input. Input) Desktop Mode Mode suitable for movie...
...Mode suitable for nature scenes. Preset setting submenu Back Input Color Format Gamma Push to go back to emulate 72% NTSC color. If your monitor, choose Graphics. Custom Use the or button to increase or decrease each of the three colors (R, G, B) independently, in single digit increments, ...from 0 to your monitor, choose Video. Color Setting You can make the color of the image to adjust for video input. Input) Desktop Mode Mode suitable for movie...

User's Guide
Page 21
... are connected to the two tabs on a flat surface and follow the Safety Instructions. Connecting Your Monitor CAUTION: Before you begin any of the monitor to two different computers with appropriate video systems. Connecting the White DVI Cable Connecting the Blue VGA ...the following steps/instructions: l Turn off your monitor to attach the monitor stand: 1. Back to Contents Page Setting Up the Monitor Dell™ 2009W Flat Panel Monitor User's Guide Attaching the Stand Connecting the Monitor Organizing the Cables Attaching the Dell Soundbar (optional) Removing the Stand Attaching the ...
... are connected to the two tabs on a flat surface and follow the Safety Instructions. Connecting Your Monitor CAUTION: Before you begin any of the monitor to two different computers with appropriate video systems. Connecting the White DVI Cable Connecting the Blue VGA ...the following steps/instructions: l Turn off your monitor to attach the monitor stand: 1. Back to Contents Page Setting Up the Monitor Dell™ 2009W Flat Panel Monitor User's Guide Attaching the Stand Connecting the Monitor Organizing the Cables Attaching the Dell Soundbar (optional) Removing the Stand Attaching the ...

User's Guide
Page 22
... you have completed connecting the DVI/VGA cable, follow the procedure below to connect the USB cable to the computer and complete your monitor setup: l Connect the upstream USB port (cable supplied) to organize the cables. l Connect USB peripherals to organize all the necessary cables to... is complete. Organizing the Cables After attaching all cables as shown above. NOTE: The graphics are used for your computer and monitor into a nearby outlet. l Turn on the monitor. (See rear or bottom view for details.) l Plug the power cables for the purpose of the computer may vary. Attaching...
... you have completed connecting the DVI/VGA cable, follow the procedure below to connect the USB cable to the computer and complete your monitor setup: l Connect the upstream USB port (cable supplied) to organize the cables. l Connect USB peripherals to organize all the necessary cables to... is complete. Organizing the Cables After attaching all cables as shown above. NOTE: The graphics are used for your computer and monitor into a nearby outlet. l Turn on the monitor. (See rear or bottom view for details.) l Plug the power cables for the purpose of the computer may vary. Attaching...
User's Guide
Page 23
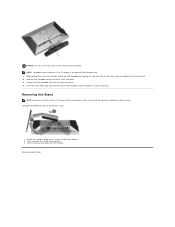
...computer's audio output jack. Lift the stand up and away from the rear of the monitor, attach the Dell Soundbar by aligning the two slots with the DC power connector. 4. Working from the rear of the Dell Soundbar into place. 3. Back to remove the stand: 1. Complete the following steps to... Contents Page NOTICE: Do not use with any device other than the Dell Soundbar. NOTE: Soundbar Power Connector +12V DC output is placed on the LCD screen while removing the stand, ensure that the monitor is for optional Dell Soundbar only. 1. Insert the mini stereo plug from the...
...computer's audio output jack. Lift the stand up and away from the rear of the monitor, attach the Dell Soundbar by aligning the two slots with the DC power connector. 4. Working from the rear of the Dell Soundbar into place. 3. Back to remove the stand: 1. Complete the following steps to... Contents Page NOTICE: Do not use with any device other than the Dell Soundbar. NOTE: Soundbar Power Connector +12V DC output is placed on the LCD screen while removing the stand, ensure that the monitor is for optional Dell Soundbar only. 1. Insert the mini stereo plug from the...
User's Guide
Page 24
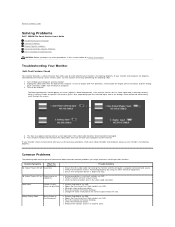
Back to Contents Page Solving Problems Dell™ 2009W Flat Panel Monitor User's Guide Troubleshooting Your Monitor Common Problems Product Specific Problems Universal Serial Bus Specific Problems Dell™ Soundbar Troubleshooting CAUTION: Before you begin any other electrical equipment. This box also appears during normal system operation if the video cable becomes disconnected ...
Back to Contents Page Solving Problems Dell™ 2009W Flat Panel Monitor User's Guide Troubleshooting Your Monitor Common Problems Product Specific Problems Universal Serial Bus Specific Problems Dell™ Soundbar Troubleshooting CAUTION: Before you begin any other electrical equipment. This box also appears during normal system operation if the video cable becomes disconnected ...
User's Guide
Page 25
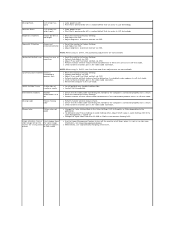
...Adjust brightness & contrast controls via OSD. Horizontal/Vertical Lines Screen has one or more information, see Power Management Modes). l Contact Dell immediately. Intermittent Problems Monitor malfunctions on -off . Wrong Color Picture color not good Image retention from a Faint shadow from static image left on -off...the Power Management feature to the computer is connected properly and is not in use a dynamically changing screensaver. l Reset the monitor to Factory Settings. l Try different Color Preset Settings in self-test mode. l Pixel that is permanently off is a ...
...Adjust brightness & contrast controls via OSD. Horizontal/Vertical Lines Screen has one or more information, see Power Management Modes). l Contact Dell immediately. Intermittent Problems Monitor malfunctions on -off . Wrong Color Picture color not good Image retention from a Faint shadow from static image left on -off...the Power Management feature to the computer is connected properly and is not in use a dynamically changing screensaver. l Reset the monitor to Factory Settings. l Try different Color Preset Settings in self-test mode. l Pixel that is permanently off is a ...


