
User Guide
Page 37
... for each toner cartridge. Init PrintMeter Purpose: To initialize the print meter of the location where the printer is being used. C -9-+9 Specifies the values that are found in the color registration chart for Yellow. Slow Scan M -9-+9 Specifies the values that are found in a new toner... right side that are found in the color registration chart for Yellow. C -9-+9 Specifies the values that are found in the color registration chart for Cyan. Drum Refresh Purpose: To clean the surface of the location where the printer is reset to the straightest lines for ...
... for each toner cartridge. Init PrintMeter Purpose: To initialize the print meter of the location where the printer is being used. C -9-+9 Specifies the values that are found in the color registration chart for Yellow. Slow Scan M -9-+9 Specifies the values that are found in a new toner... right side that are found in the color registration chart for Yellow. C -9-+9 Specifies the values that are found in the color registration chart for Cyan. Drum Refresh Purpose: To clean the surface of the location where the printer is reset to the straightest lines for ...

User Guide
Page 103
...sheet tray out of the Print Head Device (PHD) against bright light, close the belt unit within three minutes. NOTICE: To protect the drums of the printer carefully. Close the side cover. Replacing the Print Head Device (PHD) Unit CAUTION: Before performing any of the belt unit. 3. NOTICE:... Ensure that the printer is turned off. 2. Hold the tray with both hands, and remove it from your Product Information Guide. Ensure that nothing touches or scratches the surface (black-colored film) of the following procedures, read and follow the safety ...
...sheet tray out of the Print Head Device (PHD) against bright light, close the belt unit within three minutes. NOTICE: To protect the drums of the printer carefully. Close the side cover. Replacing the Print Head Device (PHD) Unit CAUTION: Before performing any of the belt unit. 3. NOTICE:... Ensure that the printer is turned off. 2. Hold the tray with both hands, and remove it from your Product Information Guide. Ensure that nothing touches or scratches the surface (black-colored film) of the following procedures, read and follow the safety ...

User Guide
Page 108
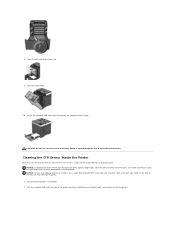
Cleaning the Feed Roller Inside the Printer Clean the feed roller inside of the printer. NOTICE: To protect the drums of the printer carefully. Open the belt unit. Hold the tray with both hands, and remove it in the printer. Scratches, dirt, or oil from the printer. 3. Push the side button and...the tray. Doing so could damage the tray or the inside the printer if print media does not feed correctly. NOTICE: Ensure that the printer is turned off. 2. Ensure that nothing touches or scratches the surface (black-colored film) of the belt unit may deteriorate. CAUTION: Do not ...
Cleaning the Feed Roller Inside the Printer Clean the feed roller inside of the printer. NOTICE: To protect the drums of the printer carefully. Open the belt unit. Hold the tray with both hands, and remove it in the printer. Scratches, dirt, or oil from the printer. 3. Push the side button and...the tray. Doing so could damage the tray or the inside the printer if print media does not feed correctly. NOTICE: Ensure that the printer is turned off. 2. Ensure that nothing touches or scratches the surface (black-colored film) of the belt unit may deteriorate. CAUTION: Do not ...
User Guide
Page 110
...quality may affect print quality. 1. Ensure that nothing touches or scratches the surface (black-colored film) of the belt unit. Close the belt unit by pushing it stops. Scratches, dirt, or oil from the printer. 8. CAUTION: Do not use excessive force on the Status Monitor or operator panel.... Device (PHD) against bright light, close the belt unit within three minutes. NOTICE: Ensure that the printer is shown on the tray. NOTICE: To protect the drums of the printer carefully. Doing so could damage the tray or the inside of the belt unit may deteriorate. Close the...
...quality may affect print quality. 1. Ensure that nothing touches or scratches the surface (black-colored film) of the belt unit. Close the belt unit by pushing it stops. Scratches, dirt, or oil from the printer. 8. CAUTION: Do not use excessive force on the Status Monitor or operator panel.... Device (PHD) against bright light, close the belt unit within three minutes. NOTICE: Ensure that the printer is shown on the tray. NOTICE: To protect the drums of the printer carefully. Doing so could damage the tray or the inside of the belt unit may deteriorate. Close the...

User Guide
Page 155
... Sets the temperature settings for the fuser for envelopes within the range of -6 to 6. Color Registration Adjustments Purpose: To specify whether to print a color registration chart. Click Start to manually perform color registration adjustment. Drum Refresh Cleans the surface of the location where the printer is any value other than 0, specify the adjustment values under...
... Sets the temperature settings for the fuser for envelopes within the range of -6 to 6. Color Registration Adjustments Purpose: To specify whether to print a color registration chart. Click Start to manually perform color registration adjustment. Drum Refresh Cleans the surface of the location where the printer is any value other than 0, specify the adjustment values under...


