
User Guide
Page 2
... the best print quality in black and white, use 90 g/m2 (24 lb) xerographic, grain long paper. For the best print quality in color, use it into the single sheet feeder. Paper lighter than 135 g/m2 (36 lb bond), grain short is preferred. Curl Curl is too rough, the toner does not ... of the printer to 80 lb bond) grain long. Grain Direction Grain refers to the alignment of the paper fibers in the paper affects both print quality and the ability of print media to 80 lb bond) grain long. Paper lighter than 60 g/m2 (16 lb) may not feed properly, and could cause paper jams. For...
... the best print quality in black and white, use 90 g/m2 (24 lb) xerographic, grain long paper. For the best print quality in color, use it into the single sheet feeder. Paper lighter than 135 g/m2 (36 lb bond), grain short is preferred. Curl Curl is too rough, the toner does not ... of the printer to 80 lb bond) grain long. Grain Direction Grain refers to the alignment of the paper fibers in the paper affects both print quality and the ability of print media to 80 lb bond) grain long. Paper lighter than 60 g/m2 (16 lb) may not feed properly, and could cause paper jams. For...

User Guide
Page 3
...Paper Proper paper selection helps prevent jams and ensures trouble-free printing. l Use paper printed with heat-resistant inks designed for use with the printer: l Chemically treated paper used to make copies without carbon paper, also known as carbonless paper, carbonless copy paper (CCP), or no carbon required (NCR) paper l Preprinted paper with your paper supplier. To help avoid jams...the printer l Preprinted paper that can be affected by the resin in toner or the silicone in the text) when printing on these requirements; Business paper designed for laser printers. ...
...Paper Proper paper selection helps prevent jams and ensures trouble-free printing. l Use paper printed with heat-resistant inks designed for use with the printer: l Chemically treated paper used to make copies without carbon paper, also known as carbonless paper, carbonless copy paper (CCP), or no carbon required (NCR) paper l Preprinted paper with your paper supplier. To help avoid jams...the printer l Preprinted paper that can be affected by the resin in toner or the silicone in the text) when printing on these requirements; Business paper designed for laser printers. ...

User Guide
Page 4
... to fit the width of the envelopes. However, it is acceptable for laser printers. This may not be facing down Single Sheet Feeder Letterhead enters the printer first Selecting Pre-Punched Paper Pre-punched paper brands can cause jams when multiple sheets feed through the printer. l Weight guidelines for instructions on loading an envelope. l To load envelope...
... to fit the width of the envelopes. However, it is acceptable for laser printers. This may not be facing down Single Sheet Feeder Letterhead enters the printer first Selecting Pre-Punched Paper Pre-punched paper brands can cause jams when multiple sheets feed through the printer. l Weight guidelines for instructions on loading an envelope. l To load envelope...

User Guide
Page 5
... sealing, excessive curling, wrinkling, or releasing hazardous emissions. Partial sheets may result in a jam. l Remove a 3 mm (0.125 inches) strip from the leading edge to peel off during printing, resulting in a jam. l Do not place anything on top of any exposed adhesive when the flap is in... when printing bar codes. Supported Paper Sizes A4 (210x297 mm) B5 (182x257 mm) A5 (148x210 mm) C5 (162x229 mm) Monarch (3.875x7.5 in the same tray. l Do not use labels that have exposed adhesive. l Do not load labels together with laser printers. Storing Print Media For proper ...
... sealing, excessive curling, wrinkling, or releasing hazardous emissions. Partial sheets may result in a jam. l Remove a 3 mm (0.125 inches) strip from the leading edge to peel off during printing, resulting in a jam. l Do not place anything on top of any exposed adhesive when the flap is in... when printing bar codes. Supported Paper Sizes A4 (210x297 mm) B5 (182x257 mm) A5 (148x210 mm) C5 (162x229 mm) Monarch (3.875x7.5 in the same tray. l Do not use labels that have exposed adhesive. l Do not load labels together with laser printers. Storing Print Media For proper ...

User Guide
Page 8
...-sheet feeder can hold: l 250 sheets of the print media. Do not use ink jet paper in progress. NOTE: Use only laser print media. Hold the tray with both hands, and remove it from the printer. 2. Adjust the paper guides. Print Media Dimensions The standard 250-sheet tray accepts print media within the following... way. 1. Back to 355.6 mm (14.00 inches) Loading Print Media in the Standard 250-Sheet Tray and Optional 250-Sheet Feeder NOTE: To avoid paper jams, do not remove the tray while printing is usually on the print media package. Pull the tray out of the...
...-sheet feeder can hold: l 250 sheets of the print media. Do not use ink jet paper in progress. NOTE: Use only laser print media. Hold the tray with both hands, and remove it from the printer. 2. Adjust the paper guides. Print Media Dimensions The standard 250-sheet tray accepts print media within the following... way. 1. Back to 355.6 mm (14.00 inches) Loading Print Media in the Standard 250-Sheet Tray and Optional 250-Sheet Feeder NOTE: To avoid paper jams, do not remove the tray while printing is usually on the print media package. Pull the tray out of the...

User Guide
Page 9
...the print media into the printer. 7. Before loading the print media, flex the sheets back and forth, and then fan them. Straighten the edges of the tray. 3. Overfilling the tray may cause paper jams. 5. Press Menu button. NOTE: When you must specify the paper size setting by squeezing the... length guide and sliding it until they rest lightly against the edge of the stack of paper. 6. After confirming that the guides are securely ...
...the print media into the printer. 7. Before loading the print media, flex the sheets back and forth, and then fan them. Straighten the edges of the tray. 3. Overfilling the tray may cause paper jams. 5. Press Menu button. NOTE: When you must specify the paper size setting by squeezing the... length guide and sliding it until they rest lightly against the edge of the stack of paper. 6. After confirming that the guides are securely ...

User Guide
Page 10
...right after they have been removed from the packaging, they may bulge. Press or button until the desired paper size appears, and then press (Set) button. Press or button until the desired paper types appears, and then press (Set) button. 13. When using the standard 250-sheet tray or... button. 10. Press or button until Tray 1 appears, and then press (Set) button. 11. To avoid jams, flatten them as shown below before loading them in the standard 250-sheet tray: NOTE: If you face towards the printer. 9. Loading Letterhead When using the single sheet feeder, the letterhead enters the...
...right after they have been removed from the packaging, they may bulge. Press or button until the desired paper size appears, and then press (Set) button. Press or button until the desired paper types appears, and then press (Set) button. 13. When using the standard 250-sheet tray or... button. 10. Press or button until Tray 1 appears, and then press (Set) button. 11. To avoid jams, flatten them as shown below before loading them in the standard 250-sheet tray: NOTE: If you face towards the printer. 9. Loading Letterhead When using the single sheet feeder, the letterhead enters the...

User Guide
Page 12
...inches) l Length - 127 mm (5.00 inches) to the print media's width. 2. Ensure that the flap comes at the right when you face towards the printer. Adjust the width guides to 355.6 mm (14.00 inches) Loading the Single Sheet Feeder 1. NOTE: Do not force the print media into the single.... Ensure that you experience problems with the top of the print media facing down close to paper jams and can damage the printer. Hold both sides of the sheet entering the printer first. Loading an Envelope Envelope#10, Monarch, or DL To load an envelope into the single sheet feeder. NOTE: ...
...inches) l Length - 127 mm (5.00 inches) to the print media's width. 2. Ensure that the flap comes at the right when you face towards the printer. Adjust the width guides to 355.6 mm (14.00 inches) Loading the Single Sheet Feeder 1. NOTE: Do not force the print media into the single.... Ensure that you experience problems with the top of the print media facing down close to paper jams and can damage the printer. Hold both sides of the sheet entering the printer first. Loading an Envelope Envelope#10, Monarch, or DL To load an envelope into the single sheet feeder. NOTE: ...

User Guide
Page 13
... you must select either Flip on Short Edge or Flip on both sides of a sheet of paper automatically. Using Booklet Print To use envelopes with the flap side face up to paper jams and can define the way 2-sided print pages are acceptable for landscape orientation). The following illustration shows... the optional duplexer is oriented in relation to the printing on how to print on Long Edge from the Duplex menu in the printer properties dialog box and then select Booklet Creation in the Booklet/Poster/Mixed Document dialog box displayed by clicking the Booklet/Poster/Mixed ...
... you must select either Flip on Short Edge or Flip on both sides of a sheet of paper automatically. Using Booklet Print To use envelopes with the flap side face up to paper jams and can define the way 2-sided print pages are acceptable for landscape orientation). The following illustration shows... the optional duplexer is oriented in relation to the printing on how to print on Long Edge from the Duplex menu in the printer properties dialog box and then select Booklet Creation in the Booklet/Poster/Mixed Document dialog box displayed by clicking the Booklet/Poster/Mixed ...

User Guide
Page 28
...menus only. See also: "Understanding Fonts", "Printing a Font Sample List" PCL Macro List Purpose: To print the information on the operator panel menus. Printer Setting Purpose: To print a list of the current user default values, the installed options, the amount of installed print memory, and the status of ... jobs that has been set by the administrator. This list contains the last 20 jobs. Job History Purpose: To print a detailed list of paper jams and fatal errors. This prevents other users from using the operator panel to modify tray settings. In this case, you may also need to...
...menus only. See also: "Understanding Fonts", "Printing a Font Sample List" PCL Macro List Purpose: To print the information on the operator panel menus. Printer Setting Purpose: To print a list of the current user default values, the installed options, the amount of installed print memory, and the status of ... jobs that has been set by the administrator. This list contains the last 20 jobs. Job History Purpose: To print a detailed list of paper jams and fatal errors. This prevents other users from using the operator panel to modify tray settings. In this case, you may also need to...

User Guide
Page 46
...install the printer driver with your printer to install a combination of saved printer driver settings and other data for example, when a paper jam occurs or toner is to be used to multiple computers running low. Type your printer from the Web: a. Click Visit Dell printer supplies ordering... the desktop icon. l Install in advance the Dell™ 2130cn Color Laser Printer printer driver in the MakeDisk folder of work required when installing the printer driver. Back to Contents Page Understanding Your Printer Software Printer Settings Utility Use the Drivers and Utilities CD that...
...install the printer driver with your printer to install a combination of saved printer driver settings and other data for example, when a paper jam occurs or toner is to be used to multiple computers running low. Type your printer from the Web: a. Click Visit Dell printer supplies ordering... the desktop icon. l Install in advance the Dell™ 2130cn Color Laser Printer printer driver in the MakeDisk folder of work required when installing the printer driver. Back to Contents Page Understanding Your Printer Software Printer Settings Utility Use the Drivers and Utilities CD that...

User Guide
Page 48
... print media properly. To print a job from a software program, a window representing the printer driver opens. Avoiding Paper Jams NOTE: It is recommended that the correct printer is selected in the printer driver window, open the online Help for instructions. Print settings selected from the driver override ...change. Click OK or Print to send the job to print. 2. Open the file you can avoid paper jams. See the following instructions on Storing Print Media Store your printer, and how to cancel a job. For more information. Verify that you try a limited sample of...
... print media properly. To print a job from a software program, a window representing the printer driver opens. Avoiding Paper Jams NOTE: It is recommended that the correct printer is selected in the printer driver window, open the online Help for instructions. Print settings selected from the driver override ...change. Click OK or Print to send the job to print. 2. Open the file you can avoid paper jams. See the following instructions on Storing Print Media Store your printer, and how to cancel a job. For more information. Verify that you try a limited sample of...

User Guide
Page 65
... toner. The PHD unit reaches the end of the following: Black Cyan Yellow Reinsert the specified toner cartridge. See "Contacting Dell". See "Clearing Jams". If this does not solve the problem, contact Dell. If this does not solve the problem, contact Dell. The printer detects a paper jam. XXX indicates the number of the duplexer and clear the...
... toner. The PHD unit reaches the end of the following: Black Cyan Yellow Reinsert the specified toner cartridge. See "Contacting Dell". See "Clearing Jams". If this does not solve the problem, contact Dell. If this does not solve the problem, contact Dell. The printer detects a paper jam. XXX indicates the number of the duplexer and clear the...

User Guide
Page 68
... only recommended print media. Ensure that you to Contents Page Clearing Jams Avoiding Jams Identifying the Location of Paper Jams The following illustration shows where paper jams may permanently damage the printer. 1 Duplexer (option) 2 Fuser 3 Single Sheet Feeder If a jam occurs with a cloth that connect to clear any print media, it . For more information. CAUTION: Do not attempt...
... only recommended print media. Ensure that you to Contents Page Clearing Jams Avoiding Jams Identifying the Location of Paper Jams The following illustration shows where paper jams may permanently damage the printer. 1 Duplexer (option) 2 Fuser 3 Single Sheet Feeder If a jam occurs with a cloth that connect to clear any print media, it . For more information. CAUTION: Do not attempt...
User Guide
Page 69
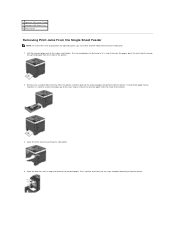
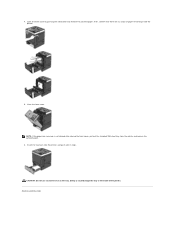
...Then, confirm that there are no jammed paper can be found or it is hard to remove the paper, go to the next step to remove the jammed paper from the inside of the printer. 3. Open the belt unit until it stops and remove the jammed paper. 4 Optional 250-Sheet Feeder 5 ...Cover Removing Print Jams From the Single Sheet Feeder NOTE: To resolve the error displayed on the operator panel, you must clear all print media from the printer, and then pull out the jammed paper remaining inside the printer. Pull the jammed paper out of paper remaining inside the printer. Remove the ...
...Then, confirm that there are no jammed paper can be found or it is hard to remove the paper, go to the next step to remove the jammed paper from the inside of the printer. 3. Open the belt unit until it stops and remove the jammed paper. 4 Optional 250-Sheet Feeder 5 ...Cover Removing Print Jams From the Single Sheet Feeder NOTE: To resolve the error displayed on the operator panel, you must clear all print media from the printer, and then pull out the jammed paper remaining inside the printer. Pull the jammed paper out of paper remaining inside the printer. Remove the ...
User Guide
Page 70
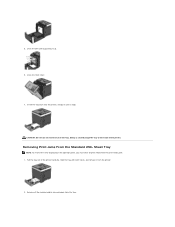
...force on the operator panel, you must clear all the jammed and/or creased paper from the tray. Sheet Tray NOTE: To resolve the error displayed on the tray. Remove all print media from the printer. 2. Insert the tray back into the printer, and push until it up. 6. Pull the tray... out of the printer. Close the front cover. 7. Removing Print Jams From the ...
...force on the operator panel, you must clear all the jammed and/or creased paper from the tray. Sheet Tray NOTE: To resolve the error displayed on the tray. Remove all print media from the printer. 2. Insert the tray back into the printer, and push until it up. 6. Pull the tray... out of the printer. Close the front cover. 7. Removing Print Jams From the ...
User Guide
Page 71
Close the front cover. Pull the jammed paper out carefully to remove the jammed paper from the inside of paper remaining inside the printer. 6. Close the belt unit by pushing the side button. 5. Open the front cover by pushing it up. 7. Then, confirm that there are no scraps of the printer. 4. If it is still hard to remove the paper, go to the next step to avoid tearing it stops and remove the jammed paper. Open the belt unit until it . 3.
Close the front cover. Pull the jammed paper out carefully to remove the jammed paper from the inside of paper remaining inside the printer. 6. Close the belt unit by pushing the side button. 5. Open the front cover by pushing it up. 7. Then, confirm that there are no scraps of the printer. 4. If it is still hard to remove the paper, go to the next step to avoid tearing it stops and remove the jammed paper. Open the belt unit until it . 3.

User Guide
Page 72
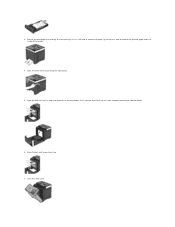
... button and open the front cover. 3. The fuser is hot. Lift the levers at both ends of the printer. Open the cover of the fuser and remove the jammed paper. Insert the tray into the printer, and push until it stops. Do not touch it, doing so may cause burns. 5. 8. CAUTION: Do not use...
... button and open the front cover. 3. The fuser is hot. Lift the levers at both ends of the printer. Open the cover of the fuser and remove the jammed paper. Insert the tray into the printer, and push until it stops. Do not touch it, doing so may cause burns. 5. 8. CAUTION: Do not use...
User Guide
Page 74
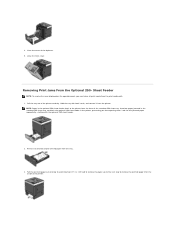
... inside of the standard 250-sheet tray, therefore paper jammed in the standard 250-sheet tray can block the optional 250-sheet feeder in the printer, preventing you must clear all jammed and/or creased paper from opening them. Remove all print media from the printer. Pull the jammed paper out carefully to avoid tearing it is still...
... inside of the standard 250-sheet tray, therefore paper jammed in the standard 250-sheet tray can block the optional 250-sheet feeder in the printer, preventing you must clear all jammed and/or creased paper from opening them. Remove all print media from the printer. Pull the jammed paper out carefully to avoid tearing it is still...
User Guide
Page 75
NOTE: If the paper jam message is not cleared after closing the front cover, pull out the standard 250-sheet tray from the printer and remove the jammed paper. 6. Insert the tray back into the printer, and push until it stops. Then, confirm that there are no scraps of the printer. Back to Contents Page Close the front cover. CAUTION: Do not use excessive force on the tray. Doing so could damage the tray or the inside of paper remaining inside the printer. 5. 4. Open the front cover by pushing the side button and remove the jammed paper.
NOTE: If the paper jam message is not cleared after closing the front cover, pull out the standard 250-sheet tray from the printer and remove the jammed paper. 6. Insert the tray back into the printer, and push until it stops. Then, confirm that there are no scraps of the printer. Back to Contents Page Close the front cover. CAUTION: Do not use excessive force on the tray. Doing so could damage the tray or the inside of paper remaining inside the printer. 5. 4. Open the front cover by pushing the side button and remove the jammed paper.


