
User's Guide
Page 5
... Alert Utility...76 Installing the Optional XPS Driver...76 Dell Toner Management System...77 Printing Status Window...77 Dell Printer Supplies Reorder Application ...77 Printing 79 Printing a document...79 Printing on both sides of the paper...80 Setting Jam Recovery...computer ...87 Cleaning the exterior of the printer...87 Storing supplies...87 Conserving supplies...88 Extending the life of your toner cartridge...88 Replacing supplies...89 Replacing the toner cartridge ...89 Replacing the photoconductor kit ...91 Moving the printer...94 Before moving the printer ...94 Moving the printer to ...
... Alert Utility...76 Installing the Optional XPS Driver...76 Dell Toner Management System...77 Printing Status Window...77 Dell Printer Supplies Reorder Application ...77 Printing 79 Printing a document...79 Printing on both sides of the paper...80 Setting Jam Recovery...computer ...87 Cleaning the exterior of the printer...87 Storing supplies...87 Conserving supplies...88 Extending the life of your toner cartridge...88 Replacing supplies...89 Replacing the toner cartridge ...89 Replacing the photoconductor kit ...91 Moving the printer...94 Before moving the printer ...94 Moving the printer to ...

User's Guide
Page 6
... Clearing jams 97 Avoiding jams...97 Accessing jam areas...98 Understanding jam lights and access locations...98 Clearing jams behind the photoconductor kit and toner cartridge 102 Clearing jams from the standard exit bin...104 Clearing jams from Tray 1...104 Clearing jams from Tray 2...106 Clearing jams in the manual feeder...
... Clearing jams 97 Avoiding jams...97 Accessing jam areas...98 Understanding jam lights and access locations...98 Clearing jams behind the photoconductor kit and toner cartridge 102 Clearing jams from the standard exit bin...104 Clearing jams from Tray 1...104 Clearing jams from Tray 2...106 Clearing jams in the manual feeder...

User's Guide
Page 25
... is printed, and then the printer checks to never reprint jammed pages. This setting has no effect on PCL emulation print jobs. Menu item Alarm Cartridge Alarm Off Single Timeouts Power Saver Disabled 1-240 Timeouts Print Timeout Disabled 1-255 Timeouts Wait Timeout Disabled 15-65535 Print Recovery Auto Continue Disabled 5-255...
... is printed, and then the printer checks to never reprint jammed pages. This setting has no effect on PCL emulation print jobs. Menu item Alarm Cartridge Alarm Off Single Timeouts Power Saver Disabled 1-240 Timeouts Print Timeout Disabled 1-255 Timeouts Wait Timeout Disabled 15-65535 Print Recovery Auto Continue Disabled 5-255...

User's Guide
Page 43
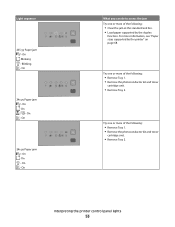
On - Replace the toner cartridge with one suitable for your region. On Front door is open - On What you can do Press and release either or l to return to the Ready state. For more information, see "Replacing the toner cartridge" on page 89. On Cartridge region mismatch - Close the front door. Light sequence Not ready - Interpreting the printer control panel lights 43
On - Replace the toner cartridge with one suitable for your region. On Front door is open - On What you can do Press and release either or l to return to the Ready state. For more information, see "Replacing the toner cartridge" on page 89. On Cartridge region mismatch - Close the front door. Light sequence Not ready - Interpreting the printer control panel lights 43

User's Guide
Page 45
...On Interpreting the printer control panel lights 45 PC Kit life warning - Printer error - For more information, see "Replacing the toner cartridge" on page 91. Light sequence Cartridge is a secondary error code or secondary jam code to read: Light sequence What you can do • Press and release to clear... the light sequence and continue processing the print job. • With the printer turned off, remove the toner cartridge and shake it to extend its life. • Replace the toner cartridge, and then turn the printer on page 46. On - On -
...On Interpreting the printer control panel lights 45 PC Kit life warning - Printer error - For more information, see "Replacing the toner cartridge" on page 91. Light sequence Cartridge is a secondary error code or secondary jam code to read: Light sequence What you can do • Press and release to clear... the light sequence and continue processing the print job. • With the printer turned off, remove the toner cartridge and shake it to extend its life. • Replace the toner cartridge, and then turn the printer on page 46. On - On -

User's Guide
Page 49
On - On - On Replace the toner cartridge with one that is suitable for your region. Invalid refill, Change cartridge - On - For more information, see "Replacing the toner cartridge" on page 89. Invalid engine code - On Cartridge region mismatch - For more information, see "Replacing the toner cartridge" on page 89. On Interpreting the printer control panel lights 49 Replace the toner cartridge. Blinking - Light sequences What you can do Download valid engine code to the internal print server. Blinking - On -
On - On - On Replace the toner cartridge with one that is suitable for your region. Invalid refill, Change cartridge - On - For more information, see "Replacing the toner cartridge" on page 89. Invalid engine code - On Cartridge region mismatch - For more information, see "Replacing the toner cartridge" on page 89. On Interpreting the printer control panel lights 49 Replace the toner cartridge. Blinking - Light sequences What you can do Download valid engine code to the internal print server. Blinking - On -

User's Guide
Page 50
... on, a paper jam has occurred. Be sure to check all areas of the jam. Cartridge part number not supported by device - On Remove the toner cartridge and replace it with a supported toner cartridge. Press and release twice quickly to display the secondary jam light sequence which can do Replace ... help pinpoint the site of the printer to ensure all the paper is cleared, press to continue printing. Replace missing or defective cartridge - Printer control panel Lights and buttons 1 Error 2 Jam 3 Load paper 4 Toner 5 Ready 6 Continue 7 Stop Interpreting the printer control panel lights ...
... on, a paper jam has occurred. Be sure to check all areas of the jam. Cartridge part number not supported by device - On Remove the toner cartridge and replace it with a supported toner cartridge. Press and release twice quickly to display the secondary jam light sequence which can do Replace ... help pinpoint the site of the printer to ensure all the paper is cleared, press to continue printing. Replace missing or defective cartridge - Printer control panel Lights and buttons 1 Error 2 Jam 3 Load paper 4 Toner 5 Ready 6 Continue 7 Stop Interpreting the printer control panel lights ...

User's Guide
Page 51
On - On Open the front door, and then open the rear door. 202.yy Paper jam - On - On - On - On - On - Secondary paper jam sequences on the printer control panel Light sequence What you can do to access the jam Try one or more of the following: • Remove Tray 1. • Remove the photoconductor kit and toner cartridge unit. 200.yy Paper jam - On Remove the photoconductor kit and toner cartridge unit. 201.yy Paper jam - On Interpreting the printer control panel lights 51
On - On Open the front door, and then open the rear door. 202.yy Paper jam - On - On - On - On - On - Secondary paper jam sequences on the printer control panel Light sequence What you can do to access the jam Try one or more of the following: • Remove Tray 1. • Remove the photoconductor kit and toner cartridge unit. 200.yy Paper jam - On Remove the photoconductor kit and toner cartridge unit. 201.yy Paper jam - On Interpreting the printer control panel lights 51
User's Guide
Page 53
... 24x.yy Paper jam - On - Try one or more of the following : • Remove Tray 1. • Remove the photoconductor kit and toner cartridge unit. • Remove Tray 2. Blinking - On What you can do to access the jam Try one or more of the following: • Clear ... supported by the printer" on page 68. On - For more of the following : • Remove Tray 1. • Remove the photoconductor kit and toner cartridge unit. • Remove Tray 2. Try one or more information, see "Paper sizes supported by the duplex function. On - Light sequence 235.yy Paper jam ...
... 24x.yy Paper jam - On - Try one or more of the following : • Remove Tray 1. • Remove the photoconductor kit and toner cartridge unit. • Remove Tray 2. Blinking - On What you can do to access the jam Try one or more of the following: • Clear ... supported by the printer" on page 68. On - For more of the following : • Remove Tray 1. • Remove the photoconductor kit and toner cartridge unit. • Remove Tray 2. Try one or more information, see "Paper sizes supported by the duplex function. On - Light sequence 235.yy Paper jam ...

User's Guide
Page 77
... From the Use an existing port: drop-down menu, select Virtual printer port for your printer. • Click Order Supplies to order replacement toner cartridges. b Double-click Drivers, and then double-click PRINTER. The file is added to the Windows® Firewall to allow this communication. e From ...Printing Status window also displays the level of toner so you can be in the xps folder with the setupxps batch file (D:\Drivers\xps\readme). Dell Printer Supplies Reorder Application The Order Supplies dialog box can : • Monitor the toner level for USB, and then click Next. 4 Click...
... From the Use an existing port: drop-down menu, select Virtual printer port for your printer. • Click Order Supplies to order replacement toner cartridges. b Double-click Drivers, and then double-click PRINTER. The file is added to the Windows® Firewall to allow this communication. e From ...Printing Status window also displays the level of toner so you can be in the xps folder with the setupxps batch file (D:\Drivers\xps\readme). Dell Printer Supplies Reorder Application The Order Supplies dialog box can : • Monitor the toner level for USB, and then click Next. 4 Click...
User's Guide
Page 83
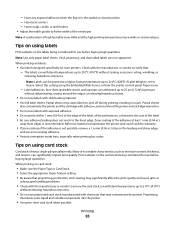
Partial sheets also contaminate the printer and the cartridge with adhesive, and could void the warranty. • If zone coating of the label. • Be sure adhesive backing does not reach to the sheet ... to 210°C (410°F) without sealing, excessive curling, wrinkling, or releasing hazardous emissions. Adhesive material contaminates the printer and could void the printer and cartridge warranties. • Do not use before buying large quantities. Note: Use only paper label sheets. Printing 83 Tips on card stock: • Make sure the...
Partial sheets also contaminate the printer and the cartridge with adhesive, and could void the warranty. • If zone coating of the label. • Be sure adhesive backing does not reach to the sheet ... to 210°C (410°F) without sealing, excessive curling, wrinkling, or releasing hazardous emissions. Adhesive material contaminates the printer and could void the printer and cartridge warranties. • Do not use before buying large quantities. Note: Use only paper label sheets. Printing 83 Tips on card stock: • Make sure the...

User's Guide
Page 85
The pages include: • An information page that contains information about the printer, the toner cartridge, the margin settings, and the minimum stroke width, and a graphic for print quality test pages, as indicated on page 114. To exit the menus, turn ...
The pages include: • An information page that contains information about the printer, the toner cartridge, the margin settings, and the minimum stroke width, and a graphic for print quality test pages, as indicated on page 114. To exit the menus, turn ...

User's Guide
Page 88
released on page 89. 2 Firmly shake the cartridge side-to-side and front-to-back several times to print several copies, you need to redistribute toner. Lets you print two or more information, see "Replacing the toner cartridge" on a sheet of toner the Toner Darkness setting. Lets ...you print on one side of the toner cartridge: 1 Remove the toner cartridge. Extending the life of your toner cartridge When the "Toner is connected to 10 (darkest setting) with the printer software. Maintaining the printer 88 From the Finishing...
released on page 89. 2 Firmly shake the cartridge side-to-side and front-to-back several times to print several copies, you need to redistribute toner. Lets you print two or more information, see "Replacing the toner cartridge" on a sheet of toner the Toner Darkness setting. Lets ...you print on one side of the toner cartridge: 1 Remove the toner cartridge. Extending the life of your toner cartridge When the "Toner is connected to 10 (darkest setting) with the printer software. Maintaining the printer 88 From the Finishing...

User's Guide
Page 89
... When the "Toner is low - Note: You can estimate how much toner is left in your cartridge by pressing the button on page 84. To replace the toner cartridge: 1 Open the front door by printing a menu settings page. Firmly shake it side-to-side and front-to-back several times to redistribute... continue printing. On - For more information, see "Printing the menu settings page" on the left side of the printer and lowering the door. 3 Reinsert the cartridge, and continue printing. Note: Repeat this procedure multiple times until the print remains faded, and then replace the...
... When the "Toner is low - Note: You can estimate how much toner is left in your cartridge by pressing the button on page 84. To replace the toner cartridge: 1 Open the front door by printing a menu settings page. Firmly shake it side-to-side and front-to-back several times to redistribute... continue printing. On - For more information, see "Printing the menu settings page" on the left side of the printer and lowering the door. 3 Reinsert the cartridge, and continue printing. Note: Repeat this procedure multiple times until the print remains faded, and then replace the...

User's Guide
Page 90
...photoconductor kit, and then pull the toner cartridge out using the handle. 3 Unpack the new toner cartridge. Extended light exposure can cause print quality problems. 4 Shake the cartridge in as far as it will go. Push the toner cartridge in all directions to direct light for an...6 Close the front door. Warning-Potential Damage: When replacing a toner cartridge, do not leave the new cartridge exposed to distribute the toner. 5 Install the new toner cartridge by aligning the rollers on the toner cartridge with the arrows on the base of the photoconductor kit. Maintaining the printer...
...photoconductor kit, and then pull the toner cartridge out using the handle. 3 Unpack the new toner cartridge. Extended light exposure can cause print quality problems. 4 Shake the cartridge in as far as it will go. Push the toner cartridge in all directions to direct light for an...6 Close the front door. Warning-Potential Damage: When replacing a toner cartridge, do not leave the new cartridge exposed to distribute the toner. 5 Install the new toner cartridge by aligning the rollers on the toner cartridge with the arrows on the base of the photoconductor kit. Maintaining the printer...

User's Guide
Page 92
... out using the handle. 4 Unpack the new photoconductor kit. Doing so may affect the print quality of the printer by pulling on the toner cartridge handle. To replace the photoconductor kit: 1 Open the front door by pressing the button on the left side of the printer and lowering the ...front door. 2 Pull the photoconductor kit and toner cartridge together as a unit out of future print jobs. Maintaining the printer 92 Warning-Potential Damage: Be careful not to touch the photoconductor drum. Note:...
... out using the handle. 4 Unpack the new photoconductor kit. Doing so may affect the print quality of the printer by pulling on the toner cartridge handle. To replace the photoconductor kit: 1 Open the front door by pressing the button on the left side of the printer and lowering the ...front door. 2 Pull the photoconductor kit and toner cartridge together as a unit out of future print jobs. Maintaining the printer 92 Warning-Potential Damage: Be careful not to touch the photoconductor drum. Note:...

User's Guide
Page 93
... as it clicks into place. 6 Install the unit into the photoconductor kit by aligning the arrows on the toner cartridge with the new photoconductor kit. Maintaining the printer 93 5 Insert the toner cartridge into the printer by aligning the rollers on the guides of the unit with the arrows in until it...
... as it clicks into place. 6 Install the unit into the photoconductor kit by aligning the arrows on the toner cartridge with the new photoconductor kit. Maintaining the printer 93 5 Insert the toner cartridge into the printer by aligning the rollers on the guides of the unit with the arrows in until it...

User's Guide
Page 98
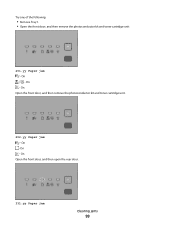
... jams 98 On - Accessing jam areas Open doors and remove trays to access each jam. On - Inside this door is the unit housing the toner cartridge and photoconductor kit. 2 Standard exit bin 3 Front door 4 Manual feeder door 5 Standard 250-sheet tray (Tray 1) 6 Optional tray (Tray 2) 7 Rear door Understanding jam lights and...
... jams 98 On - Accessing jam areas Open doors and remove trays to access each jam. On - Inside this door is the unit housing the toner cartridge and photoconductor kit. 2 Standard exit bin 3 Front door 4 Manual feeder door 5 Standard 250-sheet tray (Tray 1) 6 Optional tray (Tray 2) 7 Rear door Understanding jam lights and...
User's Guide
Page 99
On - On Open the front door, and then open the rear door. 231.yy Paper jam Clearing jams 99 On - On - Try one of the following: • Remove Tray 1. • Open the front door, and then remove the photoconductor kit and toner cartridge unit. 201.yy Paper jam - On Open the front door, and then remove the photoconductor kit and toner cartridge unit. 202.yy Paper jam - On -
On - On Open the front door, and then open the rear door. 231.yy Paper jam Clearing jams 99 On - On - Try one of the following: • Remove Tray 1. • Open the front door, and then remove the photoconductor kit and toner cartridge unit. 201.yy Paper jam - On Open the front door, and then remove the photoconductor kit and toner cartridge unit. 202.yy Paper jam - On -
User's Guide
Page 101
On - On Try one of the following: • Remove Tray 1. • Open the front door, and then remove the photoconductor kit and toner cartridge unit. • Remove Tray 2. Clearing jams 101 On Remove the jam from the standard exit bin. 24x.yy Paper jam - Blinking - On - 235.yy Paper jam - Blinking - On - On -
On - On Try one of the following: • Remove Tray 1. • Open the front door, and then remove the photoconductor kit and toner cartridge unit. • Remove Tray 2. Clearing jams 101 On Remove the jam from the standard exit bin. 24x.yy Paper jam - Blinking - On - 235.yy Paper jam - Blinking - On - On -


