
Owner's Manual
Page 3
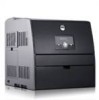
Dell™ Laser Printer 3000cn 1 2 3 4 8 7 6 5 1 Center output tray 2 Operator panel 3 Multipurpose feeder 4 Power switch 5 Power cable connector 6 Ethernet port 7 USB port 8 Parallel port For details on the optional duplex module, 250-sheet tray module, 500-sheet tray module, and other additional options, see the User's Guide. 3
Dell™ Laser Printer 3000cn 1 2 3 4 8 7 6 5 1 Center output tray 2 Operator panel 3 Multipurpose feeder 4 Power switch 5 Power cable connector 6 Ethernet port 7 USB port 8 Parallel port For details on the optional duplex module, 250-sheet tray module, 500-sheet tray module, and other additional options, see the User's Guide. 3

Owner's Manual
Page 4
...the marks and names of their products. All rights reserved. Other trademarks and trade names may be used in this text: Dell and DELL logo are registered trademarks of Novell, Inc.; UNITED STATES GOVERNMENT RESTRICTED RIGHTS This software and documentation are registered trademarks of Microsoft...loss of data and tells you make better use of your printer. Trademarks used in this document is subject to avoid the problem. Dell Inc. Novell and NetWare are trademarks of Dell Inc.; www.dell.com/supplies | support.dell.com Notes, Notices, and Cautions NOTE: A NOTE indicates ...
...the marks and names of their products. All rights reserved. Other trademarks and trade names may be used in this text: Dell and DELL logo are registered trademarks of Novell, Inc.; UNITED STATES GOVERNMENT RESTRICTED RIGHTS This software and documentation are registered trademarks of Microsoft...loss of data and tells you make better use of your printer. Trademarks used in this document is subject to avoid the problem. Dell Inc. Novell and NetWare are trademarks of Dell Inc.; www.dell.com/supplies | support.dell.com Notes, Notices, and Cautions NOTE: A NOTE indicates ...

Owner's Manual
Page 5
Contents Dell™ Laser Printer 3000cn 3 1 Loading Paper 11 Loading the Multipurpose Feeder 12 Loading the Optional Tray 14 Loading Envelopes ...17 2 Setting Up for Local Printing 19 Installing Printer Drivers 20 Connecting the Printer to the Computer Before Inserting the Drivers and Utilities CD ...20 3 ...Setting Up for Network Printing 23 Network Set-Up ...24 Print and Check the Printer Settings Page 24 Run the Installation Software 24 4 Using Your Printer 27 Changing Printer Settings 28 Initializing NVRAM ...29 Setting of Panel Lock 29 Adjusting the Language 30 Printing a...
Contents Dell™ Laser Printer 3000cn 3 1 Loading Paper 11 Loading the Multipurpose Feeder 12 Loading the Optional Tray 14 Loading Envelopes ...17 2 Setting Up for Local Printing 19 Installing Printer Drivers 20 Connecting the Printer to the Computer Before Inserting the Drivers and Utilities CD ...20 3 ...Setting Up for Network Printing 23 Network Set-Up ...24 Print and Check the Printer Settings Page 24 Run the Installation Software 24 4 Using Your Printer 27 Changing Printer Settings 28 Initializing NVRAM ...29 Setting of Panel Lock 29 Adjusting the Language 30 Printing a...

Owner's Manual
Page 9
...in your product. CAUTION: If your product is not marked with the use of specific Dell-authorized components. Dell disclaims liability associated with two people. 9 CAUTION: To move the printer safety, remove the optional 250-sheet tray module and 500-sheet tray module before moving...SAFETY INSTRUCTIONS Use the following safety guidelines to help protect your system and working environment from potential damage. • Your product uses a laser. You must be obvious. The safety features of some parts may result in hazardous radiation exposure. • Your product uses a ...
...in your product. CAUTION: If your product is not marked with the use of specific Dell-authorized components. Dell disclaims liability associated with two people. 9 CAUTION: To move the printer safety, remove the optional 250-sheet tray module and 500-sheet tray module before moving...SAFETY INSTRUCTIONS Use the following safety guidelines to help protect your system and working environment from potential damage. • Your product uses a laser. You must be obvious. The safety features of some parts may result in hazardous radiation exposure. • Your product uses a ...
Owner's Manual
Page 13
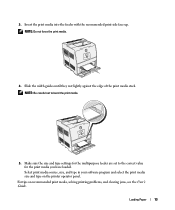
... User's Guide. Loading Paper 13 3. Slide the width guides until they rest lightly against the edge of the print media stack. For tips on the printer operator panel. Insert the print media into the feeder with the recommended print side face up. NOTE: Be careful not to the correct value for...
... User's Guide. Loading Paper 13 3. Slide the width guides until they rest lightly against the edge of the print media stack. For tips on the printer operator panel. Insert the print media into the feeder with the recommended print side face up. NOTE: Be careful not to the correct value for...
Owner's Manual
Page 17
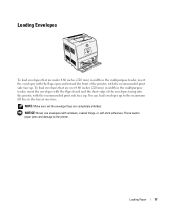
NOTE: Make sure set the envelope flaps are completely unfolded. Loading Paper 17 You can load envelopes up to the printer. NOTICE: Never use envelopes with windows, coated linings, or self-stick adhesives. To load envelopes that are under 8.66 inches (220 mm) in width in ...the multipurpose feeder, insert the envelopes with the flaps open and toward the front of the envelopes facing into the printer, with the recommended print side face up. These lead to paper jams and damage to the maximum fill line in the tray at one time...
NOTE: Make sure set the envelope flaps are completely unfolded. Loading Paper 17 You can load envelopes up to the printer. NOTICE: Never use envelopes with windows, coated linings, or self-stick adhesives. To load envelopes that are under 8.66 inches (220 mm) in width in ...the multipurpose feeder, insert the envelopes with the flaps open and toward the front of the envelopes facing into the printer, with the recommended print side face up. These lead to paper jams and damage to the maximum fill line in the tray at one time...
Owner's Manual
Page 19
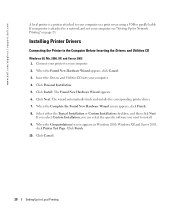
2 Section 2 Setting Up for Local Printing Installing Printer Drivers Setting Up for Local Printing
2 Section 2 Setting Up for Local Printing Installing Printer Drivers Setting Up for Local Printing
Owner's Manual
Page 20
...Installation checkbox, and then click Next. screen appears, in Windows 2000, Windows XP, and Server 2003, click Printer Test Page. www.dell.com/supplies | support.dell.com A local printer is attached to your computer or a print server using a USB or parallel cable. When the Found New ... the Computer Before Inserting the Drivers and Utilities CD Windows 98, Me, 2000, XP, and Server 2003 1. When the Congratulations! Connect your printer to a network and not your computer. 4. Click Personal Installation. 5. Click Cancel. 20 Setting Up for Network Printing" on page 23. ...
...Installation checkbox, and then click Next. screen appears, in Windows 2000, Windows XP, and Server 2003, click Printer Test Page. www.dell.com/supplies | support.dell.com A local printer is attached to your computer or a print server using a USB or parallel cable. When the Found New ... the Computer Before Inserting the Drivers and Utilities CD Windows 98, Me, 2000, XP, and Server 2003 1. When the Congratulations! Connect your printer to a network and not your computer. 4. Click Personal Installation. 5. Click Cancel. 20 Setting Up for Network Printing" on page 23. ...

Owner's Manual
Page 21
... Next. 5. When the Congratulations! Click Personal Installation. 4. Setting Up for Local Printing 21 screen appears, click Finish. 7. Insert the Drivers and Utilities CD into your printer to install. 6. Windows 95 and NT 4.0 1. If you select Custom Installation, you can select the specific software you want to your computer. 2. Select either the...
... Next. 5. When the Congratulations! Click Personal Installation. 4. Setting Up for Local Printing 21 screen appears, click Finish. 7. Insert the Drivers and Utilities CD into your printer to install. 6. Windows 95 and NT 4.0 1. If you select Custom Installation, you can select the specific software you want to your computer. 2. Select either the...
Owner's Manual
Page 24
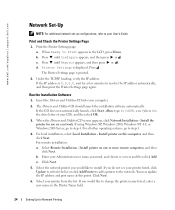
...Drivers and Utilities CD into your printer from the list. The Drivers and Utilities CD should launch the installation software automatically. When the Drivers and Utilities CD screen appears, click Network Installation - Select your computer. 2. www.dell.com/supplies | support.dell.com Network Set-Up NOTE: For...Select Remote Installation - If using Windows XP, Windows 2000, Windows NT 4.0, or Windows 2003 Server, go to Print appears in the Printer Name field. 24 Setting Up for Network Printing Press until Configure appears, and then press or . If the IP address is the ...
...Drivers and Utilities CD into your printer from the list. The Drivers and Utilities CD should launch the installation software automatically. When the Drivers and Utilities CD screen appears, click Network Installation - Select your computer. 2. www.dell.com/supplies | support.dell.com Network Set-Up NOTE: For...Select Remote Installation - If using Windows XP, Windows 2000, Windows NT 4.0, or Windows 2003 Server, go to Print appears in the Printer Name field. 24 Setting Up for Network Printing Press until Configure appears, and then press or . If the IP address is the ...

Owner's Manual
Page 25
... to send you want to set up the Dell Printer Configuration Web Tool to install the Dell software and documentation. Launch the Dell Printer Configuration Web Tool. 2. Click Apply New Settings. Click Next. 11. When the Congratulations! Use the Dell Printer Configuration Web Tool to restrict color printing, select the appropriate Color Track option. You can set up email...
... to send you want to set up the Dell Printer Configuration Web Tool to install the Dell software and documentation. Launch the Dell Printer Configuration Web Tool. 2. Click Apply New Settings. Click Next. 11. When the Congratulations! Use the Dell Printer Configuration Web Tool to restrict color printing, select the appropriate Color Track option. You can set up email...
Owner's Manual
Page 27
Section 4 Using Your Printer Changing Printer Settings Adjusting the Language Printing a Job Canceling a Job From the Printer Operator Panel Software Overview 4 Using Your Printer
Section 4 Using Your Printer Changing Printer Settings Adjusting the Language Printing a Job Canceling a Job From the Printer Operator Panel Software Overview 4 Using Your Printer
Owner's Manual
Page 28
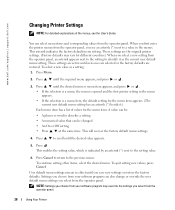
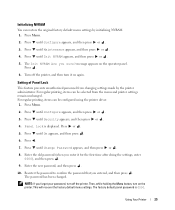
...setting new values, press Cancel. These settings are active until new ones are selected or the factory defaults are the original printer settings. (Factory defaults may override the settings you save new settings or restore the factory defaults. Press until the required menu...describe a setting • A numerical value that can select menu items and corresponding values from the operator panel. www.dell.com/supplies | support.dell.com Changing Printer Settings NOTE: For detailed explanations of values for different countries.) When you select a new setting from the operator panel...
...setting new values, press Cancel. These settings are active until new ones are selected or the factory defaults are the original printer settings. (Factory defaults may override the settings you save new settings or restore the factory defaults. Press until the required menu...describe a setting • A numerical value that can select menu items and corresponding values from the operator panel. www.dell.com/supplies | support.dell.com Changing Printer Settings NOTE: For detailed explanations of values for different countries.) When you select a new setting from the operator panel...
Owner's Manual
Page 29
.... The Init NVRAM Are you entered, and then press . Setting of Panel Lock This feature prevents unauthorized personnel from the menu and printer settings remain unchanged. Press until Maintenance appears, and then press or . 4. Then, while holding the Menu button, turn it for the ...first time after doing the settings, enter 0000), and then press . 9. Using Your Printer 29 message appears on the printer. For regular printing, items can be selected from changing settings made by initializing NVRAM. 1. NOTE: If you enter it on again....
.... The Init NVRAM Are you entered, and then press . Setting of Panel Lock This feature prevents unauthorized personnel from the menu and printer settings remain unchanged. Press until Maintenance appears, and then press or . 4. Then, while holding the Menu button, turn it for the ...first time after doing the settings, enter 0000), and then press . 9. Using Your Printer 29 message appears on the printer. For regular printing, items can be selected from changing settings made by initializing NVRAM. 1. NOTE: If you enter it on again....
Owner's Manual
Page 30
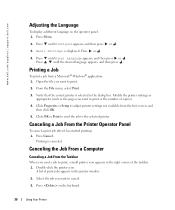
...® Windows® application: 1. A list of the taskbar. 1. Verify that the correct printer is displayed. Press Cancel. Double-click the printer icon. www.dell.com/supplies | support.dell.com Adjusting the Language To display a different language on the keyboard. 30 Using Your Printer Click OK or Print to send the job to print or the...
...® Windows® application: 1. A list of the taskbar. 1. Verify that the correct printer is displayed. Press Cancel. Double-click the printer icon. www.dell.com/supplies | support.dell.com Adjusting the Language To display a different language on the keyboard. 30 Using Your Printer Click OK or Print to send the job to print or the...

Owner's Manual
Page 31
...to manage multiple Status Window. • Select a printer from the list view (or Printer Selection) by clicking its name to open or toner is open a Status Window or Dell Printer Configuration Web Tool for the local printer. Click Start →Printers and Faxes. When an error occurs, the error... help. • The Status Monitor Console displays the Status Window for local connections, or the Dell Printer Configuration Web Tool for network connections. • To obtain status info on network printers, you when an error or warning occurs, for example, when the top cover is running low...
...to manage multiple Status Window. • Select a printer from the list view (or Printer Selection) by clicking its name to open or toner is open a Status Window or Dell Printer Configuration Web Tool for the local printer. Click Start →Printers and Faxes. When an error occurs, the error... help. • The Status Monitor Console displays the Status Window for local connections, or the Dell Printer Configuration Web Tool for network connections. • To obtain status info on network printers, you when an error or warning occurs, for example, when the top cover is running low...

Owner's Manual
Page 32
... toner error occurs. Using the setup disk that contain custom driver settings. When you cannot get information from http://www.dell.com/printers/. 32 Using Your Printer Create a separate setup disk for things such as: • Print orientation and Multiple Up (document settings) •...create driver installation packages that you have created will reduce the amount of work required when installing the printer driver. • Install in advance the Dell Laser Printer 3000cn printer driver in a server on which the disk was created or computers running the same operating system, ...
... toner error occurs. Using the setup disk that contain custom driver settings. When you cannot get information from http://www.dell.com/printers/. 32 Using Your Printer Create a separate setup disk for things such as: • Print orientation and Multiple Up (document settings) •...create driver installation packages that you have created will reduce the amount of work required when installing the printer driver. • Install in advance the Dell Laser Printer 3000cn printer driver in a server on which the disk was created or computers running the same operating system, ...

Owner's Manual
Page 34
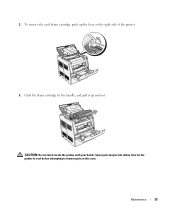
... provide warranty coverage for your printer. Dell cartridges are available only through Dell. To open both covers on page 2. Removing the Used Drum Cartridge NOTE: Remove any of the following procedures, read and follow the "CAUTION: SAFETY INSTRUCTIONS" on page 9. Dell recommends Dell cartridges for problems caused by using ...cover before opening the top cover or front door. You can order more online at http://www.dell.com/supplies or by phone, see "Order Toner Cartridges" on the printer, grab the notch in the front door and pull forward. To order by phone. NOTE: First...
... provide warranty coverage for your printer. Dell cartridges are available only through Dell. To open both covers on page 2. Removing the Used Drum Cartridge NOTE: Remove any of the following procedures, read and follow the "CAUTION: SAFETY INSTRUCTIONS" on page 9. Dell recommends Dell cartridges for problems caused by using ...cover before opening the top cover or front door. You can order more online at http://www.dell.com/supplies or by phone, see "Order Toner Cartridges" on the printer, grab the notch in the front door and pull forward. To order by phone. NOTE: First...
Owner's Manual
Page 35
Allow time for the printer to cool before attempting to remove parts in this area. CAUTION: Do not touch inside the printer with your hands. Some parts may be hot. Maintenance 35 To remove the used drum cartridge, push up and out. Grab the drum cartridge by the handle, and pull it up the lever on the right side of the printer. 3. 2.
Allow time for the printer to cool before attempting to remove parts in this area. CAUTION: Do not touch inside the printer with your hands. Some parts may be hot. Maintenance 35 To remove the used drum cartridge, push up and out. Grab the drum cartridge by the handle, and pull it up the lever on the right side of the printer. 3. 2.
Owner's Manual
Page 36
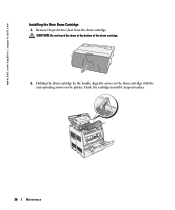
Guide the cartridge in until it snaps into place. 36 Maintenance CAUTION: Do not touch the drum at the bottom of the drum cartridge. 2. Remove the protective sheet from the drum cartridge. Holding the drum cartridge by the handle, align the arrows on the drum cartridge with the corresponding arrows on the printer. www.dell.com/supplies | support.dell.com Installing the New Drum Cartridge 1.
Guide the cartridge in until it snaps into place. 36 Maintenance CAUTION: Do not touch the drum at the bottom of the drum cartridge. 2. Remove the protective sheet from the drum cartridge. Holding the drum cartridge by the handle, align the arrows on the drum cartridge with the corresponding arrows on the printer. www.dell.com/supplies | support.dell.com Installing the New Drum Cartridge 1.


