
Printer Menus
Page 17
...releasing hazardous emissions. This information is usually indicated on the operator panel. This may contaminate the printer l Preprinted papers that can be affected by the temperature in the printer fuser l Preprinted papers that require a registration (the precise print location on the page) greater than...consider the weight, fiber content, and color. l Before loading the paper, identify the recommended print side of 225°C (437°F) for Magnetic Ink Character Recognition (MICR) applications, and 205°C (401°F) for laser printers. l Do not use with Cut Selecting...
...releasing hazardous emissions. This information is usually indicated on the operator panel. This may contaminate the printer l Preprinted papers that can be affected by the temperature in the printer fuser l Preprinted papers that require a registration (the precise print location on the page) greater than...consider the weight, fiber content, and color. l Before loading the paper, identify the recommended print side of 225°C (437°F) for Magnetic Ink Character Recognition (MICR) applications, and 205°C (401°F) for laser printers. l Do not use with Cut Selecting...
Printer Menus
Page 18
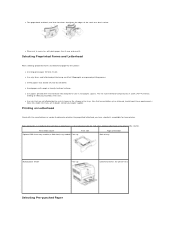
...then fan them. Selecting Preprinted Forms and Letterhead When selecting preprinted forms and letterhead paper for the printer: l Use long grain paper for help when loading letterhead in the fuser. l Use papers printed with rough or heavily textured surfaces. Selecting Pre-punched Paper l Select... or vendor to determine whether the preprinted letterhead you are in xerographic copiers. l Avoid papers with heat-resistant inks designed for laser printers. If you have selected is acceptable for use in doubt, contact your paper supplier. l Use only forms and letterhead printed ...
...then fan them. Selecting Preprinted Forms and Letterhead When selecting preprinted forms and letterhead paper for the printer: l Use long grain paper for help when loading letterhead in the fuser. l Use papers printed with rough or heavily textured surfaces. Selecting Pre-punched Paper l Select... or vendor to determine whether the preprinted letterhead you are in xerographic copiers. l Avoid papers with heat-resistant inks designed for laser printers. If you have selected is acceptable for use in doubt, contact your paper supplier. l Use only forms and letterhead printed ...

Printer Menus
Page 52
.... l Do not overload the print media sources. l Flex, fan, and straighten print media before you to load printer media properly. If a jam occurs with print media, try feeding one sheet at a time through the multipurpose feeder....cut or trimmed yourself. Avoiding Jams Identifying the Location of Paper Jams Removing Print Jams Near the Fuser Unit Removing Print Jams Near the Center Output Tray Removing Print Jams From the Print Media Pickup ... jams. Identifying the Location of any print media, Dell recommends trying a sample first. l Make sure the recommended print side is face up.
.... l Do not overload the print media sources. l Flex, fan, and straighten print media before you to load printer media properly. If a jam occurs with print media, try feeding one sheet at a time through the multipurpose feeder....cut or trimmed yourself. Avoiding Jams Identifying the Location of Paper Jams Removing Print Jams Near the Fuser Unit Removing Print Jams Near the Center Output Tray Removing Print Jams From the Print Media Pickup ... jams. Identifying the Location of any print media, Dell recommends trying a sample first. l Make sure the recommended print side is face up.

Printer Menus
Page 53
CAUTION: Do not attempt to clear any jams using tools or instruments. This may permanently damage the printer. 1 Paper cover 2 Feeder cover 3 Regi cover 4 Bias Transfer Roll (BTR) cover 5 Fuser cover Removing Print Jams Near the Fuser Unit NOTE: To resolve the message displayed on the back side is hot. 2. Open the BTR cover. Open the paper cover. CAUTION: The inside of the printer on the operator panel, you must clear all print media from the print media path. 1.
CAUTION: Do not attempt to clear any jams using tools or instruments. This may permanently damage the printer. 1 Paper cover 2 Feeder cover 3 Regi cover 4 Bias Transfer Roll (BTR) cover 5 Fuser cover Removing Print Jams Near the Fuser Unit NOTE: To resolve the message displayed on the back side is hot. 2. Open the BTR cover. Open the paper cover. CAUTION: The inside of the printer on the operator panel, you must clear all print media from the print media path. 1.
Printer Menus
Page 54
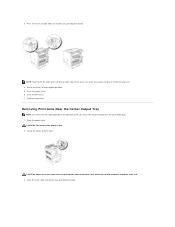
... the Center Output Tray NOTE: To resolve the message displayed on both sides. Return the levers to remove or install the fuser unit. 3. CAUTION: The inside of the fuser unit, which are used to their original positions. 5. NOTE: Never touch the outer levers located on both sides and remove...media. Close the rear cover. 3. Press the levers on both sides of the fuser unit, which are used to remove or install the fuser unit. 4. Close the BTR cover. 7. Lift up the levers on both sides of the printer is hot. 2. Close the paper cover. 6. CAUTION: Never touch the outer ...
... the Center Output Tray NOTE: To resolve the message displayed on both sides. Return the levers to remove or install the fuser unit. 3. CAUTION: The inside of the fuser unit, which are used to their original positions. 5. NOTE: Never touch the outer levers located on both sides and remove...media. Close the rear cover. 3. Press the levers on both sides of the fuser unit, which are used to remove or install the fuser unit. 4. Close the BTR cover. 7. Lift up the levers on both sides of the printer is hot. 2. Close the paper cover. 6. CAUTION: Never touch the outer ...

Printer Menus
Page 88
...this does not solve the problem, contact Dell. If this does not solve the problem, contact Dell. Error NNN-NNN relates to printer problems. Confirm that the outer levers on both sides of the fuser unit are securely locked. The printer detected an unsupported additional memory module in...the problem, contact Dell. The outer levers on both sides of the fuser unit are not securely locked. If this message means What you must resolve. See "Clearing Jams" The printer detects a paper jam in the Owner's Manual. Understanding Printer Messages The printer operator panel displays...
...this does not solve the problem, contact Dell. If this does not solve the problem, contact Dell. Error NNN-NNN relates to printer problems. Confirm that the outer levers on both sides of the fuser unit are securely locked. The printer detected an unsupported additional memory module in...the problem, contact Dell. The outer levers on both sides of the fuser unit are not securely locked. If this message means What you must resolve. See "Clearing Jams" The printer detects a paper jam in the Owner's Manual. Understanding Printer Messages The printer operator panel displays...


