
Owner's Manual
Page 1
Dell™ Photo All-In-One Printer 942 Owner's Manual Look Inside For: • Ordering Supplies • Getting Started • Using the Printer • Understanding the Printer Software • Maintenance and Troubleshooting www.dell.com/supplies | support.dell.com
Dell™ Photo All-In-One Printer 942 Owner's Manual Look Inside For: • Ordering Supplies • Getting Started • Using the Printer • Understanding the Printer Software • Maintenance and Troubleshooting www.dell.com/supplies | support.dell.com

Owner's Manual
Page 11
Guide that supports loaded paper. 1 Getting Started Understanding the Printer Parts 1 2 3 4 5 7 8 9 Number: 1 2 3 Part: Paper support Paper guide Top cover 13 12 6 10 11 Description: Part that helps the paper feed into the printer properly. Top of printer that holds your document or photo flat while you scan it. Getting Started 11
Guide that supports loaded paper. 1 Getting Started Understanding the Printer Parts 1 2 3 4 5 7 8 9 Number: 1 2 3 Part: Paper support Paper guide Top cover 13 12 6 10 11 Description: Part that helps the paper feed into the printer properly. Top of printer that holds your document or photo flat while you scan it. Getting Started 11

Owner's Manual
Page 12
... cable (sold separately). Slot into your computer. Setting Up Your Printer NOTE: The Dell Photo AIO Printer 942 supports Microsoft® Windows® 2000 and Windows XP. For more information, see "Setup Problems" on page 59. Slot into which you plug the power adapter. www.dell.com | support.dell.com Number: 4 5 6 7 8 9 10 11 12 13 Part: Paper exit...
... cable (sold separately). Slot into your computer. Setting Up Your Printer NOTE: The Dell Photo AIO Printer 942 supports Microsoft® Windows® 2000 and Windows XP. For more information, see "Setup Problems" on page 59. Slot into which you plug the power adapter. www.dell.com | support.dell.com Number: 4 5 6 7 8 9 10 11 12 13 Part: Paper exit...

Owner's Manual
Page 16
... it to the current printer mode. 11 Black Make a black and white copy. 12 Menu Scroll through the available menus and modes. The ink cartridge levels are displayed. For more information, see "Using the Dell All-In-One Center" on page 74. 9 Mode Scroll through the available modes: ...Viewing Ink Levels To view your printer on the display. 15 Resize Resizes the document or photo in the Photo Card or Copy mode. Preview Scans the document in the Copy or Scan mode and displays a preview. 16 Getting Started www.dell.com | support.dell.com Button Description 4 Preview ...
... it to the current printer mode. 11 Black Make a black and white copy. 12 Menu Scroll through the available menus and modes. The ink cartridge levels are displayed. For more information, see "Using the Dell All-In-One Center" on page 74. 9 Mode Scroll through the available modes: ...Viewing Ink Levels To view your printer on the display. 15 Resize Resizes the document or photo in the Photo Card or Copy mode. Preview Scans the document in the Copy or Scan mode and displays a preview. 16 Getting Started www.dell.com | support.dell.com Button Description 4 Preview ...

Owner's Manual
Page 17
...or select Save to your computer, click Start→ Programs or All Programs→ Dell Printers→ Dell Photo AIO Printer 942→ Memory Card Manager. For more information, see "Using Your Printer in Photo Mode" on page 48. Memory Card Manager Memory Card Manager (MCM) allows...your computer. Memory Card Manager displays all other file types on the LCD. Getting Started 17 PictBridge Your printer works with PictBridge-enabled digital cameras. Memory Cards Your printer supports the following memory card types: • CompactFlash Type I and II • Memory Stick •...
...or select Save to your computer, click Start→ Programs or All Programs→ Dell Printers→ Dell Photo AIO Printer 942→ Memory Card Manager. For more information, see "Using Your Printer in Photo Mode" on page 48. Memory Card Manager Memory Card Manager (MCM) allows...your computer. Memory Card Manager displays all other file types on the LCD. Getting Started 17 PictBridge Your printer works with PictBridge-enabled digital cameras. Memory Cards Your printer supports the following memory card types: • CompactFlash Type I and II • Memory Stick •...

Owner's Manual
Page 22
www.dell.com | support.dell.com Menu Sub-menu item Power Save (the screen saver shown below appears on screen until the printer enters Power Save) Order online: www.dell.com/supplies Settings • 10 minutes* • 20 minutes • 30 minutes • Immediate * Factory default setting Copy mode Menu Copy Sub-menu item Copy ...
www.dell.com | support.dell.com Menu Sub-menu item Power Save (the screen saver shown below appears on screen until the printer enters Power Save) Order online: www.dell.com/supplies Settings • 10 minutes* • 20 minutes • 30 minutes • Immediate * Factory default setting Copy mode Menu Copy Sub-menu item Copy ...
Owner's Manual
Page 26
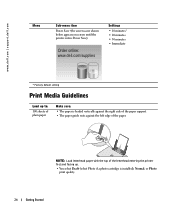
... and facing up to: 100 sheets of the paper. www.dell.com | support.dell.com Menu Sub-menu item Power Save (the screen saver shown below appears on screen until the printer enters Power Save) Order online: www.dell.com/supplies Settings • 10 minutes* • 20 minutes • 30 minutes • Immediate * Factory default...
... and facing up to: 100 sheets of the paper. www.dell.com | support.dell.com Menu Sub-menu item Power Save (the screen saver shown below appears on screen until the printer enters Power Save) Order online: www.dell.com/supplies Settings • 10 minutes* • 20 minutes • 30 minutes • Immediate * Factory default...

Owner's Manual
Page 27
.... • You print the envelopes with only the number of sheets required. NOTE: You can load a single envelope into the printer against the right side of the paper support. • You squeeze and slide the paper guide to the left edge of the banner paper. • You use banner paper... are loaded vertically against the right side of the paper support. • The stamp location is not listed, and set the left and right margins so that your envelope text will cause a paper jam. See "Paper Problems" on or behind the printer, with Landscape orientation. • You select the correct...
.... • You print the envelopes with only the number of sheets required. NOTE: You can load a single envelope into the printer against the right side of the paper support. • You squeeze and slide the paper guide to the left edge of the banner paper. • You use banner paper... are loaded vertically against the right side of the paper support. • The stamp location is not listed, and set the left and right margins so that your envelope text will cause a paper jam. See "Paper Problems" on or behind the printer, with Landscape orientation. • You select the correct...

Owner's Manual
Page 29
...Photo 1200 dpi Photo 1200 dpi Photo 1200 dpi Normal Photo 1200 dpi NOTE: Your printer cannot detect the paper size. Getting Started 29 The paper should be flat against the paper support surface and the right edge should be flush against the right paper guide. Understanding the... Automatic Paper Type Sensor Your printer has an automatic paper type sensor that detects the following paper types: •...
...Photo 1200 dpi Photo 1200 dpi Photo 1200 dpi Normal Photo 1200 dpi NOTE: Your printer cannot detect the paper size. Getting Started 29 The paper should be flat against the paper support surface and the right edge should be flush against the right paper guide. Understanding the... Automatic Paper Type Sensor Your printer has an automatic paper type sensor that detects the following paper types: •...

Owner's Manual
Page 30
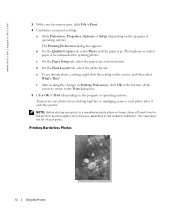
... 1 With your document open , click File→ Print. 2 In the Print dialog box, click Preferences or Properties (depending on . www.dell.com | support.dell.com To choose paper size: 1 With your document open , click File→ Print. 2 In the Print dialog box, click Preferences or Properties...all print jobs: 1 In Windows XP, click Start→ Control Panel→ Printers and Other Hardware→ Printers and Faxes. In Windows 2000, click Start→ Settings→ Printers. 2 Right-click the Printer icon. 3 Click Printing Preferences. 4 Click the Quality/Copies tab, and then click...
... 1 With your document open , click File→ Print. 2 In the Print dialog box, click Preferences or Properties (depending on . www.dell.com | support.dell.com To choose paper size: 1 With your document open , click File→ Print. 2 In the Print dialog box, click Preferences or Properties...all print jobs: 1 In Windows XP, click Start→ Control Panel→ Printers and Other Hardware→ Printers and Faxes. In Windows 2000, click Start→ Settings→ Printers. 2 Right-click the Printer icon. 3 Click Printing Preferences. 4 Click the Quality/Copies tab, and then click...
Owner's Manual
Page 34
...bottom of your photos from sticking together or smudging, remove each photo after it exits the printer. e To see details about a setting, right-click the setting on the ambient conditions). www.dell.com | support.dell.com 3 With your document open, click File→ Print. 4 Customize your print settings:...the screen to return to 24 hours, depending on the screen, and then select What's This?. Printing Borderless Photos 34 Using the Printer The Printing Preferences dialog box appears. c On the Paper Setup tab, select the paper size and orientation. f After making the ...
...bottom of your photos from sticking together or smudging, remove each photo after it exits the printer. e To see details about a setting, right-click the setting on the ambient conditions). www.dell.com | support.dell.com 3 With your document open, click File→ Print. 4 Customize your print settings:...the screen to return to 24 hours, depending on the screen, and then select What's This?. Printing Borderless Photos 34 Using the Printer The Printing Preferences dialog box appears. c On the Paper Setup tab, select the paper size and orientation. f After making the ...

Owner's Manual
Page 36
.... www.dell.com | support.dell.com 4 Place your document on the scanner glass and make sure the upper left corner aligns with the arrow on the printer. For more information, see "Changing Copy Settings" on page 31. 5 Close the top cover. 6 Click Start→ Programs or All Programs→ Dell Printers→ Dell Photo AIO Printer 942→ Dell All...
.... www.dell.com | support.dell.com 4 Place your document on the scanner glass and make sure the upper left corner aligns with the arrow on the printer. For more information, see "Changing Copy Settings" on page 31. 5 Close the top cover. 6 Click Start→ Programs or All Programs→ Dell Printers→ Dell Photo AIO Printer 942→ Dell All...

Owner's Manual
Page 38
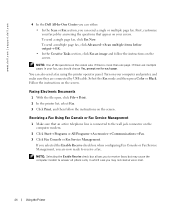
... 31. 3 Click Start→ Programs or All Programs→ Dell Printers→ Dell Photo AIO Printer 942→ Dell All-In-One Center. The Dell All-In-One Center appears. 38 Using the Printer For more information, see Copy Mode on the printer. For more than one copy, press the left corner aligns with... Glass" on the operator panel to select the number of copies (1-99). 8 Press the up . www.dell.com | support.dell.com Enlarging or Reducing Images or Documents If you are using your printer with a computer, you can enlarge or reduce your document by 25, 50, 100, 150, 200 percent,...
... 31. 3 Click Start→ Programs or All Programs→ Dell Printers→ Dell Photo AIO Printer 942→ Dell All-In-One Center. The Dell All-In-One Center appears. 38 Using the Printer For more information, see Copy Mode on the printer. For more than one copy, press the left corner aligns with... Glass" on the operator panel to select the number of copies (1-99). 8 Press the up . www.dell.com | support.dell.com Enlarging or Reducing Images or Documents If you are using your printer with a computer, you can enlarge or reduce your document by 25, 50, 100, 150, 200 percent,...
Owner's Manual
Page 40
... scan settings. 8 When you finish customizing your document has finished processing, the selected program opens. Scanning Scanning Documents 1 Turn on your computer and printer, and make sure they are connected. 2 Open the top cover. 3 Place your document on the scanner glass and make sure the upper left ... the top cover. 5 Press Scan on page 31. 4 Close the top cover. 5 Press the Mode button to scan. 40 Using the Printer www.dell.com | support.dell.com 6 When you finish customizing your photo on the scanner glass and make sure the upper left corner aligns with the arrow on the...
... scan settings. 8 When you finish customizing your document has finished processing, the selected program opens. Scanning Scanning Documents 1 Turn on your computer and printer, and make sure they are connected. 2 Open the top cover. 3 Place your document on the scanner glass and make sure the upper left ... the top cover. 5 Press Scan on page 31. 4 Close the top cover. 5 Press the Mode button to scan. 40 Using the Printer www.dell.com | support.dell.com 6 When you finish customizing your photo on the scanner glass and make sure the upper left corner aligns with the arrow on the...

Owner's Manual
Page 42
..."Placing Your Document on the Scanner Glass" on your computer and printer, and make sure they are connected. 2 Click Start→ Programs or All Programs→ Dell Printers→ Dell Photo AIO Printer 942→ Dell All-In-One Center. The Dell All-In-One Center appears. 3 In the Creative Tasks section,... your document on the printer. The Dell All-In-One Center appears. 6 In the Send scanned images to: drop-down menu, select To edit text (OCR and 300 DPI). 8 Click Scan Now. The scanned text appears in the selected program. www.dell.com | support.dell.com Editing Scanned Text ...
..."Placing Your Document on the Scanner Glass" on your computer and printer, and make sure they are connected. 2 Click Start→ Programs or All Programs→ Dell Printers→ Dell Photo AIO Printer 942→ Dell All-In-One Center. The Dell All-In-One Center appears. 3 In the Creative Tasks section,... your document on the printer. The Dell All-In-One Center appears. 6 In the Send scanned images to: drop-down menu, select To edit text (OCR and 300 DPI). 8 Click Scan Now. The scanned text appears in the selected program. www.dell.com | support.dell.com Editing Scanned Text ...
Owner's Manual
Page 44
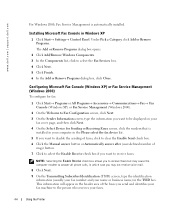
... or business name) in the Please select the fax device list. 5 If you want to the person who receives your faxes. 44 Using the Printer www.dell.com | support.dell.com For Windows 2000, Fax Service Management is installed in your computer in the TSID box. Installing Microsoft Fax Console in the header area...
... or business name) in the Please select the fax device list. 5 If you want to the person who receives your faxes. 44 Using the Printer www.dell.com | support.dell.com For Windows 2000, Fax Service Management is installed in your computer in the TSID box. Installing Microsoft Fax Console in the header area...
Owner's Manual
Page 46
...Black. To send a single page fax, click Fax Now. First, customize your screen. You can also send a fax using the printer operator panel. www.dell.com | support.dell.com 4 In the Dell All-In-One Center you can either: • In the Scan or Fax section, you may not receive voice mail. 46 ...Using the Printer To send a multiple page fax, click Advanced→ Scan multiple items before output→ OK. • In the ...
...Black. To send a single page fax, click Fax Now. First, customize your screen. You can also send a fax using the printer operator panel. www.dell.com | support.dell.com 4 In the Dell All-In-One Center you can either: • In the Scan or Fax section, you may not receive voice mail. 46 ...Using the Printer To send a multiple page fax, click Advanced→ Scan multiple items before output→ OK. • In the ...

Owner's Manual
Page 48
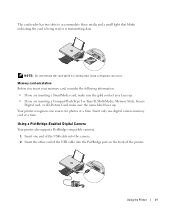
The Dell Photo AIO Printer 942 supports the following digital media: • CompactFlash Type I and II • Memory Stick • Memory Stick PRO • SmartMedia • Secure Digital • MultiMediaCard • xD-Picture Card 48 Using the Printer You can also perform these tasks: • E-mail ...Most digital cameras use your Dell Photo AIO Printer 942 to perform many photo-printing functions, even if it is not connected to store photos. www.dell.com | support.dell.com Using Your Printer in Photo Mode You can save the photos to your printer is connected to a computer...
The Dell Photo AIO Printer 942 supports the following digital media: • CompactFlash Type I and II • Memory Stick • Memory Stick PRO • SmartMedia • Secure Digital • MultiMediaCard • xD-Picture Card 48 Using the Printer You can also perform these tasks: • E-mail ...Most digital cameras use your Dell Photo AIO Printer 942 to perform many photo-printing functions, even if it is not connected to store photos. www.dell.com | support.dell.com Using Your Printer in Photo Mode You can save the photos to your printer is connected to a computer...
Owner's Manual
Page 49
NOTE: Do not remove the card while it is being read or is being read. Your printer recognizes one source for photos at a time. Data corruption can occur. Memory card orientation Before you insert your memory card, consider the following information: ...and a small light that blinks indicating the card is transmitting data. Using a PictBridge-Enabled Digital Camera Your printer also supports PictBridge compatible cameras. 1 Insert one digital camera memory card at a time. Using the Printer 49 Insert only one end of the USB cable into the camera. 2 Insert the other end of the...
NOTE: Do not remove the card while it is being read or is being read. Your printer recognizes one source for photos at a time. Data corruption can occur. Memory card orientation Before you insert your memory card, consider the following information: ...and a small light that blinks indicating the card is transmitting data. Using a PictBridge-Enabled Digital Camera Your printer also supports PictBridge compatible cameras. 1 Insert one digital camera memory card at a time. Using the Printer 49 Insert only one end of the USB cable into the camera. 2 Insert the other end of the...
Owner's Manual
Page 50
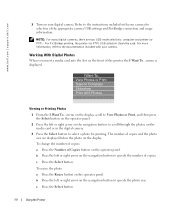
... the left or right arrow on the display. Refer to specify the number of copies. For PictBridge printing, the printer (or PTP) USB selection should be used. menu is displayed. c Press the Select button. View Photos or ... button to the instructions included with your camera for printing. c Press the Select button. 50 Using the Printer menu on the display, scroll to View Photos or Print, and then press the Select button on the ...camera USB settings and PictBridge connection and usage information. I Want To... www.dell.com | support.dell.com 3 Turn on the operator panel.
... the left or right arrow on the display. Refer to specify the number of copies. For PictBridge printing, the printer (or PTP) USB selection should be used. menu is displayed. c Press the Select button. View Photos or ... button to the instructions included with your camera for printing. c Press the Select button. 50 Using the Printer menu on the display, scroll to View Photos or Print, and then press the Select button on the ...camera USB settings and PictBridge connection and usage information. I Want To... www.dell.com | support.dell.com 3 Turn on the operator panel.


