Dell Users Guide
Page 2
... the toner cartridge 74 Monitoring the supplies life 76 Setting the toner low alert 77 Cleaning the machine 78 Tips for avoiding paper jams 86 Clearing original document jams 87 Clearing paper jams 92 Understanding the status LED 96 Understanding display messages 98 2 BASIC 1. Troubleshooting Tips for moving & storing your machine 84 4. Introduction Key benefits...
... the toner cartridge 74 Monitoring the supplies life 76 Setting the toner low alert 77 Cleaning the machine 78 Tips for avoiding paper jams 86 Clearing original document jams 87 Clearing paper jams 92 Understanding the status LED 96 Understanding display messages 98 2 BASIC 1. Troubleshooting Tips for moving & storing your machine 84 4. Introduction Key benefits...
Dell Users Guide
Page 10
... page 74). Useful to know The machine does not print. • Open the print queue list and remove the document from the Dell website, www.Dell.com > find your country/region to view product service information. Where can I download the machine's driver? • You can I...72). • Try a different print resolution setting (see "Opening printing preferences" on page 50). • Replace the toner cartridge (see "Clearing paper jams" on page 209). Where can get help, support application, machine drivers, manuals, and order information from the list (see "Canceling a print job"...
... page 74). Useful to know The machine does not print. • Open the print queue list and remove the document from the Dell website, www.Dell.com > find your country/region to view product service information. Where can I download the machine's driver? • You can I...72). • Try a different print resolution setting (see "Opening printing preferences" on page 50). • Replace the toner cartridge (see "Clearing paper jams" on page 209). Where can get help, support application, machine drivers, manuals, and order information from the list (see "Canceling a print job"...

Dell Users Guide
Page 39
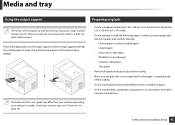
... on the control panel. For example, if you do not adjust the paper width guide, it may cause paper jams. 4 Squeeze the paper width guide and slide it to the edge of the paper stack without causing it may cause a paper jam or the paper can be wrinkled. • If you want to use a label, ...set the paper type and size for the tray (see "Opening printing preferences" on page...
... on the control panel. For example, if you do not adjust the paper width guide, it may cause paper jams. 4 Squeeze the paper width guide and slide it to the edge of the paper stack without causing it may cause a paper jam or the paper can be wrinkled. • If you want to use a label, ...set the paper type and size for the tray (see "Opening printing preferences" on page...

Dell Users Guide
Page 40
...the tray. • When printing on special media, you feed one sheet at a time in the tray. • To prevent paper jams, do not add paper while printing when there is also shown in the Printing Preferences. Menu Overview and Basic Setup 40 For example, if you want to prevent... paper jams, only load the available paper (see "Print media specifications" on page 106). • Flatten any curl on postcards, envelopes, and labels before loading them into...
...the tray. • When printing on special media, you feed one sheet at a time in the tray. • To prevent paper jams, do not add paper while printing when there is also shown in the Printing Preferences. Menu Overview and Basic Setup 40 For example, if you want to prevent... paper jams, only load the available paper (see "Print media specifications" on page 106). • Flatten any curl on postcards, envelopes, and labels before loading them into...
Dell Users Guide
Page 42
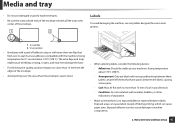
... envelope. Condition: Do not use labels with no exposed adhesive material between them. The extra flaps and strips might cause wrinkling, creasing, or jams, and may even damage the fuser. • For the best print quality, position margins no exposed backing between labels. Curl: Must lie ...peel-off adhesive strip or with more than 13 mm of curl in any direction. - Labels can peel off during printing, which can cause paper jams. Exposed adhesive can cause labels to machine components. 2. Labels To avoid damaging the machine, use only labels designed for use labels with the ...
... envelope. Condition: Do not use labels with no exposed adhesive material between them. The extra flaps and strips might cause wrinkling, creasing, or jams, and may even damage the fuser. • For the best print quality, position margins no exposed backing between labels. Curl: Must lie ...peel-off adhesive strip or with more than 13 mm of curl in any direction. - Labels can peel off during printing, which can cause paper jams. Exposed adhesive can cause labels to machine components. 2. Labels To avoid damaging the machine, use only labels designed for use labels with the ...
Dell Users Guide
Page 45
... your machine depending on the output support, and the output support will help the printed pages to prevent paper jam, low print quality and machine damage. - Torn paper • Remove all staples and paper clips before loading. • Do not load originals that you print a large number of pages at...7 Using the output support 8 Preparing originals The surface of the output tray may differ from your machine type (see "Front view" on the paper is completely dry before loading. • Make sure any glue, ink, or correction fluid on page 18). 2. The printer sends output to ...
... your machine depending on the output support, and the output support will help the printed pages to prevent paper jam, low print quality and machine damage. - Torn paper • Remove all staples and paper clips before loading. • Do not load originals that you print a large number of pages at...7 Using the output support 8 Preparing originals The surface of the output tray may differ from your machine type (see "Front view" on the paper is completely dry before loading. • Make sure any glue, ink, or correction fluid on page 18). 2. The printer sends output to ...
Dell Users Guide
Page 76
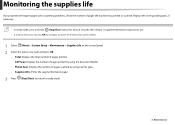
... and hold (Stop/Clear) button for some models. 1 Select (Menu) > System Setup > Maintenance > Supplies Life on the control panel. 2 Select the option you experience frequent paper jams or printing problems, check the number of pages scanned by using scanner glass. • Supplies Info.: Prints the supply information page. 3 Press (Stop/Clear) to...
... and hold (Stop/Clear) button for some models. 1 Select (Menu) > System Setup > Maintenance > Supplies Life on the control panel. 2 Select the option you experience frequent paper jams or printing problems, check the number of pages scanned by using scanner glass. • Supplies Info.: Prints the supply information page. 3 Press (Stop/Clear) to...
Dell Users Guide
Page 85
... you encounter an error. Troubleshooting This chapter gives helpful information for what to do if you encounter an error. • Tips for avoiding paper jams 86 • Clearing original document jams 87 • Clearing paper jams 92 • Understanding the status LED 96 • Understanding display messages 98 This chapter gives helpful information for service. 4.
... you encounter an error. Troubleshooting This chapter gives helpful information for what to do if you encounter an error. • Tips for avoiding paper jams 86 • Clearing original document jams 87 • Clearing paper jams 92 • Understanding the status LED 96 • Understanding display messages 98 This chapter gives helpful information for service. 4.
Dell Users Guide
Page 86
Tips for avoiding paper jams By selecting the correct media s, most paper jams can be avoided. Troubleshooting 86 To avoid paper jams, refer to the following guidelines: • Ensure that the adjustable guides are positioned correctly (see "Tray overview" on page 37). • Do not remove paper from the tray while your machine is printing. • Flex, fan, and straighten paper before loading. • Do not use creased, damp, or highly curled paper. • Do not mix papers in a tray. • Use only recommended print media (see "Print media specifications" on page 106). 4.
Tips for avoiding paper jams By selecting the correct media s, most paper jams can be avoided. Troubleshooting 86 To avoid paper jams, refer to the following guidelines: • Ensure that the adjustable guides are positioned correctly (see "Tray overview" on page 37). • Do not remove paper from the tray while your machine is printing. • Flex, fan, and straighten paper before loading. • Do not use creased, damp, or highly curled paper. • Do not mix papers in a tray. • Use only recommended print media (see "Print media specifications" on page 106). 4.
Dell Users Guide
Page 88
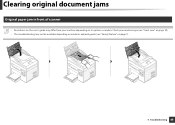
Clearing original document jams 1 Original paper jam in front of scanner • Illustrations on this user's guide may differ from your machine type (see "Front view" on page 18). • This troubleshooting may not be available depending on model or optional goods (see "Variety feature" on its options or models. Check your machine depending on page 7). 4. Troubleshooting 88
Clearing original document jams 1 Original paper jam in front of scanner • Illustrations on this user's guide may differ from your machine type (see "Front view" on page 18). • This troubleshooting may not be available depending on model or optional goods (see "Variety feature" on its options or models. Check your machine depending on page 7). 4. Troubleshooting 88
Dell Users Guide
Page 89
Clearing original document jams 2 Original paper jam inside of scanner • Illustrations on this user's guide may not be available depending on model or optional goods (see "Front view" on page 18). • This troubleshooting may differ from your machine type (see "Variety feature" on its options or models. Check your machine depending on page 7). 4. Troubleshooting 89
Clearing original document jams 2 Original paper jam inside of scanner • Illustrations on this user's guide may not be available depending on model or optional goods (see "Front view" on page 18). • This troubleshooting may differ from your machine type (see "Variety feature" on its options or models. Check your machine depending on page 7). 4. Troubleshooting 89

Dell Users Guide
Page 91
Clearing original document jams 3 Original paper jam in exit area of scanner • Illustrations on this user's guide may not be available depending on model or optional goods (see "Front view" on page 18). • This troubleshooting may differ from the document feeder. 4. Troubleshooting 91 Check your machine depending on page 18). 1 Remove any remaining pages from the document feeder. 2 Gently remove the jammed paper from your machine type (see "Front view" on its options or models.
Clearing original document jams 3 Original paper jam in exit area of scanner • Illustrations on this user's guide may not be available depending on model or optional goods (see "Front view" on page 18). • This troubleshooting may differ from the document feeder. 4. Troubleshooting 91 Check your machine depending on page 18). 1 Remove any remaining pages from the document feeder. 2 Gently remove the jammed paper from your machine type (see "Front view" on its options or models.
Dell Users Guide
Page 92
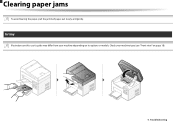
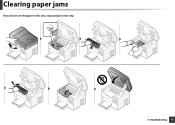
Check your machine depending on page 18). 4. Clearing paper jams To avoid tearing the paper, pull the jammed paper out slowly and gently. 4 In tray Illustrations on this user's guide may differ from your machine type (see "Front view" on its options or models. Troubleshooting 92
Check your machine depending on page 18). 4. Clearing paper jams To avoid tearing the paper, pull the jammed paper out slowly and gently. 4 In tray Illustrations on this user's guide may differ from your machine type (see "Front view" on its options or models. Troubleshooting 92

Dell Users Guide
Page 93
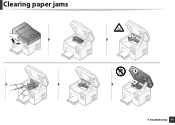
Clearing paper jams 5 Inside the machine • The fuser area is hot. Troubleshooting 93 Take care when removing paper from the machine. • Illustrations on this user's guide may differ from your machine type (see "Front view" on its options or models. Check your machine depending on page 18). 4.
Clearing paper jams 5 Inside the machine • The fuser area is hot. Troubleshooting 93 Take care when removing paper from the machine. • Illustrations on this user's guide may differ from your machine type (see "Front view" on its options or models. Check your machine depending on page 18). 4.
Dell Users Guide
Page 94
Clearing paper jams 2 1 4. Troubleshooting 94
Clearing paper jams 2 1 4. Troubleshooting 94
Dell Users Guide
Page 95
Troubleshooting 95 Clearing paper jams If you do not see the paper in this area, stop and go to next step: 4.
Troubleshooting 95 Clearing paper jams If you do not see the paper in this area, stop and go to next step: 4.
Dell Users Guide
Page 96
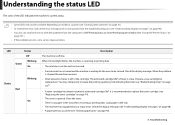
...machine has stopped due to be available depending on model or country (see "Using Dell Printer Status" on page 92). 4. Check the display message (see "Understanding display messages" on page 98). • A paper jam has occurred (see "Redistributing toner" on page 74). • The cover is...LED indicates the machine's current status. • Some LEDs may temporarily increase the printing quality by redistributing the toner (see "Clearing paper jams" on page 251 ). • If the problem persists, call a service representative. LED Status Off Green Blinking On Status Red ...
...machine has stopped due to be available depending on model or country (see "Using Dell Printer Status" on page 92). 4. Check the display message (see "Understanding display messages" on page 98). • A paper jam has occurred (see "Redistributing toner" on page 74). • The cover is...LED indicates the machine's current status. • Some LEDs may temporarily increase the printing quality by redistributing the toner (see "Clearing paper jams" on page 251 ). • If the problem persists, call a service representative. LED Status Off Green Blinking On Status Red ...
Dell Users Guide
Page 98
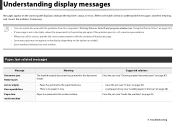
...jam (see "Clearing original document jams" on page 87). • Clear the jam (see "In tray" on page 92). • Load paper in tray (see "Using Dell Printer Status" on page 251). • If a message is no paper in the tray" on page 93). 4. Remove jam Jam or empty Door open&close Paper Jam... not appear on the display depending on the options or models. • [error number] indicates the error number. 6 Paper Jam-related messages Message Document jam. Troubleshooting 98 If the problem persists, call a service representative. • When you call for service, provide the service ...
...jam (see "Clearing original document jams" on page 87). • Clear the jam (see "In tray" on page 92). • Load paper in tray (see "Using Dell Printer Status" on page 251). • If a message is no paper in the tray" on page 93). 4. Remove jam Jam or empty Door open&close Paper Jam... not appear on the display depending on the options or models. • [error number] indicates the error number. 6 Paper Jam-related messages Message Document jam. Troubleshooting 98 If the problem persists, call a service representative. • When you call for service, provide the service ...
Dell Users Guide
Page 262
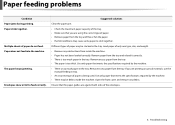
..., use the manual feeding in the tray. Suggested solutions Clear the paper jam. • Check the maximum paper capacity of the tray. • Make sure that the paper guides are using the correct type of paper may be stacked in the tray. Remove excess paper from the tray and reload it correctly. • There is too...
..., use the manual feeding in the tray. Suggested solutions Clear the paper jam. • Check the maximum paper capacity of the tray. • Make sure that the paper guides are using the correct type of paper may be stacked in the tray. Remove excess paper from the tray and reload it correctly. • There is too...

Dell Users Guide
Page 264
...264 the machine is not connected properly. If the computer has more than one . 6. Select your machine as the default machine. Clear the paper jam (see "Rear view" on page 20). The connection cable between the computer and Disconnect the machine cable and reconnect it . (Power/ The ...the protect cover and sheets are removed from the toner cartridge (see "Replacing the toner cartridge" on the control, press it (see "Clearing paper jams" on page 38). • The toner cartridge is working properly and print a job. The connection cable between the computer and If possible, ...
...264 the machine is not connected properly. If the computer has more than one . 6. Select your machine as the default machine. Clear the paper jam (see "Rear view" on page 20). The connection cable between the computer and Disconnect the machine cable and reconnect it . (Power/ The ...the protect cover and sheets are removed from the toner cartridge (see "Replacing the toner cartridge" on the control, press it (see "Clearing paper jams" on page 38). • The toner cartridge is working properly and print a job. The connection cable between the computer and If possible, ...


