User Manual
Page 6
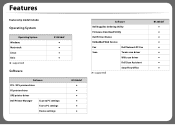
Features Features by model include: Operating System Operating System Windows Macintosh Linux Unix (●: supported) Software B1265dnf Software PCL / SPL printer driver PS printer driver XPS printer driver Dell Printer Manager Scan to PC settings Fax to PC settings Device settings B1265dnf Software Dell Supplies Ordering Utility Firmware Download Utility Dell Printer Status Embedded Web Service Fax Dell Network PC Fax Scan Twain scan driver WIA scan driver Dell Scan Assistant (●: supported) SmarThru Office B1265dnf
Features Features by model include: Operating System Operating System Windows Macintosh Linux Unix (●: supported) Software B1265dnf Software PCL / SPL printer driver PS printer driver XPS printer driver Dell Printer Manager Scan to PC settings Fax to PC settings Device settings B1265dnf Software Dell Supplies Ordering Utility Firmware Download Utility Dell Printer Status Embedded Web Service Fax Dell Network PC Fax Scan Twain scan driver WIA scan driver Dell Scan Assistant (●: supported) SmarThru Office B1265dnf
User Manual
Page 23
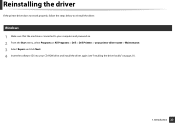
Reinstalling the driver If the printer driver does not work properly, follow the steps below to reinstall the driver. 15 Windows 1 Make sure that the machine is connected to your computer and powered on. 2 From the Start menu, select Programs or All Programs > Dell > Dell Printers > your printer driver name > Maintenance. 3 Select Repair and click Next. 4 Insert the software CD into your CD-ROM drive and install the driver again (see "Installing the driver locally" on page 21). 1. Introduction 23
Reinstalling the driver If the printer driver does not work properly, follow the steps below to reinstall the driver. 15 Windows 1 Make sure that the machine is connected to your computer and powered on. 2 From the Start menu, select Programs or All Programs > Dell > Dell Printers > your printer driver name > Maintenance. 3 Select Repair and click Next. 4 Insert the software CD into your CD-ROM drive and install the driver again (see "Installing the driver locally" on page 21). 1. Introduction 23

User Manual
Page 48
.... 2 Enter a name for future use a saved setting, select it from the control panel, eco mode is enabled. You can also restore the printer driver's default settings by selecting Default Favorite from the Favorites drop-down list and click (Delete). To use . To delete saved settings, select it from... overview and basic setup 49 If you want to know on the Printing Preferences window and press F1 on each preferences tab except for the Dell tab, allows you to the settings you save a Favorites item, follow these steps: 1 Change the settings as needed on your keyboard. 3 Click...
.... 2 Enter a name for future use a saved setting, select it from the control panel, eco mode is enabled. You can also restore the printer driver's default settings by selecting Default Favorite from the Favorites drop-down list and click (Delete). To use . To delete saved settings, select it from... overview and basic setup 49 If you want to know on the Printing Preferences window and press F1 on each preferences tab except for the Dell tab, allows you to the settings you save a Favorites item, follow these steps: 1 Change the settings as needed on your keyboard. 3 Click...
User Manual
Page 110
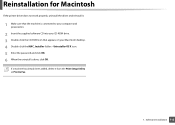
Software Installation 112 Reinstallation for Macintosh If the printer driver does not work properly, uninstall the driver and reinstall it from the Print Setup Utility or Print & Fax. 1. If a machine has already been added, delete it . 1 Make sure that the machine is connected to your computer and powered on. 2 Insert the supplied software CD into your CD-ROM drive. 3 Double-click the CD-ROM icon that appears on your Macintosh desktop. 4 Double-click the MAC_Installer folder > Uninstaller OS X icon. 5 Enter the password and click OK. 6 When the uninstall is done, click OK.
Software Installation 112 Reinstallation for Macintosh If the printer driver does not work properly, uninstall the driver and reinstall it from the Print Setup Utility or Print & Fax. 1. If a machine has already been added, delete it . 1 Make sure that the machine is connected to your computer and powered on. 2 Insert the supplied software CD into your CD-ROM drive. 3 Double-click the CD-ROM icon that appears on your Macintosh desktop. 4 Double-click the MAC_Installer folder > Uninstaller OS X icon. 5 Enter the password and click OK. 6 When the uninstall is done, click OK.
User Manual
Page 112
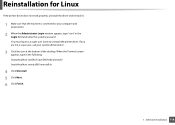
... Login window appears, type "root" in the following. [root@localhost root]#cd /opt/Dell/mfp/uninstall/ [root@localhost uninstall]#./uninstall.sh 4 Click Uninstall. 5 Click Next. 6 Click Finish. 1. Reinstallation for Linux If the printer driver does not work properly, uninstall the driver and reinstall it. 1 Make sure that the machine is connected to uninstall the...
... Login window appears, type "root" in the following. [root@localhost root]#cd /opt/Dell/mfp/uninstall/ [root@localhost uninstall]#./uninstall.sh 4 Click Uninstall. 5 Click Next. 6 Click Finish. 1. Reinstallation for Linux If the printer driver does not work properly, uninstall the driver and reinstall it. 1 Make sure that the machine is connected to uninstall the...

User Manual
Page 121
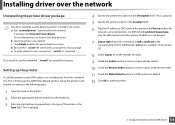
... Next. 4 Select Network printer and click the Search button. 5 The printer's IP address and model name appears on . Using a Network-Connected Machine 123 Also, your machine's IP address should have been set. 2 Download the Unified Linux Driver package from the Dell website. 3 Extract the ...the new directory. 4 Double-click the Linux folder > install.sh icon. 5 The Dell installer window opens. Installing driver over the network Install the Linux driver and add network printer Add a network printer 1 Make sure that the machine is connected to your network and powered on list field....
... Next. 4 Select Network printer and click the Search button. 5 The printer's IP address and model name appears on . Using a Network-Connected Machine 123 Also, your machine's IP address should have been set. 2 Download the Unified Linux Driver package from the Dell website. 3 Extract the ...the new directory. 4 Double-click the Linux folder > install.sh icon. 5 The Dell installer window opens. Installing driver over the network Install the Linux driver and add network printer Add a network printer 1 Make sure that the machine is connected to your network and powered on list field....

User Manual
Page 122
... procedure is used to your UNIX OS for details. 4 Unpack the UNIX printer driver package. See administration guide of UNIX OS mentioned. 1 From the Dell website, download and unpack the UNIX Printer Driver package to install or uninstall the UNIX Printer Driver package. Setup the printer in this case run the following two commands on Solaris 10, just...
... procedure is used to your UNIX OS for details. 4 Unpack the UNIX printer driver package. See administration guide of UNIX OS mentioned. 1 From the Dell website, download and unpack the UNIX Printer Driver package to install or uninstall the UNIX Printer Driver package. Setup the printer in this case run the following two commands on Solaris 10, just...
User Manual
Page 123
..." command from the command line. It will bring up the printer To add the printer to the following steps: 1 Type the name of the printer. 2 Select the appropriate printer model from the system. Setup the printer in this printer as lpd or jetdirect in the corresponding list box. This is... sorted. 10 Check the Reverse Order option to the type of the printer in the Type field. e To verify removal results, execute the ". /install -c" command. Installing driver over the network Uninstalling the printer driver package The utility should be deleted. On IBM AIX with jetdirect Queue ...
..." command from the command line. It will bring up the printer To add the printer to the following steps: 1 Type the name of the printer. 2 Select the appropriate printer model from the system. Setup the printer in this printer as lpd or jetdirect in the corresponding list box. This is... sorted. 10 Check the Reverse Order option to the type of the printer in the Type field. e To verify removal results, execute the ". /install -c" command. Installing driver over the network Uninstalling the printer driver package The utility should be deleted. On IBM AIX with jetdirect Queue ...
User Manual
Page 124
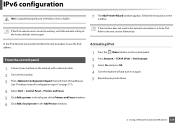
...use the IPv6 address. 9 From the control panel 1 Connect your printer driver. 4 Select Start > Control Panel > Printers and Faxes. 5 Click Add a printer in the left pane of the Printers and Faxes windows. 6 Click Add a local printer in the window. IPv6 configuration IPv6 is supported properly only in ...the network environment, activate IPv6. Using a Network-Connected Machine 126 Follow the instructions in the Add Printer windows. 2. In the IPv6 network environment, follow the next procedure to the network with a network cable. 2 Turn on the machine...
...use the IPv6 address. 9 From the control panel 1 Connect your printer driver. 4 Select Start > Control Panel > Printers and Faxes. 5 Click Add a printer in the left pane of the Printers and Faxes windows. 6 Click Add a local printer in the window. IPv6 configuration IPv6 is supported properly only in ...the network environment, activate IPv6. Using a Network-Connected Machine 126 Follow the instructions in the Add Printer windows. 2. In the IPv6 network environment, follow the next procedure to the network with a network cable. 2 Turn on the machine...
User Manual
Page 127
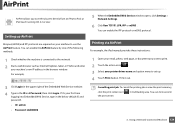
... the print summary, click the print center icon ( the print center. ) in 2. AirPrint AirPrint allows you want to print. 2 Touch the action icon( ). 3 Select your printer driver name and option menu to use the AirPrint feature. You can enable the AirPrint feature by one of the Embedded Web Service website. 4 Type in...
... the print summary, click the print center icon ( the print center. ) in 2. AirPrint AirPrint allows you want to print. 2 Touch the action icon( ). 3 Select your printer driver name and option menu to use the AirPrint feature. You can enable the AirPrint feature by one of the Embedded Web Service website. 4 Type in...

User Manual
Page 139
Automatically substitutes the printer driver's paper size to disregard the paper mismatch error or not. Select Off, then the machine does not stop printing even if the paper mismatches. Useful ... life of your toner cartridge and reduces your machine (see "Menu overview" on page 26). 3. The printer detects the printing data from the Embedded Web Service. 7 Paper setup Some menus may not appear in the printer driver, the machine prints on options or models. You can set to your cost per page beyond...
Automatically substitutes the printer driver's paper size to disregard the paper mismatch error or not. Select Off, then the machine does not stop printing even if the paper mismatches. Useful ... life of your toner cartridge and reduces your machine (see "Menu overview" on page 26). 3. The printer detects the printing data from the Embedded Web Service. 7 Paper setup Some menus may not appear in the printer driver, the machine prints on options or models. You can set to your cost per page beyond...

User Manual
Page 151
... 1 Click the Windows Start menu. 2 Select Control Panel > Devices and Printers. 3 Right-click on your machine and select Set as Default Printer. XPS printer driver: used to the selected printer. 12 Using advanced print features 5 Change the settings on Windows Vista OS ...printer. 11 Setting your machine as a default machine 1 Click the Windows Start menu. 2 Select Control Panel > Devices and Printers. 3 Select your machine. 4 Right-click your machine. 4 Select Printing preferences. If Printing preferences has a ▶, you can install the XPS printer driver when you install the Dell...
... 1 Click the Windows Start menu. 2 Select Control Panel > Devices and Printers. 3 Right-click on your machine and select Set as Default Printer. XPS printer driver: used to the selected printer. 12 Using advanced print features 5 Change the settings on Windows Vista OS ...printer. 11 Setting your machine as a default machine 1 Click the Windows Start menu. 2 Select Control Panel > Devices and Printers. 3 Select your machine. 4 Right-click your machine. 4 Select Printing preferences. If Printing preferences has a ▶, you can install the XPS printer driver when you install the Dell...
User Manual
Page 152
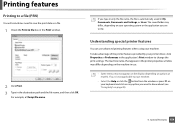
... in use advanced printing features when using . The machine name, that appears in the printer properties window may differ depending on the machine in My Documents, Documents and Settings, or Users. Understanding special printer features You can use . • Some menus may differ, depending on any option ...the file is not applicable to your machine. • Select the Help or click the button from the window or press F1 on your printer driver, click Properties or Preferences in the destination path and the file name, and then click OK. For example, c:\Temp\file name. Printing features...
... in use advanced printing features when using . The machine name, that appears in the printer properties window may differ depending on the machine in My Documents, Documents and Settings, or Users. Understanding special printer features You can use . • Some menus may differ, depending on any option ...the file is not applicable to your machine. • Select the Help or click the button from the window or press F1 on your printer driver, click Properties or Preferences in the destination path and the file name, and then click OK. For example, c:\Temp\file name. Printing features...
User Manual
Page 156
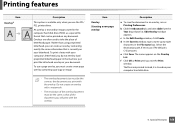
... take the place of the document you exit the Print window. Printing features Item Overlaya Description This option is C:\Formover). To use the SPL/ PCL printer driver. b Click the Advanced tab, and select Edit from the Text drop-down list. Special Features 158 Item Overlay (Creating a new page overlay) Description a To save...
... take the place of the document you exit the Print window. Printing features Item Overlaya Description This option is C:\Formover). To use the SPL/ PCL printer driver. b Click the Advanced tab, and select Edit from the Text drop-down list. Special Features 158 Item Overlay (Creating a new page overlay) Description a To save...
User Manual
Page 157
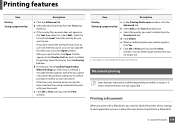
... Overlay When Printing box. e Click OK or Print until you access the Open window. c Select the overlay you want to check the printer driver settings in an external source, you can delete page overlays that the features are not supported. You can also load the file when you exit... click the Advanced tab. e When a confirming message window appears, click Yes. a. down list. Select the overlay file you no longer use XPS driver. 13 Macintosh printing Some features may not be available depending on your document. f Click OK or Print until you to delete from the Overlay List...
... Overlay When Printing box. e Click OK or Print until you access the Open window. c Select the overlay you want to check the printer driver settings in an external source, you can delete page overlays that the features are not supported. You can also load the file when you exit... click the Advanced tab. e When a confirming message window appears, click Yes. a. down list. Select the overlay file you no longer use XPS driver. 13 Macintosh printing Some features may not be available depending on your document. f Click OK or Print until you to delete from the Overlay List...
User Manual
Page 161
... following hot keys may not be used . For example, if you are printing "document1" printui document1 This will open the UNIX Printer Driver Print Job Manager in which the user can select various print options in Number of Copies. 5 Press OK to your requirements. •...; Paper Type: Choose the type of the printer features provided by your printer driver, press Properties. By default, it is Auto Selection. • Orientation: Select the direction in which information is used : "H" for ...
... following hot keys may not be used . For example, if you are printing "document1" printui document1 This will open the UNIX Printer Driver Print Job Manager in which the user can select various print options in Number of Copies. 5 Press OK to your requirements. •...; Paper Type: Choose the type of the printer features provided by your printer driver, press Properties. By default, it is Auto Selection. • Orientation: Select the direction in which information is used : "H" for ...
User Manual
Page 164
...application you are using. Special Features 166 Scanned image is installed on your computer using the software CD, since the printer driver includes the scan program (see "Installing the driver locally" on page 21). 1 Place a single document face down on the document glass, or load the documents... import documents at the image editing software such as the registered scan ID for Dell Printer Manager > Switch to advanced mode > Scan to PC Settings. • Password is the 4 digit number registered password for Dell Printer Manager > Switch to advanced mode > Scan to PC Settings. 4 Select the...
...application you are using. Special Features 166 Scanned image is installed on your computer using the software CD, since the printer driver includes the scan program (see "Installing the driver locally" on page 21). 1 Place a single document face down on the document glass, or load the documents... import documents at the image editing software such as the registered scan ID for Dell Printer Manager > Switch to advanced mode > Scan to PC Settings. • Password is the 4 digit number registered password for Dell Printer Manager > Switch to advanced mode > Scan to PC Settings. 4 Select the...
User Manual
Page 171
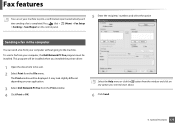
The Print window will be installed when you want to the machine. It may look slightly different depending on any option you installed the printer driver. 1 Open the document to print a confirmation report automatically each time sending a fax is completed. Special Features 173 This program will be sent. 2 Select Print from ... the computer You can set your machine to be displayed. Fax features You can send a fax from the window and click on your application. 3 Select Dell Network PC Fax from your computer, the Dell Network PC Fax program must be installed.
The Print window will be installed when you want to the machine. It may look slightly different depending on any option you installed the printer driver. 1 Open the document to print a confirmation report automatically each time sending a fax is completed. Special Features 173 This program will be sent. 2 Select Print from ... the computer You can set your machine to be displayed. Fax features You can send a fax from the window and click on your application. 3 Select Dell Network PC Fax from your computer, the Dell Network PC Fax program must be installed.

User Manual
Page 180
Click http://www.support.dell.com. 3 If your printer driver name > Firmware Update Utility. 2 Download the latest firmware. Using Firmware update utility Firmware Update Utility allows you to maintain your machine by upgrading firmware. 1 From the Start menu, select Programs or All Programs > Dell > Dell Printers > your printer is connected with an USB cable, click USB Connected Printer or Network Connected Printer. 4 Click Browse and select the downloaded firmware file. 5 Click Update Firmware. 5. Useful Management Tools 182
Click http://www.support.dell.com. 3 If your printer driver name > Firmware Update Utility. 2 Download the latest firmware. Using Firmware update utility Firmware Update Utility allows you to maintain your machine by upgrading firmware. 1 From the Start menu, select Programs or All Programs > Dell > Dell Printers > your printer is connected with an USB cable, click USB Connected Printer or Network Connected Printer. 4 Click Browse and select the downloaded firmware file. 5 Click Update Firmware. 5. Useful Management Tools 182
User Manual
Page 181
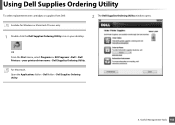
For Macintosh, Open the Applications folder > Dell folder > Dell Supplies Ordering Utility. 5. OR From the Start menu, select Programs or All Programs >Dell > Dell Printers > your desktop. Useful Management Tools 183 Using Dell Supplies Ordering Utility To order replacement toner cartridges or supplies from Dell: Availabe for Windows or Macintosh OS users only. 2 The Dell Supplies Ordering Utility window opens. 1 Double-click the Dell Supplies Ordering Utility icon on your printer driver name > Dell Supplies Ordering Utility.
For Macintosh, Open the Applications folder > Dell folder > Dell Supplies Ordering Utility. 5. OR From the Start menu, select Programs or All Programs >Dell > Dell Printers > your desktop. Useful Management Tools 183 Using Dell Supplies Ordering Utility To order replacement toner cartridges or supplies from Dell: Availabe for Windows or Macintosh OS users only. 2 The Dell Supplies Ordering Utility window opens. 1 Double-click the Dell Supplies Ordering Utility icon on your printer driver name > Dell Supplies Ordering Utility.


