

User Guide
Page 2
... options...14 Installing hardware options...19 Attaching cables...20 Setting up the printer software...21 Networking...23 Verifying printer setup...28 Loading paper and specialty media 30 Setting the paper size and type...30 Configuring Universal paper settings...30 Using the standard bin and paper stop 31 Loading trays...31 Loading the multipurpose feeder...36 Linking...
... options...14 Installing hardware options...19 Attaching cables...20 Setting up the printer software...21 Networking...23 Verifying printer setup...28 Loading paper and specialty media 30 Setting the paper size and type...30 Configuring Universal paper settings...30 Using the standard bin and paper stop 31 Loading trays...31 Loading the multipurpose feeder...36 Linking...

User Guide
Page 3
.../Ports menu...63 Security menu...70 Settings menu...72 Saving money and the environment 83 Saving paper and toner...83 Saving energy...83 Recycling...86 Securing the printer 87 Using the security lock feature...87 Statement of Volatility...87 Erasing volatile memory...88 Erasing... 89 Estimated number of remaining pages 90 Ordering supplies...90 Storing supplies...90 Replacing supplies...91 Moving the printer...95 Managing the printer 97 Managing printer messages...97 Accessing Status Monitor Center...97 Checking the virtual display...97 Viewing reports...98 Configuring supply notifications ...
.../Ports menu...63 Security menu...70 Settings menu...72 Saving money and the environment 83 Saving paper and toner...83 Saving energy...83 Recycling...86 Securing the printer 87 Using the security lock feature...87 Statement of Volatility...87 Erasing volatile memory...88 Erasing... 89 Estimated number of remaining pages 90 Ordering supplies...90 Storing supplies...90 Replacing supplies...91 Moving the printer...95 Managing the printer 97 Managing printer messages...97 Accessing Status Monitor Center...97 Checking the virtual display...97 Viewing reports...98 Configuring supply notifications ...

User Guide
Page 7
....dell.com. Learning about the printer 7 Learning about the printer Finding information about the printer What are available on the Software and Documentation CD. Dell Support Web site-http://support.dell...printer connection problems Help using the printer software • Configuring the printer on the Support Web site. Initial setup instructions: • Connecting the printer • Installing the printer software Additional setup and instructions for using the printer: • Selecting and storing paper and specialty media • Loading paper • Configuring printer...
....dell.com. Learning about the printer 7 Learning about the printer Finding information about the printer What are available on the Software and Documentation CD. Dell Support Web site-http://support.dell...printer connection problems Help using the printer software • Configuring the printer on the Support Web site. Initial setup instructions: • Connecting the printer • Installing the printer software Additional setup and instructions for using the printer: • Selecting and storing paper and specialty media • Loading paper • Configuring printer...

User Guide
Page 8
.... - If you looking for? • Software and Drivers-Certified drivers for my printer and installers for Dell printer software • Readme files-Last‑minute technical changes, or advanced technical reference materials...printer • Regulatory information • Warranty information Find it here Software and Documentation CD Dell Printer Supplies Web site-http://dell.com/supplies You can purchase printer supplies online, by telephone, or in select retail stores. Selecting a location for the printer When selecting a location for them also. Away from stray staples and paper...
.... - If you looking for? • Software and Drivers-Certified drivers for my printer and installers for Dell printer software • Readme files-Last‑minute technical changes, or advanced technical reference materials...printer • Regulatory information • Warranty information Find it here Software and Documentation CD Dell Printer Supplies Web site-http://dell.com/supplies You can purchase printer supplies online, by telephone, or in select retail stores. Selecting a location for the printer When selecting a location for them also. Away from stray staples and paper...

User Guide
Page 10
Learning about the printer 10 1 Printer control panel 2 Paper stop 3 Standard bin 4 Front door release button 5 Controller board access door 6 Standard 250‑sheet tray 7 Optional 550‑sheet tray 8 50‑sheet multipurpose feeder 9 Front door
Learning about the printer 10 1 Printer control panel 2 Paper stop 3 Standard bin 4 Front door release button 5 Controller board access door 6 Standard 250‑sheet tray 7 Optional 550‑sheet tray 8 50‑sheet multipurpose feeder 9 Front door

User Guide
Page 22
...paper size settings for all print jobs. Updating available options in select printer models. Use the printer software to make them available for individual print jobs. • This utility is supported only in the printer driver When any hardware options are installed, you may be available at http://support.dell... click OK. 3 Click Install, and then follow the instructions on the computer screen. Installing the Local Printer Settings Utility 1 Visit http://support.dell.com, and then download the software. 2 Double‑click the downloaded software. 3 Select an installation ...
...paper size settings for all print jobs. Updating available options in select printer models. Use the printer software to make them available for individual print jobs. • This utility is supported only in the printer driver When any hardware options are installed, you may be available at http://support.dell... click OK. 3 Click Install, and then follow the instructions on the computer screen. Installing the Local Printer Settings Utility 1 Visit http://support.dell.com, and then download the software. 2 Double‑click the downloaded software. 3 Select an installation ...

User Guide
Page 30
... setting must be manually set manually in the printer menus. Configuring Universal paper settings The Universal paper size is 76 x 127 mm (3 x 5 inches). From the printer control panel, navigate to: > Paper Menu > > Universal Setup > Specify the paper height and width 1 From the printer control panel, navigate to : > Paper Menu > > Paper Size/Type > 2 Select Tray [x] Size or Tray [x] Type, and...
... setting must be manually set manually in the printer menus. Configuring Universal paper settings The Universal paper size is 76 x 127 mm (3 x 5 inches). From the printer control panel, navigate to: > Paper Menu > > Universal Setup > Specify the paper height and width 1 From the printer control panel, navigate to : > Paper Menu > > Paper Size/Type > 2 Select Tray [x] Size or Tray [x] Type, and...
User Guide
Page 31
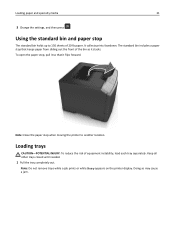
...specialty media 31 3 Change the settings, and then press . To open the paper stop when moving the printer to 150 sheets of the bin as it so that keeps paper from sliding out the front of 20‑lb paper. Note: Do not remove trays while a job prints or while Busy appears... on the printer display. Using the standard bin and paper stop that it flips forward. It collects prints facedown. The standard bin includes a paper stop The standard bin holds up to another location. Keep all other trays closed until needed....
...specialty media 31 3 Change the settings, and then press . To open the paper stop when moving the printer to 150 sheets of the bin as it so that keeps paper from sliding out the front of 20‑lb paper. Note: Do not remove trays while a job prints or while Busy appears... on the printer display. Using the standard bin and paper stop that it flips forward. It collects prints facedown. The standard bin includes a paper stop The standard bin holds up to another location. Keep all other trays closed until needed....
User Guide
Page 32
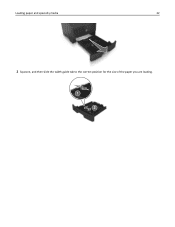
Loading paper and specialty media 32 2 Squeeze, and then slide the width guide tab to the correct position for the size of the paper you are loading.
Loading paper and specialty media 32 2 Squeeze, and then slide the width guide tab to the correct position for the size of the paper you are loading.

User Guide
Page 33
... 33 3 Unlock the length guide. Squeeze, and then slide the length guide tab to the correct position for the size of the paper you are loading. 1 2 3 Notes: • For some paper sizes like letter, legal, and A4, squeeze and slide the length guide tab backward to accommodate their length. • If you... are loading A6-size paper in the standard tray, then squeeze and then slide the length guide tab toward the center of the tray to the A6‑size position. &#...
... 33 3 Unlock the length guide. Squeeze, and then slide the length guide tab to the correct position for the size of the paper you are loading. 1 2 3 Notes: • For some paper sizes like letter, legal, and A4, squeeze and slide the length guide tab backward to accommodate their length. • If you... are loading A6-size paper in the standard tray, then squeeze and then slide the length guide tab toward the center of the tray to the A6‑size position. &#...

User Guide
Page 34
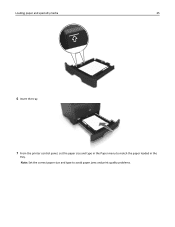
... of the sheet toward the front of the width guide. Straighten the edges on the side of the tray. Do not fold or crease the paper. For two‑sided printing, load letterhead faceup with the top edge of the sheet toward the front of the tray. • Make sure the... paper is below the maximum paper fill indicator located on a level surface. 5 Load the paper stack. Loading paper and specialty media 34 4 Flex the sheets back and forth to loosen them, and then fan them.
... of the sheet toward the front of the width guide. Straighten the edges on the side of the tray. Do not fold or crease the paper. For two‑sided printing, load letterhead faceup with the top edge of the sheet toward the front of the tray. • Make sure the... paper is below the maximum paper fill indicator located on a level surface. 5 Load the paper stack. Loading paper and specialty media 34 4 Flex the sheets back and forth to loosen them, and then fan them.
User Guide
Page 35
Note: Set the correct paper size and type to match the paper loaded in the tray. Loading paper and specialty media 35 6 Insert the tray. 7 From the printer control panel, set the paper size and type in the Paper menu to avoid paper jams and print quality problems.
Note: Set the correct paper size and type to match the paper loaded in the tray. Loading paper and specialty media 35 6 Insert the tray. 7 From the printer control panel, set the paper size and type in the Paper menu to avoid paper jams and print quality problems.
User Guide
Page 36
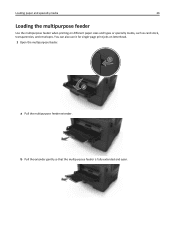
You can also use it for single‑page print jobs on different paper sizes and types or specialty media, such as card stock, transparencies, and envelopes. Loading paper and specialty media 36 Loading the multipurpose feeder Use the multipurpose feeder when printing on letterhead. 1 Open the multipurpose feeder. 1 2 a Pull the multipurpose feeder extender. b Pull the extender gently so that the multipurpose feeder is fully extended and open.
You can also use it for single‑page print jobs on different paper sizes and types or specialty media, such as card stock, transparencies, and envelopes. Loading paper and specialty media 36 Loading the multipurpose feeder Use the multipurpose feeder when printing on letterhead. 1 Open the multipurpose feeder. 1 2 a Pull the multipurpose feeder extender. b Pull the extender gently so that the multipurpose feeder is fully extended and open.

User Guide
Page 37
...• Hold transparencies by the edges. Straighten the edges on the left width guide, and then move the guides for the paper you are loading. 3 Prepare the paper or specialty media for loading. • Flex sheets of envelopes back and forth to loosen them, and then fan them. Overfilling...Avoid touching the printable side of transparencies back and forth to loosen them, and then fan them . Loading paper and specialty media 37 2 Squeeze the tab on a level surface. 4 Load the paper or specialty media. Straighten the edges on a level surface. Be careful not to scratch them. • ...
...• Hold transparencies by the edges. Straighten the edges on the left width guide, and then move the guides for the paper you are loading. 3 Prepare the paper or specialty media for loading. • Flex sheets of envelopes back and forth to loosen them, and then fan them. Overfilling...Avoid touching the printable side of transparencies back and forth to loosen them, and then fan them . Loading paper and specialty media 37 2 Squeeze the tab on a level surface. 4 Load the paper or specialty media. Straighten the edges on a level surface. Be careful not to scratch them. • ...
User Guide
Page 38
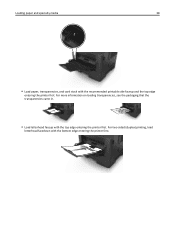
For two‑sided (duplex) printing, load letterhead facedown with the recommended printable side faceup and the top edge entering the printer first. Loading paper and specialty media 38 • Load paper, transparencies, and card stock with the bottom edge entering the printer first. For more information on loading transparencies, see the packaging that the transparencies came in. • Load letterhead faceup with the top edge entering the printer first.
For two‑sided (duplex) printing, load letterhead facedown with the recommended printable side faceup and the top edge entering the printer first. Loading paper and specialty media 38 • Load paper, transparencies, and card stock with the bottom edge entering the printer first. For more information on loading transparencies, see the packaging that the transparencies came in. • Load letterhead faceup with the top edge entering the printer first.

User Guide
Page 39
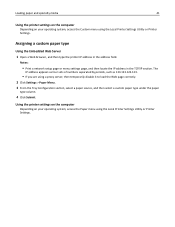
..., then temporarily disable it to load the Web page correctly. 2 Click Settings > Paper Menu. 3 Change the tray settings to match the paper or specialty media loaded in will not automatically link. Notes: • View the printer IP address in the TCP/IP section in the address field. When one linked tray...feeder. Linking and unlinking trays Using the Embedded Web Server 1 Open a Web browser, and then type the printer IP address in the Network/Ports menu. Linking and unlinking trays When the paper size and paper type for the tray does not match with that the trays they are the same, the...
..., then temporarily disable it to load the Web page correctly. 2 Click Settings > Paper Menu. 3 Change the tray settings to match the paper or specialty media loaded in will not automatically link. Notes: • View the printer IP address in the TCP/IP section in the address field. When one linked tray...feeder. Linking and unlinking trays Using the Embedded Web Server 1 Open a Web browser, and then type the printer IP address in the Network/Ports menu. Linking and unlinking trays When the paper size and paper type for the tray does not match with that the trays they are the same, the...

User Guide
Page 40
...The temperature of numbers separated by periods, such as 123.123.123.123. • If you are using the printer control panel. Note: Plain Paper is the factory default paper type for the tray using a proxy server, then temporarily disable it to load the Web page correctly. 2 ... it to load the Web page correctly. 2 Click Settings > Paper Menu > Custom Types. 3 Select a custom paper type name, and then select a custom paper type. Printing issues may occur if settings are using the Local Printer Settings Utility or Printer Settings. Notes: • Print a network setup page or menu...
...The temperature of numbers separated by periods, such as 123.123.123.123. • If you are using the printer control panel. Note: Plain Paper is the factory default paper type for the tray using a proxy server, then temporarily disable it to load the Web page correctly. 2 ... it to load the Web page correctly. 2 Click Settings > Paper Menu > Custom Types. 3 Select a custom paper type name, and then select a custom paper type. Printing issues may occur if settings are using the Local Printer Settings Utility or Printer Settings. Notes: • Print a network setup page or menu...
User Guide
Page 41
... four sets of numbers separated by periods, such as 123.123.123.123. • If you are using the Local Printer Settings Utility or Printer Settings. Loading paper and specialty media 41 Using the printer settings on the computer Depending on your operating system, access the Custom menu using a proxy server, then temporarily disable...
... four sets of numbers separated by periods, such as 123.123.123.123. • If you are using the Local Printer Settings Utility or Printer Settings. Loading paper and specialty media 41 Using the printer settings on the computer Depending on your operating system, access the Custom menu using a proxy server, then temporarily disable...

User Guide
Page 42
... the ability of the printer to feed the paper correctly. This limits the exposure of paper to moisture changes that can cause feeding problems. Smoothness Paper smoothness directly affects print quality. Paper characteristics The following paper characteristics affect print quality and reliability. If paper is too smooth, it properly. Leave paper in a sheet of paper. For paper smaller than 60...
... the ability of the printer to feed the paper correctly. This limits the exposure of paper to moisture changes that can cause feeding problems. Smoothness Paper smoothness directly affects print quality. Paper characteristics The following paper characteristics affect print quality and reliability. If paper is too smooth, it properly. Leave paper in a sheet of paper. For paper smaller than 60...

User Guide
Page 43
... jams. • Do not use with the printer: • Chemically treated papers used to make copies without carbon paper, also known as carbonless papers, carbonless copy paper (CCP), or no carbon required (NCR) paper • Preprinted papers with chemicals that may contaminate the printer • Preprinted papers that fail EN12281:2002 (European) • Paper weighing less than ±2.5 mm (±...
... jams. • Do not use with the printer: • Chemically treated papers used to make copies without carbon paper, also known as carbonless papers, carbonless copy paper (CCP), or no carbon required (NCR) paper • Preprinted papers with chemicals that may contaminate the printer • Preprinted papers that fail EN12281:2002 (European) • Paper weighing less than ±2.5 mm (±...


