
Users Guide
Page 3
Contents About Your Monitor 5 Package Contents 5 Product Features 6 Identifying Parts and Controls 7 Monitor Specifications 8 Plug and Play Capability 16 Maintenance Guidelines 16 Setting Up the Monitor 17 Attaching the Stand 17 Connecting Your Monitor 18 Organizing Your Cables 19 Removing the Monitor Stand 19 Wall Mounting (Optional 20 Operating the Monitor 21 Power On the Monitor 21 Using the Front-Panel Controls 21 Using the On-Screen Display (OSD) Menu 22 Setting the Maximum Resolution 34 Using the Tilt 36 3
Contents About Your Monitor 5 Package Contents 5 Product Features 6 Identifying Parts and Controls 7 Monitor Specifications 8 Plug and Play Capability 16 Maintenance Guidelines 16 Setting Up the Monitor 17 Attaching the Stand 17 Connecting Your Monitor 18 Organizing Your Cables 19 Removing the Monitor Stand 19 Wall Mounting (Optional 20 Operating the Monitor 21 Power On the Monitor 21 Using the Front-Panel Controls 21 Using the On-Screen Display (OSD) Menu 22 Setting the Maximum Resolution 34 Using the Tilt 36 3

Users Guide
Page 4
Only) and Other Regulatory Information 45 Contact Dell 45 4 Troubleshooting 37 Self-Test 37 Built-in Diagnostics 38 Common Problems 39 Product-Specific Problems 42 Dell Soundbar Problems 43 Appendix 45 Safety Instructions 45 FCC Notices (U.S.
Only) and Other Regulatory Information 45 Contact Dell 45 4 Troubleshooting 37 Self-Test 37 Built-in Diagnostics 38 Common Problems 39 Product-Specific Problems 42 Dell Soundbar Problems 43 Appendix 45 Safety Instructions 45 FCC Notices (U.S.

Users Guide
Page 8
To attach the optional Dell Soundbar. TFT LCD TN 8 About Your Monitor To connect your computer to the monitor using a VGA cable. Monitor Specifications Flat-Panel Specifications Model number Screen type Panel Technology E2218HN Active matrix - To connect your computer to the monitor using a HDMI cable. Side View Right Side Bottom View Label Description 1 AC power connector 2 HDMI connector 3 VGA connector 4 Dell soundbar mounting slots Use To connect the monitor power cable.
To attach the optional Dell Soundbar. TFT LCD TN 8 About Your Monitor To connect your computer to the monitor using a VGA cable. Monitor Specifications Flat-Panel Specifications Model number Screen type Panel Technology E2218HN Active matrix - To connect your computer to the monitor using a HDMI cable. Side View Right Side Bottom View Label Description 1 AC power connector 2 HDMI connector 3 VGA connector 4 Dell soundbar mounting slots Use To connect the monitor power cable.
Users Guide
Page 10
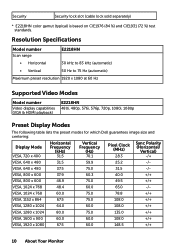
...+/+ VESA, 1920 x 1080 67.5 60.0 148.5 +/+ 10 About Your Monitor VESA, 640 x 480 37.5 75.0 31.5 -/- Resolution Specifications Model number Scan range E2218HN • Horizontal 30 kHz to 83 kHz (automatic) • Vertical 50 Hz to 75 Hz (automatic) Maximum preset resolution 1920 x 1080 ... Video Modes Model number Video display capabilities (VGA & HDMI playback) E2218HN 480i, 480p, 576i, 576p, 720p, 1080i, 1080p Preset Display Modes The following table lists the preset modes for which Dell guarantees image size and centering: Display Mode VESA, 720 x 400 Horizontal...
...+/+ VESA, 1920 x 1080 67.5 60.0 148.5 +/+ 10 About Your Monitor VESA, 640 x 480 37.5 75.0 31.5 -/- Resolution Specifications Model number Scan range E2218HN • Horizontal 30 kHz to 83 kHz (automatic) • Vertical 50 Hz to 75 Hz (automatic) Maximum preset resolution 1920 x 1080 ... Video Modes Model number Video display capabilities (VGA & HDMI playback) E2218HN 480i, 480p, 576i, 576p, 720p, 1080i, 1080p Preset Display Modes The following table lists the preset modes for which Dell guarantees image size and centering: Display Mode VESA, 720 x 400 Horizontal...
Users Guide
Page 11
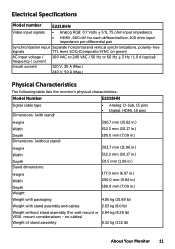
Electrical Specifications Model number E2218HN Video input signals • Analog RGB: 0.7 Volts ± 5 %, 75 ohm input impedance • HDMI , 600 mV for each differential line, 100 ohm input impedance per ... ± 3 Hz / 1.0 A (typical) frequency / current Inrush current 120 V: 30 A (Max.) 240 V: 50 A (Max.) Physical Characteristics The following table lists the monitor's physical characteristics: Model Number E2218HN Signal cable type Dimensions: (with stand) • Analog: D-Sub, 15 pins • Digital: HDMI, 19 pins Height 396.7 mm (15.62 in.) Width 512.2 mm...
Electrical Specifications Model number E2218HN Video input signals • Analog RGB: 0.7 Volts ± 5 %, 75 ohm input impedance • HDMI , 600 mV for each differential line, 100 ohm input impedance per ... ± 3 Hz / 1.0 A (typical) frequency / current Inrush current 120 V: 30 A (Max.) 240 V: 50 A (Max.) Physical Characteristics The following table lists the monitor's physical characteristics: Model Number E2218HN Signal cable type Dimensions: (with stand) • Analog: D-Sub, 15 pins • Digital: HDMI, 19 pins Height 396.7 mm (15.62 in.) Width 512.2 mm...

Users Guide
Page 32
... enters the Power Save mode, the following message appears: Activate the computer and wake up the monitor to gain access to the OSD. See Monitor Specifications for the horizontal and vertical frequency ranges addressable by this monitor. You will appear depending on the selected input: 32 Operating the Monitor If you...
... enters the Power Save mode, the following message appears: Activate the computer and wake up the monitor to gain access to the OSD. See Monitor Specifications for the horizontal and vertical frequency ranges addressable by this monitor. You will appear depending on the selected input: 32 Operating the Monitor If you...
Users Guide
Page 42
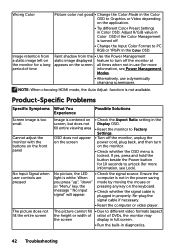
... power cord, plug back, and then turn off the monitor at appears on the screen all times when not in the Color OSD. Product-Specific Problems Specific Symptoms What You Experience Possible Solutions Screen image is too small Cannot adjust the monitor with the buttons on the front panel No Input Signal...
... power cord, plug back, and then turn off the monitor at appears on the screen all times when not in the Color OSD. Product-Specific Problems Specific Symptoms What You Experience Possible Solutions Screen image is too small Cannot adjust the monitor with the buttons on the front panel No Input Signal...
Display Manager Users Guide
Page 2
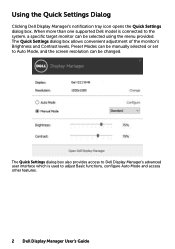
... be manually selected or set to Auto Mode, and the screen resolution can be changed. Using the Quick Settings Dialog Clicking Dell Display Manager's notification tray icon opens the Quick Settings dialog box. The Quick Settings dialog box also provides access to... Dell Display Manager's advanced user interface which is connected to adjust Basic functions, configure Auto Mode and access other features. 2 Dell Display Manager User's Guide When more than one supported Dell model is used to the system, a specific target monitor can be selected using...
... be manually selected or set to Auto Mode, and the screen resolution can be changed. Using the Quick Settings Dialog Clicking Dell Display Manager's notification tray icon opens the Quick Settings dialog box. The Quick Settings dialog box also provides access to... Dell Display Manager's advanced user interface which is connected to adjust Basic functions, configure Auto Mode and access other features. 2 Dell Display Manager User's Guide When more than one supported Dell model is used to the system, a specific target monitor can be selected using...
Display Manager Users Guide
Page 3
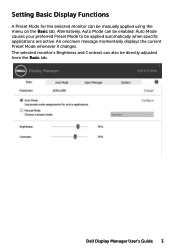
An onscreen message momentarily displays the current Preset Mode whenever it changes. The selected monitor's Brightness and Contrast can be directly adjusted from the Basic tab. Dell Display Manager User's Guide 3 Auto Mode causes your preferred Preset Mode to be manually applied using the menu on the Basic tab. Alternatively, Auto Mode can also be enabled. Setting Basic Display Functions A Preset Mode for the selected monitor can be applied automatically when specific applications are active.
An onscreen message momentarily displays the current Preset Mode whenever it changes. The selected monitor's Brightness and Contrast can be directly adjusted from the Basic tab. Dell Display Manager User's Guide 3 Auto Mode causes your preferred Preset Mode to be manually applied using the menu on the Basic tab. Alternatively, Auto Mode can also be enabled. Setting Basic Display Functions A Preset Mode for the selected monitor can be applied automatically when specific applications are active.

Display Manager Users Guide
Page 4
... switch to the corresponding Preset Mode whenever the associated application is pre-configured for many popular applications. Dell Display Manager is activated. When Auto Mode is enabled, Dell Display Manager will be the same on each connected monitor, or it can vary from the desktop,... Windows Start Menu or elsewhere, and drop it automatically. The Preset Mode assigned to a particular application may be ineffective. 4 Dell Display Manager User's Guide To add a new application to the assignment list, simply drag the application from one monitor to the next. Assigning...
... switch to the corresponding Preset Mode whenever the associated application is pre-configured for many popular applications. Dell Display Manager is activated. When Auto Mode is enabled, Dell Display Manager will be the same on each connected monitor, or it can vary from the desktop,... Windows Start Menu or elsewhere, and drop it automatically. The Preset Mode assigned to a particular application may be ineffective. 4 Dell Display Manager User's Guide To add a new application to the assignment list, simply drag the application from one monitor to the next. Assigning...

