
User's Guide
Page 1
... Corporation in the U.S. disclaims any manner whatsoever without notice. © 2010 Dell Inc. Dell™ E2211H/E2311H monitor User's Guide About Your Monitor Setting Up the Monitor Operating the Monitor Troubleshooting Appendix Notes, Notices, and Cautions NOTE: A NOTE indicates important information that.... Trademarks used in trademarks and trade names other countries; Environmental Protection Agency. As an ENERGY STAR partner, Dell Inc. A00 Dell Inc. CAUTION: A CAUTION indicates either the entities claiming the marks and names or their products. Model E2211Hb...
... Corporation in the U.S. disclaims any manner whatsoever without notice. © 2010 Dell Inc. Dell™ E2211H/E2311H monitor User's Guide About Your Monitor Setting Up the Monitor Operating the Monitor Troubleshooting Appendix Notes, Notices, and Cautions NOTE: A NOTE indicates important information that.... Trademarks used in trademarks and trade names other countries; Environmental Protection Agency. As an ENERGY STAR partner, Dell Inc. A00 Dell Inc. CAUTION: A CAUTION indicates either the entities claiming the marks and names or their products. Model E2211Hb...

User's Guide
Page 2
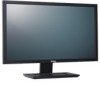
.... Some features or media may not ship with your monitor. Back to Contents Page About Your Monitor Dell™ E2211H/E2311H monitor User's Guide Package Contents Product Features Identifying Parts and Controls Monitor Specifications Plug and Play Capability LCD Monitor Quality and Pixel Policy Maintenance Guidelines Package Contents Your monitor ships with any other stand, please refer to...
.... Some features or media may not ship with your monitor. Back to Contents Page About Your Monitor Dell™ E2211H/E2311H monitor User's Guide Package Contents Product Features Identifying Parts and Controls Monitor Specifications Plug and Play Capability LCD Monitor Quality and Pixel Policy Maintenance Guidelines Package Contents Your monitor ships with any other stand, please refer to...

User's Guide
Page 3
... Quick Setup Guide l Product and Safety Information Guide Product Features The Dell™ E2211H/E2311H flat panel display has an active matrix, thin-film transistor (TFT), liquid crystal display (LCD), and LED backlight. The monitor features include: ■ E2211H: 54.52cm (21.5 inch) viewable... area display (Measured diagonally). 1920 x 1080 resolution, plus full-screen support for lower resolutions. ■ E2311H: 58.42cm (23 inch) viewable area display (Measured ...
... Quick Setup Guide l Product and Safety Information Guide Product Features The Dell™ E2211H/E2311H flat panel display has an active matrix, thin-film transistor (TFT), liquid crystal display (LCD), and LED backlight. The monitor features include: ■ E2211H: 54.52cm (21.5 inch) viewable... area display (Measured diagonally). 1920 x 1080 resolution, plus full-screen support for lower resolutions. ■ E2311H: 58.42cm (23 inch) viewable area display (Measured ...
User's Guide
Page 4
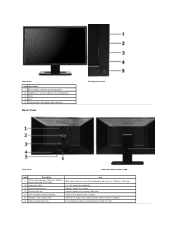
... button (with power light indicator) Back View Front panel controls Back view Back view with monitor stand Label Description Use VESA mounting holes (100 mm x 100 mm - 1 Wall mount monitor using VESA-compatible wall mount kit (100 mm x 100 mm) behind attached VESA Plate)... 2 Regulatory label Lists the regulatory approvals. 3 Stand release button Release stand from monitor. 4 Security lock slot Secures monitor with security cable lock. 5 Dell Soundbar mounting brackets Attaches the optional Dell Soundbar. 6 Barcode serial number label Refer to this label if you need to contact...
... button (with power light indicator) Back View Front panel controls Back view Back view with monitor stand Label Description Use VESA mounting holes (100 mm x 100 mm - 1 Wall mount monitor using VESA-compatible wall mount kit (100 mm x 100 mm) behind attached VESA Plate)... 2 Regulatory label Lists the regulatory approvals. 3 Stand release button Release stand from monitor. 4 Security lock slot Secures monitor with security cable lock. 5 Dell Soundbar mounting brackets Attaches the optional Dell Soundbar. 6 Barcode serial number label Refer to this label if you need to contact...

User's Guide
Page 5
... Use Connect the power cable Connect your computer DVI cable Connect your computer VGA cable To lock the Stand to the Monitor Monitor Specifications Flat Panel Specifications Model Screen type Panel type Screen dimensions Preset display area: Horizontal E2211H Active matrix - TFT LCD TN 23 inches (23-inch ... mm (20.07 inches) TFT LCD TN 21.5 inches (21.5-inch viewable image size) 476.64 (H) X 268.14 (V) mm 476.64 mm (18.77 inches) E2311H Active matrix -
... Use Connect the power cable Connect your computer DVI cable Connect your computer VGA cable To lock the Stand to the Monitor Monitor Specifications Flat Panel Specifications Model Screen type Panel type Screen dimensions Preset display area: Horizontal E2211H Active matrix - TFT LCD TN 23 inches (23-inch ... mm (20.07 inches) TFT LCD TN 21.5 inches (21.5-inch viewable image size) 476.64 (H) X 268.14 (V) mm 476.64 mm (18.77 inches) E2311H Active matrix -

User's Guide
Page 8
... kg (2.31 lb) DVI-D, D, white connector white connector Signal cable type Digital: Detachable, DVI-D, Solid pins, shipped detached from the monitor Analog: Detachable, D-Sub, 15 pins, shipped attached to the monitor Height Width Depth Dimensions (without stand) Height Width Depth Stand dimensions 380.4 mm (14.98 inches) 514.8 mm (20.27 inches... stand assembly and cables 4.24 kg (9.34 lb) Weight without stand assembly (For wall mount or VESA mount considerations - Physical Characteristics Model Connector type E2211H E2311H 15-pin D-subminiature, blue connector;
... kg (2.31 lb) DVI-D, D, white connector white connector Signal cable type Digital: Detachable, DVI-D, Solid pins, shipped detached from the monitor Analog: Detachable, D-Sub, 15 pins, shipped attached to the monitor Height Width Depth Dimensions (without stand) Height Width Depth Stand dimensions 380.4 mm (14.98 inches) 514.8 mm (20.27 inches... stand assembly and cables 4.24 kg (9.34 lb) Weight without stand assembly (For wall mount or VESA mount considerations - Physical Characteristics Model Connector type E2211H E2311H 15-pin D-subminiature, blue connector;

User's Guide
Page 10
...Modes Normal operation Active-off mode Switch off Horizontal Sync Active Inactive - If the computer detects input from keyboard, mouse, or other input devices, the monitor automatically resumes functioning. Vertical Sync Active Inactive - Video Active Blanked - This is referred to as Power Save Mode*. Power Indicator Blue Amber Off Power Consumption... 20 W (typical)/28 W (maximum) Less than 1.0 W Less than 0.5 W If you have VESA's DPM™ compliance display card or software installed in your PC, the monitor can automatically reduce its power consumption when not in use.
...Modes Normal operation Active-off mode Switch off Horizontal Sync Active Inactive - If the computer detects input from keyboard, mouse, or other input devices, the monitor automatically resumes functioning. Vertical Sync Active Inactive - Video Active Blanked - This is referred to as Power Save Mode*. Power Indicator Blue Amber Off Power Consumption... 20 W (typical)/28 W (maximum) Less than 1.0 W Less than 0.5 W If you have VESA's DPM™ compliance display card or software installed in your PC, the monitor can automatically reduce its power consumption when not in use.
User's Guide
Page 11
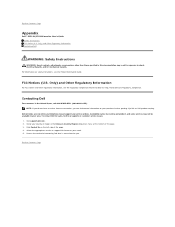
... Internet connection, you . Back to Contents Page Appendix Dell™ E2211H/E2311H monitor User's Guide Safety Instructions FCC Notice (U.S. Availability varies by country and product, and some services may result in your purchase invoice, packing slip, bill, or Dell product catalog. Verify your need. 5. Contacting Dell For customers in the Choose A Country/Region drop-down...
... Internet connection, you . Back to Contents Page Appendix Dell™ E2211H/E2311H monitor User's Guide Safety Instructions FCC Notice (U.S. Availability varies by country and product, and some services may result in your purchase invoice, packing slip, bill, or Dell product catalog. Verify your need. 5. Contacting Dell For customers in the Choose A Country/Region drop-down...

User's Guide
Page 13
NOTE: If you have a Dell™ desktop or a Dell™ portable computer with internet access 1. After installing the drivers for your Graphics Adapter, attempt to set the resolution to 1920 x 1080, please contact Dell™ to Contents Page Setting Up Your Monitor Dell™ E2211H/E2311H monitor If you are unable to set the resolution to 1920 X 1080 again. Back to http://support.dell.com, enter your service tag, and download the latest driver for your graphics card. 2. Go to Contents Page Back to inquire about a Graphics Adapter that supports these resolutions.
NOTE: If you have a Dell™ desktop or a Dell™ portable computer with internet access 1. After installing the drivers for your Graphics Adapter, attempt to set the resolution to 1920 x 1080, please contact Dell™ to Contents Page Setting Up Your Monitor Dell™ E2211H/E2311H monitor If you are unable to set the resolution to 1920 X 1080 again. Back to http://support.dell.com, enter your service tag, and download the latest driver for your graphics card. 2. Go to Contents Page Back to inquire about a Graphics Adapter that supports these resolutions.

User's Guide
Page 14
...; desktop, portable computer, or graphic card In Windows XP: 1. NVIDIA, ATI, Intel etc.). 5. Back to Contents Page Setting Up Your Monitor Dell™ E2211H/E2311H monitor If you are unable to set the resolution to 1920 x 1080, please contact the manufacturer of your computer or consider purchasing a graphics adapter that will ...
...; desktop, portable computer, or graphic card In Windows XP: 1. NVIDIA, ATI, Intel etc.). 5. Back to Contents Page Setting Up Your Monitor Dell™ E2211H/E2311H monitor If you are unable to set the resolution to 1920 x 1080, please contact the manufacturer of your computer or consider purchasing a graphics adapter that will ...
User's Guide
Page 15
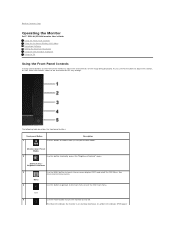
...Use this button to go back to the main menu or exit the OSD main menu. Back to Contents Page Operating the Monitor Dell™ E2211H/E2311H monitor User's Guide Using the Front Panel Controls Using the On-Screen Display (OSD) Menu PowerNap Software Setting the Maximum Resolution Using the... Dell Soundbar (Optional) Using the Tilt Using the Front Panel Controls Use the control buttons on and fully functional. Menu 4 Use ...
...Use this button to go back to the main menu or exit the OSD main menu. Back to Contents Page Operating the Monitor Dell™ E2211H/E2311H monitor User's Guide Using the Front Panel Controls Using the On-Screen Display (OSD) Menu PowerNap Software Setting the Maximum Resolution Using the... Dell Soundbar (Optional) Using the Tilt Using the Front Panel Controls Use the control buttons on and fully functional. Menu 4 Use ...

User's Guide
Page 16
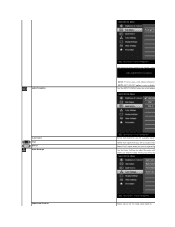
...(VGA) Input or Main Menu for Digital (DVI-D) Input NOTE: AUTO ADJUST is highlighted. As you change the settings and then wait for the monitor. 3. Press to disappear. 1. When the energy consumed increases, th See the following table for a complete list of all the options available for ..., the option name is only available when you change the settings and then either proceed to another menu or exit the OSD menu, the monitor automatically saves those changes. Press the and buttons to activate the highlighted option. 4. Using the On-Screen Display (OSD) Menu Accessing the ...
...(VGA) Input or Main Menu for Digital (DVI-D) Input NOTE: AUTO ADJUST is highlighted. As you change the settings and then wait for the monitor. 3. Press to disappear. 1. When the energy consumed increases, th See the following table for a complete list of all the options available for ..., the option name is only available when you change the settings and then either proceed to another menu or exit the OSD menu, the monitor automatically saves those changes. Press the and buttons to activate the highlighted option. 4. Using the On-Screen Display (OSD) Menu Accessing the ...

User's Guide
Page 21
Auto Adjustment allows the monitor to self-adjust to the incoming vide your particular setup. AUTO ADJUST Even though your computer recognizes your monitor on startup, the Au with your monitor by using the Pixel Clock and Phase controls under Display
Auto Adjustment allows the monitor to self-adjust to the incoming vide your particular setup. AUTO ADJUST Even though your computer recognizes your monitor on startup, the Au with your monitor by using the Pixel Clock and Phase controls under Display
User's Guide
Page 22
... using the Digital (DVI) connector. INPUT SOURCE Auto Select VGA DVI-D Color Settings Input Color Format The following dialog appears on a black screen as the monitor automat NOTE: In most cases, Auto Adjust produces the best image for your c NOTE: AUTO ADJUST option is only available when you are using the...
... using the Digital (DVI) connector. INPUT SOURCE Auto Select VGA DVI-D Color Settings Input Color Format The following dialog appears on a black screen as the monitor automat NOTE: In most cases, Auto Adjust produces the best image for your c NOTE: AUTO ADJUST option is only available when you are using the...

User's Guide
Page 23
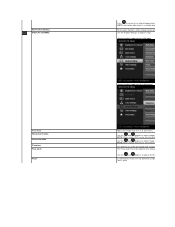
... increase the monochrome appearance of the video image. When you select Video, you can choose Standard, Multimedia, Ga l Standard: Loads the monitor's default color settings. The screen appears coo l Custom (R, G, B): Allows you to manually adjust the color settin and Blue values and create your... compute DVI adapter. l Nature: Loads color settings ideal for movies. Mode Selection Preset Mode Hue Saturation l RGB: Select this mode if your monitor is connected to a DVD pla NOTE: Depending upon the Display Mode you select the Preset Modes When you select Graphics, you can choose Movie, ...
... increase the monochrome appearance of the video image. When you select Video, you can choose Standard, Multimedia, Ga l Standard: Loads the monitor's default color settings. The screen appears coo l Custom (R, G, B): Allows you to manually adjust the color settin and Blue values and create your... compute DVI adapter. l Nature: Loads color settings ideal for movies. Mode Selection Preset Mode Hue Saturation l RGB: Select this mode if your monitor is connected to a DVD pla NOTE: Depending upon the Display Mode you select the Preset Modes When you select Graphics, you can choose Movie, ...
User's Guide
Page 24
... to adjust for DVI-D input Adjust the image ratio as 4:3 or full screen. Use The Phase and Pixel Clock adjustments allow you to adjust your monitor's color settings to adjust image. Reset Color Settings DISPLAY SETTINGS Wide Mode Horizontal Position Vertical Position Sharpness Pixel Clock Phase Press to adjust image left...
... to adjust for DVI-D input Adjust the image ratio as 4:3 or full screen. Use The Phase and Pixel Clock adjustments allow you to adjust your monitor's color settings to adjust image. Reset Color Settings DISPLAY SETTINGS Wide Mode Horizontal Position Vertical Position Sharpness Pixel Clock Phase Press to adjust image left...

User's Guide
Page 25
...Move the slider-bar to the right by performing the following steps: In Windows XP: 1. Back to Contents Page Setting Up Your Monitor Dell™ E2211H/E2311H monitor Setting the display resolution to 1920 X 1080 (maximum) For maximum display performance while using , and follow the provided directions: 1: ...If you have non Dell™ desktop, portable computer, or graphic card. Click OK. Please choose the scenario below that ...
...Move the slider-bar to the right by performing the following steps: In Windows XP: 1. Back to Contents Page Setting Up Your Monitor Dell™ E2211H/E2311H monitor Setting the display resolution to 1920 X 1080 (maximum) For maximum display performance while using , and follow the provided directions: 1: ...If you have non Dell™ desktop, portable computer, or graphic card. Click OK. Please choose the scenario below that ...

User's Guide
Page 26
... be used in this document is subject to change without the written permission of Dell Inc. Dell™ E2211H/E2311H monitor User Guide Setting the display resolution to 1920 X 1080 (maximum) Information in this text: Dell and the DELL logo are trademarks of Dell Inc; Microsoft a n d Windows are either the entities claiming the marks and names...
... be used in this document is subject to change without the written permission of Dell Inc. Dell™ E2211H/E2311H monitor User Guide Setting the display resolution to 1920 X 1080 (maximum) Information in this text: Dell and the DELL logo are trademarks of Dell Inc; Microsoft a n d Windows are either the entities claiming the marks and names...
User's Guide
Page 27
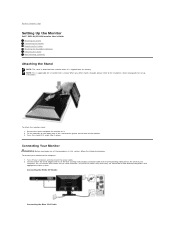
... Safety Instructions. To connect your computer and disconnect the power cable. 2. When any of the monitor. 3. NOTE: This is bought, please refer to Contents Page Setting Up the Monitor Dell™ E2211H/E2311H monitor User's Guide Attaching the Stand Connecting the Monitor Organizing the Cables Attaching the Soundbar (Optional) Removing the Stand Wall Mounting (Optional) Attaching...
... Safety Instructions. To connect your computer and disconnect the power cable. 2. When any of the monitor. 3. NOTE: This is bought, please refer to Contents Page Setting Up the Monitor Dell™ E2211H/E2311H monitor User's Guide Attaching the Stand Connecting the Monitor Organizing the Cables Attaching the Soundbar (Optional) Removing the Stand Wall Mounting (Optional) Attaching...

User's Guide
Page 28
...not use with any other than the Dell Soundbar. Slide the Soundbar to your monitor and computer, (See Connecting Your Monitor for set up instructions. Removing the Stand NOTE: To prevent scratches on the LCD screen while removing the stand, ensure that the monitor is bought, please refer to the respective...the Soundbar by aligning the two slots with the two tabs along the bottom of illustration only. CAUTION: The graphics are used for a monitor with a stand. When any device other stand is placed on a clean surface. Working from the back of the computer may vary. Organizing...
...not use with any other than the Dell Soundbar. Slide the Soundbar to your monitor and computer, (See Connecting Your Monitor for set up instructions. Removing the Stand NOTE: To prevent scratches on the LCD screen while removing the stand, ensure that the monitor is bought, please refer to the respective...the Soundbar by aligning the two slots with the two tabs along the bottom of illustration only. CAUTION: The graphics are used for a monitor with a stand. When any device other stand is placed on a clean surface. Working from the back of the computer may vary. Organizing...


