
Inspiron 15 3000 Service Manual
Page 4
Replacing the keyboard 25 Procedure 25 Post-requisites 25 Removing the base cover 26 Prerequisites 26 Procedure 26 Replacing the base cover 31 Procedure 31 Post-requisites 33 Removing the optical-drive interposer 34 Prerequisites 34 Procedure 34 Replacing the optical-drive interposer 36 Procedure 36 Post-requisites 36 Removing the hard drive 37 Prerequisites 37 Procedure 37 Replacing the hard drive 40 Procedure 40 Post-requisites 40 Removing the memory modules 41 Prerequisites 41 Procedure 41 4
Replacing the keyboard 25 Procedure 25 Post-requisites 25 Removing the base cover 26 Prerequisites 26 Procedure 26 Replacing the base cover 31 Procedure 31 Post-requisites 33 Removing the optical-drive interposer 34 Prerequisites 34 Procedure 34 Replacing the optical-drive interposer 36 Procedure 36 Post-requisites 36 Removing the hard drive 37 Prerequisites 37 Procedure 37 Replacing the hard drive 40 Procedure 40 Post-requisites 40 Removing the memory modules 41 Prerequisites 41 Procedure 41 4
Inspiron 15 3000 Service Manual
Page 12
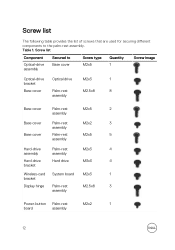
... Palm-rest M2.5x8 8 assembly Base cover Palm-rest M2x5 2 assembly Base cover Palm-rest M2x2 3 assembly Base cover Palm-rest M2x5 5 assembly Hard-drive Palm-rest M2x3 4 assembly assembly Hard-drive Hard drive M3x3 4 bracket Wireless-card System board M2x3 1 bracket Display hinge Palm-rest M2.5x8 3 assembly Power-button Palm-rest M2x2 1 board assembly...
... Palm-rest M2.5x8 8 assembly Base cover Palm-rest M2x5 2 assembly Base cover Palm-rest M2x2 3 assembly Base cover Palm-rest M2x5 5 assembly Hard-drive Palm-rest M2x3 4 assembly assembly Hard-drive Hard drive M3x3 4 bracket Wireless-card System board M2x3 1 bracket Display hinge Palm-rest M2.5x8 3 assembly Power-button Palm-rest M2x2 1 board assembly...

Inspiron 15 3000 Service Manual
Page 37
...hard drive. CAUTION: To avoid data loss, do not remove the hard drive while the computer is in "Removing the base cover". Prerequisites 1 Remove the battery. 2 Follow the procedure from step 1 to step 3 in "Removing the optical drive... inside your computer. Removing the hard drive WARNING: Before working inside your computer, read the safety information that secure the hard-drive assembly to the palm-rest assembly... steps in After working inside your computer. CAUTION: Hard drives are fragile. Procedure 1 Open the latch and disconnect the hard-drive cable from step 1 to step 7 in sleep ...
...hard drive. CAUTION: To avoid data loss, do not remove the hard drive while the computer is in "Removing the base cover". Prerequisites 1 Remove the battery. 2 Follow the procedure from step 1 to step 3 in "Removing the optical drive... inside your computer. Removing the hard drive WARNING: Before working inside your computer, read the safety information that secure the hard-drive assembly to the palm-rest assembly... steps in After working inside your computer. CAUTION: Hard drives are fragile. Procedure 1 Open the latch and disconnect the hard-drive cable from step 1 to step 7 in sleep ...
Inspiron 15 3000 Service Manual
Page 38
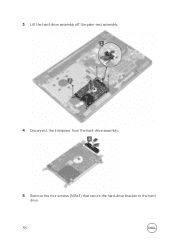
3 Lift the hard-drive assembly off the palm-rest assembly. 4 Disconnect the interposer from the hard-drive assembly. 5 Remove the four screws (M3x3) that secure the hard-drive bracket to the hard drive. 38
3 Lift the hard-drive assembly off the palm-rest assembly. 4 Disconnect the interposer from the hard-drive assembly. 5 Remove the four screws (M3x3) that secure the hard-drive bracket to the hard drive. 38
Inspiron 15 3000 Service Manual
Page 39
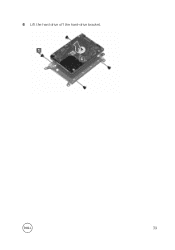
6 Lift the hard drive off the hard-drive bracket. 39
6 Lift the hard drive off the hard-drive bracket. 39

Inspiron 15 3000 Service Manual
Page 40
...screws (M2x3) that secure the hard-drive bracket to the hard drive. 3 Connect the interposer to the hard drive. 4 Place the hard-drive assembly in the palm-rest assembly and align the screw holes on the hard-drive assembly with your computer and ...hard drive. 2 Replace the four screws (M3x3) that secure the hard-drive assembly to the palm-rest assembly. 6 Slide the hard-drive cable into its connector on the system board and close the latch to secure the cable. Exercise care when handling the hard drive. For more safety best practices, see the Regulatory Compliance home page at www.dell...
...screws (M2x3) that secure the hard-drive bracket to the hard drive. 3 Connect the interposer to the hard drive. 4 Place the hard-drive assembly in the palm-rest assembly and align the screw holes on the hard-drive assembly with your computer and ...hard drive. 2 Replace the four screws (M3x3) that secure the hard-drive assembly to the palm-rest assembly. 6 Slide the hard-drive cable into its connector on the system board and close the latch to secure the cable. Exercise care when handling the hard drive. For more safety best practices, see the Regulatory Compliance home page at www.dell...

Inspiron 15 3000 Service Manual
Page 74
... cable from the system board. 5 Open the latch and disconnect the power-button board cable from the system board. 6 Open the latch and disconnect the hard-drive cable from the system board. 7 Open the latch and disconnect the I/O-board cable from the system board. 8 Disconnect the speaker cable from the system board...
... cable from the system board. 5 Open the latch and disconnect the power-button board cable from the system board. 6 Open the latch and disconnect the hard-drive cable from the system board. 7 Open the latch and disconnect the I/O-board cable from the system board. 8 Disconnect the speaker cable from the system board...
Inspiron 15 3000 Service Manual
Page 78
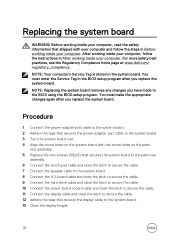
For more safety best practices, see the Regulatory Compliance home page at www.dell.com/ regulatory_compliance. You must make the appropriate changes again after you have made to the BIOS using the BIOS setup program. Procedure 1 Connect the power-... secure the cable. 7 Connect the speaker cable to the system board. 8 Connect the I/O-board cable and close the latch to secure the cable. 9 Connect the hard-drive cable and close the latch to secure the cable. 10 Connect the power-button board cable and close the latch to secure the cable. 11...
For more safety best practices, see the Regulatory Compliance home page at www.dell.com/ regulatory_compliance. You must make the appropriate changes again after you have made to the BIOS using the BIOS setup program. Procedure 1 Connect the power-... secure the cable. 7 Connect the speaker cable to the system board. 8 Connect the I/O-board cable and close the latch to secure the cable. 9 Connect the hard-drive cable and close the latch to secure the cable. 10 Connect the power-button board cable and close the latch to secure the cable. 11...
Inspiron 15 3000 Service Manual
Page 108
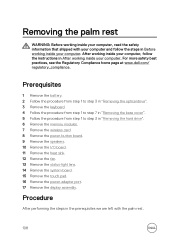
... the steps in the prerequisites we are left with your computer and follow the instructions in "Removing the hard drive". 6 Remove the memory modules. 7 Remove the wireless card. 8 Remove the power-button board. 9.... 12 Remove the fan. 13 Remove the status-light lens. 14 Remove the system board. 15 Remove the touch pad. 16 Remove the power-adapter port. 17 Remove the display assembly. For... more safety best practices, see the Regulatory Compliance home page at www.dell.com/ regulatory_compliance. Removing the palm rest WARNING: Before working inside your computer, read the safety...
... the steps in the prerequisites we are left with your computer and follow the instructions in "Removing the hard drive". 6 Remove the memory modules. 7 Remove the wireless card. 8 Remove the power-button board. 9.... 12 Remove the fan. 13 Remove the status-light lens. 14 Remove the system board. 15 Remove the touch pad. 16 Remove the power-adapter port. 17 Remove the display assembly. For... more safety best practices, see the Regulatory Compliance home page at www.dell.com/ regulatory_compliance. Removing the palm rest WARNING: Before working inside your computer, read the safety...
Inspiron 15 3000 Service Manual
Page 110
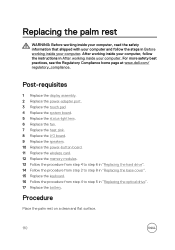
.... Procedure Place the palm rest on a clean and flat surface. 110 For more safety best practices, see the Regulatory Compliance home page at www.dell.com/ regulatory_compliance. Post-requisites 1 Replace the display assembly. 2 Replace the power-adapter port. 3 Replace the touch pad. 4 Replace the system ...12 Replace the memory modules. 13 Follow the procedure from step 4 to step 6 in "Replacing the hard drive". 14 Follow the procedure from step 2 to step 8 in "Replacing the base cover". 15 Replace the keyboard. 16 Follow the procedure from step 4 to step 5 in After working inside your...
.... Procedure Place the palm rest on a clean and flat surface. 110 For more safety best practices, see the Regulatory Compliance home page at www.dell.com/ regulatory_compliance. Post-requisites 1 Replace the display assembly. 2 Replace the power-adapter port. 3 Replace the touch pad. 4 Replace the system ...12 Replace the memory modules. 13 Follow the procedure from step 4 to step 6 in "Replacing the hard drive". 14 Follow the procedure from step 2 to step 8 in "Replacing the base cover". 15 Replace the keyboard. 16 Follow the procedure from step 4 to step 5 in After working inside your...
Inspiron 15 3000 Service Manual
Page 111
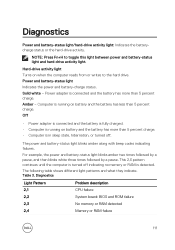
... by a pause, and then blinks white three times followed by a pause. This 2,3 pattern continues until the computer is turned off . NOTE: Press Fn+H to the hard drive. Off • Power adapter is connected and the battery is fully charged. • Computer is running on when the computer reads from or writes to... toggle this light between power and battery-status light and hard-drive activity light. The power and battery-status light blinks amber along with beep codes indicating failures.
... by a pause, and then blinks white three times followed by a pause. This 2,3 pattern continues until the computer is turned off . NOTE: Press Fn+H to the hard drive. Off • Power adapter is connected and the battery is fully charged. • Computer is running on when the computer reads from or writes to... toggle this light between power and battery-status light and hard-drive activity light. The power and battery-status light blinks amber along with beep codes indicating failures.
Inspiron 15 3000 Setup and Specifications
Page 8
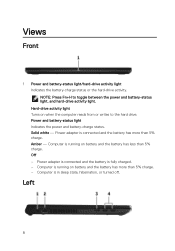
...than 5% charge. - Computer is running on when the computer reads from or writes to toggle between the power and battery-status light, and hard-drive activity light. Left 8 Computer is in sleep state, hibernation, or turned off. Amber - Power adapter is connected and the battery is ... and the battery has more than 5% charge. Power adapter is fully charged. - Views Front 1 Power and battery-status light/hard-drive activity light Indicates the battery-charge status or the hard-drive activity. Computer is running on battery and the battery has more than 5% charge.
...than 5% charge. - Computer is running on when the computer reads from or writes to toggle between the power and battery-status light, and hard-drive activity light. Left 8 Computer is in sleep state, hibernation, or turned off. Amber - Power adapter is connected and the battery is ... and the battery has more than 5% charge. Power adapter is fully charged. - Views Front 1 Power and battery-status light/hard-drive activity light Indicates the battery-charge status or the hard-drive activity. Computer is running on battery and the battery has more than 5% charge.
Inspiron 15 3000 Setup and Specifications
Page 16
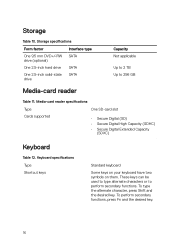
... the alternate character, press Shift and the desired key. Storage specifications Form factor Interface type One 9.5 mm DVD+/-RW SATA drive (optional) One 2.5-inch hard drive SATA One 2.5-inch solid-state SATA drive Capacity Not applicable Up to 2 TB Up to perform secondary functions. Media-card reader specifications Type Cards supported One SD-card...
... the alternate character, press Shift and the desired key. Storage specifications Form factor Interface type One 9.5 mm DVD+/-RW SATA drive (optional) One 2.5-inch hard drive SATA One 2.5-inch solid-state SATA drive Capacity Not applicable Up to 2 TB Up to perform secondary functions. Media-card reader specifications Type Cards supported One SD-card...
Inspiron 15 3000 Setup and Specifications
Page 20
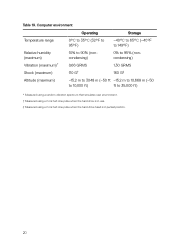
...% (noncondensing) 1.30 GRMS 160 G‡ Altitude (maximum) -15.2 m to 3048 m (-50 ft -15.2 m to 10,668 m (-50 to 10,000 ft) ft to 35,000 ft) * Measured using a random vibration spectrum that simulates user environment. † Measured using a 2 ms half-sine pulse when the hard drive is in use. ‡ Measured using a 2 ms half...
...% (noncondensing) 1.30 GRMS 160 G‡ Altitude (maximum) -15.2 m to 3048 m (-50 ft -15.2 m to 10,668 m (-50 to 10,000 ft) ft to 35,000 ft) * Measured using a random vibration spectrum that simulates user environment. † Measured using a 2 ms half-sine pulse when the hard drive is in use. ‡ Measured using a 2 ms half...
Inspiron 15 3000 Setup and Specifications
Page 23
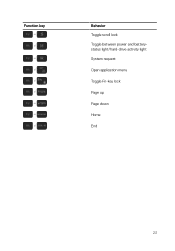
Function key Behavior Toggle scroll lock Toggle between power and batterystatus light/hard-drive activity light System request Open application menu Toggle Fn-key lock Page up Page down Home End 23
Function key Behavior Toggle scroll lock Toggle between power and batterystatus light/hard-drive activity light System request Open application menu Toggle Fn-key lock Page up Page down Home End 23


