
Owner's Manual
Page 3
Contents Before You Begin 9 Turn Off Your Computer and Connected Devices . . . . . 9 Safety Instructions 10 Recommended Tools 10 After Working Inside Your Computer 11 Removing the Battery 12 Procedure 12 Replacing the Battery 13 Procedure 13 Removing the Optical Drive 14 Prerequisites 14 Procedure 14 Replacing the Optical Drive 16 Procedure 16 Postrequisites 16 Removing the Keyboard 17 Prerequisites 17 Procedure 17 Replacing the Keyboard 20 Procedure 20 Postrequisites 20 Removing the Base Cover 21 Prerequisites 21 Procedure 21 Contents | 3
Contents Before You Begin 9 Turn Off Your Computer and Connected Devices . . . . . 9 Safety Instructions 10 Recommended Tools 10 After Working Inside Your Computer 11 Removing the Battery 12 Procedure 12 Replacing the Battery 13 Procedure 13 Removing the Optical Drive 14 Prerequisites 14 Procedure 14 Replacing the Optical Drive 16 Procedure 16 Postrequisites 16 Removing the Keyboard 17 Prerequisites 17 Procedure 17 Replacing the Keyboard 20 Procedure 20 Postrequisites 20 Removing the Base Cover 21 Prerequisites 21 Procedure 21 Contents | 3

Owner's Manual
Page 5
... Prerequisites 36 Procedure 37 Replacing the Coin-Cell Battery 38 Procedure 38 Postrequisites 38 Removing the I/O Board 39 Prerequisites 39 Procedure 40 Replacing the I/O Board 41 Procedure 41 Postrequisites 41 Removing the Power-Adapter ...
... Prerequisites 36 Procedure 37 Replacing the Coin-Cell Battery 38 Procedure 38 Postrequisites 38 Removing the I/O Board 39 Prerequisites 39 Procedure 40 Replacing the I/O Board 41 Procedure 41 Postrequisites 41 Removing the Power-Adapter ...

Owner's Manual
Page 12
... the unlock position. For additional safety best practices information, see the Regulatory Compliance Homepage at dell.com/regulatory_compliance. After working inside your computer and follow the instructions in "Before You Begin" on page 11. Removing the Battery WARNING: Before working inside your computer, read the safety information that shipped with your computer...
... the unlock position. For additional safety best practices information, see the Regulatory Compliance Homepage at dell.com/regulatory_compliance. After working inside your computer and follow the instructions in "Before You Begin" on page 11. Removing the Battery WARNING: Before working inside your computer, read the safety information that shipped with your computer...

Owner's Manual
Page 13
Procedure Align the tabs on the battery with your computer and follow the instructions in "Before You Begin" on page 9. Replacing the Battery WARNING: Before working inside your computer, read the safety information that shipped with the slots on the battery bay and snap the battery into place. For additional safety best practices information, see the Regulatory Compliance Homepage at dell.com/regulatory_compliance. Replacing the Battery | 13 After working inside your computer, follow the steps in "After Working Inside Your Computer" on page 11.
Procedure Align the tabs on the battery with your computer and follow the instructions in "Before You Begin" on page 9. Replacing the Battery WARNING: Before working inside your computer, read the safety information that shipped with the slots on the battery bay and snap the battery into place. For additional safety best practices information, see the Regulatory Compliance Homepage at dell.com/regulatory_compliance. Replacing the Battery | 13 After working inside your computer, follow the steps in "After Working Inside Your Computer" on page 11.

Owner's Manual
Page 14
... the optical-drive bracket. 14 | Removing the Optical Drive For additional safety best practices information, see the Regulatory Compliance Homepage at dell.com/regulatory_compliance. Prerequisites Remove the battery. See "Removing the Battery" on page 12. Procedure 1 Remove the screw that secures the optical-drive assembly to the computer base. 2 Using your fingertips, slide...
... the optical-drive bracket. 14 | Removing the Optical Drive For additional safety best practices information, see the Regulatory Compliance Homepage at dell.com/regulatory_compliance. Prerequisites Remove the battery. See "Removing the Battery" on page 12. Procedure 1 Remove the screw that secures the optical-drive assembly to the computer base. 2 Using your fingertips, slide...

Owner's Manual
Page 16
Postrequisites Replace the battery. Replacing the Optical Drive WARNING: Before working inside your computer, read the safety information that shipped with the screw hole on page 13. 16 | Replacing ... ensure that secures the optical-drive assembly to the computer base. For additional safety best practices information, see the Regulatory Compliance Homepage at dell.com/regulatory_compliance. See "Replacing the Battery" on computer base. 4 Replace the screw that the screw hole on the optical-drive bracket aligns with your computer, follow the steps...
Postrequisites Replace the battery. Replacing the Optical Drive WARNING: Before working inside your computer, read the safety information that shipped with the screw hole on page 13. 16 | Replacing ... ensure that secures the optical-drive assembly to the computer base. For additional safety best practices information, see the Regulatory Compliance Homepage at dell.com/regulatory_compliance. See "Replacing the Battery" on computer base. 4 Replace the screw that the screw hole on the optical-drive bracket aligns with your computer, follow the steps...

Owner's Manual
Page 17
For additional safety best practices information, see the Regulatory Compliance Homepage at dell.com/regulatory_compliance. See "Removing the Battery" on page 9. Removing the Keyboard WARNING: Before working inside your computer, read the safety information that secure the keyboard to the computer base 1 1 screws (2) Removing ... Inside Your Computer" on page 11. After working inside your computer and follow the instructions in "Before You Begin" on page 12. Prerequisites Remove the battery.
For additional safety best practices information, see the Regulatory Compliance Homepage at dell.com/regulatory_compliance. See "Removing the Battery" on page 9. Removing the Keyboard WARNING: Before working inside your computer, read the safety information that secure the keyboard to the computer base 1 1 screws (2) Removing ... Inside Your Computer" on page 11. After working inside your computer and follow the instructions in "Before You Begin" on page 12. Prerequisites Remove the battery.

Owner's Manual
Page 20
... place the keyboard on the palm-rest. 3 Gently press around the edges of the keyboard to the computer base. See "Replacing the Battery" on page 11. Postrequisites Replace the battery. Procedure 1 Slide the keyboard cable into the keyboard-cable connector and press down on the connector latch to secure the cable. 2 Slide...
... place the keyboard on the palm-rest. 3 Gently press around the edges of the keyboard to the computer base. See "Replacing the Battery" on page 11. Postrequisites Replace the battery. Procedure 1 Slide the keyboard cable into the keyboard-cable connector and press down on the connector latch to secure the cable. 2 Slide...

Owner's Manual
Page 21
... Begin" on page 9. For additional safety best practices information, see the Regulatory Compliance Homepage at dell.com/regulatory_compliance. See "Removing the Battery" on the computer base. 1 2 1 screw 2 base cover Removing the Base Cover | 21 Prerequisites Remove the battery. Removing the Base Cover WARNING: Before working inside your computer, read the safety information that...
... Begin" on page 9. For additional safety best practices information, see the Regulatory Compliance Homepage at dell.com/regulatory_compliance. See "Removing the Battery" on the computer base. 1 2 1 screw 2 base cover Removing the Base Cover | 21 Prerequisites Remove the battery. Removing the Base Cover WARNING: Before working inside your computer, read the safety information that...

Owner's Manual
Page 22
... that secures the base cover to the computer base. For additional safety best practices information, see the Regulatory Compliance Homepage at dell.com/regulatory_compliance. Postrequisites Replace the battery. See "Replacing the Battery" on the computer base and snap the base cover into place. 2 Replace the screw that shipped with your computer, follow the...
... that secures the base cover to the computer base. For additional safety best practices information, see the Regulatory Compliance Homepage at dell.com/regulatory_compliance. Postrequisites Replace the battery. See "Replacing the Battery" on the computer base and snap the base cover into place. 2 Replace the screw that shipped with your computer, follow the...

Owner's Manual
Page 23
After working inside your computer, follow the steps in "After Working Inside Your Computer" on page 11. See "Removing the Battery" on each end of the memory-module connector until the memory module pops up. 2 Remove the memory module from the memory-module connector...Removing the Base Cover" on page 21. For additional safety best practices information, see the Regulatory Compliance Homepage at dell.com/regulatory_compliance. Prerequisites 1 Remove the battery. Removing the Memory Module(s) WARNING: Before working inside your computer, read the safety information that shipped with your ...
After working inside your computer, follow the steps in "After Working Inside Your Computer" on page 11. See "Removing the Battery" on each end of the memory-module connector until the memory module pops up. 2 Remove the memory module from the memory-module connector...Removing the Base Cover" on page 21. For additional safety best practices information, see the Regulatory Compliance Homepage at dell.com/regulatory_compliance. Prerequisites 1 Remove the battery. Removing the Memory Module(s) WARNING: Before working inside your computer, read the safety information that shipped with your ...

Owner's Manual
Page 24
Procedure 1 Align the notch on the memory module with your computer and follow the instructions in "Before You Begin" on page 9. See "Replacing the Battery" on page 22. 2 Replace the battery. See "Replacing the Base Cover" on page 13. 24 | Replacing the Memory Module(s) For additional safety best practices information, see the Regulatory... memory module firmly into place. NOTE: If you do not hear the click, remove the memory module and reinstall it clicks into the connector at dell.com/regulatory_compliance. Postrequisites 1 Replace the base cover.
Procedure 1 Align the notch on the memory module with your computer and follow the instructions in "Before You Begin" on page 9. See "Replacing the Battery" on page 22. 2 Replace the battery. See "Replacing the Base Cover" on page 13. 24 | Replacing the Memory Module(s) For additional safety best practices information, see the Regulatory... memory module firmly into place. NOTE: If you do not hear the click, remove the memory module and reinstall it clicks into the connector at dell.com/regulatory_compliance. Postrequisites 1 Replace the base cover.
Owner's Manual
Page 25
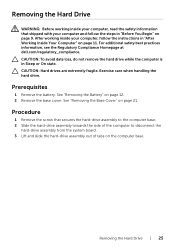
...the instructions in "Before You Begin" on page 9. For additional safety best practices information, see the Regulatory Compliance Homepage at dell.com/regulatory_compliance. Prerequisites 1 Remove the battery. See "Removing the Base Cover" on page 12. 2 Remove the base cover. Removing the Hard Drive WARNING: Before ...assembly from the system board. 3 Lift and slide the hard-drive assembly out of tabs on the computer base. See "Removing the Battery" on page 21. Exercise care when handling the hard drive. Procedure 1 Remove the screw that shipped with your computer, follow the ...
...the instructions in "Before You Begin" on page 9. For additional safety best practices information, see the Regulatory Compliance Homepage at dell.com/regulatory_compliance. Prerequisites 1 Remove the battery. See "Removing the Base Cover" on page 12. 2 Remove the base cover. Removing the Hard Drive WARNING: Before ...assembly from the system board. 3 Lift and slide the hard-drive assembly out of tabs on the computer base. See "Removing the Battery" on page 21. Exercise care when handling the hard drive. Procedure 1 Remove the screw that shipped with your computer, follow the ...

Owner's Manual
Page 27
... computer base. For additional safety best practices information, see the Regulatory Compliance Homepage at dell.com/regulatory_compliance. See "Replacing the Base Cover" on page 13. CAUTION: Hard drives are extremely fragile. See "Replacing the Battery" on page 22. 2 Replace the battery. Postrequisites 1 Replace the base cover. Exercise care when handling the hard drive.
... computer base. For additional safety best practices information, see the Regulatory Compliance Homepage at dell.com/regulatory_compliance. See "Replacing the Base Cover" on page 13. CAUTION: Hard drives are extremely fragile. See "Replacing the Battery" on page 22. 2 Replace the battery. Postrequisites 1 Replace the base cover. Exercise care when handling the hard drive.

Owner's Manual
Page 28
...Before You Begin" on page 11. See "Removing the Base Cover" on page 12. 2 Remove the base cover. See "Removing the Battery" on page 21. Procedure 1 Disconnect the antenna cables from the wireless mini-card. 2 Remove the screw that shipped with your computer,... follow the steps in "After Working Inside Your Computer" on page 9. Prerequisites 1 Remove the battery. For additional safety best practices information, see the Regulatory Compliance Homepage at dell.com/regulatory_compliance. Removing the Wireless Mini-Card WARNING: Before working inside your computer, read the safety...
...Before You Begin" on page 11. See "Removing the Base Cover" on page 12. 2 Remove the base cover. See "Removing the Battery" on page 21. Procedure 1 Disconnect the antenna cables from the wireless mini-card. 2 Remove the screw that shipped with your computer,... follow the steps in "After Working Inside Your Computer" on page 9. Prerequisites 1 Remove the battery. For additional safety best practices information, see the Regulatory Compliance Homepage at dell.com/regulatory_compliance. Removing the Wireless Mini-Card WARNING: Before working inside your computer, read the safety...

Owner's Manual
Page 30
... Align the notch on the wireless mini-card with the tab on the mini-card connector. 2 Insert the wireless mini-card at dell.com/regulatory_compliance. The following table provides the antenna cable color schemes for the wireless mini-card supported by your computer and follow the ...instructions in "Before You Begin" on page 9. See "Replacing the Battery" on the wireless mini-card WLAN + Bluetooth (2 cables) Main WLAN + Bluetooth (white triangle) Auxiliary WLAN + Bluetooth (black triangle) Antenna cable...
... Align the notch on the wireless mini-card with the tab on the mini-card connector. 2 Insert the wireless mini-card at dell.com/regulatory_compliance. The following table provides the antenna cable color schemes for the wireless mini-card supported by your computer and follow the ...instructions in "Before You Begin" on page 9. See "Replacing the Battery" on the wireless mini-card WLAN + Bluetooth (2 cables) Main WLAN + Bluetooth (white triangle) Auxiliary WLAN + Bluetooth (black triangle) Antenna cable...

Owner's Manual
Page 31
For additional safety best practices information, see the Regulatory Compliance Homepage at dell.com/regulatory_compliance. See "Removing the Keyboard" on page 25. 4 Remove the keyboard. See "Removing the Base Cover" on page 21. 3 Follow the instructions from step 1 ... inside your computer, read the safety information that secure the palm-rest to step 3 in "Removing the Hard Drive" on page 17. Prerequisites 1 Remove the battery. Procedure 1 Remove the screws that shipped with your computer, follow the steps in "After Working Inside Your Computer" on page 11. See "Removing the...
For additional safety best practices information, see the Regulatory Compliance Homepage at dell.com/regulatory_compliance. See "Removing the Keyboard" on page 25. 4 Remove the keyboard. See "Removing the Base Cover" on page 21. 3 Follow the instructions from step 1 ... inside your computer, read the safety information that secure the palm-rest to step 3 in "Removing the Hard Drive" on page 17. Prerequisites 1 Remove the battery. Procedure 1 Remove the screws that shipped with your computer, follow the steps in "After Working Inside Your Computer" on page 11. See "Removing the...

Owner's Manual
Page 35
See "Replacing the Battery" on page 22. 4 Replace the battery. Replacing the Palm-Rest | 35 Postrequisites 1 Replace the keyboard. After working inside your computer and follow the instructions in "After Working Inside Your Computer" on page 11. For additional safety best practices information, see the Regulatory Compliance Homepage at dell.com/regulatory_compliance. Procedure 1 Align...
See "Replacing the Battery" on page 22. 4 Replace the battery. Replacing the Palm-Rest | 35 Postrequisites 1 Replace the keyboard. After working inside your computer and follow the instructions in "After Working Inside Your Computer" on page 11. For additional safety best practices information, see the Regulatory Compliance Homepage at dell.com/regulatory_compliance. Procedure 1 Align...

Owner's Manual
Page 36
... 1 to default. After working inside your computer, follow the steps in "Before You Begin" on page 9. Prerequisites 1 Remove the battery. See "Removing the Palm-Rest" on page 25. 4 Remove the keyboard. It is recommended that shipped with your computer and follow... Removing the Coin-Cell Battery WARNING: Before working inside your computer, read the safety information that you note the BIOS settings before removing the coin-cell battery. For additional safety best practices information, see the Regulatory Compliance Homepage at dell.com/regulatory_compliance. See "Removing...
... 1 to default. After working inside your computer, follow the steps in "Before You Begin" on page 9. Prerequisites 1 Remove the battery. See "Removing the Palm-Rest" on page 25. 4 Remove the keyboard. It is recommended that shipped with your computer and follow... Removing the Coin-Cell Battery WARNING: Before working inside your computer, read the safety information that you note the BIOS settings before removing the coin-cell battery. For additional safety best practices information, see the Regulatory Compliance Homepage at dell.com/regulatory_compliance. See "Removing...
Owner's Manual
Page 37
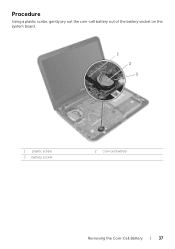
Procedure Using a plastic scribe, gently pry out the coin-cell battery out of the battery socket on the system board. 1 2 3 1 plastic scribe 3 battery socket 2 coin-cell battery Removing the Coin-Cell Battery | 37
Procedure Using a plastic scribe, gently pry out the coin-cell battery out of the battery socket on the system board. 1 2 3 1 plastic scribe 3 battery socket 2 coin-cell battery Removing the Coin-Cell Battery | 37

