
Dell Owners Manual
Page 12
Figure 2. Keyboard and Palmrest Assembly removed 1. Installing the Secure Digital (SD) Card 1. speakers 4. Slide the SD card into its slot until it from the computer. Top View - hard-drive bay 5. Follow the procedures in After Working Inside Your Computer. 12 ExpressCard cage 3. Press in on the SD card to release it clicks into place. 2. Follow the procedures in Before Working Inside Your Computer. 2. Slide the SD card out of the computer. I/O board Removing the Secure Digital (SD) Card 1. WiFi-switch board 2. system board 6.
Figure 2. Keyboard and Palmrest Assembly removed 1. Installing the Secure Digital (SD) Card 1. speakers 4. Slide the SD card into its slot until it from the computer. Top View - hard-drive bay 5. Follow the procedures in After Working Inside Your Computer. 12 ExpressCard cage 3. Press in on the SD card to release it clicks into place. 2. Follow the procedures in Before Working Inside Your Computer. 2. Slide the SD card out of the computer. I/O board Removing the Secure Digital (SD) Card 1. WiFi-switch board 2. system board 6.
Dell Owners Manual
Page 13
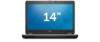
Slide the release latches and flip the battery out of the computer. Installing the Battery 1. Removing the ExpressCard 1. Slide the ExpressCard out of the computer. Slide the ExpressCard .... Installing the ExpressCard 1. Follow the procedures in Before Working Inside Your Computer. 2. Slide the battery into place. 2. Follow the procedures in on the ExpressCard to release it clicks in After Working Inside Your Computer. 13 Press in Before Working Inside Your Computer. 2. Removing the Battery 1. Follow the procedures in place. 2.
Slide the release latches and flip the battery out of the computer. Installing the Battery 1. Removing the ExpressCard 1. Slide the ExpressCard out of the computer. Slide the ExpressCard .... Installing the ExpressCard 1. Follow the procedures in Before Working Inside Your Computer. 2. Slide the battery into place. 2. Follow the procedures in on the ExpressCard to release it clicks in After Working Inside Your Computer. 13 Press in Before Working Inside Your Computer. 2. Removing the Battery 1. Follow the procedures in place. 2.
Dell Owners Manual
Page 16
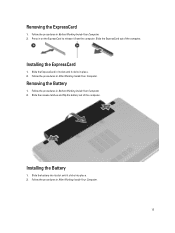
... Hard Drive 1. Attach the hard-drive caddy to the hard drive. 4. Install the battery. 7. Slide the optical-drive latch and remove it from the computer. 4. b) Release the optical drive. Tighten the screws to secure the hard-drive caddy to the hard drive. 3. Follow the procedures in Before Working Inside Your Computer. 2.
... Hard Drive 1. Attach the hard-drive caddy to the hard drive. 4. Install the battery. 7. Slide the optical-drive latch and remove it from the computer. 4. b) Release the optical drive. Tighten the screws to secure the hard-drive caddy to the hard drive. 3. Follow the procedures in Before Working Inside Your Computer. 2.
Dell Owners Manual
Page 17
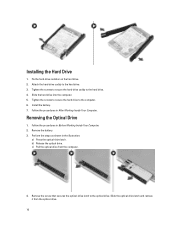
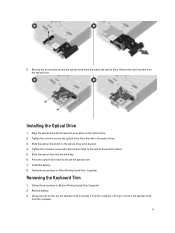
... drive bay. 6. Follow the procedures in Before Working Inside Your Computer. 2. Installing the Optical Drive 1. Install the battery. 8. Align the optical-drive latch bracket to release it up to remove the keyboard trim from the computer. Remove battery. 3. 5.
... drive bay. 6. Follow the procedures in Before Working Inside Your Computer. 2. Installing the Optical Drive 1. Install the battery. 8. Align the optical-drive latch bracket to release it up to remove the keyboard trim from the computer. Remove battery. 3. 5.
Dell Owners Manual
Page 22
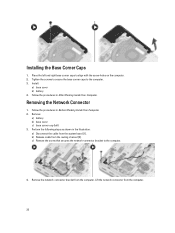
b) Release cable from the computer. 22 Tighten the screws to secure the base corner caps to the computer. 4. Follow the procedures in Before Working Inside Your ...
b) Release cable from the computer. 22 Tighten the screws to secure the base corner caps to the computer. 4. Follow the procedures in Before Working Inside Your ...
Dell Owners Manual
Page 39
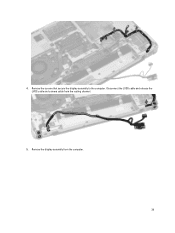
Remove the display assembly from the routing channel. 5. Disconnect the LVDS cable and release the LVDS cable and camera cable from the computer. 39 Remove the screws that secure the display assembly to the computer. 4.
Remove the display assembly from the routing channel. 5. Disconnect the LVDS cable and release the LVDS cable and camera cable from the computer. 39 Remove the screws that secure the display assembly to the computer. 4.
Dell Owners Manual
Page 40
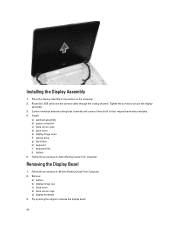
... trim j) battery 5. Removing the Display Bezel 1. Route the LVDS cable and the camera cable through the routing channel. Connect wireless antennas along the edges to release the display bezel. 40 Pry up along their channels and connect them back to secure the display assembly. 3. Follow the procedures in Before Working Inside...
... trim j) battery 5. Removing the Display Bezel 1. Route the LVDS cable and the camera cable through the routing channel. Connect wireless antennas along the edges to release the display bezel. 40 Pry up along their channels and connect them back to secure the display assembly. 3. Follow the procedures in Before Working Inside...
Dell Setup and Features Information
Page 1
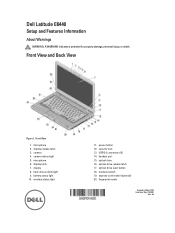
... (optional) 20. display latch 7. headset port 15. Front View and Back View Figure 1. hard-drive activity light 9. optical-drive release latch 17. camera status light 5. wireless switch 19. wireless status light 11. Dell Latitude E6440 Setup and Features Information About Warnings WARNING: A WARNING indicates a potential for property damage, personal injury, or death. Front View...
... (optional) 20. display latch 7. headset port 15. Front View and Back View Figure 1. hard-drive activity light 9. optical-drive release latch 17. camera status light 5. wireless switch 19. wireless status light 11. Dell Latitude E6440 Setup and Features Information About Warnings WARNING: A WARNING indicates a potential for property damage, personal injury, or death. Front View...
Dell Setup and Features Information
Page 3
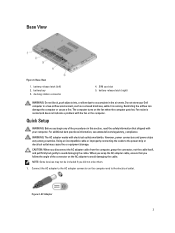
Do not store your computer. For additional best practices information, see www.dell.com/regulatory_compliance WARNING: The AC adapter works with your Dell computer in the air vents. CAUTION: When you did not order them. 1. battery bay 3. The computer turns on the AC adapter... the computer. However, power connectors and power strips vary among countries. NOTE: Some devices may cause fire or equipment damage. battery release latch (left) 2. battery release latch (right) WARNING: Do not block, push objects into, or allow dust to avoid damaging the cable. Fan noise is running...
Do not store your computer. For additional best practices information, see www.dell.com/regulatory_compliance WARNING: The AC adapter works with your Dell computer in the air vents. CAUTION: When you did not order them. 1. battery bay 3. The computer turns on the AC adapter... the computer. However, power connectors and power strips vary among countries. NOTE: Some devices may cause fire or equipment damage. battery release latch (left) 2. battery release latch (right) WARNING: Do not block, push objects into, or allow dust to avoid damaging the cable. Fan noise is running...


