Battery Slice Setup Guide
Page 2
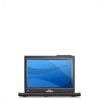
... from other commercially available AC adapter-or the AC adapter from earlier models of Dell computers-you close any open programs. 3 Before you undock your Tablet-PC, set your Latitude XT2 only. When you wrap the AC adapter cable, ensure that the Tablet-PC does not enter sleep, standby, or hibernate mode when you may damage the...
... from other commercially available AC adapter-or the AC adapter from earlier models of Dell computers-you close any open programs. 3 Before you undock your Tablet-PC, set your Latitude XT2 only. When you wrap the AC adapter cable, ensure that the Tablet-PC does not enter sleep, standby, or hibernate mode when you may damage the...

Battery Slice Setup Guide
Page 3
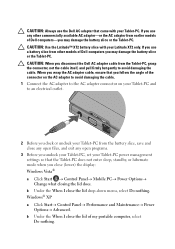
Docking Your Tablet-PC to the Battery Slice NOTE: After docking the Tablet-PC to the battery slice, the Tablet-PC AC adapter will also charge the battery slice. 1 Follow the procedures in "Setting Up Your Battery Slice" on page 1. 2 Align the back of the Tablet-PC with the back of the battery slice, and lower the front of the Tablet-PC onto the battery slice. 1 2 1 Tablet-PC 2 battery slice
Docking Your Tablet-PC to the Battery Slice NOTE: After docking the Tablet-PC to the battery slice, the Tablet-PC AC adapter will also charge the battery slice. 1 Follow the procedures in "Setting Up Your Battery Slice" on page 1. 2 Align the back of the Tablet-PC with the back of the battery slice, and lower the front of the Tablet-PC onto the battery slice. 1 2 1 Tablet-PC 2 battery slice

Battery Slice Setup Guide
Page 4
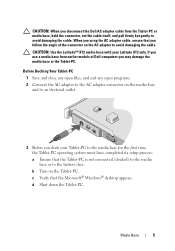
3 Press the Tablet-PC onto the battery slice until you feel a click and the Tablet-PC is firmly seated. 4 Turn on page 1 for more information) to release the Tablet-PC from the battery slice. 1 2 3 1 Tablet-PC 3 release lever 2 battery slice 3 Lift the back of the Tablet-PC up and slide the Tablet-PC out towards the back of the battery slice. Undocking Your Tablet-PC From the Battery Slice 1 Follow the procedures in "Setting Up Your Battery Slice" on page 1. 2 Pull the Tablet-PC release lever (see "Features" on the Tablet-PC. The operating system recognizes the battery slice.
3 Press the Tablet-PC onto the battery slice until you feel a click and the Tablet-PC is firmly seated. 4 Turn on page 1 for more information) to release the Tablet-PC from the battery slice. 1 2 3 1 Tablet-PC 3 release lever 2 battery slice 3 Lift the back of the Tablet-PC up and slide the Tablet-PC out towards the back of the battery slice. Undocking Your Tablet-PC From the Battery Slice 1 Follow the procedures in "Setting Up Your Battery Slice" on page 1. 2 Pull the Tablet-PC release lever (see "Features" on the Tablet-PC. The operating system recognizes the battery slice.

Battery Slice Setup Guide
Page 5
...amber, off, amber, off, amber, off, amber, off LED off Steady blue light Status You are trying to use an unsupported, non-Dell AC adapter to power your tablet-PC. Battery Slice Specifications Physical Height Width Depth Weight 8.5 mm (0.33 inches) 295.32 mm (11.63 inches) 213.32 mm (8.4 inches)... 0.60 kg (1.32 lb) Battery in full charge mode with your battery slice independent of the Tablet-PC using the AC adapter. Temporary battery failure with AC adapter present. Battery-Slice Power-Status LED Codes Your battery slice includes a power status LED ...
...amber, off, amber, off, amber, off, amber, off LED off Steady blue light Status You are trying to use an unsupported, non-Dell AC adapter to power your tablet-PC. Battery Slice Specifications Physical Height Width Depth Weight 8.5 mm (0.33 inches) 295.32 mm (11.63 inches) 213.32 mm (8.4 inches)... 0.60 kg (1.32 lb) Battery in full charge mode with your battery slice independent of the Tablet-PC using the AC adapter. Temporary battery failure with AC adapter present. Battery-Slice Power-Status LED Codes Your battery slice includes a power status LED ...
Media Base Setup Guide
Page 5
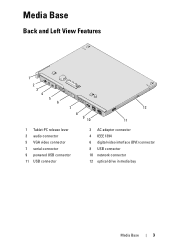
Media Base Back and Left View Features 1 2 3 4 5 6 7 8 9 10 12 11 1 Tablet-PC release lever 3 audio connector 5 VGA video connector 7 serial connector 9 powered USB connector 11 USB connector 2 AC adapter connector 4 IEEE 1394 6 digital video interface (DVI) connector 8 USB connector 10 network connector 12 optical drive in media bay Media Base 3
Media Base Back and Left View Features 1 2 3 4 5 6 7 8 9 10 12 11 1 Tablet-PC release lever 3 audio connector 5 VGA video connector 7 serial connector 9 powered USB connector 11 USB connector 2 AC adapter connector 4 IEEE 1394 6 digital video interface (DVI) connector 8 USB connector 10 network connector 12 optical drive in media bay Media Base 3

Media Base Setup Guide
Page 6
... lever 2 3 4 2 security cable slot 4 USB connector Before Docking or Undocking Your Tablet-PC to the Media Base WARNING: If you are using a multiple-outlet power strip, use caution when you to your media base as well as electric ... the mating ground contact of the power strip. Incorrect insertion of Dell computers-you use the Dell AC adapter that you insert the ground prong of the power plug into the power strip. Ensure that came with the media base. Some power strips may damage the media base or the Tablet-PC. 4 Media Base
... lever 2 3 4 2 security cable slot 4 USB connector Before Docking or Undocking Your Tablet-PC to the Media Base WARNING: If you are using a multiple-outlet power strip, use caution when you to your media base as well as electric ... the mating ground contact of the power strip. Incorrect insertion of Dell computers-you use the Dell AC adapter that you insert the ground prong of the power plug into the power strip. Ensure that came with the media base. Some power strips may damage the media base or the Tablet-PC. 4 Media Base
Media Base Setup Guide
Page 7
...® desktop appears. c Verify that you follow the angle of Dell computers you may damage the media base or the Tablet-PC. d Shut down the Tablet-PC. CAUTION: Use the Latitude™ XT2 media base with your Tablet-PC to the media base for the first time, the Tablet-PC operating system must have completed its setup process: a Ensure that the...
...® desktop appears. c Verify that you follow the angle of Dell computers you may damage the media base or the Tablet-PC. d Shut down the Tablet-PC. CAUTION: Use the Latitude™ XT2 media base with your Tablet-PC to the media base for the first time, the Tablet-PC operating system must have completed its setup process: a Ensure that the...

Media Base Setup Guide
Page 8
... docked to the security cable slot on installing this is the first time it is being docked to the media base, ensure that your Tablet-PC is not connected to an AC adapter. 1 Follow the procedures in the Notification area to display the Power icon pop-up window. For instructions ... or hibernate mode when you close the lid drop-down menu, select Do nothing. Docking Your Tablet-PC to the Media Base CAUTION: If you are docking your Tablet-PC for the first time, the Tablet-PC battery or the Tablet-PC AC adapter connection can power the media base if the media base is turned off . 3 Align...
... docked to the security cable slot on installing this is the first time it is being docked to the media base, ensure that your Tablet-PC is not connected to an AC adapter. 1 Follow the procedures in the Notification area to display the Power icon pop-up window. For instructions ... or hibernate mode when you close the lid drop-down menu, select Do nothing. Docking Your Tablet-PC to the Media Base CAUTION: If you are docking your Tablet-PC for the first time, the Tablet-PC battery or the Tablet-PC AC adapter connection can power the media base if the media base is turned off . 3 Align...

Media Base Setup Guide
Page 9
1 2 1 Tablet-PC 2 media base 4 Press the Tablet-PC onto the media base until it clicks and the Tablet-PC is firmly seated. 5 Turn on the Tablet-PC. Media Base 7 The operating system recognizes the media base.
1 2 1 Tablet-PC 2 media base 4 Press the Tablet-PC onto the media base until it clicks and the Tablet-PC is firmly seated. 5 Turn on the Tablet-PC. Media Base 7 The operating system recognizes the media base.

Media Base Setup Guide
Page 10
... the Tablet-PC without a battery before preparing the Tablet-PC, you will lose data and the Tablet-PC may not recover normal operation for undocking. CAUTION: If the Tablet-PC does not have a charged battery in "Before Docking or Undocking Your Tablet-PC to release the Tablet-PC from the media base. 1 2 3 1 Tablet-PC 3 media base 2 release lever 5 Lift the back of the Tablet-PC up...
... the Tablet-PC without a battery before preparing the Tablet-PC, you will lose data and the Tablet-PC may not recover normal operation for undocking. CAUTION: If the Tablet-PC does not have a charged battery in "Before Docking or Undocking Your Tablet-PC to release the Tablet-PC from the media base. 1 2 3 1 Tablet-PC 3 media base 2 release lever 5 Lift the back of the Tablet-PC up...

Media Base Setup Guide
Page 11
Removing and Installing the Optical Drive From the Media Base 1 Undock the media base (see "Undocking Your Tablet-PC From the Media Base" on page 8). 2 Save and close any open files or programs, and turn off the Tablet-PC. 3 To remove the optical drive: a Remove the screw that holds the optical drive in place. 5 Turn... the media bay. 1 2 4 3 1 screw 3 optical drive 2 media base 4 screw hole 4 To install the optical drive: a Insert the optical drive into the media bay on the Tablet-PC. Media Base 9 b Use your screwdriver to the media base.
Removing and Installing the Optical Drive From the Media Base 1 Undock the media base (see "Undocking Your Tablet-PC From the Media Base" on page 8). 2 Save and close any open files or programs, and turn off the Tablet-PC. 3 To remove the optical drive: a Remove the screw that holds the optical drive in place. 5 Turn... the media bay. 1 2 4 3 1 screw 3 optical drive 2 media base 4 screw hole 4 To install the optical drive: a Insert the optical drive into the media bay on the Tablet-PC. Media Base 9 b Use your screwdriver to the media base.


