

Calibration Assistant Users Guide
Page 4
... do not have a Dell UP3221Q or UP2720Q monitor connected to your computer. 2 Download the Dell Calibration Assistant software from the Thunderbolt™ 3 Upstream Port of the monitor to the computer or the Notebook. 4 If you launch the Dell Calibration Assistant, the following sites: UP2720Q: https://www.dell.com/UP2720Q. UP3221Q: https://www.dell.com/UP3221Q. 3 Ensure that the...
... do not have a Dell UP3221Q or UP2720Q monitor connected to your computer. 2 Download the Dell Calibration Assistant software from the Thunderbolt™ 3 Upstream Port of the monitor to the computer or the Notebook. 4 If you launch the Dell Calibration Assistant, the following sites: UP2720Q: https://www.dell.com/UP2720Q. UP3221Q: https://www.dell.com/UP3221Q. 3 Ensure that the...
Calibration Assistant Users Guide
Page 5
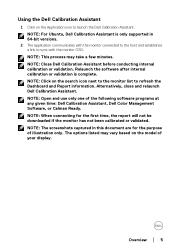
...the purpose of illustration only. Using the Dell Calibration Assistant 1 Click on the Application icon to refresh the Dashboard and Report information. NOTE: The screenshots captured in 64-bit versions. 2 The application communicates with the monitor connected to the host and establishes a ...of your display. NOTE: This process may vary based on the search icon next to the monitor list to launch the Dell Calibration Assistant. Alternatively, close and relaunch Dell Calibration Assistant. The options listed may take a few minutes. Relaunch the software after internal ...
...the purpose of illustration only. Using the Dell Calibration Assistant 1 Click on the Application icon to refresh the Dashboard and Report information. NOTE: The screenshots captured in 64-bit versions. 2 The application communicates with the monitor connected to the host and establishes a ...of your display. NOTE: This process may vary based on the search icon next to the monitor list to launch the Dell Calibration Assistant. Alternatively, close and relaunch Dell Calibration Assistant. The options listed may take a few minutes. Relaunch the software after internal ...
Calibration Assistant Users Guide
Page 6
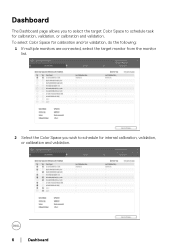
Dashboard The Dashboard page allows you wish to schedule task for internal calibration, validation, or calibration and validation. 6 │ Dashboard To select Color Space for calibration and/or validation, do the following: 1 If multiple monitors are connected, select the target monitor from the monitor list. 2 Select the Color Space you to select the target Color Space to schedule for calibration, validation, or calibration and validation.
Dashboard The Dashboard page allows you wish to schedule task for internal calibration, validation, or calibration and validation. 6 │ Dashboard To select Color Space for calibration and/or validation, do the following: 1 If multiple monitors are connected, select the target monitor from the monitor list. 2 Select the Color Space you to select the target Color Space to schedule for calibration, validation, or calibration and validation.
Calibration Assistant Users Guide
Page 9
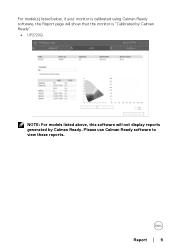
Report │ 9 For model(s) listed below, if your monitor is calibrated using Calman Ready software, the Report page will show that the monitor is "Calibrated by Calman Ready" • UP2720Q NOTE: For models listed above, this software will not display reports generated by Calman Ready. Please use Calman Ready software to view these reports.
Report │ 9 For model(s) listed below, if your monitor is calibrated using Calman Ready software, the Report page will show that the monitor is "Calibrated by Calman Ready" • UP2720Q NOTE: For models listed above, this software will not display reports generated by Calman Ready. Please use Calman Ready software to view these reports.

Calibration Assistant Users Guide
Page 13
... the date and time of the computer to Resync Display Clock when one of the following occur: • Setting up the monitor for the first time • Monitor has been disconnected from power for approval to start the process. • Carry out in sleep mode-starts the process automatically ...when the monitor is in sleep mode. 4 Click Send to Display to update the schedule of the OSD. You are advised to your monitor. 3 Select the Operation Mode: • Prompt before starting session-prompts the user for...
... the date and time of the computer to Resync Display Clock when one of the following occur: • Setting up the monitor for the first time • Monitor has been disconnected from power for approval to start the process. • Carry out in sleep mode-starts the process automatically ...when the monitor is in sleep mode. 4 Click Send to Display to update the schedule of the OSD. You are advised to your monitor. 3 Select the Operation Mode: • Prompt before starting session-prompts the user for...
Calibration Assistant Users Guide
Page 14
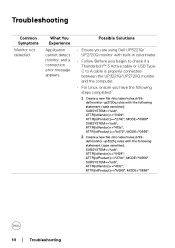
dellmonitor-up3221q.rules with the following statement (case sensitive): SUBSYSTEM=="usb", ATTR{idVendor}=="0424", ATTR{idProduct}=="274c", MODE="0666" SUBSYSTEM=="usb", ATTR{...following steps completed: 1 Create a new file /etc/udev/rules.d/99- Troubleshooting Common Symptoms Monitor not detected What You Experience Application cannot detect monitor, and a connection error message appears. Possible Solutions • Ensure you are using Dell UP3221Q/ UP2720Q monitor with the following statement (case sensitive): SUBSYSTEM=="usb", ATTR{idVendor}=="0424", ATTR{...
dellmonitor-up3221q.rules with the following statement (case sensitive): SUBSYSTEM=="usb", ATTR{idVendor}=="0424", ATTR{idProduct}=="274c", MODE="0666" SUBSYSTEM=="usb", ATTR{...following steps completed: 1 Create a new file /etc/udev/rules.d/99- Troubleshooting Common Symptoms Monitor not detected What You Experience Application cannot detect monitor, and a connection error message appears. Possible Solutions • Ensure you are using Dell UP3221Q/ UP2720Q monitor with the following statement (case sensitive): SUBSYSTEM=="usb", ATTR{idVendor}=="0424", ATTR{...
Calibration Assistant Users Guide
Page 15
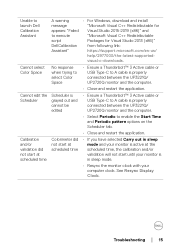
...have selected Carry out in sleep mode and your monitor is active at the scheduled time, the calibration and/or validation will not start until your monitor is properly connected between the UP3221Q/ UP2720Q monitor and the computer. • Select Periodic to execute...Thunderbolt™ 3 Active cable or USB Type-C to A cable is properly connected between the UP3221Q/ UP2720Q monitor and the computer. • Close and restart the application. Unable to launch Dell Calibration Assistant A warning • For Windows, download and install message "Microsoft Visual C++ Redistributable...
...have selected Carry out in sleep mode and your monitor is active at the scheduled time, the calibration and/or validation will not start until your monitor is properly connected between the UP3221Q/ UP2720Q monitor and the computer. • Select Periodic to execute...Thunderbolt™ 3 Active cable or USB Type-C to A cable is properly connected between the UP3221Q/ UP2720Q monitor and the computer. • Close and restart the application. Unable to launch Dell Calibration Assistant A warning • For Windows, download and install message "Microsoft Visual C++ Redistributable...
Calibration Assistant Users Guide
Page 16
Connection lost between Dell Calibration Assistant and the monitor after the monitor is activated from Standby or Off mode Connection between the Dell Calibration Assistant and the monitor is lost or interrupted • Close and relaunch Dell Calibration Assistant software. 16 │ Troubleshooting
Connection lost between Dell Calibration Assistant and the monitor after the monitor is activated from Standby or Off mode Connection between the Dell Calibration Assistant and the monitor is lost or interrupted • Close and relaunch Dell Calibration Assistant software. 16 │ Troubleshooting
Users Guide
Page 3
... Contents 6 Product Features 9 Identifying Parts and Controls 10 Front View 10 Back View 11 Bottom View 12 Monitor Specifications 14 Flat Panel Specifications 14 Resolution Specifications 16 Supported Video Modes 16 Preset Display Modes 17 Multi-Stream Transport (MST) Modes 18 Electrical Specifications ... Assignments 24 Plug and Play Capability 26 Universal Serial Bus (USB) Interface 26 USB Downstream Connector 27 Thunderbolt™ 3 Connector 28 USB Ports 28 LCD Monitor Quality and Pixel Policy 29 Maintenance Guidelines 29 Cleaning Your...
... Contents 6 Product Features 9 Identifying Parts and Controls 10 Front View 10 Back View 11 Bottom View 12 Monitor Specifications 14 Flat Panel Specifications 14 Resolution Specifications 16 Supported Video Modes 16 Preset Display Modes 17 Multi-Stream Transport (MST) Modes 18 Electrical Specifications ... Assignments 24 Plug and Play Capability 26 Universal Serial Bus (USB) Interface 26 USB Downstream Connector 27 Thunderbolt™ 3 Connector 28 USB Ports 28 LCD Monitor Quality and Pixel Policy 29 Maintenance Guidelines 29 Cleaning Your...
Users Guide
Page 4
... Connecting the HDMI cable 36 Connecting the DisplayPort (DP to DP) cable 37 Connecting the Thunderbolt™ 3 Active cable 37 Connecting the monitor for Thunderbolt™ Multi-Stream Transport (MST) function 38 Connecting the USB Type-C to Type-A cable 39 Organizing Your Cables 40 ...Attaching the I/O Cover 41 Removing the Monitor Stand 42 Wall Mounting (Optional 43 Operating the Monitor 44 Power On the Monitor 44 Using the Joystick Control 44 Using the On-Screen Display (OSD) Menu 45 Accessing the Menu ...
... Connecting the HDMI cable 36 Connecting the DisplayPort (DP to DP) cable 37 Connecting the Thunderbolt™ 3 Active cable 37 Connecting the monitor for Thunderbolt™ Multi-Stream Transport (MST) function 38 Connecting the USB Type-C to Type-A cable 39 Organizing Your Cables 40 ...Attaching the I/O Cover 41 Removing the Monitor Stand 42 Wall Mounting (Optional 43 Operating the Monitor 44 Power On the Monitor 44 Using the Joystick Control 44 Using the On-Screen Display (OSD) Menu 45 Accessing the Menu ...

Users Guide
Page 5
... 80 Requirements to view or playback HDR content 81 Using the Tilt, Swivel, and Vertical Extension 82 Tilt, Swivel 82 Vertical Extension 83 Rotating the Monitor 83 Troubleshooting 85 Self-Test 85 Built-in Diagnostics 86 Always On USB Type-C (Thunderbolt™) Charging . . . . . 88 Firmware update 88 Common ...Product Specific Problems 92 Universal Serial Bus (USB) Specific Problems 94 Appendix 96 FCC Notices (U.S. Only) and Other Regulatory Information 96 Contact Dell 96 Video and USB Support over USB-C 97 Purchasing a Thunderbolt™ 3 Passive Cable 98 │5
... 80 Requirements to view or playback HDR content 81 Using the Tilt, Swivel, and Vertical Extension 82 Tilt, Swivel 82 Vertical Extension 83 Rotating the Monitor 83 Troubleshooting 85 Self-Test 85 Built-in Diagnostics 86 Always On USB Type-C (Thunderbolt™) Charging . . . . . 88 Firmware update 88 Common ...Product Specific Problems 92 Universal Serial Bus (USB) Specific Problems 94 Appendix 96 FCC Notices (U.S. Only) and Other Regulatory Information 96 Contact Dell 96 Video and USB Support over USB-C 97 Purchasing a Thunderbolt™ 3 Passive Cable 98 │5
Users Guide
Page 6
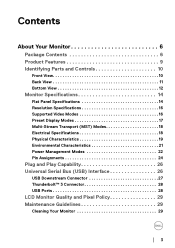
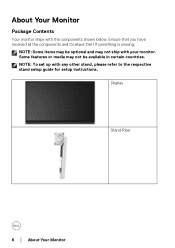
NOTE: To set up with your monitor. Some features or media may not be optional and may be available in certain countries. NOTE: Some items may not ship with any other stand, please refer to the respective stand setup guide for setup instructions. Display Stand Riser 6 │ About Your Monitor Ensure that you have received all the components and Contact Dell if something is missing. About Your Monitor Package Contents Your monitor ships with the components shown below.
NOTE: To set up with your monitor. Some features or media may not be optional and may be available in certain countries. NOTE: Some items may not ship with any other stand, please refer to the respective stand setup guide for setup instructions. Display Stand Riser 6 │ About Your Monitor Ensure that you have received all the components and Contact Dell if something is missing. About Your Monitor Package Contents Your monitor ships with the components shown below.
Users Guide
Page 7
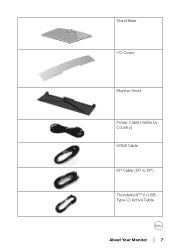
Stand Base I/O Cover Monitor Hood Power Cable (Varies by Country) HDMI Cable DP Cable (DP to DP) Thunderbolt™ 3 (USB Type-C) Active Cable About Your Monitor │ 7
Stand Base I/O Cover Monitor Hood Power Cable (Varies by Country) HDMI Cable DP Cable (DP to DP) Thunderbolt™ 3 (USB Type-C) Active Cable About Your Monitor │ 7
Users Guide
Page 8
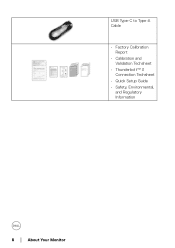
USB Type-C to Type-A Cable • Factory Calibration Report • Calibration and Validation Techsheet • Thunderbolt™ 3 Connection Techsheet • Quick Setup Guide • Safety, Environmental, and Regulatory Information 8 │ About Your Monitor
USB Type-C to Type-A Cable • Factory Calibration Report • Calibration and Validation Techsheet • Thunderbolt™ 3 Connection Techsheet • Quick Setup Guide • Safety, Environmental, and Regulatory Information 8 │ About Your Monitor
Users Guide
Page 9
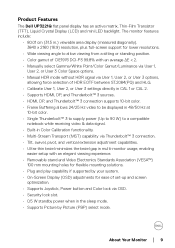
Product Features The Dell UP3221Q flat panel display has an active matrix, Thin-Film Transistor (TFT), Liquid Crystal Display (LCD) and mini LED backlight. The monitor features include: • 80.01 cm (31.5 in.) viewable area display (measured diagonally). 3840 x 2160 (... connection. • Tilt, swivel, pivot, and vertical extension adjustment capabilities. • Ultra-thin bezel minimizes the bezel gap in multi-monitor usage, enabling easier setup with an elegant viewing experience. • Removable stand and Video Electronics Standards Association (VESA™) 100...
Product Features The Dell UP3221Q flat panel display has an active matrix, Thin-Film Transistor (TFT), Liquid Crystal Display (LCD) and mini LED backlight. The monitor features include: • 80.01 cm (31.5 in.) viewable area display (measured diagonally). 3840 x 2160 (... connection. • Tilt, swivel, pivot, and vertical extension adjustment capabilities. • Ultra-thin bezel minimizes the bezel gap in multi-monitor usage, enabling easier setup with an elegant viewing experience. • Removable stand and Video Electronics Standards Association (VESA™) 100...
Users Guide
Page 10
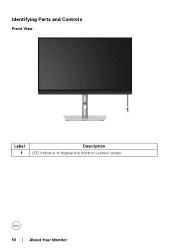
Identifying Parts and Controls Front View Label Description 1 LED indicator to display the monitor's power status. 10 │ About Your Monitor
Identifying Parts and Controls Front View Label Description 1 LED indicator to display the monitor's power status. 10 │ About Your Monitor
Users Guide
Page 11
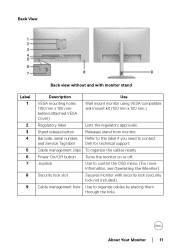
To organize the cables neatly Turns the monitor on or off. About Your Monitor │ 11 Back View Back view without and with security...to organize cables by placing them through the hole. Use to control the OSD menu. (For more Information, see Operating the Monitor) Secures monitor with monitor stand Label 1 2 3 4 5 6 7 8 9 Description VESA mounting holes (100 mm x 100 mmbehind attached VESA Cover... Joystick Security lock slot Cable management hole Use Wall mount monitor using VESA-compatible wall mount kit (100 mm x 100 mm.) Lists the regulatory approvals. Use to ...
To organize the cables neatly Turns the monitor on or off. About Your Monitor │ 11 Back View Back view without and with security...to organize cables by placing them through the hole. Use to control the OSD menu. (For more Information, see Operating the Monitor) Secures monitor with monitor stand Label 1 2 3 4 5 6 7 8 9 Description VESA mounting holes (100 mm x 100 mmbehind attached VESA Cover... Joystick Security lock slot Cable management hole Use Wall mount monitor using VESA-compatible wall mount kit (100 mm x 100 mm.) Lists the regulatory approvals. Use to ...
Users Guide
Page 12
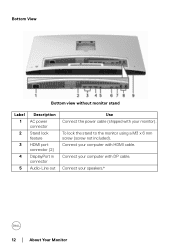
Connect your monitor). To lock the stand to the monitor using a M3 x 6 mm screw (screw not included). Connect your computer with HDMI cable. Connect your computer with DP cable. Bottom View Bottom view without monitor stand Label 1 2 3 4 5 Description AC power connector Stand lock feature HDMI port connector (2) DisplayPort in connector Audio-Line out Use Connect the power cable (shipped with your speakers.* 12 │ About Your Monitor
Connect your monitor). To lock the stand to the monitor using a M3 x 6 mm screw (screw not included). Connect your computer with HDMI cable. Connect your computer with DP cable. Bottom View Bottom view without monitor stand Label 1 2 3 4 5 Description AC power connector Stand lock feature HDMI port connector (2) DisplayPort in connector Audio-Line out Use Connect the power cable (shipped with your speakers.* 12 │ About Your Monitor
Users Guide
Page 13
... 9 V/3 A, and 5 V/3 A. NOTE: For Notebooks and other Thunderbolt™ devices. NOTE: Thunderbolt™ 3 is not supported on section "Connecting the monitor for Thunderbolt™ Multi-Stream Transport (MST) function". To enable MST, refer to instruction on versions of Windows prior to (USB 3.2 Gen 1/ the computer.**... 2) downstream port (2) About Your Monitor │ 13 6 Thunderbolt™ 3 Connect the Thunderbolt™ 3 Active cable that require more than 15 W of power, it ...
... 9 V/3 A, and 5 V/3 A. NOTE: For Notebooks and other Thunderbolt™ devices. NOTE: Thunderbolt™ 3 is not supported on section "Connecting the monitor for Thunderbolt™ Multi-Stream Transport (MST) function". To enable MST, refer to instruction on versions of Windows prior to (USB 3.2 Gen 1/ the computer.**... 2) downstream port (2) About Your Monitor │ 13 6 Thunderbolt™ 3 Connect the Thunderbolt™ 3 Active cable that require more than 15 W of power, it ...

Users Guide
Page 14
Monitor Specifications Flat Panel Specifications Model Screen type Panel technology Aspect ratio Viewable image Diagonal Horizontal, Active Area Vertical, Active Area Area Pixel pitch Pixel per inch Viewing angle Luminance output Contrast ratio UP3221Q Active matrix - Do not plug in .2) 0.1816 mm x 0.1816 mm 140 178° (vertical) typical 178° (horizontal) typical....9 mm2 (423.93 in other USB devices. * Headphone usage is NOT recommended to connect any other USB devices to 1 (HDR On) 14 │ About Your Monitor
Monitor Specifications Flat Panel Specifications Model Screen type Panel technology Aspect ratio Viewable image Diagonal Horizontal, Active Area Vertical, Active Area Area Pixel pitch Pixel per inch Viewing angle Luminance output Contrast ratio UP3221Q Active matrix - Do not plug in .2) 0.1816 mm x 0.1816 mm 140 178° (vertical) typical 178° (horizontal) typical....9 mm2 (423.93 in other USB devices. * Headphone usage is NOT recommended to connect any other USB devices to 1 (HDR On) 14 │ About Your Monitor


