Vostro 14-5468 Owners Manual
Page 4
... panel hinges...39 Installing the display panel hinges...40 Removing the camera...40 Installing the camera...41 Removing the display...41 Installing the display ...43 Keyboard...43 Removing the palmrest...43 Installing the palmrest...44 4 Technology and components...45 Power adapter...45 Processors...45 Identifying the processor in Windows 10 and...
... panel hinges...39 Installing the display panel hinges...40 Removing the camera...40 Installing the camera...41 Removing the display...41 Installing the display ...43 Keyboard...43 Removing the palmrest...43 Installing the palmrest...44 4 Technology and components...45 Power adapter...45 Processors...45 Identifying the processor in Windows 10 and...

Vostro 14-5468 Owners Manual
Page 5
... specifications...61 Audio specifications...62 Video specifications...62 Communication specifications...62 Battery specifications...62 Ports and connector specifications...63 Display specifications...63 Touchpad specifications...64 Keyboard specifications...64 Adapter specifications...64 Environmental specifications...64 7 System setup options...66 General screen options...66 System Configuration screen options...67 Video screen options...68...
... specifications...61 Audio specifications...62 Video specifications...62 Communication specifications...62 Battery specifications...62 Ports and connector specifications...63 Display specifications...63 Touchpad specifications...64 Keyboard specifications...64 Adapter specifications...64 Environmental specifications...64 7 System setup options...66 General screen options...66 System Configuration screen options...67 Video screen options...68...
Vostro 14-5468 Owners Manual
Page 11
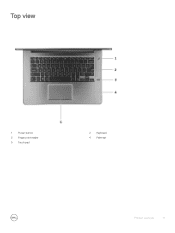
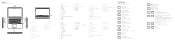
Top view 1 Power button 3 Finger print reader 5 Touch pad 2 Keyboard 4 Palmrest Product overview 11
Top view 1 Power button 3 Finger print reader 5 Touch pad 2 Keyboard 4 Palmrest Product overview 11
Vostro 14-5468 Owners Manual
Page 43
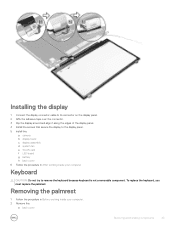
... along the edges of the display panel. 4 Install the screws that secure the display to remove the keyboard because keyboard is not a removable component. Removing the palmrest 1 Follow the procedure in After working inside your computer Keyboard CAUTION: Do not try to the display panel. 5 Install the: a camera b display bezel c display assembly d system...
... along the edges of the display panel. 4 Install the screws that secure the display to remove the keyboard because keyboard is not a removable component. Removing the palmrest 1 Follow the procedure in After working inside your computer Keyboard CAUTION: Do not try to the display panel. 5 Install the: a camera b display bezel c display assembly d system...
Vostro 14-5468 Owners Manual
Page 52
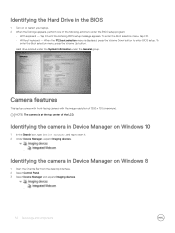
Identifying the Hard Drive in the BIOS 1 Turn on or restart your laptop. 2 When the Dell logo appears, perform one of the LCD. Tap F2 until the Entering BIOS setup message appears. Hard drive is displayed, press the Volume Down button ... This laptop comes with front-facing camera with the image resolution of 1280 x 720 (maximum). To enter the Boot selection menu, tap F12. • Without keyboard - Identifying the camera in Device Manager on Windows 10 1 In the Search box, type device manager, and tap to enter the BIOS setup program: •...
Identifying the Hard Drive in the BIOS 1 Turn on or restart your laptop. 2 When the Dell logo appears, perform one of the LCD. Tap F2 until the Entering BIOS setup message appears. Hard drive is displayed, press the Volume Down button ... This laptop comes with front-facing camera with the image resolution of 1280 x 720 (maximum). To enter the Boot selection menu, tap F12. • Without keyboard - Identifying the camera in Device Manager on Windows 10 1 In the Search box, type device manager, and tap to enter the BIOS setup program: •...

Vostro 14-5468 Owners Manual
Page 54
...menu, and press Enter. Tap F2 until the Entering BIOS setup message appears. Press and hold the Volume Up button when the Dell logo is displayed • With keyboard - NOTE: Since memory is a part of the system board. Testing memory using ePSA 1 Turn on your laptop. 2 Perform... one of the following actions after the Dell logo is displayed on the screen. To enter the Boot selection menu, tap F12. 3 On the left pane, select Settings > General > System Information, The memory information is displayed: • With keyboard - Memory features In this laptop, the memory ...
...menu, and press Enter. Tap F2 until the Entering BIOS setup message appears. Press and hold the Volume Up button when the Dell logo is displayed • With keyboard - NOTE: Since memory is a part of the system board. Testing memory using ePSA 1 Turn on your laptop. 2 Perform... one of the following actions after the Dell logo is displayed on the screen. To enter the Boot selection menu, tap F12. 3 On the left pane, select Settings > General > System Information, The memory information is displayed: • With keyboard - Memory features In this laptop, the memory ...
Vostro 14-5468 Owners Manual
Page 64
... 149°F) 10% to 158°F) (nonoperating) Environmental specifications Feature Temperature - Touchpad specifications Feature Specification Active Area: X-axis 99.50 mm Y-axis 53.00 mm Keyboard specifications Feature Number of keys Specification • 83 keys: US English, Thai, French-Canadian, Korean, Russian, Hebrew, English-International • 84 keys: UK English, French...
... 149°F) 10% to 158°F) (nonoperating) Environmental specifications Feature Temperature - Touchpad specifications Feature Specification Active Area: X-axis 99.50 mm Y-axis 53.00 mm Keyboard specifications Feature Number of keys Specification • 83 keys: US English, Thai, French-Canadian, Korean, Russian, Hebrew, English-International • 84 keys: UK English, French...
Vostro 14-5468 Owners Manual
Page 67
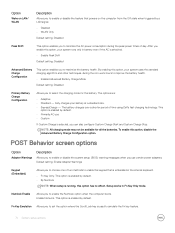
... (by default. This technology is an optional feature. • Always Allows Dell Docks. The options are : • SATA-1 • M.2 PCI-e SSD-0 SMART Reporting This field controls whether hard drive errors for OS. The keyboard brightness level can be set from 0% to configure the SATA drives on board... is selected. Drives Allows you to 100%. If USB port is enabled and available for integrated drives are enabled by default enabled) Keyboard Illumination This field lets you to this port. This is part of USB Mass Storage Devices (HDD, memory key, floppy). This ...
... (by default. This technology is an optional feature. • Always Allows Dell Docks. The options are : • SATA-1 • M.2 PCI-e SSD-0 SMART Reporting This field controls whether hard drive errors for OS. The keyboard brightness level can be set from 0% to configure the SATA drives on board... is selected. Drives Allows you to 100%. If USB port is enabled and available for integrated drives are enabled by default enabled) Keyboard Illumination This field lets you to this port. This is part of USB Mass Storage Devices (HDD, memory key, floppy). This ...
Vostro 14-5468 Owners Manual
Page 68
...enabled by default • 15 seconds • 30 seconds • 1 minute • 5 minute • 15 minute • never Keyboard Backlight The Keyboard Backlight Time-out dims out with Battery option. Security screen options Option Admin Password Description Allows you set , change, or delete the administrator (... System setup options Options are : • 5 seconds • 10 seconds - Options are : • 5 seconds • 10 seconds - Keyboard Illumination will be visible only when a video card is installed into the system. This field has an effect when the backlight is enabled...
...enabled by default • 15 seconds • 30 seconds • 1 minute • 5 minute • 15 minute • never Keyboard Backlight The Keyboard Backlight Time-out dims out with Battery option. Security screen options Option Admin Password Description Allows you set , change, or delete the administrator (... System setup options Options are : • 5 seconds • 10 seconds - Options are : • 5 seconds • 10 seconds - Keyboard Illumination will be visible only when a video card is installed into the system. This field has an effect when the backlight is enabled...
Vostro 14-5468 Owners Manual
Page 72
...the batteries. Fully charges your system uses the standard charging algorithm and other techniques, during the peak power times of time using Dell's fast charging technology. Default setting: Enable Adapter Warnings Keypad (Embedded) Allows you to choose one of two methods to enable ...this option, your battery at a standard rate. • ExpressCharge - The options are: • Adaptive • Standard - Setup works in the internal keyboard. • Fn Key Only: This option is enabled by a LAN signal. • Disabled • WLAN Only Default setting: Disabled Peak Shift This ...
...the batteries. Fully charges your system uses the standard charging algorithm and other techniques, during the peak power times of time using Dell's fast charging technology. Default setting: Enable Adapter Warnings Keypad (Embedded) Allows you to choose one of two methods to enable ...this option, your battery at a standard rate. • ExpressCharge - The options are: • Adaptive • Standard - Setup works in the internal keyboard. • Fn Key Only: This option is enabled by a LAN signal. • Disabled • WLAN Only Default setting: Disabled Peak Shift This ...
Vostro 5468 Quick Start Guide - Windows 10
Page 2
...4. 麥克風 5 6 7. USB 3.0 ポート 17. USB 3.0 포트 9 10 11. 스피커 12 13 14. 스피커 15 16. USB 3.0 포트 17. Features 1. Network port 20. USB 3.0 端口 9 10 11. 扬声...21 Shortcut keys Mute audio Decrease volume Increase volume Previous track Play/Pause Next track Extend display Search Backlit keyboard Decrease brightness Increase brightness Turn off/on wireless Toggle between power and battery-status light/ hard-drive activity...
...4. 麥克風 5 6 7. USB 3.0 ポート 17. USB 3.0 포트 9 10 11. 스피커 12 13 14. 스피커 15 16. USB 3.0 포트 17. Features 1. Network port 20. USB 3.0 端口 9 10 11. 扬声...21 Shortcut keys Mute audio Decrease volume Increase volume Previous track Play/Pause Next track Extend display Search Backlit keyboard Decrease brightness Increase brightness Turn off/on wireless Toggle between power and battery-status light/ hard-drive activity...


