

Owners Manual
Page 4
...power operation switch on Handling 5 v Features...5 b Part Names and Functions 6, 7 n Read this manual before using this instructions in a safe place. Using the Remote Control Unit 15 ⁄0 Setting up the ...Speaker Systems 8 , Connections 9~14 . AUX terminal The AVR-1404/484's front panel is provided with the warranty in a safe place. • Note that there...connection cords between all other audio components when moving the set for choosing the DENON A/V Surround receiver. After reading, store this instructions along with an immense array...
...power operation switch on Handling 5 v Features...5 b Part Names and Functions 6, 7 n Read this manual before using this instructions in a safe place. Using the Remote Control Unit 15 ⁄0 Setting up the ...Speaker Systems 8 , Connections 9~14 . AUX terminal The AVR-1404/484's front panel is provided with the warranty in a safe place. • Note that there...connection cords between all other audio components when moving the set for choosing the DENON A/V Surround receiver. After reading, store this instructions along with an immense array...
Owners Manual
Page 10
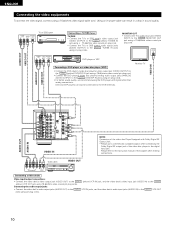
..., and the video deck's audio input jacks (AUDIO IN) to the VIDEO (yellow) VCR OUT jack using pin plug cords. Please refer to the instruction manual of the video disc player to the digital input jack. MONITOR OUT • Connect the TV's video input jack (VIDEO INPUT) to the AUDIO TV...
..., and the video deck's audio input jacks (AUDIO IN) to the VIDEO (yellow) VCR OUT jack using pin plug cords. Please refer to the instruction manual of the video disc player to the digital input jack. MONITOR OUT • Connect the TV's video input jack (VIDEO INPUT) to the AUDIO TV...

Owners Manual
Page 11
.... (See page 4 for instructions on removing the cap.) Connecting a video component equipped with S-video jacks • When marking connections, also refer to the equipment's instruction manuals. AUX terminal is equipped with a cap. VIDEO OUT VIDEO IN Connecting the video decks • Connect the video deck's S output jack (S-OUT) to the S-VIDEO...
.... (See page 4 for instructions on removing the cap.) Connecting a video component equipped with S-video jacks • When marking connections, also refer to the equipment's instruction manuals. AUX terminal is equipped with a cap. VIDEO OUT VIDEO IN Connecting the video decks • Connect the video deck's S output jack (S-OUT) to the S-VIDEO...

Owners Manual
Page 21
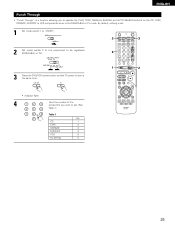
Tape deck (TAPE) system buttons 6, 7 2 1 8, 9 3 DISC SKIP+ : Manual search (forward and reverse) : Stop : Play : Auto search (cue) : Pause : Switch discs (for the component to the component's operating instructions. Tuner system buttons 6 : Rewind 7... Switch between the AM and FM bands MODE : Switch between decks A and B SHIFT : Switch preset channel range CHANNEL : Preset channel +, - 11 REMOTE CONTROL UNIT Operating DENON audio components • Turn on the power of components may not be operated. (CD, CDR/MD or Tape deck) 1 3 ENGLISH 3 2 3 Operate the audio component....
Tape deck (TAPE) system buttons 6, 7 2 1 8, 9 3 DISC SKIP+ : Manual search (forward and reverse) : Stop : Play : Auto search (cue) : Pause : Switch discs (for the component to the component's operating instructions. Tuner system buttons 6 : Rewind 7... Switch between the AM and FM bands MODE : Switch between decks A and B SHIFT : Switch preset channel range CHANNEL : Preset channel +, - 11 REMOTE CONTROL UNIT Operating DENON audio components • Turn on the power of components may not be operated. (CD, CDR/MD or Tape deck) 1 3 ENGLISH 3 2 3 Operate the audio component....

Owners Manual
Page 23
Video disc player (VDP) system buttons POWER : Power (on/standby) (ON/SOURCE) OFF : DENEN DVD power off 6,7 : Manual search (forward and reverse) 2 : Stop 1 : Play 8,9 : Auto search (to beginning of track) 3 : Pause 0 ~ 9, +10 : 10 key skip + : Disc skip (for... : Menu RETURN : Return SETUP : Setup •, ª, 0, 1 : Cursor up, down, left and right ENTER : Enter setting POWER : Power on/standby (ON/SOURCE) 6,7 : Manual search (forward and reverse) 2 : Stop 1 : Play 8,9 : Auto search (cue) 3 : Pause 0~9, +10 : 10 key NOTE: • Some manufacturers use different names for the...
Video disc player (VDP) system buttons POWER : Power (on/standby) (ON/SOURCE) OFF : DENEN DVD power off 6,7 : Manual search (forward and reverse) 2 : Stop 1 : Play 8,9 : Auto search (to beginning of track) 3 : Pause 0 ~ 9, +10 : 10 key skip + : Disc skip (for... : Menu RETURN : Return SETUP : Setup •, ª, 0, 1 : Cursor up, down, left and right ENTER : Enter setting POWER : Power on/standby (ON/SOURCE) 6,7 : Manual search (forward and reverse) 2 : Stop 1 : Play 8,9 : Auto search (cue) 3 : Pause 0~9, +10 : 10 key NOTE: • Some manufacturers use different names for the...

Owners Manual
Page 24
NOTES: • For this CD, CDR, MD and TAPE components, buttons can be operated in the same way as for Denon audio components (page 21). • The TV can be operated when the switch is at DVD/VDP, VCR, TV position. 24 Digital broadcast satellite (DBS) ... ENTER : Enter CHANNEL : Switch channels +, - 0~9, +10 : Channels DISPLAY : Switch display VOL +, - : Volume up /down 5. Monitor TV (TV) system buttons POWER : Power on /standby (ON/SOURCE) 6,7 : Manual search (forward and reverse) 2 : Stop 1 : Play 3 : Pause Channel +, - : Channels 4.
NOTES: • For this CD, CDR, MD and TAPE components, buttons can be operated in the same way as for Denon audio components (page 21). • The TV can be operated when the switch is at DVD/VDP, VCR, TV position. 24 Digital broadcast satellite (DBS) ... ENTER : Enter CHANNEL : Switch channels +, - 0~9, +10 : Channels DISPLAY : Switch display VOL +, - : Volume up /down 5. Monitor TV (TV) system buttons POWER : Power on /standby (ON/SOURCE) 6,7 : Manual search (forward and reverse) 2 : Stop 1 : Play 3 : Pause Channel +, - : Channels 4.
Owners Manual
Page 25
... and the TV power button at the same time. 1 2 • Indicator flash. 4 1 2 3 4 5 6 7 8 9 0 Input the number of the component you want to operate the PLAY, STOP, MANUAL SEARCH and AUTO SEARCH buttons on the CD, TAPE, CDR/MD, DVD/VDP or VCR components when in the DBS/CABLE or TV mode. CD...
... and the TV power button at the same time. 1 2 • Indicator flash. 4 1 2 3 4 5 6 7 8 9 0 Input the number of the component you want to operate the PLAY, STOP, MANUAL SEARCH and AUTO SEARCH buttons on the CD, TAPE, CDR/MD, DVD/VDP or VCR components when in the DBS/CABLE or TV mode. CD...

Owners Manual
Page 28
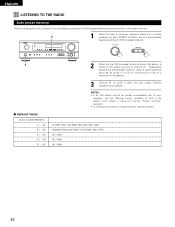
... source component to the digital input jacks (OPTICAL/COAXIAL) and set at +1 dB or greater, the volume cannot be decreased to up to the component's manual. 5 Adjust the volume.
... source component to the digital input jacks (OPTICAL/COAXIAL) and set at +1 dB or greater, the volume cannot be decreased to up to the component's manual. 5 Adjust the volume.

Owners Manual
Page 33
... control unit during playback in the Dolby Surround Pro Logic II mode. 3 Play a program source with the mark. • For operating instructions, refer to the manuals of the respective components. 4 Select the surround parameter mode. Example: DVD (Main unit) (Remote control unit) 2 Select the Dolby Surround Pro Logic II mode. (Main...
... control unit during playback in the Dolby Surround Pro Logic II mode. 3 Play a program source with the mark. • For operating instructions, refer to the manuals of the respective components. 4 Select the surround parameter mode. Example: DVD (Main unit) (Remote control unit) 2 Select the Dolby Surround Pro Logic II mode. (Main...
Owners Manual
Page 42
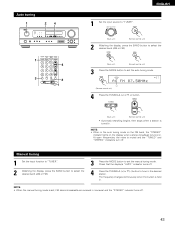
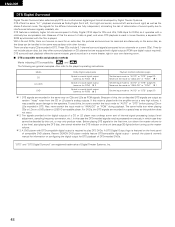
NOTES: • If an FM station cannot be preset automatically due to poor reception, use the "Manual tuning" operation to E8, for FM broadcast stations. 1 2 DEFAULT VALUE AUTO TUNER PRESETS A1 ~ A8 B1 ~ B8 C1 ~ C8 D1 ~ D8 E1 ~ E8 2 When the ... C8, D1 to D8 and E1 to tune in after the auto preset memory operation is tuned in the station, then preset it using the manual "Preset memory" operation. • To interrupt this function, press the power operation button. 87.5/89.1/98.1/107.9/90.1/90.1/90.1/90.1 MHz 520/600/1000...
NOTES: • If an FM station cannot be preset automatically due to poor reception, use the "Manual tuning" operation to E8, for FM broadcast stations. 1 2 DEFAULT VALUE AUTO TUNER PRESETS A1 ~ A8 B1 ~ B8 C1 ~ C8 D1 ~ D8 E1 ~ E8 2 When the ... C8, D1 to D8 and E1 to tune in after the auto preset memory operation is tuned in the station, then preset it using the manual "Preset memory" operation. • To interrupt this function, press the power operation button. 87.5/89.1/98.1/107.9/90.1/90.1/90.1/90.1 MHz 520/600/1000...
Owners Manual
Page 43
...muted and the "TUNED" and "STEREO" indicators turn off . 4 Press the TUNING D (+) or H (-) button to set the manual tuning mode. NOTE: • When the manual tuning mode is tuned in . NOTE: • When in the auto tuning mode on the FM band, the "STEREO" indicator lights... (+) or H (-) button. (Main unit) (Remote control unit) • Automatic searching begins, then stops when a station is set the auto tuning mode. Manual tuning 1 Set the input function to "TUNER". 2 Watching the display, press the BAND button to select the desired band (AM or FM). 3 Press the ...
...muted and the "TUNED" and "STEREO" indicators turn off . 4 Press the TUNING D (+) or H (-) button to set the manual tuning mode. NOTE: • When the manual tuning mode is tuned in . NOTE: • When in the auto tuning mode on the FM band, the "STEREO" indicator lights... (+) or H (-) button. (Main unit) (Remote control unit) • Automatic searching begins, then stops when a station is set the auto tuning mode. Manual tuning 1 Set the input function to "TUNER". 2 Watching the display, press the BAND button to select the desired band (AM or FM). 3 Press the ...
Owners Manual
Page 44
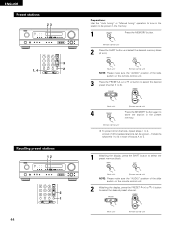
... select the desired preset channel. (Main unit) (Remote control unit) ENGLISH Preset stations 23 3 1, 4 2 Recalling preset stations 12 2 1 44 Preparations: Use the "Auto tuning" or "Manual tuning" operation to tune in the station to be preset - 8 stations (channels 1 to 8) in each of blocks A to E. 1 Watching the display, press the SHIFT button...
... select the desired preset channel. (Main unit) (Remote control unit) ENGLISH Preset stations 23 3 1, 4 2 Recalling preset stations 12 2 1 44 Preparations: Use the "Auto tuning" or "Manual tuning" operation to tune in the station to be preset - 8 stations (channels 1 to 8) in each of blocks A to E. 1 Watching the display, press the SHIFT button...

Owners Manual
Page 46
... mode to achieve the same sense of presence as bipolar types, or dipolar types, provide a wider dispersion than the front speakers. • Consult the owner's manual for different purposes. Use these speakers at the left, creating an enveloping and realistic surround sound presentation. Front speakers Monitor Center speaker Subwoofer 45°...
... mode to achieve the same sense of presence as bipolar types, or dipolar types, provide a wider dispersion than the front speakers. • Consult the owner's manual for different purposes. Use these speakers at the left, creating an enveloping and realistic surround sound presentation. Front speakers Monitor Center speaker Subwoofer 45°...

Owners Manual
Page 47
recorded channels (elements) No. Please refer to the instruction manual of the adapter when making connection. 2 Some DVD digital outputs have been recorded as for PCM) 2 Others (satellite broadcasts, CATV, etc.) Optical or coaxial digital ...output (same as two channels of source and the contents, so it possible to 20 kHz or greater). Decoding these signals is input to the AVR-1404/484, the surround mode is automatically set to Dolby Pro Logic II when the "DOLBY/DTS SURROUND" mode is a new multi-channel playback format developed...
recorded channels (elements) No. Please refer to the instruction manual of the adapter when making connection. 2 Some DVD digital outputs have been recorded as for PCM) 2 Others (satellite broadcasts, CATV, etc.) Optical or coaxial digital ...output (same as two channels of source and the contents, so it possible to 20 kHz or greater). Decoding these signals is input to the AVR-1404/484, the surround mode is automatically set to Dolby Pro Logic II when the "DOLBY/DTS SURROUND" mode is a new multi-channel playback format developed...
Owners Manual
Page 48
... but they cannot be sure to switch the input mode to "AUTO" or "DTS" (page 27). Also refer to "ANALOG" or "PCM" during playback. Recent DENON DVD player models feature DTS-compatible digital output - Never set the mode to "ANALOG" or "PCM". 1 Set the input mode to "AUTO" or "DTS" before... (see page 35) lights before playing CDs or LDs recorded in the same way on CDs and LDs as PCM signals. consult the player's owner's manual for information on configuring the digital output for the first time, turn down the master volume to "AUTO" or "DTS" (page 27). 1 DTS signals ...
... but they cannot be sure to switch the input mode to "AUTO" or "DTS" (page 27). Also refer to "ANALOG" or "PCM" during playback. Recent DENON DVD player models feature DTS-compatible digital output - Never set the mode to "ANALOG" or "PCM". 1 Set the input mode to "AUTO" or "DTS" before... (see page 35) lights before playing CDs or LDs recorded in the same way on CDs and LDs as PCM signals. consult the player's owner's manual for information on configuring the digital output for the first time, turn down the master volume to "AUTO" or "DTS" (page 27). 1 DTS signals ...


