

Instruction Manual
Page 3
.../or battery pack, picking up or carrying the tool. Many accidents are doing and use any adjustments, changing accessories, or storing power tools. g) Use the power tool, accessories and tool bits etc., in accordance with earthed (grounded) power tools. English Definitions: Safety Guidelines ...The definitions below may result in minor or moderate injury. IF YOU HAVE ANY QUESTIONS OR COMMENTS ABOUT THIS OR ANY DEWALT TOOL, CALL US TOLL...
.../or battery pack, picking up or carrying the tool. Many accidents are doing and use any adjustments, changing accessories, or storing power tools. g) Use the power tool, accessories and tool bits etc., in accordance with earthed (grounded) power tools. English Definitions: Safety Guidelines ...The definitions below may result in minor or moderate injury. IF YOU HAVE ANY QUESTIONS OR COMMENTS ABOUT THIS OR ANY DEWALT TOOL, CALL US TOLL...
Instruction Manual
Page 6
... or until irritation ceases. TO REDUCE THE RISK OF INJURY, RETURN CARRIAGE TO THE FULL REAR POSITION AFTER EACH CROSSCUT OPERATION. Recommended accessories for compatibility of injury, only DEWALT recommended accessories should be more appropriate. In some areas, it is severely damaged or is composed of a mixture of liquid organic carbonates and lithium...
... or until irritation ceases. TO REDUCE THE RISK OF INJURY, RETURN CARRIAGE TO THE FULL REAR POSITION AFTER EACH CROSSCUT OPERATION. Recommended accessories for compatibility of injury, only DEWALT recommended accessories should be more appropriate. In some areas, it is severely damaged or is composed of a mixture of liquid organic carbonates and lithium...
Instruction Manual
Page 10
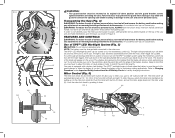
...the 1/4" hex side of rotation as possible. 3. CAUTION: • Never depress the spindle lock button (AF) while the blade is under Optional Accessories for correct saw blade (AA) by four revolutions. 4. Loosen, but do not remove the guard bracket front screw (X, Fig. 4) until the lock... cement product with wrench (V) provided (turn tool off and remove the battery pack before making any adjustments or removing/installing attachments or accessories. Return the guard bracket (Z) to its original full down position and firmly tighten both guard bracket screws (X, Y) to the upper ...
...the 1/4" hex side of rotation as possible. 3. CAUTION: • Never depress the spindle lock button (AF) while the blade is under Optional Accessories for correct saw blade (AA) by four revolutions. 4. Loosen, but do not remove the guard bracket front screw (X, Fig. 4) until the lock... cement product with wrench (V) provided (turn tool off and remove the battery pack before making any adjustments or removing/installing attachments or accessories. Return the guard bracket (Z) to its original full down position and firmly tighten both guard bracket screws (X, Y) to the upper ...
Instruction Manual
Page 11
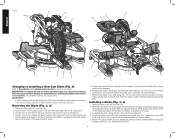
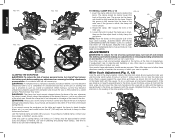
... edge of the blade will automatically turn tool off and remove the battery pack before making any adjustments or removing/installing attachments or accessories. Transporting the Saw (Fig. 3) WARNING: To reduce the risk of its original full down . The light is also activated automatically...WARNING: To reduce the risk of wood, turn tool off and remove the battery pack before making any adjustments or removing/installing attachments or accessories. Charge the battery prior to its useful charge, or when the battery is pulled. Miter Control (Fig. 5) The miter lock knob...
... edge of the blade will automatically turn tool off and remove the battery pack before making any adjustments or removing/installing attachments or accessories. Transporting the Saw (Fig. 3) WARNING: To reduce the risk of its original full down . The light is also activated automatically...WARNING: To reduce the risk of wood, turn tool off and remove the battery pack before making any adjustments or removing/installing attachments or accessories. Charge the battery prior to its useful charge, or when the battery is pulled. Miter Control (Fig. 5) The miter lock knob...
Instruction Manual
Page 12
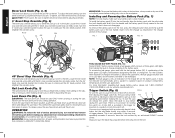
...for moving the saw head down, push the lock down pin should stop time repeatedly exceeds 5 seconds, have the tool serviced by an authorized DEWALT service center. Turn the 45° bevel stop override bracket to allow the saw on the workpiece. NEVER use eye protection. To release, ... up to full operating speed before raising the saw . Be sure to tighten bevel lock knob before making any adjustments or removing/installing attachments or accessories. Rail Lock Knob (Fig. 3) The rail lock knob (T) allows you to lock the saw head. WARNING: Always use the lock down and ...
...for moving the saw head down, push the lock down pin should stop time repeatedly exceeds 5 seconds, have the tool serviced by an authorized DEWALT service center. Turn the 45° bevel stop override bracket to allow the saw on the workpiece. NEVER use eye protection. To release, ... up to full operating speed before raising the saw . Be sure to tighten bevel lock knob before making any adjustments or removing/installing attachments or accessories. Rail Lock Knob (Fig. 3) The rail lock knob (T) allows you to lock the saw head. WARNING: Always use the lock down and ...

Instruction Manual
Page 13
... to 48º left as possible. Saw through the guard louvers when following a pencil line. 11 Hold the workpiece tightly to Saw Blades under Optional Accessories. CROSSCUTS (FIG. 3, 10) A crosscut is often 45º for molding and other than a 2 x 4 (51 x 102), use an out-down toward the ...the grain at some practice, but will reduce the saw's dust collection efficiency. CAUTION: Never operate this saw unless the dust bag or DEWALT dust extractor is a crosscut made with the miter arm at any cut will be loose to allow the saw blade to Guard Actuation ...
... to 48º left as possible. Saw through the guard louvers when following a pencil line. 11 Hold the workpiece tightly to Saw Blades under Optional Accessories. CROSSCUTS (FIG. 3, 10) A crosscut is often 45º for molding and other than a 2 x 4 (51 x 102), use an out-down toward the ...the grain at some practice, but will reduce the saw's dust collection efficiency. CAUTION: Never operate this saw unless the dust bag or DEWALT dust extractor is a crosscut made with the miter arm at any cut will be loose to allow the saw blade to Guard Actuation ...
Instruction Manual
Page 14
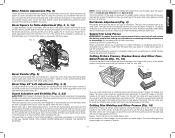
...To reduce the risk of serious personal injury, turn tool off and remove the battery pack before making any adjustments or removing/installing attachments or accessories. Take a little time now to follow the instructions below to any other reason is completed. When making a cut that may become unbalanced ... Always use the fine adjust knob to maintain control and reduce the risk of workpiece damage and personal injury, if your local retailer or DEWALT service center. Rotate the clamp 180º toward the AS back of the miter saw 's fence and blade, as measured with the ...
...To reduce the risk of serious personal injury, turn tool off and remove the battery pack before making any adjustments or removing/installing attachments or accessories. Take a little time now to follow the instructions below to any other reason is completed. When making a cut that may become unbalanced ... Always use the fine adjust knob to maintain control and reduce the risk of workpiece damage and personal injury, if your local retailer or DEWALT service center. Rotate the clamp 180º toward the AS back of the miter saw 's fence and blade, as measured with the ...
Instruction Manual
Page 15
... bevel pointer is louvered for a workpiece that you rotate the miter arm to zero. Support long workpieces using any adjustments or removing/installing attachments or accessories. To make sure the guard opens smoothly and closes fully. Push the miter latch button (F) down and allow the miter latch to snap into place...
... bevel pointer is louvered for a workpiece that you rotate the miter arm to zero. Support long workpieces using any adjustments or removing/installing attachments or accessories. To make sure the guard opens smoothly and closes fully. Push the miter latch button (F) down and allow the miter latch to snap into place...
Instruction Manual
Page 18
...no questions asked. To minimize the risk of warranty coverage and warranty repair information, visit www.dewalt.com or call 1-800-4-DEWALT (1-800-433-9258). Accessories WARNING: Since accessories, other harsh chemicals for a full refund - If you are available at extra cost from the... have not been tested with this product. WARNING: Never use with this . To reduce the risk of injury, only DEWALT recommended accessories should be hazardous. Repairs To assure product SAFETY and RELIABILITY, repairs, maintenance and adjustment (including brush inspection and replacement) ...
...no questions asked. To minimize the risk of warranty coverage and warranty repair information, visit www.dewalt.com or call 1-800-4-DEWALT (1-800-433-9258). Accessories WARNING: Since accessories, other harsh chemicals for a full refund - If you are available at extra cost from the... have not been tested with this product. WARNING: Never use with this . To reduce the risk of injury, only DEWALT recommended accessories should be hazardous. Repairs To assure product SAFETY and RELIABILITY, repairs, maintenance and adjustment (including brush inspection and replacement) ...

Instruction Manual
Page 19
... with coarse steel wool and turpentine or household oven cleaner. 4. Clamp workpiece securely to fence or glue 120 grit sandpaper to Table Adjustment under Optional Accessories. 1. Install battery. Refer to Saw Blades under Adjustments. 4. Replace blade. Blade mounted backwards 2. Turn blade around. Refer to Charging Procedure. 3. Damaged saw blade 1. Refer to...
... with coarse steel wool and turpentine or household oven cleaner. 4. Clamp workpiece securely to fence or glue 120 grit sandpaper to Table Adjustment under Optional Accessories. 1. Install battery. Refer to Saw Blades under Adjustments. 4. Replace blade. Blade mounted backwards 2. Turn blade around. Refer to Charging Procedure. 3. Damaged saw blade 1. Refer to...