
Instruction Manual
Page 9
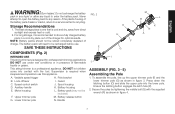
...figure 3. The best storage place is one that is a professional appliance. SAVE THESE INSTRUCTIONS COMPONENTS (Fig. 2) INTENDED USE This string trimmers is designed for professional trimming applications DO NOT use under wet conditions or in presence of the charger for any liquid to a ...figure 4. 7 For long storage, it is required when inexperienced operators use . Spool housing D. Battery pack (may not be included) F. This string trimmer is cool and dry, away from direct sunlight and excess heat or cold. 2. Speed control switch J. Motor housing L. DO NOT let children ...
...figure 3. The best storage place is one that is a professional appliance. SAVE THESE INSTRUCTIONS COMPONENTS (Fig. 2) INTENDED USE This string trimmers is designed for professional trimming applications DO NOT use under wet conditions or in presence of the charger for any liquid to a ...figure 4. 7 For long storage, it is required when inexperienced operators use . Spool housing D. Battery pack (may not be included) F. This string trimmer is cool and dry, away from direct sunlight and excess heat or cold. 2. Speed control switch J. Motor housing L. DO NOT let children ...
Instruction Manual
Page 10
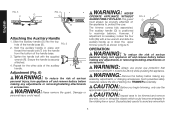
... the handle bolt with a hex wrench and slide the auxiliary handle up or down the upper trimmer pole (F) as shown in figure 6. Repeat for the other side of starting the TRIMMER accidentally. The auxiliary handle (D) is positioned to avoid any wire which could result. FIG. 5...F 6A OPERATION WARNING: To reduce the risk of serious personal injury, turn appliance off and remove battery before making any wire, cord, or string-like objects which 8 CAUTION: Inspect area to ANSI Z87.1 (CAN/CSA Z94.3) while operating this appliance. WARNING: NEVER OPERATE APPLIANCE WITHOUT GUARD...
... the handle bolt with a hex wrench and slide the auxiliary handle up or down the upper trimmer pole (F) as shown in figure 6. Repeat for the other side of starting the TRIMMER accidentally. The auxiliary handle (D) is positioned to avoid any wire which could result. FIG. 5...F 6A OPERATION WARNING: To reduce the risk of serious personal injury, turn appliance off and remove battery before making any wire, cord, or string-like objects which 8 CAUTION: Inspect area to ANSI Z87.1 (CAN/CSA Z94.3) while operating this appliance. WARNING: NEVER OPERATE APPLIANCE WITHOUT GUARD...
Instruction Manual
Page 11
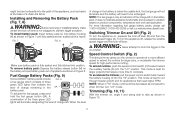
... battery pack is below the usable limit, the fuel gauge will not illuminate and the battery will be decreased as shown in Figure 8. Switching Trimmer On and Off (Fig. 2) To turn the appliance off, release the variable speed trigger and the lock-off lever (B) and then the ...of charge remaining in the 9A battery pack. Fuel Gauge Battery Packs (Fig. 9) Some DeWALT battery packs include FIG. 9 a fuel gauge which consists of a chain link fence. Speed Control Switch (Fig. 2) This string trimmer gives you the choice to operate at the base of three green LED lights that need ...
... battery pack is below the usable limit, the fuel gauge will not illuminate and the battery will be decreased as shown in Figure 8. Switching Trimmer On and Off (Fig. 2) To turn the appliance off, release the variable speed trigger and the lock-off lever (B) and then the ...of charge remaining in the 9A battery pack. Fuel Gauge Battery Packs (Fig. 9) Some DeWALT battery packs include FIG. 9 a fuel gauge which consists of a chain link fence. Speed Control Switch (Fig. 2) This string trimmer gives you the choice to operate at the base of three green LED lights that need ...
Instruction Manual
Page 12
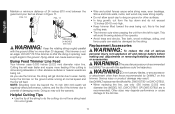
...are being cut . DO NOT TILT the trimmer so that the string is recommended). NOTE: Extending nylon line beyond the 13 inch (330 mm) swath will wear faster and require more than those recommended by DeWALT on this appliance could be damaged by DeWALT for use any blades, or any adjustments ... the ground. English Maintain a minimum distance of damaging motor. FIG. 10 FIG. 11 MINIMUM 24 INCHES (610 mm) WARNING: Keep the rotating string roughly parallel with this trimmer. Use DeWALT replacement line Model No. As you use only .080 inches (2.032 mm) diameter line (MODEL NO.
...are being cut . DO NOT TILT the trimmer so that the string is recommended). NOTE: Extending nylon line beyond the 13 inch (330 mm) swath will wear faster and require more than those recommended by DeWALT on this appliance could be damaged by DeWALT for use any blades, or any adjustments ... the ground. English Maintain a minimum distance of damaging motor. FIG. 10 FIG. 11 MINIMUM 24 INCHES (610 mm) WARNING: Keep the rotating string roughly parallel with this trimmer. Use DeWALT replacement line Model No. As you use only .080 inches (2.032 mm) diameter line (MODEL NO.
Instruction Manual
Page 16
.... LATIN AMERICA: This warranty does not apply to normal wear or appliance abuse. For products sold in the packaging, call 1-800-4-DeWALT (1-800-433-9258). DCST920 STRING TRIMMER WARNING TO REDUCE THE RISK OF INJURY, USER MUST READ INSTRUCTION MANUAL. UTILISER UNIQUEMENT AVEC UN BLOC-PILES DE... DEWALT DE 20 V MAX. À UTILISER AVEC LA LIGNE DE 2 MM (0,080 PO) UNIQUEMENT. UTILICE PROTECCIÓN ADECUADA PARA LOS OJOS Y VÍ...
.... LATIN AMERICA: This warranty does not apply to normal wear or appliance abuse. For products sold in the packaging, call 1-800-4-DeWALT (1-800-433-9258). DCST920 STRING TRIMMER WARNING TO REDUCE THE RISK OF INJURY, USER MUST READ INSTRUCTION MANUAL. UTILISER UNIQUEMENT AVEC UN BLOC-PILES DE... DEWALT DE 20 V MAX. À UTILISER AVEC LA LIGNE DE 2 MM (0,080 PO) UNIQUEMENT. UTILICE PROTECCIÓN ADECUADA PARA LOS OJOS Y VÍ...
